PIONEER S-81-QL/SXTW/E5 Owner's Manual

Cover page of PIONEER S-81-QL/SXTW/E5 Owner's Manual

Owner's Manual for PIONEER S-81-QL/SXTW/E5, downloadable as a PDF file.

We also have service manual to this model.

Manual details

  • Immediate download after payment.
  • Delivered as a PDF file.
  • The manual has 54 pages
  • File size: 7.4 MB
  • Available language versions: Chinese Simplified, Danish, Italian, Norwegian, Portuguese, French, Swedish, English, Russian, Spanish, Dutch, German, Finnish
  • Different language versions may vary sligthly in file size and page count.

We guarantee that...

  • our manuals are complete,
  • our manuals are checked with antivirus,
  • We'll issue refund if the manual is damaged, incomplete or unreadable (our refund policy)

Sample pages

Thumbnail of page 1Thumbnail of page 2Thumbnail of page 3Thumbnail of page 4
Thumbnail of page 5Thumbnail of page 6Thumbnail of page 7Thumbnail of page 8
Thumbnail of page 9
background image
1
En
FRRD-232-A_S-81_En.book
1
background image
1
En
FRRD-232-A_S-81_En.book
1
background image
2
En
Thank you for buying this Pioneer product.
Please read through these operating instructions so you will know how to operate your model properly. After you have finished reading the
instructions, put them away in a safe place for future reference.
Before you start
· The nominal impedance of this speaker system is 6
.
Connect the speaker system to an amplifier with a load
impedance ranging from 6
to 16 (a model with "6 to
16
" displayed on the speaker output terminals).
In order to prevent damage to the speaker system resulting
from input overload, please observe the following precautions:
· Do not supply power to the speaker system in excess of the
maximum permissible input.
· When using a graphic equalizer to emphasize loud sounds
in the high-frequency range, do not use excessive amplifier
volume.
· Do not try to force a low-powered amplifier to produce loud
volumes of sound (the amplifier's harmonic distortion will
be increased, and you may damage the speaker).
Caution: installation
· When placing this unit, ensure that it is firmly secured and
avoid areas where it may be likely to fall and cause injury in the
event of a natural disaster (such as an earthquake).
· Do not attach these speakers to the wall or ceiling. They may
fall off and cause injury.
· Do not install your speakers overhead on the ceiling or wall. If
improperly attached, the speaker grille can fall and cause
damage or personal injury.
· Switch off and unplug your AV equipment and consult the
instructions when connecting up components. Make sure you
use the correct connecting cables.
· The grille is affixed with magnets. The grille may fall if force is
applied to the grille in a horizontal direction. When cleaning
the speaker, remove the grille first.
Caution: in use
· Do not place the speaker on an unstable surface. It could
present a hazard if it falls, as well as damaging the equipment.
· Do not use the speaker to output distorted sound for long
periods of times. This can result in a fire hazard.
· Do not sit or stand on the speaker, or let children play on the
speaker.
· Do not put large or heavy objects on top of the speaker.
· Do not place magnetic objects such as screwdrivers or iron
parts near the tweeter or midrange. Since the speakers use
strong magnets, the objects may be attracted, causing injury
or damaging the diaphragm.
Cleaning the speaker cabinet
With normal use, wiping with a dry cloth should be sufficient to
keep the cabinet clean. If necessary, clean with a cloth dipped in
a neutral cleanser diluted five or six times with water, and wrung
out well. Do not use furniture wax or cleansers.
Never use thinners, benzine, insecticide sprays or other chemicals
on or near this unit since these will corrode the surfaces.
Cleaning the glossy finish of the speaker system
S-81-K only
· If you use a dusty or hard cloth or if you rub the screen hard,
the finish of the product will be scratched.
· If you clean the surface of the speaker system with a wet cloth,
water droplets on the surface may enter into the product,
resulting in malfunction.
· When cleaning the finish of the speaker system, gently wipe it
with a dry soft cloth; the supplied cleaning cloth.
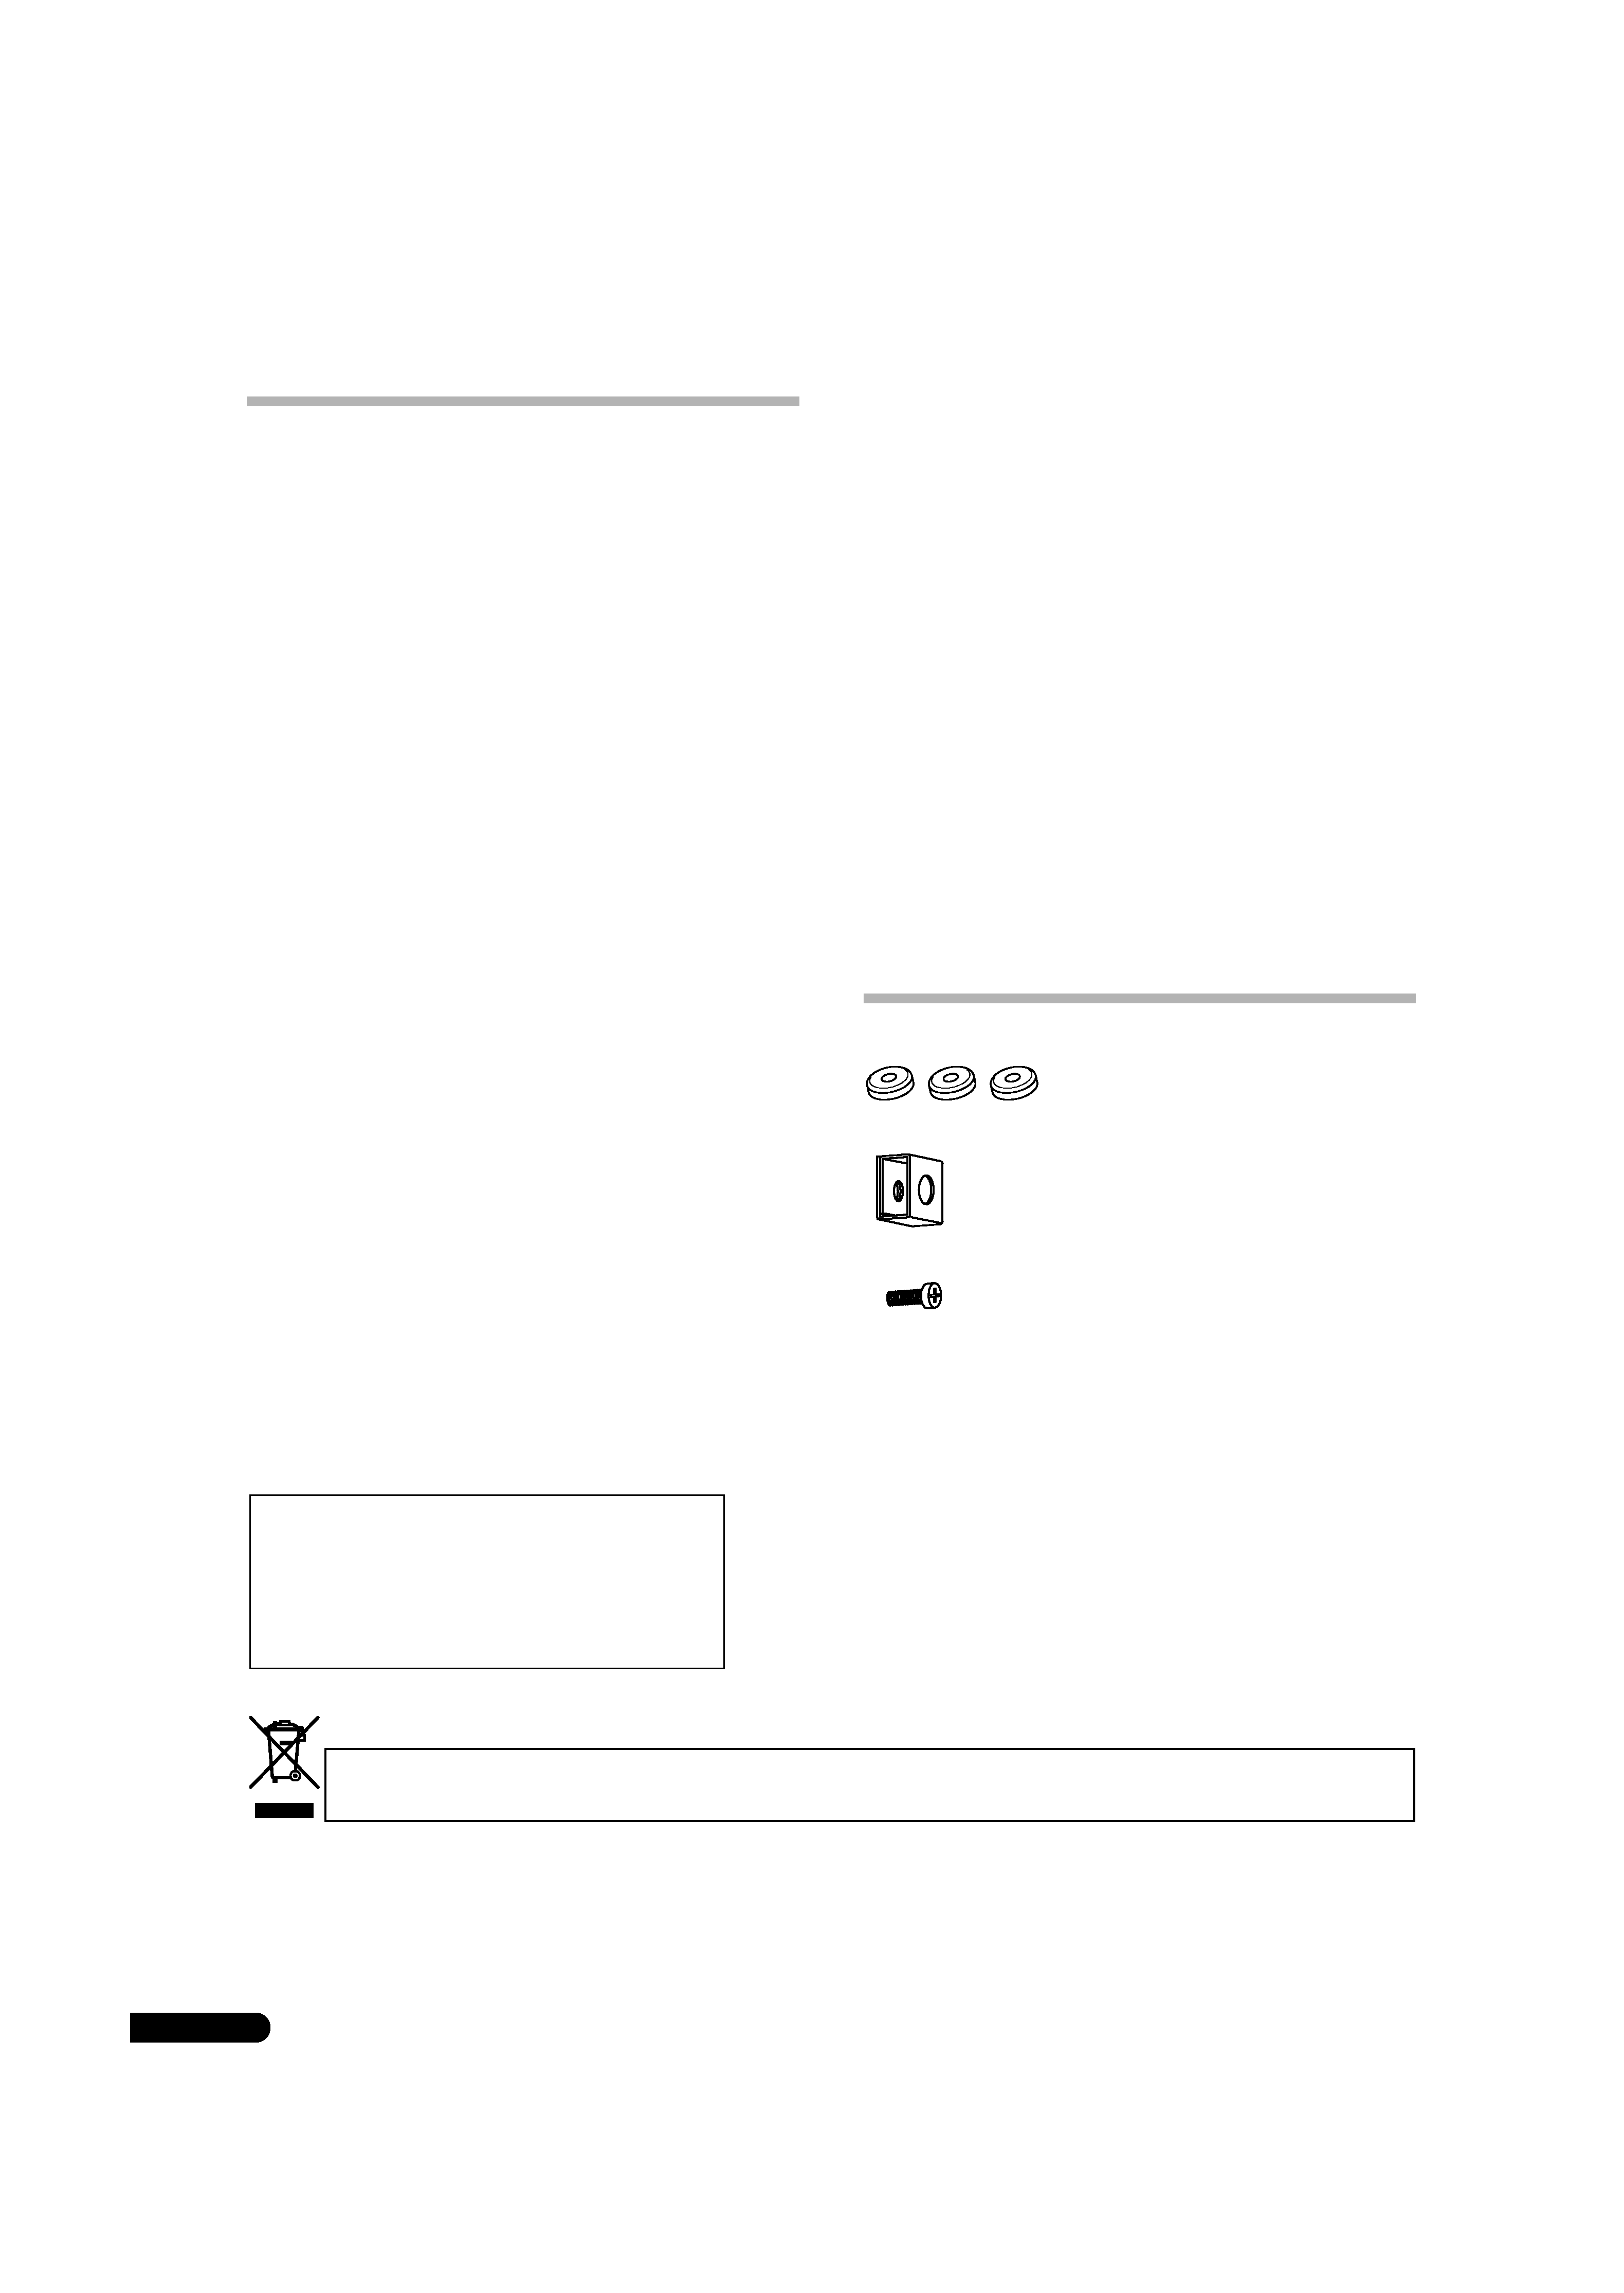
What's in the box
Spike bases x 3
Metal catch x 1
Screw (for metal catch) x 1
Grille x 1
Cleaning cloth (for S-81-K only) x 1
Operating instructions
For U.S. model
For European model
WARNING: Handling the cord on this product or
cords associated with accessories sold with the
product will expose you to chemicals listed on
proposition 65 known to the State of California and
other governmental entities to cause cancer and
birth defect or other reproductive harm.
D36-P4_A_En
Wash hands after handling
If you want to dispose this product, do not mix it with general household waste. There is a separate collection system for used
electronic products in accordance with legislation that requires proper treatment, recovery and recycling.
Private households in the member states of the EU, in Switzerland and Norway may return their used electronic products free of charge to
designated collection facilities or to a retailer (if you purchase a similar new one).
For countries not mentioned above, please contact your local authorities for the correct method of disposal.
By doing so you will ensure that your disposed product undergoes the necessary treatment, recovery and recycling and thus prevent potential
negative effects on the environment and human health.
K058_A_En
FRRD-232-A_S-81_En.book
2
background image
3
En
English
How to install
Choosing where to place the speaker systems
· Sounds played through speaker systems are easily affected in
subtle ways by the conditions in the listening space.
· For best sound, choose a solid floor upon which to place the
speakers, and position the speakers as shown below. The level
of low sounds can be adjusted by moving the speakers closer
to or further from the wall. Adjust the speakers so that they are
equidistant from their respective side walls to assure balanced
sound.
· Place the left and right speakers equal distances from your
listening position for good stereo sound. Use speaker cords of
the same length for each speaker.
· So far as possible, place the front left and front right speakers
on the same plane as the TV screen.
· To achieve optimum surround sound, you should place the TV
between the left and right speakers, with the speakers
pointing at a 50 to 60 degree angle toward the listening
position.
· If the room has a lot of reverberation, we recommend hanging
heavy fabric on the walls, and/or putting a carpet on the floor
to damp the sound. For best results, cover walls completely.
· Pioneer assumes no liability whatsoever for damages
resulting from assembly, improper mounting, insufficient
reinforcement, misuse of the product, acts of nature, etc.
S-81-QL only
· The cabinet uses sliced veneer made of natural wood. Do not
place the speaker where it will be in direct sunlight, and avoid
positioning it near heaters and air conditioners. Doing so may
cause warping and discoloration of the speaker cabinet and
damage to the speaker.
Using the spikes
This speaker system is supported by three points (the front two
legs, and the back spike located between the back two legs).
1
Set the spike bases in the positions where the points of
the three spikes will strike when the speaker is set down.
2
Set the speaker on the spike bases and check to confirm
the speaker does not rock.
· Always use the spike bases as shown, with the indented
surface facing up to receive the spike point.
Mounting the Fall-Prevention Fastener
· Using the included screw, tightly secure the metal catch to the
backside of the speaker.
· Pass a commercially-available reinforced string through the
metal catch to securely support the speaker to the wall. Be
sure that the wall to which you fasten the speaker is strong
enough to support the weight of the speaker. After fastening
the speaker, make sure that it does not fall over.
· The speaker can incur damage in the event of a fall.
· Do not attach the metal catch directly to the wall. It should
only be used in conjunction with reinforced string to prevent
the speaker from falling.
· Pass two reinforced strings through the metal catch, and
fasten the speaker to the wall as shown above.
50 to 60
20 cm
(7 7/8 in.)
50 cm
(19 11/16 in.)
If you do not use the spike bases when placing the
speakers, the spikes may cause damage to the floor. If
you plan on using the spikes we highly recommend to
use the spike bases.
Tip-prevention legs
Spikes
Back
Front
Cabinet base
Metal catch
Reinforced strings
Backside of speaker
FRRD-232-A_S-81_En.book
3
background image
4
En
Attaching/removing the grille
This speaker system comes with grille which may be attached and
removed by:
1
To attach the grille, align the grille with the speaker body
and press gently.
2
To remove the grille, hold the grille with both hands near
the middle and pull gently toward you to separate the grille
from the speaker.
· Magnets are used for holding the grille in place. Do not place
the grilles near devices that may be susceptible to magnetic
influence (CRT televisions, etc.).
Connections
This speaker does not include speaker cables used for connecting
to an amplifier.
Connecting the cables
1
Switch off the power to your amplifier.
2
Connect the speaker cables to the input terminals (lower)
on the back of the speaker. For input terminal polarity, red is
positive (+) and black is negative (­).
3
Connect the other ends of the cables to the amp's
speaker output terminals (for more details, refer to your amp
instruction manual).
· Grasp the cap knobs on the lower input terminals and rotate
them to the left (counter-clockwise), insert the speaker cable
wires into the holes in the terminal posts, then tighten the
knobs to secure the short bar as well as the wires.
· You can also connect the speaker's terminals with a banana
plug. When using a banana plug, be sure to remove the cap at
the tip of the input terminal.
· After connecting the plugs, pull lightly on the cables to make
sure that the ends of the cables are securely connected to the
terminals. Poor connections can create noise and
interruptions in the sound.
· If the cables' wires happen to be pushed out of the terminals,
allowing the wires to come into contact with each other, it
places an excessive additional load on the amp. This may
cause the amp to stop functioning, and may even damage the
amp.
· When using a set of speakers connected to an amplifier, you
won't be able to obtain the normal stereo effect if the polarity
(
+, ­) of one of the speakers (left or right) is reversed.
Bi-Wire connections
Bi-wiring requires two cables for each speaker, one for high
frequencies and one for low frequencies. Using separate cables
for the high end and low end improves the sound.
1
Switch off the power to your amplifier.
2Remove the two short bars.
· In this state, the low-frequency speakers and the higher-
frequency speakers are completely independent. Store the
short bars in a safe place for later use.
· The lower terminals are for the bass, and the upper terminals
are for midrange and treble sounds.
· Connecting the cables with reversed polarity may degrade the
tone seriously. Confirm that the cables are connected
properly.
Bi-Amplification connections
Bi-amping is an even more powerful way of connecting your
speakers. Just as with bi-wiring, the input terminal short bars are
removed, but here the low-frequency terminals are connected to a
separate, dedicated low-frequency amp, and the high-frequency
terminals are connected to a dedicated high-frequency amp.
Short bar connectors
Red terminal (+)
Black terminal (-)
CAUTION
These speaker terminals carry
HAZARDOUS LIVE
voltage. To prevent the risk of electric shock when
connecting or disconnecting the speaker cables,
disconnect the power cord before touching any
uninsulated parts.
D3-4-2-2-3_A_En
SPEAKERS OUTPUT
Speaker
Amplifier (rear)
(Only one channel shown)
Speaker (rear): Input panel
SPEAKERS OUTPUT
SPEAKERS OUTPUT
(Only one channel shown)
Amplifier (rear)
(High frequency)
Amplifier (rear)
(Low frequency)
Speaker
Speaker (rear): Input panel
FRRD-232-A_S-81_En.book
4
background image
5
En
English
Specifications
Enclosure. . . . . . . . . . . . . . . . . . . . . . . . . Bass-reflex floorstanding type
Configuration . . . . . . . . . . . . . . . . . . . . . . . . . . . . . . . . . . . . . . . . . .4-way
Woofer . . . . . . . . . . . . . . . . . . . . . . . . . . . . . . . .13 cm (5 1/8 in.) cone x 2
Mid/Tweeter . . . . . . Coaxial unit: 13 cm (5 1/8 in.) cone/2.5 cm (1 in.) dome
Super tweeter . . . . . . . . . . . . . 8 mm x 46 mm (3/8 in. x 1
13/
16 in.) riffel
Impedance. . . . . . . . . . . . . . . . . . . . . . . . . . . . . . . . . . . . . . . . . . . . . . 6
Frequency response . . . . . . . . . . . . . . . . . . . . . . . . . . . 30 Hz to 100 kHz
Sensitivity. . . . . . . . . . . . . . . . . . . . . . . . . . . . . . . . . . . . . 85.5 dB (2.83 V)
Maximum input power . . . . . . . . . . . . . . . . . . . . . . . . . . . . . . . . . . 130 W
Crossover frequency . . . . . . . . . . . . . . . . . . . . . . . . . . . . . . 370 Hz/3 kHz
Exterior dimensions . . . . . 267 (W) mm x 1190 (H) mm x 280.5 (D) mm
10 9/16 (W) in. x 46
7/
8 (H) in. x 11
1/
16 (D) in.
Weight . . . . . . . . . . . . . . . . . . . . . . . . . . . . . . . . . . 25.8 kg (56 lbs 15 oz.)
Supplied accessories
Spike bases . . . . . . . . . . . . . . . . . . . . . . . . . . . . . . . . . . . . . . . . . . . . . . . 3
Metal catch . . . . . . . . . . . . . . . . . . . . . . . . . . . . . . . . . . . . . . . . . . . . . . . 1
Screw (for metal catch) . . . . . . . . . . . . . . . . . . . . . . . . . . . . . . . . . . . . . 1
Grille . . . . . . . . . . . . . . . . . . . . . . . . . . . . . . . . . . . . . . . . . . . . . . . . . . . . . 1
Cleaning cloth (S-81-K only). . . . . . . . . . . . . . . . . . . . . . . . . . . . . . . . . . 1
Operating instructions
Specifications and design subject to possible modification
without notice, due to improvements.
is a trademark placed on a product with Pioneer's Phase
Control technology. This technology enables high-grade sound
reproduction through each component by improving overall
phase matching.
Published by Pioneer Corporation.
Copyright © 2008 Pioneer Corporation.
All rights reserved.
S001_En
Selecting fine audio equipment such as the unit
you've just purchased is only the start of your
musical enjoyment. Now it's time to consider how
you can maximize the fun and excitement your
equipment offers. This manufacturer and the
Electronic Industries Association's Consumer
Electronics Group want you to get the most out of
your equipment by playing it at a safe level. One that
lets the sound come through loud and clear without
annoying blaring or distortion-and, most importantly,
without affecting your sensitive hearing.
Sound can be deceiving. Over time your hearing
"comfort level" adapts to higher volumes of sound.
So what sounds "normal" can actually be loud and
harmful to your hearing. Guard against this by
setting your equipment at a safe level BEFORE your
hearing adapts.
To establish a safe level:
· Start your volume control at a low setting.
· Slowly increase the sound until you can hear it
comfortably and clearly, and without distortion.
Once you have established a comfortable sound
level:
· Set the dial and leave it there.
Taking a minute to do this now will help to prevent
hearing damage or loss in the future. After all, we
want you listening for a lifetime.
We Want You Listening For A Lifetime
Used wisely, your new sound equipment will
provide a lifetime of fun and enjoyment. Since
hearing damage from loud noise is often
undetectable until it is too late, this manufacturer
and the Electronic Industries Association's
Consumer Electronics Group recommend you avoid
prolonged exposure to excessive noise. This list of
sound levels is included for your protection.
Decibel
Level Example
30
Quiet library, soft whispers
40
Living room, refrigerator, bedroom away from traffic
50
Light traffic, normal conversation, quiet office
60
Air conditioner at 20 feet, sewing machine
70
Vacuum cleaner, hair dryer, noisy restaurant
80
Average city traffic, garbage disposals, alarm clock
at two feet.
THE FOLLOWING NOISES CAN BE DANGEROUS
UNDER CONSTANT EXPOSURE
90
Subway, motorcycle, truck traffic, lawn mower
100
Garbage truck, chain saw, pneumatic drill
120
Rock band concert in front of speakers,
thunderclap
140
Gunshot blast, jet plane
180
Rocket launching pad
Information courtesy of the Deafness Research Foundation.
For U.S. model
FRRD-232-A_S-81_En.book
5

Reviews

There are no reviews of this manual yet.