TECHNICS SH-DV290 Owner's Manual

Cover page of TECHNICS SH-DV290 Owner's Manual

Owner's Manual for TECHNICS SH-DV290, downloadable as a PDF file.

Manual details

  • Immediate download after payment.
  • Delivered as a PDF file.
  • The manual has 52 pages
  • File size: 2.23 MB
  • Available language versions: English
  • Different language versions may vary sligthly in file size and page count.

We guarantee that...

  • our manuals are complete,
  • our manuals are checked with antivirus,
  • We'll issue refund if the manual is damaged, incomplete or unreadable (our refund policy)

Sample pages

Thumbnail of page 1Thumbnail of page 2Thumbnail of page 3Thumbnail of page 4
Thumbnail of page 5Thumbnail of page 6Thumbnail of page 7Thumbnail of page 8
Thumbnail of page 9
background image
EB
E
EE GN
DVD Stereo System
Operating Instructions
Model No.
SC-DV290
Note
"EB" on the outer packaging indicates the
United Kingdom.
Before connecting, operating or adjusting
this product, please read these instructions
completely. Please keep this manual for fu-
ture reference.
RQT6894-B
The illustration shows the model for the United Kingdom, Continental Europe and Russia.
Z
For the United Kingdom and
Continental Europe
The region number of this player is "2".
The player will play DVD-Video marked with
labels containing "2" or "ALL".
Example:
For Australia and N.Z.
The region number of this player is "4".
The player will play DVD-Video marked with
labels containing "4" or "ALL".
Example:
For Russia
The region number of this player is "5".
The player will play DVD-Video marked with
labels containing "5" or "ALL".
Example:
3
5
2
2
ALL
Region number supported by
this player
Region numbers are allocated to DVD players and
software according to where they are sold.
4
6
2
4
ALL
2
5
1
5
ALL
background image
2
RQT6894
Before
use
System
Sound processor
Stereo tuner/amplifier
DVD/Video CD/CD changer
Stereo cassette deck
Supplied accessories
Please check and identify the supplied acces-
sories. Use numbers indicated in parentheses
when asking for replacement parts.
AC mains lead . . . . . . . . . . . . . . . . . . . . . . . . . . . . . . . . . . . . . . 1
For the United Kingdom
For Australia and N.Z.
(RJA0053-3X)
(RJA0035-2X)
For Continental Europe and Russia
(RJA0019-2X)
Note
The included AC mains lead is for use with this unit only. Do not use
it with other equipment.
Remote control . . . . . . . . . . . . . . . . . . . . . . . . . . . . . . . . . . . . . 1
For the United Kingdom,
For Australia and N.Z.
Continental Europe and Russia
(EUR7702300)
(EUR7702290)
Remote control batteries . . . . . . . . . . . . . . . . . . . . . . . . . . . . . 2
FM indoor antenna . . . . . . . . . . . . . . . . . . . . . . . . . . . . . . . . . . 1
For the United Kingdom,
For Australia and N.Z.
Continental Europe and Russia
(RSA0006-J)
(RSA0007)
AM loop antenna set: (RSA0022-L) . . . . . . . . . . . . . . . . . . . . . 1
Speaker leads
(REE1234-1) . . . . . . . . . .
2
(REE1233-1) . . . . . . . . . . 2
(Red/Black)
(Gray/Blue)
Antenna plug adaptor: (SJP9009) . . . . . . . . . . . . . . . . . . . . . . 1
(Only for the United Kingdom)
Video cord
For the United Kingdom and Continental Europe
(VJA0815-A) . . . . . . . . . . . . . . . . . . . . . . . . . . . . . . . . . . . . . . 1
For Russia (RJL1P019B15) . . . . . . . . . . . . . . . . . . . . . . . . . . . . 1
For Australia and N.Z. (RJL1P019B15) . . . . . . . . . . . . . . . . . . . . 2
RCAJ adaptor: (VFA0151-2) . . . . . . . . . . . . . . . . . . . . . . . . . . . 1
(Only for the United Kingdom, Continental Europe and Russia)
Dear customer
Thank you for purchasing this product.
For optimum performance and safety, please read these instructions care-
fully.
Front
Center
Surround
Speakers
SC-DV290
SH-DV290
SA-DV290
SL-DV290
RS-DV290
SB-DV290
SB-PC95
SB-PS95
www.panasonic.co.uk (for UK customers only)
³ Order accessory and consumable items for your
product with ease and confidence by telephoning our
Customer Care Centre Mon­Friday 9:00am­5:30pm.
(Excluding public holidays.)
³ Or go on line through our Internet Accessory ordering
application.
³ Most major credit and debit cards accepted.
³ All enquiries transactions and distribution facilities are
provided directly by Panasonic UK Ltd.
³ It couldn't be simpler!
Customer Care Centre
For UK customers: 08705 357357
For Republic of Ireland customers: 01 289 8333
Technical Support
For UK customers: 0870 1 505610
This Technical Support Hot Line number is for
Panasonic PC software related products only.
For Republic of Ireland, please use the Customer Care
Centre number listed above for all enquiries.
For all other product related enquiries, please use the
Customer Care Centre numbers listed above.
For United Kingdom and Republic of Ireland
Unless otherwise indicated, illustrations in these operating in-
structions are of the system for the United Kingdom, Continen-
tal Europe and Russia.
background image
3
RQT6894
Before
use
Table of contents
Before use
Safety precautions . . . . . . . . . . . . . . . . . . . . . . . . . . . . . . . . c3
Maintenance . . . . . . . . . . . . . . . . . . . . . . . . . . . . . . . . . . . . . c3
Cassette tape selection and care . . . . . . . . . . . . . . . . . . . . c3
Caution for AC Mains Lead . . . . . . . . . . . . . . . . . . . . . . . . . c4
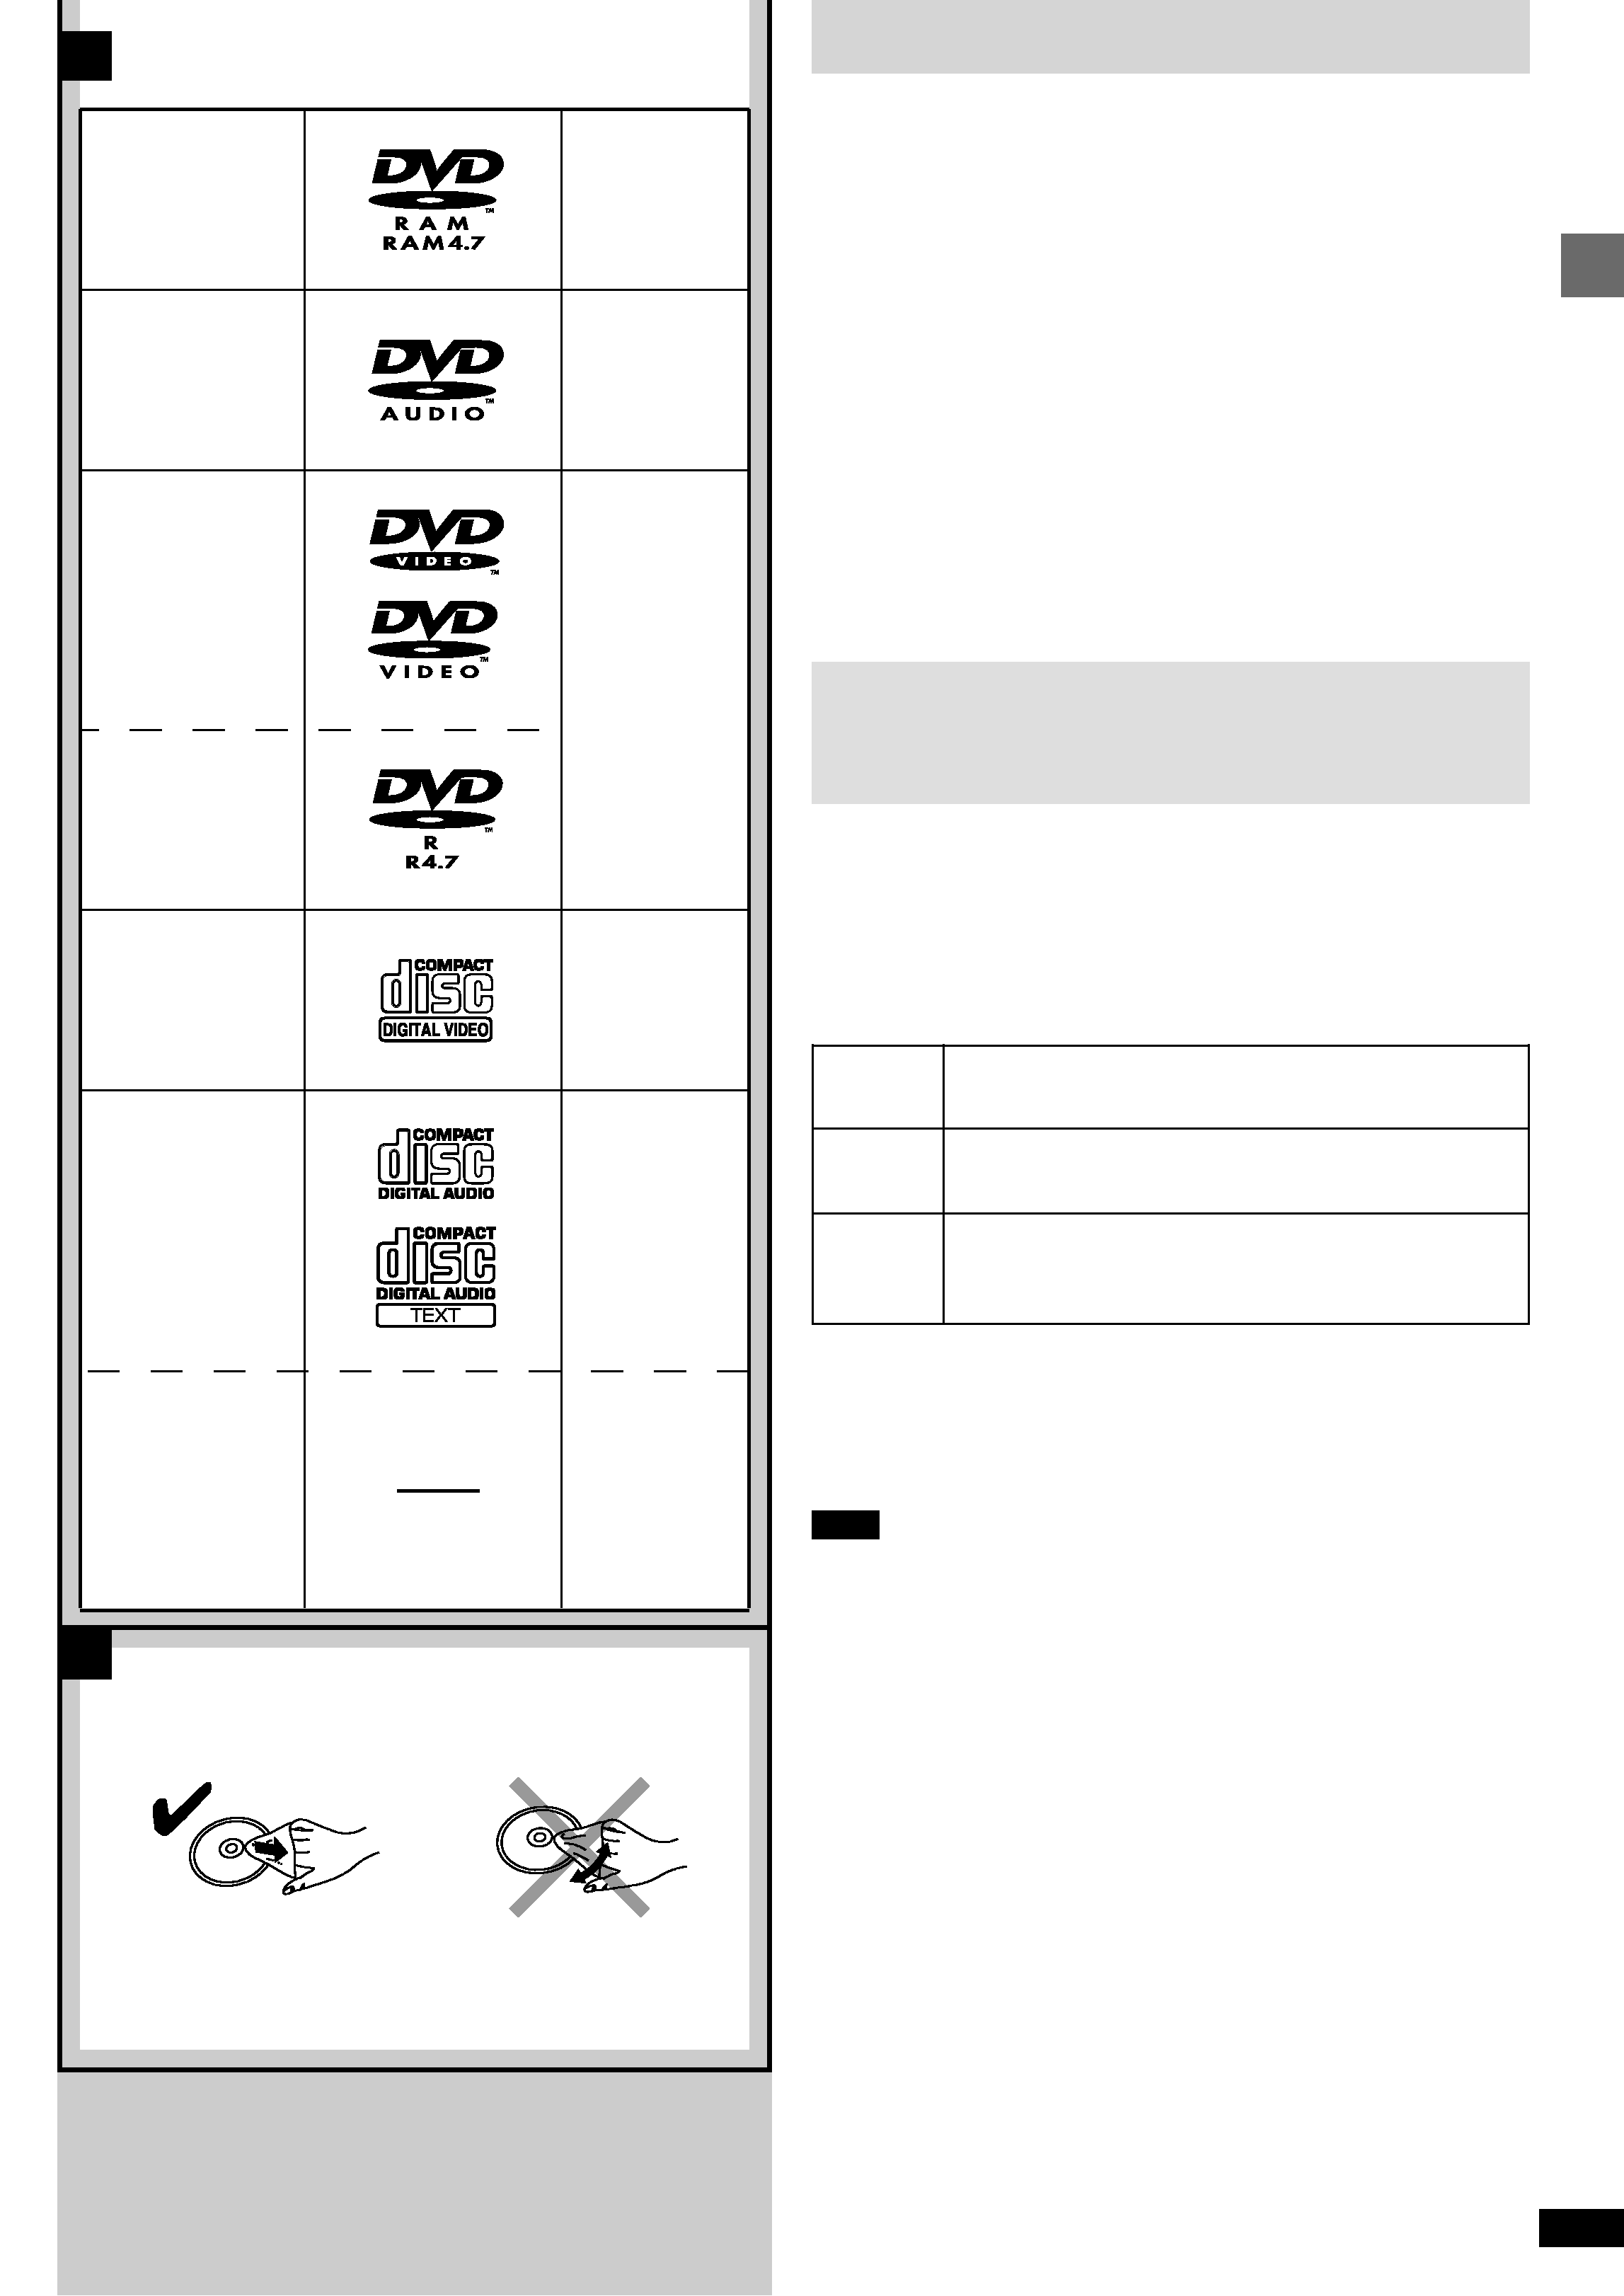
Disc information . . . . . . . . . . . . . . . . . . . . . . . . . . . . . . . . . . c5
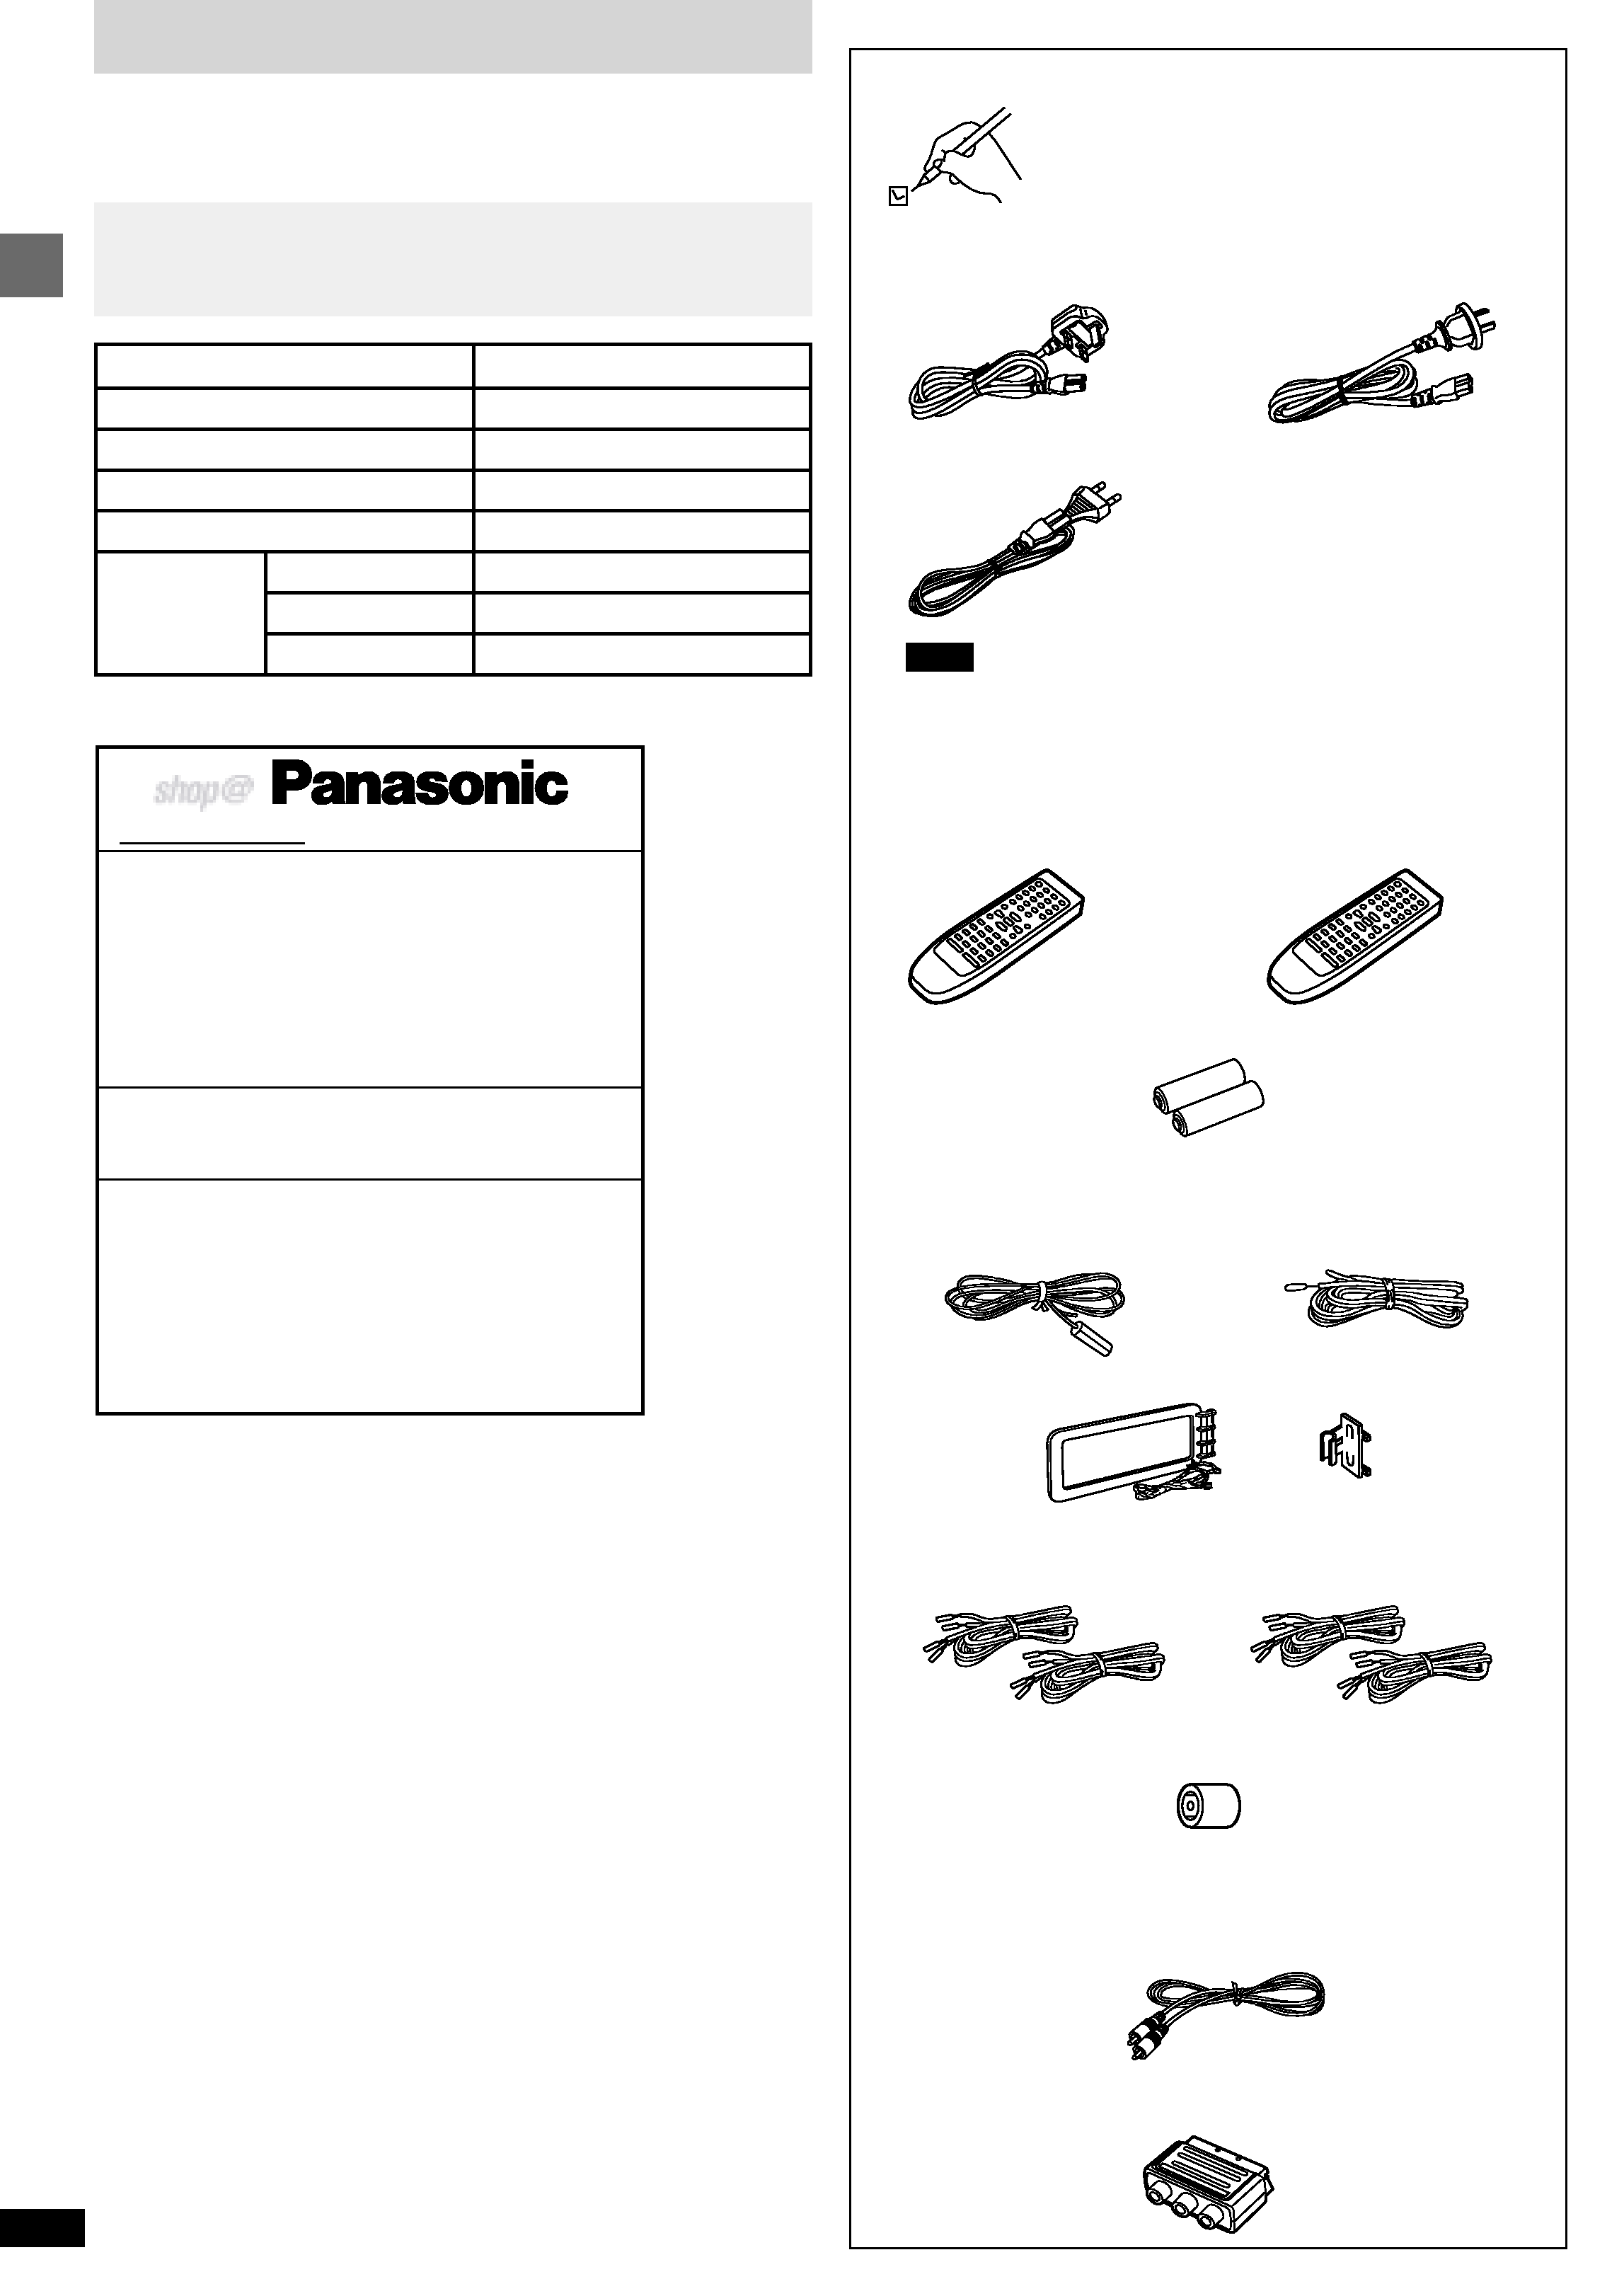
Simple setup . . . . . . . . . . . . . . . . . . . . . . . . . . . . . . . . . .
6
Control guide and preparatory steps
Front panel controls . . . . . . . . . . . . . . . . . . . . . . . . . . . . . . . 10
Turning DEMO off . . . . . . . . . . . . . . . . . . . . . . . . . . . . . . . . . 11
The remote control . . . . . . . . . . . . . . . . . . . . . . . . . . . . . . . . 12
Setting the time . . . . . . . . . . . . . . . . . . . . . . . . . . . . . . . . . . . 12
QUICK SETUP . . . . . . . . . . . . . . . . . . . . . . . . . . . . . . . . . . . . 13
Basic operations
Discs . . . . . . . . . . . . . . . . . . . . . . . . . . . . . . . . . . . . . . . . . . . 14
Skip function/Search function/Slow-motion play . . . . . . . . . . . . . . . . 15
Frame-by-frame viewing . . . . . . . . . . . . . . . . . . . . . . . . . . . . . . . . . . 15
Position Memory function/Selecting groups to play . . . . . . . . . . . . . . 16
Soundtracks/Subtitles/Cinema . . . . . . . . . . . . . . . . . . . . . . . . . . . . . 17
Marking places to play again/Variable Zoom function . . . . . . . . . . . . 18
Repeat play/A-B repeat play/All group play . . . . . . . . . . . . . . . . . . . . 19
Program play . . . . . . . . . . . . . . . . . . . . . . . . . . . . . . . . . . . . . . . . . . . 20
Random play/ALL DISC play . . . . . . . . . . . . . . . . . . . . . . . . . . . . . . . 21
Starting play from a selected item . . . . . . . . . . . . . . . . . . . . . . . . . . . 21
Playing the programs or play lists on DVD-RAM . . . . . . . 22
Navigation menus . . . . . . . . . . . . . . . . . . . . . . . . . . . . . . . . . 22
Using GUI screens . . . . . . . . . . . . . . . . . . . . . . . . . . . . . . . . 24
The radio: manual tuning . . . . . . . . . . . . . . . . . . . . . . . . . . 27
The radio: preset tuning . . . . . . . . . . . . . . . . . . . . . . . . . . . 28
Cassette tapes . . . . . . . . . . . . . . . . . . . . . . . . . . . . . . . . . . . 29
Changing sound field and quality
Boosting the super woofer . . . . . . . . . . . . . . . . . . . . . . . . . 30
Using the super sound equalizer . . . . . . . . . . . . . . . . . . . . 30
Double re-master--Enjoying more natural sound . . . . . . 30
Changing sound field and quality . . . . . . . . . . . . . . . . . . . 30
Using the acoustic image equalizer (AI EQ) . . . . . . . . . . . . . . . . . . . 31
Using the manual equalizer (M.EQ) . . . . . . . . . . . . . . . . . . . . . . . . . 31
Enjoying surround sound . . . . . . . . . . . . . . . . . . . . . . . . . . 32
Surround effects . . . . . . . . . . . . . . . . . . . . . . . . . . . . . . . . . . 34
Recording operations
Before recording (Deck 2 only) . . . . . . . . . . . . . . . . . . . . . . 35
Recording discs . . . . . . . . . . . . . . . . . . . . . . . . . . . . . . . . . . 36
Recording the radio . . . . . . . . . . . . . . . . . . . . . . . . . . . . . . . 37
Tape-to-tape recording . . . . . . . . . . . . . . . . . . . . . . . . . . . . 37
Timer operations and convenient functions
Using the timers . . . . . . . . . . . . . . . . . . . . . . . . . . . . . . . . . . 38
Changing the sound range display . . . . . . . . . . . . . . . . . . 41
Muting the volume . . . . . . . . . . . . . . . . . . . . . . . . . . . . . . . . 41
Using headphones (not included) . . . . . . . . . . . . . . . . . . . 41
Enjoying karaoke (For Australia and N.Z.) . . . . . . . . . . . . 42
External unit connections . . . . . . . . . . . . . . . . . . . . . . . . . . 44
Optional antenna connections . . . . . . . . . . . . . . . . . . . . . . 45
Using other equipment . . . . . . . . . . . . . . . . . . . . . . . . . . . . 45
Changing settings . . . . . . . . . . . . . . . . . . . . . . . . . . . . . . . . 46
Reference
Glossary . . . . . . . . . . . . . . . . . . . . . . . . . . . . . . . . . . . . . . . . 48
Technical specifications . . . . . . . . . . . . . . . . . . . . . . . . . . . 49
Troubleshooting guide . . . . . . . . . . . . . . . . . . . . . . . . . . . . 50
Safety precautions
Placement
Set the unit up on an even surface away from direct sunlight, high tem-
peratures, high humidity, and excessive vibration. These conditions can
damage the cabinet and other components, thereby shortening the unit's
service life.
Do not place heavy items on the unit.
Voltage
Do not use high voltage power sources. This can overload the unit and
cause a fire.
Do not use a DC power source. Check the source carefully when setting
the unit up on a ship or other place where DC is used.
AC mains lead protection
Ensure the AC mains lead is connected correctly and not damaged. Poor
connection and lead damage can cause fire or electric shock. Do not pull,
bend, or place heavy items on the lead.
Grasp the plug firmly when unplugging the lead. Pulling the AC mains
lead can cause electric shock.
Do not handle the plug with wet hands. This can cause electric shock.
Foreign matter
Do not let metal objects fall inside the unit. This can cause electric shock
or malfunction.
Do not let liquids get into the unit. This can cause electric shock or mal-
function. If this occurs, immediately disconnect the unit from the power sup-
ply and contact your dealer.
Do not spray insecticides onto or into the unit. They contain flammable
gases which can ignite if sprayed into the unit.
Service
Do not attempt to repair this unit by yourself. If sound is interrupted, indi-
cators fail to light, smoke appears, or any other problem that is not covered
in these instructions occurs, disconnect the AC mains lead and contact your
dealer or an authorized service center. Electric shock or damage to the unit
can occur if the unit is repaired, disassembled or reconstructed by unquali-
fied persons.
Extend operating life by disconnecting the unit from the power source if it
is not to be used for a long time.
Maintenance
If the surfaces are dirty
To clean this unit, wipe with a soft, dry cloth.
Never use alcohol, paint thinner or benzine to clean this unit.
Before using chemically treated cloth, read the instructions that came with
the cloth carefully.
For a cleaner crisper sound
Clean the heads regularly to assure good quality playback and recording.
Use a cleaning tape (not included).
Cassette tape selection and care
The unit can correctly play or record on the following types. It identifies the
type automatically.
Tapes exceeding 100 minutes are thin and can break or get caught in the
mechanism.
Tape slack can get caught up in the mechanism and should be taken up
before the tape is played.
Endless tapes can get caught up in the deck's moving parts if used incor-
rectly. Use tapes appropriate to this unit's auto-reverse mechanism.
Normal position/TYPE I
High position/TYPE II
Metal position/TYPE IV
background image
4
RQT6894
Before
use
(For United Kingdom)
("EB" area code model only)
For your safety, please read the following text carefully.
This appliance is supplied with a moulded three pin mains
plug for your safety and convenience.
A 5-ampere fuse is fitted in this plug.
Should the fuse need to be replaced please ensure that
the replacement fuse has a rating of 5-ampere and that it
is approved by ASTA or BSI to BS1362.
Check for the ASTA mark
or the BSI mark
on the
body of the fuse.
If the plug contains a removable fuse cover you must en-
sure that it is refitted when the fuse is replaced.
If you lose the fuse cover the plug must not be used until a
replacement cover is obtained.
A replacement fuse cover can be purchased from your
local dealer.
Caution for AC Mains Lead
If a new plug is to be fitted please observe the wiring code
as stated below.
If in any doubt please consult a qualified electrician.
IMPORTANT
The wires in this mains lead are coloured in accordance
with the following code:
Blue: Neutral, Brown: Live.
As these colours may not correspond with the coloured
markings identifying the terminals in your plug, proceed
as follows:
The wire which is coloured Blue must be connected to the
terminal which is marked with the letter N or coloured
Black or Blue.
The wire which is coloured Brown must be connected to
the terminal which is marked with the letter L or coloured
Brown or Red.
WARNING: DO NOT CONNECT EITHER WIRE TO THE
EARTH TERMINAL WHICH IS MARKED WITH THE
LETTER E, BY THE EARTH SYMBOL
OR COL-
OURED GREEN OR GREEN/YELLOW.
THIS PLUG IS NOT WATERPROOF--KEEP DRY.
Before use
Remove the connector cover.
How to replace the fuse
The location of the fuse differ according to the type of AC
mains plug (figures A and B). Confirm the AC mains plug
fitted and follow the instructions below.
Illustrations may differ from actual AC mains plug.
1. Open the fuse cover with a screwdriver.
2. Replace the fuse and close or attach the fuse
cover.
CAUTION!
IF THE FITTED MOULDED PLUG IS UNSUIT-
ABLE FOR THE SOCKET OUTLET IN YOUR
HOME THEN THE FUSE SHOULD BE RE-
MOVED AND THE PLUG CUT OFF AND DIS-
POSED OF SAFELY.
THERE IS A DANGER OF SEVERE ELEC-
TRICAL SHOCK IF THE CUT OFF PLUG
IS INSERTED INTO ANY 13-AMPERE
SOCKET.
Fuse cover
Figure A
Figure B
Fuse
(5 ampere)
Fuse
(5 ampere)
Figure A
Figure B
background image
5
RQT6894
Before
use
A
B
[DVD-A]
[VCD]
[DVD-V]
[CD]
[WMA]
[MP3]
[JPEG]
[RAM]
Disc information
[A[ Discs that can be played
Use discs with the logos at left and that conform to specifications. The unit
cannot play other discs correctly.
Do not use irregularly shaped discs (e.g. heart-shaped), as these can
damage the unit.
Discs that cannot be played
DVD-RAM (2.6 GB, TYPE 1), DVD-ROM, CD-ROM, CDV, CD-G,
RW,
DVD-RW, CVD, SVCD, SACD, Divx Video Discs and Photo CD.
Disc structure
Disc structure and the labels given to the items on discs depend on the disc
type.
Track:
the smallest division on DVD-Audio, CDs and Video CDs, or a
single WMA/MP3 file.
Chapter:
the smallest division on DVD-Video.
Group:
collections of tracks on DVD-Audio and equivalent to folders or
albums on data discs.
Title:
the largest division on DVD-Video, usually an entire movie.
Program: the division on DVD-RAM equivalent to a single recording.
Picture:
a single JPEG file.
Play list:
a group of scenes on DVD-RAM.
Scene:
DVD-RAM program sections specified and grouped into play
lists on a DVD video recorder.
DVD-RAM
DVD-Audio
DVD-Video
DVD-R
Video CD
CD
CD-R/RW
CD-R and CD-RW discs
This unit can play CD-R/RW (audio recording disc) recorded with CD-DA,
video CD, WMA, MP3, or JPEG. Finalize the disc after recording.
DVD-R discs
Panasonic DVD-R recorded and finalized on a Panasonic DVD video re-
corder are played as DVD-Video on this unit.
DVD-RAM discs
DVD-RAM discs must meet the following conditions for this unit to be able
to play them.
Playing DVDs and Video CDs
The producer of these discs can control how they are played so you
may not always be able to control play as described in these operating
instructions (for example if the play time is not displayed or if a Video
CD has menus). Read the disc's instructions carefully.
Non-cartridge discs
Discs that can be removed from their cartridges
(TYPE 2 and 4)
12 cm 9.4 GB (double-sided) and 4.7 GB (single-
sided)
8 cm 2.8 GB (double-sided)
Discs recorded with DVD video recorders, DVD video
cameras, personal computers, etc., using Version 1.1 of
the Video Recording Format (a unified video recording
standard).
Type
Capacity
Recording
format
Remove TYPE 2 and 4 discs from their cartridges before use, then return
them when you are finished. Read the instructions for the disc carefully.
Do not allow the disc to become dirty or scratched. Store discs in their
cartridges and ensure the disc label and cartridge label face the same
way.
Some parts of the disc, for example where one program ends and another
begins, may not play smoothly.
Note
It may not be possible to play CD-R, CD-RW, DVD-R and DVD-RAM in all
cases due to the type of disc or condition of the recording.
Video systems
This unit can play both the PAL and NTSC video systems. To view PAL or
NTSC, however, your television must match the system used on the disc.
PAL discs cannot be correctly viewed on an NTSC television. NTSC can be
correctly viewed on a PAL television by converting the video signal to
PAL 60 ( page 46, Video--NTSC Disc Output).
To clean discs
DVD-Audio, DVD-Video, Video CD, CD
Wipe with a damp cloth and then wipe dry.
[B]
DVD-RAM, DVD-R
Clean with an optional DVD-RAM/PD disc cleaner (LF-K200DCA1, where
available).
Never use cloths or cleaners for CDs etc.
Handling precautions
Do not write on the label side with a ball-point pen or other writing instru-
ment.
Do not use record cleaning sprays, benzine, thinner, static electricity
prevention liquids or any other solvent.
Do not attach labels or stickers to discs. (Do not use discs with exposed
adhesive from tape or left over peeled-off stickers.)
Do not use scratch-proof protectors or covers.
Do not use discs printed with label printers available on the market.
Including
CD text

Reviews

There are no reviews of this manual yet.