PIONEER XR-A4900/MYXJ Owner's Manual

Cover page of PIONEER XR-A4900/MYXJ Owner's Manual

Owner's Manual for PIONEER XR-A4900/MYXJ, downloadable as a PDF file.

We also have service manual to this model.

Manual details

  • Immediate download after payment.
  • Delivered as a PDF file.
  • The manual has 52 pages
  • File size: 3.21 MB
  • Available language versions: Portuguese, French, Swedish, English, Spanish, Dutch, German, Italian
  • Different language versions may vary sligthly in file size and page count.

We guarantee that...

  • our manuals are complete,
  • our manuals are checked with antivirus,
  • We'll issue refund if the manual is damaged, incomplete or unreadable (our refund policy)

Sample pages

Thumbnail of page 1Thumbnail of page 2Thumbnail of page 3Thumbnail of page 4
Thumbnail of page 5Thumbnail of page 6Thumbnail of page 7Thumbnail of page 8
Thumbnail of page 9
background image
Operating Instructions
Mode d'emploi
STEREO CD CASSETTE DECK RECEIVER
AMPLI-TUNER/LECTEUR CD/DOUBLE PLATINE A CASSETTE
XR-A4900
SPEAKER SYSTEM
ENCEINTES ACOUSTIQUES
S-A4900
background image
Operating Instructions
Mode d'emploi
STEREO CD CASSETTE DECK RECEIVER
AMPLI-TUNER/LECTEUR CD/DOUBLE PLATINE A CASSETTE
XR-A4900
SPEAKER SYSTEM
ENCEINTES ACOUSTIQUES
S-A4900
background image
WARNING: TO PREVENT FIRE OR SHOCK
HAZARD, DO NOT EXPOSE THIS APPLIANCE TO RAIN
OR MOISTURE.
The exclamation point within an equilateral
triangle is intended to alert the user to the
presence of important operating and
maintenance (servicing) instructions in the
literature accompanying the appliance.
CAUTION:
TO PREVENT THE RISK OF ELECTRIC SHOCK, DO
NOT REMOVE COVER (OR BACK).
NO USER-
SERVICEABLE PARTS INSIDE. REFER SERVICING
TO QUALIFIED SERVICE PERSONNEL.
The lightning flash with arrowhead symbol, within
an equilateral triangle, is intended to alert the user
to the presence of uninsulated "dangerous voltage"
within the product's enclosure that may be of
sufficient magnitude to constitute a risk of electric
shock to persons.
IMPORTANT
RISK OF ELECTRIC SHOCK
DO NOT OPEN
CAUTION
THE STANDBY/ON BUTTON IS SECONDARY CONNECTED
AND THEREFORE DOES NOT SEPARATE THE UNIT FROM
MAINS POWER IN STANDBY POSITION.
CAUTION
This product contains a laser diode of higher class than 1.
To ensure continued safety, do not remove any covers or
attempt to gain access to the inside of the product.
Refer all servicing to qualified personnel.
The following caution label appears on your unit.
Location: rear of the unit
ATTENTION: AFIN DE PREVENIR TOUS
RISQUES DE CHOC ELECTRIQUE OU DE DEBUT
D'ENCENDIE, NE PAS EXPOSER CET APPAREIL A
L'HUMIDITE OU A LA PLUIE.
This product complies with the Low Voltage Directive (73/
23/EEC), EMC Directives (89/336/EEC, 92/31/EEC) and CE
Marking Directive (93/68/EEC).
Ce produit est conforme à la directive relative aux appareils
basse tension (73/23/CEE), aux directives relatives à la
compatbilité électromagnétique (89/336/CEE, 92/31/CEE) et à la
directive CE relative aux marquages (93/68/CEE).
ATTENTION
Ce produit renferme une diode à laser d'une catégorie
supérieure à 1. Pour garantir une sécurité constante, ne
pas retirer les couvercles ni essayer d'accéder à
l'intérieur de l'appareil.
Pour toute réparation, s'adresser à un personnel
qualitié.
La note suivante se trouve sulr le panneau arrière de
cet appareil.
Emplacement: arrière de l'appareil.
CLASS 1
LASER PRODUCT
IMPORTANT
FOR USE IN THE UNITED
KINGDOM
The wires in this mains lead are coloured in
accordance with the following code:
Blue
: neutral
Brown : live
If the plug provided is unsuitable for your socket
outlets, the plug must be cut off and a suitable plug
fitted.
The cut-off plug should be disposed of and must not
be inserted into any 13 amp socket as this can result
in electric shock. The plug or adaptor of the distribution
panel should be provided with a 5 amp fuse. As the
colours of the wires in the mains lead of this appliance
may not correspond with coloured markings
identifying the terminals in your plug, proceed as
follows:
The wire which is coloured blue must be connected
to the terminal which is marked with the letter N or
coloured black.
The wire which is coloured brown must be connected
to the terminal which is marked with the letter L or
coloured red.
Do not connect either wire to the earth terminal of a
three-pin plug.
NOTE
After replacing or changing a fuse, the fuse cover in
the plug must be replaced with a fuse cover which
corresponds to the colour of the insert in the base of
the plug or the word that is embossed on the base of
the plug, and the appliance must not be used without
a fuse cover. If lost, replacement fuse covers can be
obtained from your dealer.
Only 5 A fuses approved by B.S.I. or A.S.T.A. to B.S.
1362 should be used.
Ventilation
When installing this unit, make sure to leave space around the
unit for ventilation to improve heat radiation (at least 30 cm at top,
15 cm at rear, and 15 cm at each side). If not enough space is
provided between the unit and walls or other equipment, heat
will build up inside, interfering with performance or causing
malfunctions.
Ventilation
Lors de l'installation de l'appareil, veillez à laisser suffisamment
d'espace autour pour permettre une bonne ventilation et
l'évacuation de la chaleur (au moins 30 cm au-dessus, 15 cm à
l'arrière et 15 cm de chaque côté). S'il n'y a pas suffisamment
d'espace entre l'appareil et les parois ou les autres équipements
qui l'entourent, la chaleur s'accumule à l'intérieur de l'appareil et
affectera ses performances ou causera des dysfonctionnements.
CLASS 1
LASER PRODUCT
En/Fr
LE BOUTON STANDBY/ON EST RACCORDE
SECONDAIREMENT ET PAR CONSEQUENT NE SEPARE
PAS L'APPAREIL DE L'ALIMENTATION SECTEUR SUR LA
POSITION D'ATTENTE.
This product is for general household purposes. Any failure
due to use for other than household purposes (such as
long- term use for business purposes in a restaurant or use
in a car or ship) and which requires repair will be charged
for even during the warranty period.
Ce lecteur est un produit grand public destiné à un usage
domestique. Si vous l'utilisez à d'autres fins (par exemple,
pour la sonorisation d'un restaurant, ou bien dans un
véhicule ou un bateau), les réparations éventuelles vous
seront facturées, même s'il est encore sous garantie.
background image
Thank you for buying this Pioneer product.
Please read through these operating instructions so you
will know how to operate your model properly. After you
have finished reading the instructions, put them away in
a safe place for future reference.
In some countries or regions, the shape of the power
plug and power outlet may differ from that shown in the
explanatory drawings. However, the method of con-
necting and operating the unit is the same.
Energy-saving design
This system is designed to use 1 W of electricity
when power is switched to Standby.
POWER-CORD CAUTION
Handle the power cord by the plug. Do not pull out the plug
by tugging the cord and never touch the power cord when
your hands are wet as this could cause a short circuit or
electric shock. Do not place the unit, a piece of furniture,
etc., on the power cord, or pinch the cord. Never make a
knot in the cord or tie it with other cords. The power cords
should be routed such that they are not likely to be stepped
on. A damaged power cord can cause a fire or give you an
electrical shock. Check the power cord once in a while.
When you find it damaged, ask your nearest PIONEER
authorized service center or your dealer for a replacement.
Contents
1 Before You Start
Checking what's in the box ................................. 5
Using this manual .............................................. 5
Putting the batteries in the remote ..................... 5
Using the remote control ................................... 6
Finding a suitable location ................................. 6
Avoiding condensation problems ..................... 7
Moving the system unit ...................................... 7
Discs compatible with this system ....................... 7
2 Connecting Up
The rear panel ................................................... 8
Connecting the speakers .................................... 9
Connecting the front speakers ......................... 9
Placing the speakers ...................................... 10
Connecting the radio antennas ........................ 10
Connecting external antennas ......................... 12
Connecting auxiliary components ..................... 12
Connecting the power ...................................... 13
Switching the demo mode on/off ..................... 13
3 Controls & Displays
Front panel ....................................................... 14
Display ............................................................. 16
Remote control ................................................. 17
4 Getting Started
Switching on and setting the clock .................... 18
Playing CDs ...................................................... 19
Summary of playback controls for CDs .......... 20
Changing discs ................................................. 21
Tuning in stations ............................................. 22
Improving poor FM reception ......................... 22
Playing cassette tapes ...................................... 23
Resetting the tape counter ............................. 25
Relay play ...................................................... 25
5 More CD Features
Programming a playlist ..................................... 26
Using repeat play ............................................. 27
Using random play ........................................... 27
6 More Tuner Features
Saving stations for quick recall ......................... 28
Listening to station presets ............................ 29
Changing the frequency step ............................ 29
Using RDS ....................................................... 30
Displaying RDS information ........................... 31
Searching for RDS program types .................. 32
7 Recording Cassette Tapes
Making tape recordings .................................... 33
Automatically recording CDs ......................... 35
Copying tapes ............................................... 36
Improving AM tape recordings ....................... 36
8 Singing Karaoke
Singing karaoke ............................................... 37
9 Using Sound Effects
Using the sound morph .................................... 38
Using preset effects ......................................... 38
Audio preset mode ........................................ 38
Surround preset mode ................................... 38
Changing sound presets using the remote ...... 39
Using individual sound effects .......................... 39
Equalizer mode .............................................. 39
Zoom Surround mode ................................... 40
P.Bass mode ................................................... 40
Changing sound effects using the remote ....... 40
Saving your own settings .................................. 41
Changing the sound display ............................. 41
Muting the sound ............................................. 41
10 Using the Timer
Setting the wake-up timer ................................ 42
Setting the sleep timer ..................................... 43
Setting the record timer ................................... 43
Canceling the timer ......................................... 44
11 Additional Information
Taking care of your system ............................... 45
Disc lens cleaner ............................................ 45
Taking care of your discs .................................. 45
Storing discs .................................................. 46
Discs to avoid ................................................ 46
Using cassette tapes ......................................... 47
Tapes you should avoid .................................. 47
Protecting your recordings ............................ 47
Troubleshooting ............................................... 48
Specifications .................................................. 50
En
background image
4
Fr
Sommaire
1 Avant de commencer
Faire l'inventaire de la boîte ............................... 5
Utilisation de ce manuel ..................................... 5
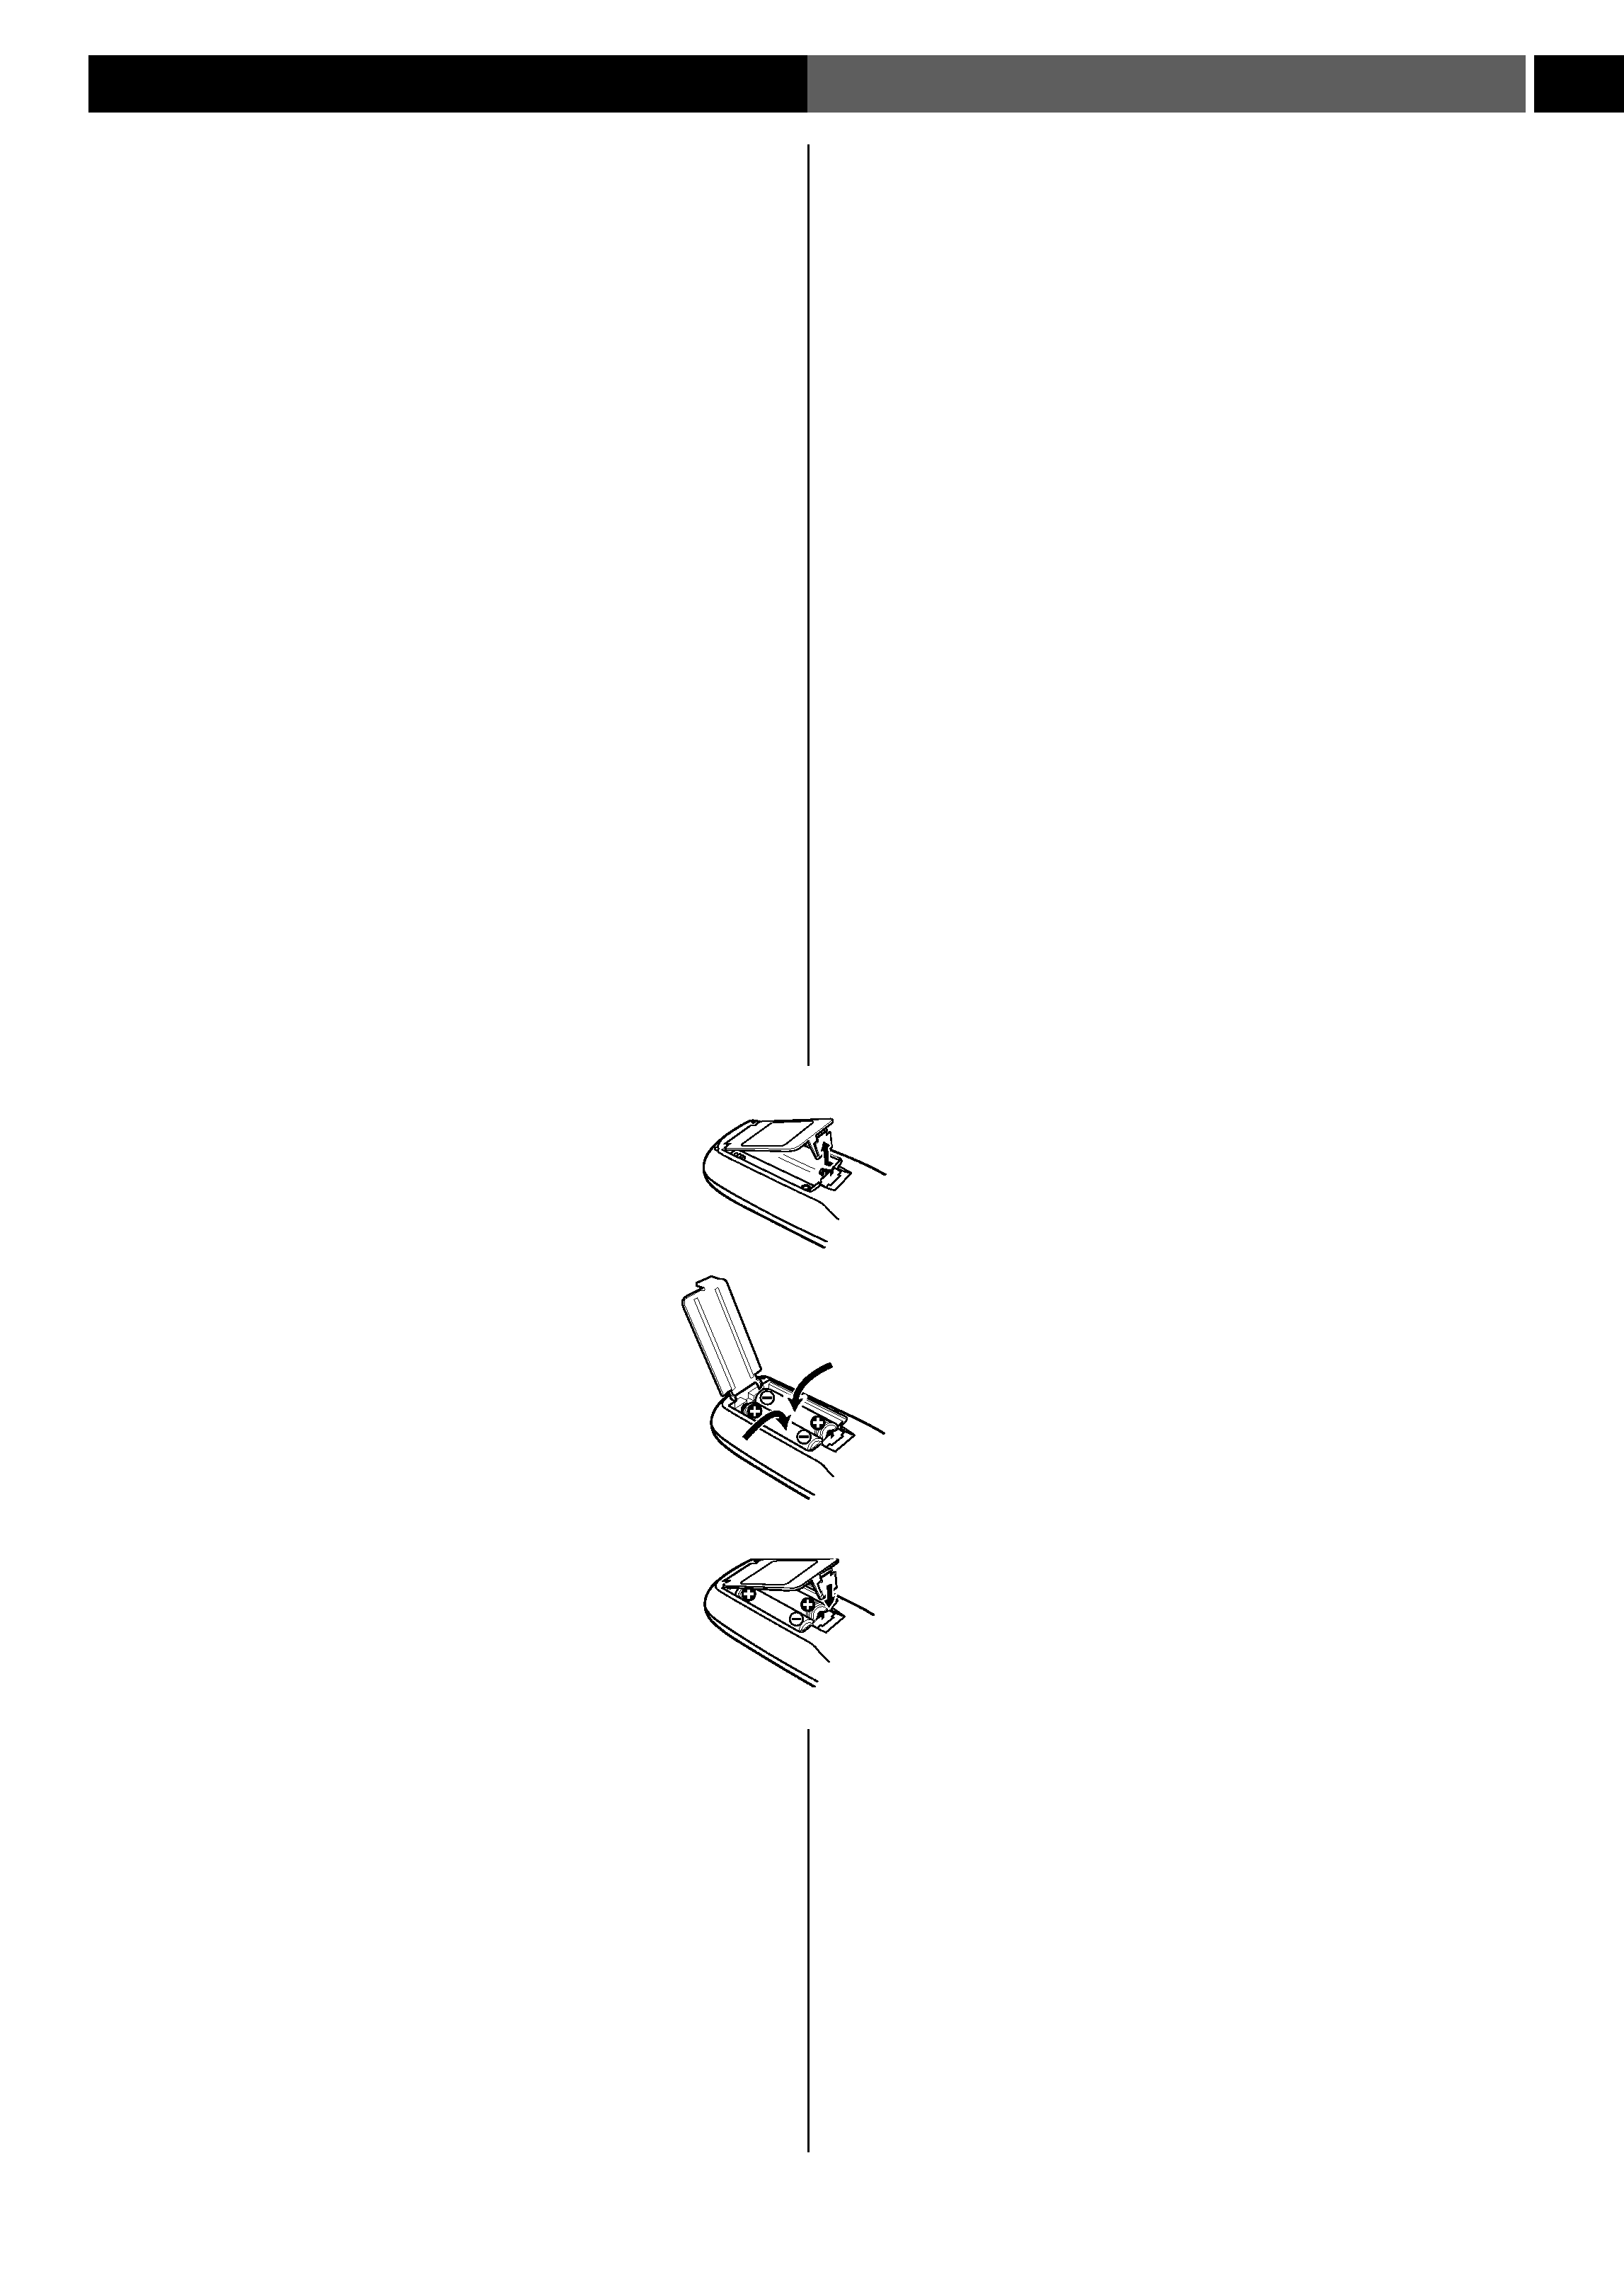
Placer les piles dans la télécommande ................ 5
Utilisation de la télécommande .......................... 6
Rechercher un endroit adapté ............................ 6
Comment éviter les problèmes de condensation ... 7
Déplacer l'appareil ............................................ 7
Disques compatibles avec cette chaîne ............... 7
2 Raccordement
Le panneau arrière ............................................. 8
Raccorder les enceintes ...................................... 9
Raccorder les enceintes avant .......................... 9
Choisir l'emplacement des enceintes .............. 10
Raccorder les antennes radio ........................... 10
Raccoder des antennes extérieures .................. 12
Raccoder les composants auxiliaires .................. 12
Mettre sous tension ......................................... 13
Activation/désactivation du mode de
démonstration ................................................. 13
3 Commandes et affichages
Panneau frontal ................................................ 15
Affichage .......................................................... 16
Télécommande ................................................. 17
4 Mise en service
Mise en marche et réglage de l'horloge ............. 18
Lecture de CD .................................................. 19
Sommaire des commandes de lecture
pour CD ........................................................ 20
Nous vous remercions pour cet achat d'un produit Pio-
neer.
Nous vous demandons de lire soigneusement ce
mode d'emploi; vous serez ainsi à même de faire
fonctionner l'appareil correctement. Après avoir bien
lu le mode d'emploi, rangez-le dans un endroit sûr
pour pouvoir vous y référer ultérieurement.
Dans certains pays ou certaines régions, la forme de la
fiche d'alimentation et de la prise d'alimentation peut
différer de celle qui figure sur les schémas, mais les
branchements et le fonctionnement de l'appareil
restent les mêmes.
Conception économie d'energie
Cette chaîne est conçue pour utiliser 1 W d'electricité
quand l'alimentation est en mode d'attente.
NOTE IMPORTANTE SUR LE CABLE
D'ALIMENTATION
Tenir le câble d'alimentation par la fiche. Ne pas débrancher
la prise en tirant sur le câble et ne pas toucher le câble avec
des mains mouillées. Cela risque de provoquer un court-
circuit ou un choc électrique. Ne pas poser l'appareil ou un
meuble sur le câble. Ne pas pincer le câble. Ne pas faire de
noeud avec le câble ou l'attacher à d'autres câbles. Les
câbles d'alimentation doivent être posés de façon à ne pas
être écrasés. Un câble abîmé peut constituer un risque
d'incendie ou un choc électrique. Vérifier le câble
d'alimentation de temps en temps. Contacter le service
après-vente PIONEER le plus proche ou le revendeur pour un
remplacement.
Changer les disques ......................................... 21
Capter les stations ........................................... 22
Améliorer une mauvaise réception FM ............ 22
Lecture et enregistrement de cassettes ............. 23
Remise à zéro du compteur de défilement
de bande ....................................................... 25
Lecture enchaînée ......................................... 25
5 Informations supplémentaires sur les CD
Programmation des répertoires ........................ 26
Utilisation de la lecture répétée ....................... 27
Utilisation de la lecture aléatoire ..................... 27
6 Fonctions supplémentaires du tuner
Mémorisation de station pour un rappel rapide ... 28
Écoute de préréglages de station ................... 29
Changement du pas de la fréquence ................. 29
Utilisation du RDS ........................................... 30
Affichage de l'information RDS ...................... 31
Recherche d'un type de programme RDS ....... 32
7 Enregistrement sur cassettes
Comment effectuer des enregistrements sur
cassette ........................................................... 33
Enregistrement automatique de CD ............... 35
Copies de cassettes ........................................ 36
Amélioration des enregistrements AM sur
cassette ......................................................... 36
8 Chanter avec le Karaoke
Chanter avec le Karaoke ................................... 37
9 Manipuler le son
Utilisation de la transformation du son ............ 38
Utilisation des effets préréglés ......................... 38
Mode audio prédéfini .................................... 38
Mode Surround préréglé ................................ 38
Changement des préréglages du son en
utilisant la télécommande .............................. 39
Utilisation des effets sonores individuels .......... 39
Mode Equalizer .............................................. 39
Mode Zoom Surround ................................... 40
Mode P.Bass .................................................. 40
Changement des effets sonores en utilisant
la télécommande ........................................... 40
Sauvegarder vos mises au point ........................ 41
Modifier l'affichage du son ............................... 41
Mettre le son en sourdine ................................. 41
10 Utilisation de la minuterie
Configuration de la minuterie de réveil ............. 42
S'endormir au son de la radio .......................... 43
Réglage du programmateur d'enregistrement ... 43
Annuler le programmateur ............................... 44
11 Informations supplémentaires
Comment entretenir le système ........................ 45
Produits nettoyants pour la lentille de disque ... 45
Comment entretenir vos disques ...................... 45
Rangement des disques ................................. 46
Disques à éviter ............................................. 46
Utilisation des cassettes ................................... 47
Les cassettes à éviter ...................................... 47
Protéger vos enregistrements ......................... 47
Guide de dépannage ........................................ 49
Spécifications ................................................... 51
background image
1
Before You Start
Avant de commencer
5
En/Fr
Checking what's in the box
Thank you for buying this Pioneer product. Before starting to set
up your new stereo system, please check that you received the
following supplied accessories:
· Operating instructions
· Remote control unit
· Power cord
· FM antenna
· AM loop antenna
· AA/R6P dry cell batteries (x2)
Using this manual
This manual is for the XR-A4900 Stereo CD Cassette Deck
Receiver. It is split into three sections: setting up (chapters 1 and
2); using the system (chapters 3 to 10), and additional informa-
tion (chapter 11). This last chapter contains care information for
the system, as well as discs and tapes, a troubleshooting section,
and specifications.
Putting the batteries in the
remote
1 Open the battery compartment cover
on the back of the remote control unit.
2 Load the supplied batteries into the
battery compartment following the
indications (
ª, ·) inside the
compartment.
3 Close the cover.
Caution!
· Remove the batteries if the remote is not going to
be used for a month or more.
· Remove dead batteries promptly--they can leak and damage
the unit.
· When disposing of used batteries, please comply with
governmental public institution's rules that apply in your
country or area.
1
2
3
Faire l'inventaire de la boîte
Nous vous remercions d'avoir choisi un produit Pioneer. Avant
d'installer votre nouveau système stéréo, veuillez faire l'inventaire
des accessoires suivants:
· Mode d'emploi
· Une télécommande
· Un cordon d'alimentation
· Antenne FM
· Une antenne cadre AM
· Deux piles sèches AA/R6P
Utilisation de ce manuel
Ce manuel est consacré au Lecteur CD/double platine à cassette
XR-A4900. Il est divisé en trois sections: configuration (chapitres 1
et 2); utilisation de la chaÎne (chapitre 3 à 10), et information
additionnelle (chapitre 11). Ce dernier chapitre comprend
l'information pour le soin de la chaîne, ainsi que pour les disques
et les cassettes, une section guide de dépannage et des
spécifications.
Placer les piles dans la
télécommande
1 Soulevez le couvercle du compartiment à
piles qui se trouve au dos de la
télécommande
2 Chargez les piles fournies dans le
compartiment à piles en suivant les
indications (
ª, ·) qui se trouvent à
l'intérieur du compartiment.
3 Refermez le couvercle.
Mise en garde!
· Enlevez les piles si vous n'utilisez pas la télécommande
pendant un mois ou plus.
· Enlevez immédiatement les piles usées--elles peuvent
présenter une fuite et endommager l'unité.
· Lorsque vous diposez de piles / batteries usées, veuillez vous
conformer aux normes gouvernementales ou
environnementales en vigueur dans votre pays ou région.

Reviews

There are no reviews of this manual yet.