PIONEER S-W8 Owner's Manual

Cover page of PIONEER S-W8 Owner's Manual

Owner's Manual for PIONEER S-W8, downloadable as a PDF file.

Manual details

  • Immediate download after payment.
  • Delivered as a PDF file.
  • The manual has 20 pages
  • File size: 1.03 MB
  • Available language versions: English, Spanish
  • Different language versions may vary sligthly in file size and page count.

We guarantee that...

  • our manuals are complete,
  • our manuals are checked with antivirus,
  • We'll issue refund if the manual is damaged, incomplete or unreadable (our refund policy)

Sample pages

Thumbnail of page 1Thumbnail of page 2Thumbnail of page 3Thumbnail of page 4
Thumbnail of page 5Thumbnail of page 6Thumbnail of page 7Thumbnail of page 8
Thumbnail of page 9
background image
S-W8
background image
S-W8
background image
WARNING: TO PREVENT FIRE OR
SHOCK HAZARD, DO NOT EXPOSE THIS
APPLIANCE TO RAIN OR MOISTURE.
ADVERTENCIA: PARA EVITAR
INCENDIOS Y DESCARGAS ELÉCTRICAS,
NO EXPONGA ESTE APARATO A LA
LLUVIA NI A LA HUMEDAD.
background image
3
En/Sp/ChH
English
Espa
ñ
ol
POWER-CORD CAUTION
Handle the power cord by the plug. Do not
pull out the plug by tugging the cord and
never touch the power cord when your hands
are wet as this could cause a short circuit or
electric shock. Do not place the unit, a piece
of furniture, etc., on the power cord, or pinch
the cord. Never make a knot in the cord or tie
it with other cords. The power cords should
be routed such that they are not likely to be
stepped on. A damaged power cord can
cause a fire or give you an electrical shock.
Check the power cord once in a while. When
you find it damaged, ask your nearest
PIONEER authorized service center or your
dealer for a replacement.
Thank you for buying this PIONEER product.
Please read through these operating
instructions so you will know how to operate
your model properly. After you have finished
reading the instructions, put them away in a
safe place for future reference.
In some countries or regions, the shape of
the power plug and power outlet may
sometimes differ from that shown in the
explanatory drawings. However, the method
of connecting and operating the unit is the
same.
PRECAUCIONES
CONCERNIENTES A LA
MANIPULACIÓN DEL CABLE DE
ALIMENTACIÓN
Tome el cable de alimentación por la
clavija. No extraiga la clavija tirando del
cable. Nunca toque el cable de
alimentación cuando sus manos estén
mojadas, ya que esto podría causar
cortocircuitos o descargas eléctricas. No
coloque la unidad, algún mueble, etc.,
sobre el cable de alimentación.
Asegúrese de no hacer nudos en el cable
ni de unirlo a otros cables. Los cables de
alimentación deberán ser dispuestos de
tal forma que la probabilidad de que
sean pisados sea mínima. Una cable de
alimentación dañado podrá causar
incendios o descargas eléctricas. Revise
el cable de alimentación está dañado,
solicite el reemplazo del mismo al centro
de servicio autorizado PIONEER más
cercano, o a su distribuidor.
Gracias por la adquisición de este
producto Pioneer.
Para saber cómo utilizar correctamente
su modelo, lea cuidadosamente este
manual de instrucciones. Después de
haber finalizado su lectura, guárdelo en
un lugar seguro para futuras referencias.
En algunos países o regiones, la forma de
la clavija de alimentación y de la toma
de corriente pueden ser diferentes a la
indicada en las ilustraciones
explicatorias, sin embargo el método de
conexión y operación de la unidad es
idéntico.
background image
4
En/Sp/ChH
FEATURES
7 200 W power that serves video
software playback such as Dolby*
Digital with a wide dynamic range.
7 Equipped with a high-efficiency class D
amplifier with a PWM system.
7 Turnover frequency can be continuous (50­
150 Hz).
7 Phase conversion switch (0°/180°).
7 Auto power off feature when there is
no input signal for about 9 minutes
(amplifer output switches to standby).
7 2 systems consisting of an input that
connects to the amplifier's speaker
terminals and an input that connects to
the SUBWOOFER PRE-OUT terminal.
7 30 cm woofer and PASSIVE RADIATOR
port for greater bass sound.
7 A second subwoofer can easily be
connected using the Line Level Output
jack.
7 Filter-through switch for both DVD audio
and regular audio.
* Manufactured under license from Dolby
Laboratories. "Dolby" and the double-D
symbol are trademarks of Dolby
Laboratories. Confidential unpublished
works. © 1992-1997 Dolby Laboratories.
All rights reserved.
ACCESSORY ITEMS
1 Speaker cords x 2
2 RCA plug cord x 1
3 Ground cable x 1
4 Operating instructions x 1
7
*
7
7
7
7
7
7
7
7
*
©
1
2
3
4
CARACTERÍSTICAS
7 200 W de potencia que sirven para la
reproducción de software de video tales
como sonido Dolby* Digital con una gama
dinámica amplia.
7 Equipado con una correa de transmisión de
22 cm
7 La frecuencia de transición puede ser
continua (50-150 Hz).
7 Interruptor de conversión de fase (0°/180°).
7 Función de apagado automático cuando no
hay señal de entrada durante unos 9
minutos (la salida del amplificador se pone
en el modo de espera).
7 2 sistemas consistentes de una entrada
que conecta al terminal de altavoz del
amplificador y una entrada que conecta al
terminal SUBWOOFER PRE-OUT.
7 Altavoz de graves de 30 cm y puerto
PASSIVE RADIATOR para obtener un
sonido grave más potente.
7 Utilizando la toma de salida de nivel de
línea se puede conectar fácilmente un
segundo altavoz de subgraves.
7 Conmutador de omisión de filtro para el
audio DVD y el audio convencional.
* Fabricado bajo licencia de Dolby
Laboratories. "Dolby" y el símbolo con
una doble D son marcas registradas de
Dolby Laboratories. Trabajos confidenciales
no publicados. © 1992-1997 por Dolby
Laboratories. Todos los derechos quedan
reservados.
ACCESORIOS INCLUIDOS
1 Cable de altavoz x 2
2 Cable de clavija RCA x 1
3 cable de tierra x 1
4 Manual de instrucciones x 1
12
3
background image
5
En/Sp/ChH
English
Espa
ñ
ol
INSTALLATION
A
B
Speaker Installation
The subwoofer plays back the bass in
monaural, making use of the fact that the
human ear loses the sense of direction of
low-pitched sound. Since the sense of
direction is lost, the subwoofer can be
installed almost anywhere. If it is installed too
far away, however, the sound from the left
and right speakers may become unnatural.
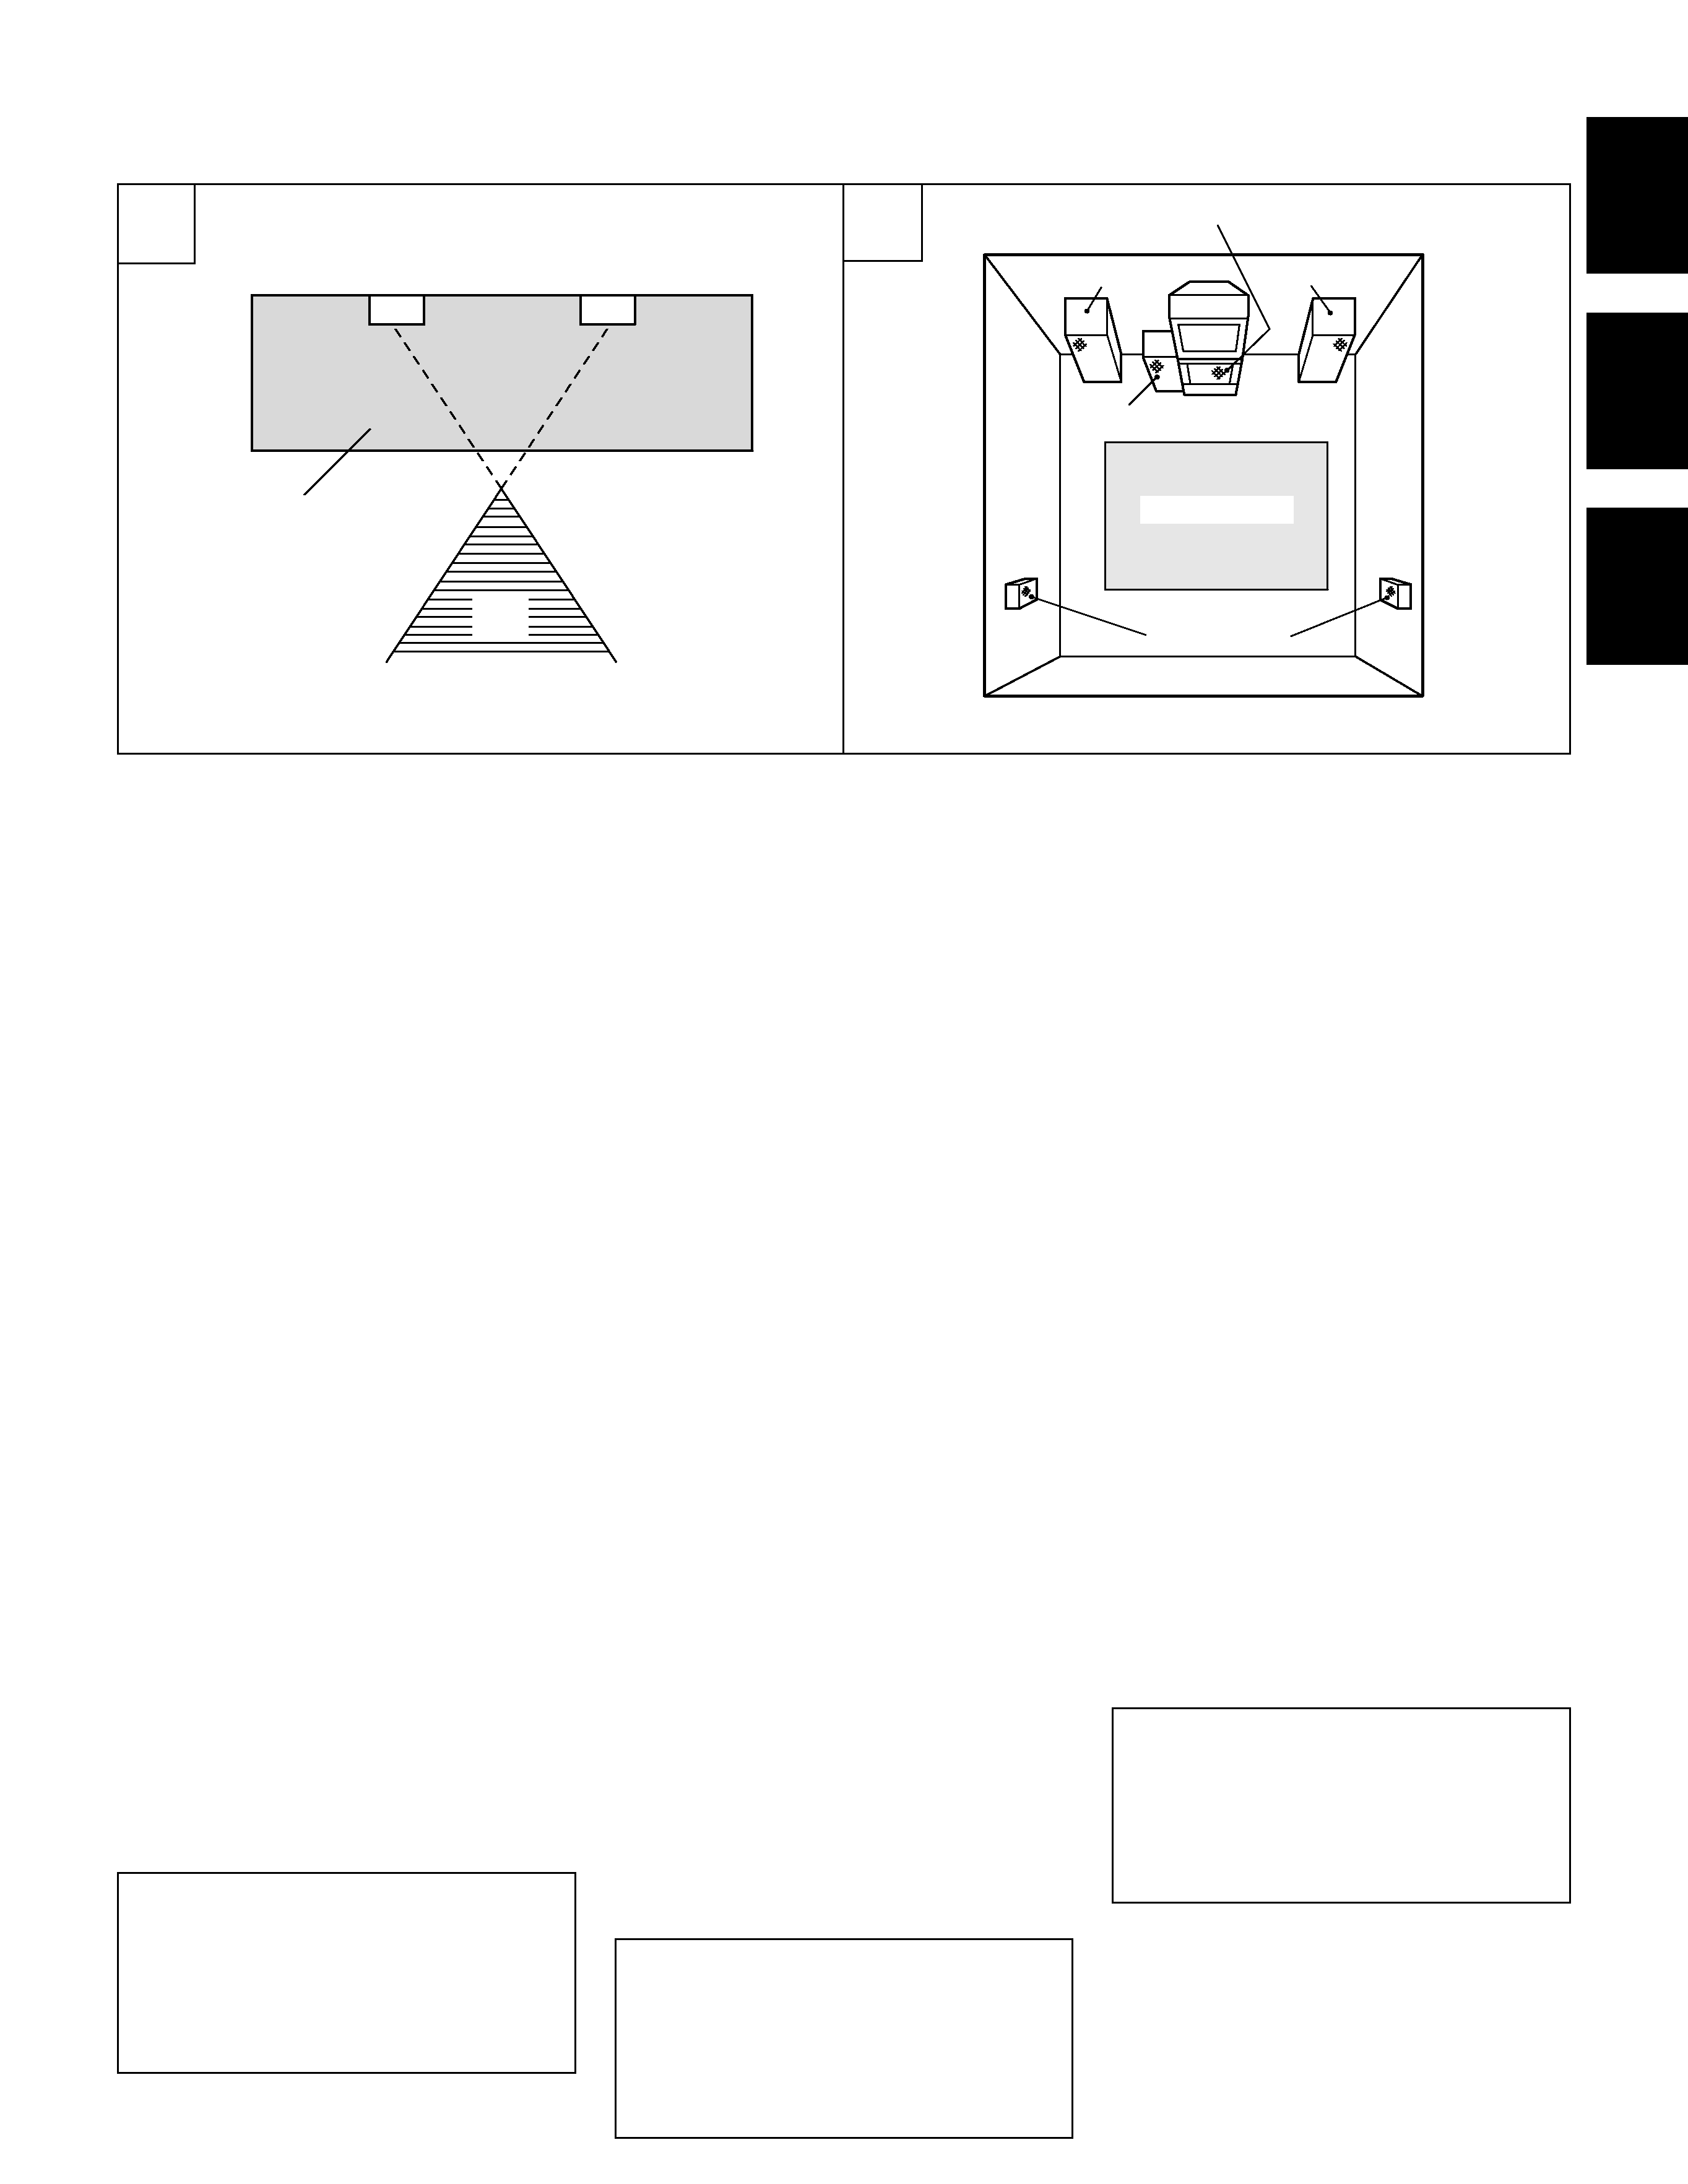
Subwoofer Installation Criteria (Å)
1 Left speaker
2 Right speaker
3 Recommended installation range for the
subwoofer
4 Listening position
An example of speaker positioning (i)
1 Front left speaker
2 Center speaker
3 Front right speaker
4 Subwoofer
5 Listening area
6 Rear left speaker
7 Rear right speaker
NOTE:
· To avoid interference with the picture on a
nearby TV set, use magnetically shielded speaker
systems. This is particularly important for the
center speaker since it is usually located closest
to the TV.
· Position the left and right channel speakers at
equal distances from the TV set and
approximately 1.8 meters from each other.
· Install the center speakers above or below the
TV so that the sound of the center channel is
localized at the TV screen.
· The rear (surround) speakers are most effective
when installed in parallel locations directly to the
side, or slightly behind, the listener, at a level
about 1 meter above the listener's ears.
CAUTION:
When installing the center speaker on top of the
TV, be sure to secure it with tape or some other
suitable means.
Otherwise, the speaker may fall from the TV
due to external shocks such as earthquakes,
and it may lead to endangering those nearby or
damaging the speaker.
1
4
2
3
67
5
3
1
4
2
Å
1
2
3
4
i
1
2
3
4
5
6
7
·
·
·
·
Insalación de Altavoz
El altavoz de graves secundario reproduce los
sonidos agudos en monofónico, haciendo uso del
hecho de que el oído humano pierde el sentido de
la dirección de los sonidos de baja altura tonal.
Como el sentido de dirección se pierde, el altavoz
de graves secundario puede ser instalado casi en
cualquier parte. Si se instala demasiado alejado,
no obstante, el sonido desde los altavoces
izquierdo y derecho pueden perder naturalidad.
Instalación de altavoz de graves secundario
Criterio (Å)
1 Altavoz izquierdo
2 Altavoz derecho
3 Gama de instalación recomendada para los
altavoces de graves secundarios
4 Posición de audición
Un ejemplo de ubicación de los altavoces (i)
1 Altavoz izquierdo delantero
2 Altavoz central
3 Altavoz derecho delantero
4 Altavoz de graves secundario
5 Area de audición
6 Altavoz izquierdo trasero
7 Altavoz derecho trasero
NOTA:
· Para evitar interferencias con la imagen en un
televisor cercano, utilice sistemas de altavoces
blindados magnéticamente. Esto es particularmente
importante para el altavoz central ya que normalmente
se encuentra ubicado cerca del televisor.
· Ubique los altavoces de canal izquierdo y derecho
separados a igual distancia del televisor, y
aproximadamente 1,8 metros uno de otro.
· Instale la pantalla acústica central encima o debajo del
TV, de forma que el sonido del canal central quede
localizado a la altura del televisor.
· Los altavoces traseros (envolvente) son los más
efectivos cuando se instala en ubicaciones paralelas
directamente al lado, o ligeramente detrás del oyente,
en un nivel de aproximadamente 1 metro por encima
de los oídos del oyente.
ATENCIÓN:
Al instalar la pantalla acústica sobre el TV, procure
asegurarla con algún medio que evite su posible
caída.
De lo contrario, podría caer debido a sacudidas
externas como temblores de tierra, provocando
daños en las personas próximas o en la propia
pantalla acústica.
INSTALACIÓN

Reviews

There are no reviews of this manual yet.