PIONEER PDR-W839/WYXJ Owner's Manual

Cover page of PIONEER PDR-W839/WYXJ Owner's Manual

Owner's Manual for PIONEER PDR-W839/WYXJ, downloadable as a PDF file.

We also have service manual to this model.

Manual details

  • Immediate download after payment.
  • Delivered as a PDF file.
  • The manual has 84 pages
  • File size: 1.87 MB
  • Available language versions: Portuguese, French, Swedish, English, Spanish, Dutch, German, Italian
  • Different language versions may vary sligthly in file size and page count.

We guarantee that...

  • our manuals are complete,
  • our manuals are checked with antivirus,
  • We'll issue refund if the manual is damaged, incomplete or unreadable (our refund policy)

Sample pages

Thumbnail of page 1Thumbnail of page 2Thumbnail of page 3Thumbnail of page 4
Thumbnail of page 5Thumbnail of page 6Thumbnail of page 7Thumbnail of page 8
Thumbnail of page 9
background image
Operating Instructions
Mode d'emploi
COMPACT DISC RECORDER/MULTI-CD CHANGER
ENREGISTREUR DE COMPACT DISC/CHANGEUR 3 CD
PDR-W839
background image
Operating Instructions
Mode d'emploi
COMPACT DISC RECORDER/MULTI-CD CHANGER
ENREGISTREUR DE COMPACT DISC/CHANGEUR 3 CD
PDR-W839
background image
2
ATTENTION
Ce produit renferme une diode à laser d'une
catégorie supérieure à 1. Pour garantir une
sécurité constante, ne pas retirer les
couvercles ni essayer d'accéder à l'intérieur
de l'appareil. Pour toute réparation,
s'addresser à un personnel qualifié.
L'étiquette d'avertissement suivante se
trouve sur l'Enregistreur de Disque Compact.
Emolacement: Sur le panneau arrière de
l'Enregistreur de Disque Compact.
ATTENTION: AFIN DE PREVENIR TOUS RISQUES
DE CHOC ELECTRIQUE OU D'INCENDIE, NE PAS
EXPOSER CET APPAREIL A L'HUMIDITE OU A LA PLUIE.
Nous vous remercions pour cet achat d'un produit Pioneer.
Nous vous demandons de lire soigneusement ce mode
d'emploi; vous serez ainsi à même de faire fonctionner
l'appareil correctement. Après avoir bien lu le mode
d'emploi, le ranger dans un endroit sûr pour pouvoir s'y
référer ultérieurement.
Dans certains pays ou certaines régions, la forme de la
fiche d'alimentation et de la prise d'alimentation peut
différer de celle qui figure sur les schémas, mais les
branchements et le fonctionnement de l'appareil restent
les mêmes.
CLASS 1
LASER PRODUCT
WARNING: TO PREVENT FIRE OR SHOCK HAZARD,
DO NOT EXPOSE THIS APPLIANCE TO RAIN OR
MOISTURE.
The exclamation point within an equilateral
triangle is intended to alert the user to the
presence of important operating and
maintenance (servicing) instructions in the
literature accompanying the appliance.
CAUTION:
TO PREVENT THE RISK OF ELECTRIC SHOCK, DO
NOT REMOVE COVER (OR BACK).
NO USER-
SERVICEABLE PARTS INSIDE. REFER SERVICING
TO QUALIFIED SERVICE PERSONNEL.
The lightning flash with arrowhead symbol, within
an equilateral triangle, is intended to alert the user
to the presence of uninsulated "dangerous voltage"
within the product's enclosure that may be of
sufficient magnitude to constitute a risk of electric
shock to persons.
IMPORTANT
RISK OF ELECTRIC SHOCK
DO NOT OPEN
CAUTION
Thank you for buying this Pioneer product.
Please read through these operating instructions so you will
know how to operate your model properly. After you have
finished reading the instructions, put them away in a safe
place for future reference.
In some countries or regions, the shape of the power plug
and power outlet may sometimes differ from that shown in
the explanatory drawings. However, the method of con-
necting and operating the unit is the same.
CAUTION
This product contains a laser diode of higher
class than 1. To ensure continued safety, do
not remove any covers or attempt to gain
access to the inside of the product.
Refer all servicing to qualified personnel.
The following caution label appears on the unit.
Location: Rear of the unit.
CLASS 1
LASER PRODUCT
Ce produit est conforme à la directive relative aux
appareils basse tengion (73/23/CEE), à la directive CE
relative à la compatibilité electromagnétique (89/
336/CEE, amendements 92/31/CEE et 93/58/CEE).
This product complies with the Low Voltage Directive
(73/23/EEC, amended by 93/68/EEC), EMC Directives
(89/336/EEC, amended by 92/31/EEC and 93/68/EEC).
Ce produit est destiné à une utilisation domestique
générale. Toute panne due à une utilisation autre qu'à
des fins privées (comme une utilisation à des fins
commerciales dans un restaurant, dans un autocar ou
sur un bateau) et qui nécessite une réparation sera aux
frais du client, même pendant la période de garantie.
K041_Fr
This product is for general household purposes. Any
failure due to use for other than household purposes
(such as long-term use for business purposes in a
restaurant or use in a car or ship) and which requires
repair will be charged for even during the warranty
period.
K041_En
background image
3
Contents
1
Before You Start
Checking what's in the box .................................................. 5
Using this manual ................................................................ 5
Putting the batteries in the remote ...................................... 5
Hints on installation ............................................................ 6
Avoiding condensation problems ......................................... 6
Maintaining your CD recorder ............................................. 7
Moving the unit .................................................................... 7
CD lens cleaner ..................................................................... 7
Power cord caution .............................................................. 7
About CD, CD­R and CD­RW Discs .................................... 8
Consumer-use discs .............................................................. 8
Recording copyright material .............................................. 9
Recording and finalizing discs ............................................ 9
Playing partially recorded discs ......................................... 10
2
Connecting Up
Rear panel .......................................................................... 11
Connecting optical cords .................................................... 11
Connecting coaxial cords ................................................... 11
Connecting stereo audio cords ........................................... 11
Connecting the control cord .............................................. 11
Plugging in ......................................................................... 11
Connecting a keyboard ...................................................... 13
Keyboard controls ............................................................... 14
3
Controls and Displays
Front panel ......................................................................... 15
Remote control ................................................................... 17
Display ................................................................................ 19
4
Getting Started
Quick CD recording ............................................................ 21
Recording tracks during playback ..................................... 22
Setting the headphone level ............................................... 22
Playing a CD ....................................................................... 23
Playback modes .................................................................. 25
Starting playback with a timer .......................................... 26
Using the menu features .................................................... 26
Switching the display ......................................................... 27
5
Recording Features
Introduction ....................................................................... 32
Recording a CD ................................................................... 32
Recording individual tracks ............................................... 33
Recording form anywhere on the disc ............................... 35
Recording a programmed selection ................................... 36
Using CD text ...................................................................... 38
Editing CD text ................................................................... 40
Copying track names to other tracks ................................. 41
Recording fade ins and fade outs ....................................... 43
Automatically numbering tracks ....................................... 44
Setting the silence threshold .............................................. 45
Manually numbering tracks .............................................. 46
Starting tracks in time increments .................................... 47
Changing the recording speed ........................................... 48
Setting the recording level ................................................. 48
Setting the balance ............................................................. 49
6
Finalizing and Erasing
Finalizing a disc ................................................................. 50
Erasing a CD­RW disc ....................................................... 52
Marking recorded tracks to skip ......................................... 54
Playing a disc with skip IDs ............................................... 57
7
Playback Functions
Programming a playlist (3-CD changer) .......................... 58
Clearing the playlist ........................................................... 59
Programming a playlist (CD-R) ........................................ 60
Using the repeat modes ...................................................... 61
Using the random mode .................................................... 62
Fading in and fading out ................................................... 63
8
Recording Other Sources
Introduction ....................................................................... 64
Monitoring a source for recording ..................................... 65
Digital synchro recording .................................................. 66
Analog synchro recording .................................................. 68
Manual recording (analog or digital) ............................... 70
Recording blank sections ................................................... 72
9
Additional Information
Handling discs ................................................................... 73
Storing discs ........................................................................ 73
Discs to avoid ...................................................................... 73
Recording CDs .................................................................... 74
Digital and analog sources ................................................ 74
Digital recording restrictions ............................................. 74
Digital recording from DAT ................................................ 75
Digital signal interruptions ................................................ 75
Power interruptions ............................................................ 75
Miscellaneous information ................................................ 75
Understanding display messages ....................................... 76
Error messages ................................................................... 78
Digital synchro recording troubleshooting ....................... 78
Messages relating to recording ........................................... 80
Troubleshooting ................................................................. 82
Specifications ...................................................................... 84
En
English
Français
background image
4
Fr
Sommaire
1
Avant le démarrage
Vérification du contenu de la boîte ...................................... 5
Emploi de ce mode d'emploi ............................................... 5
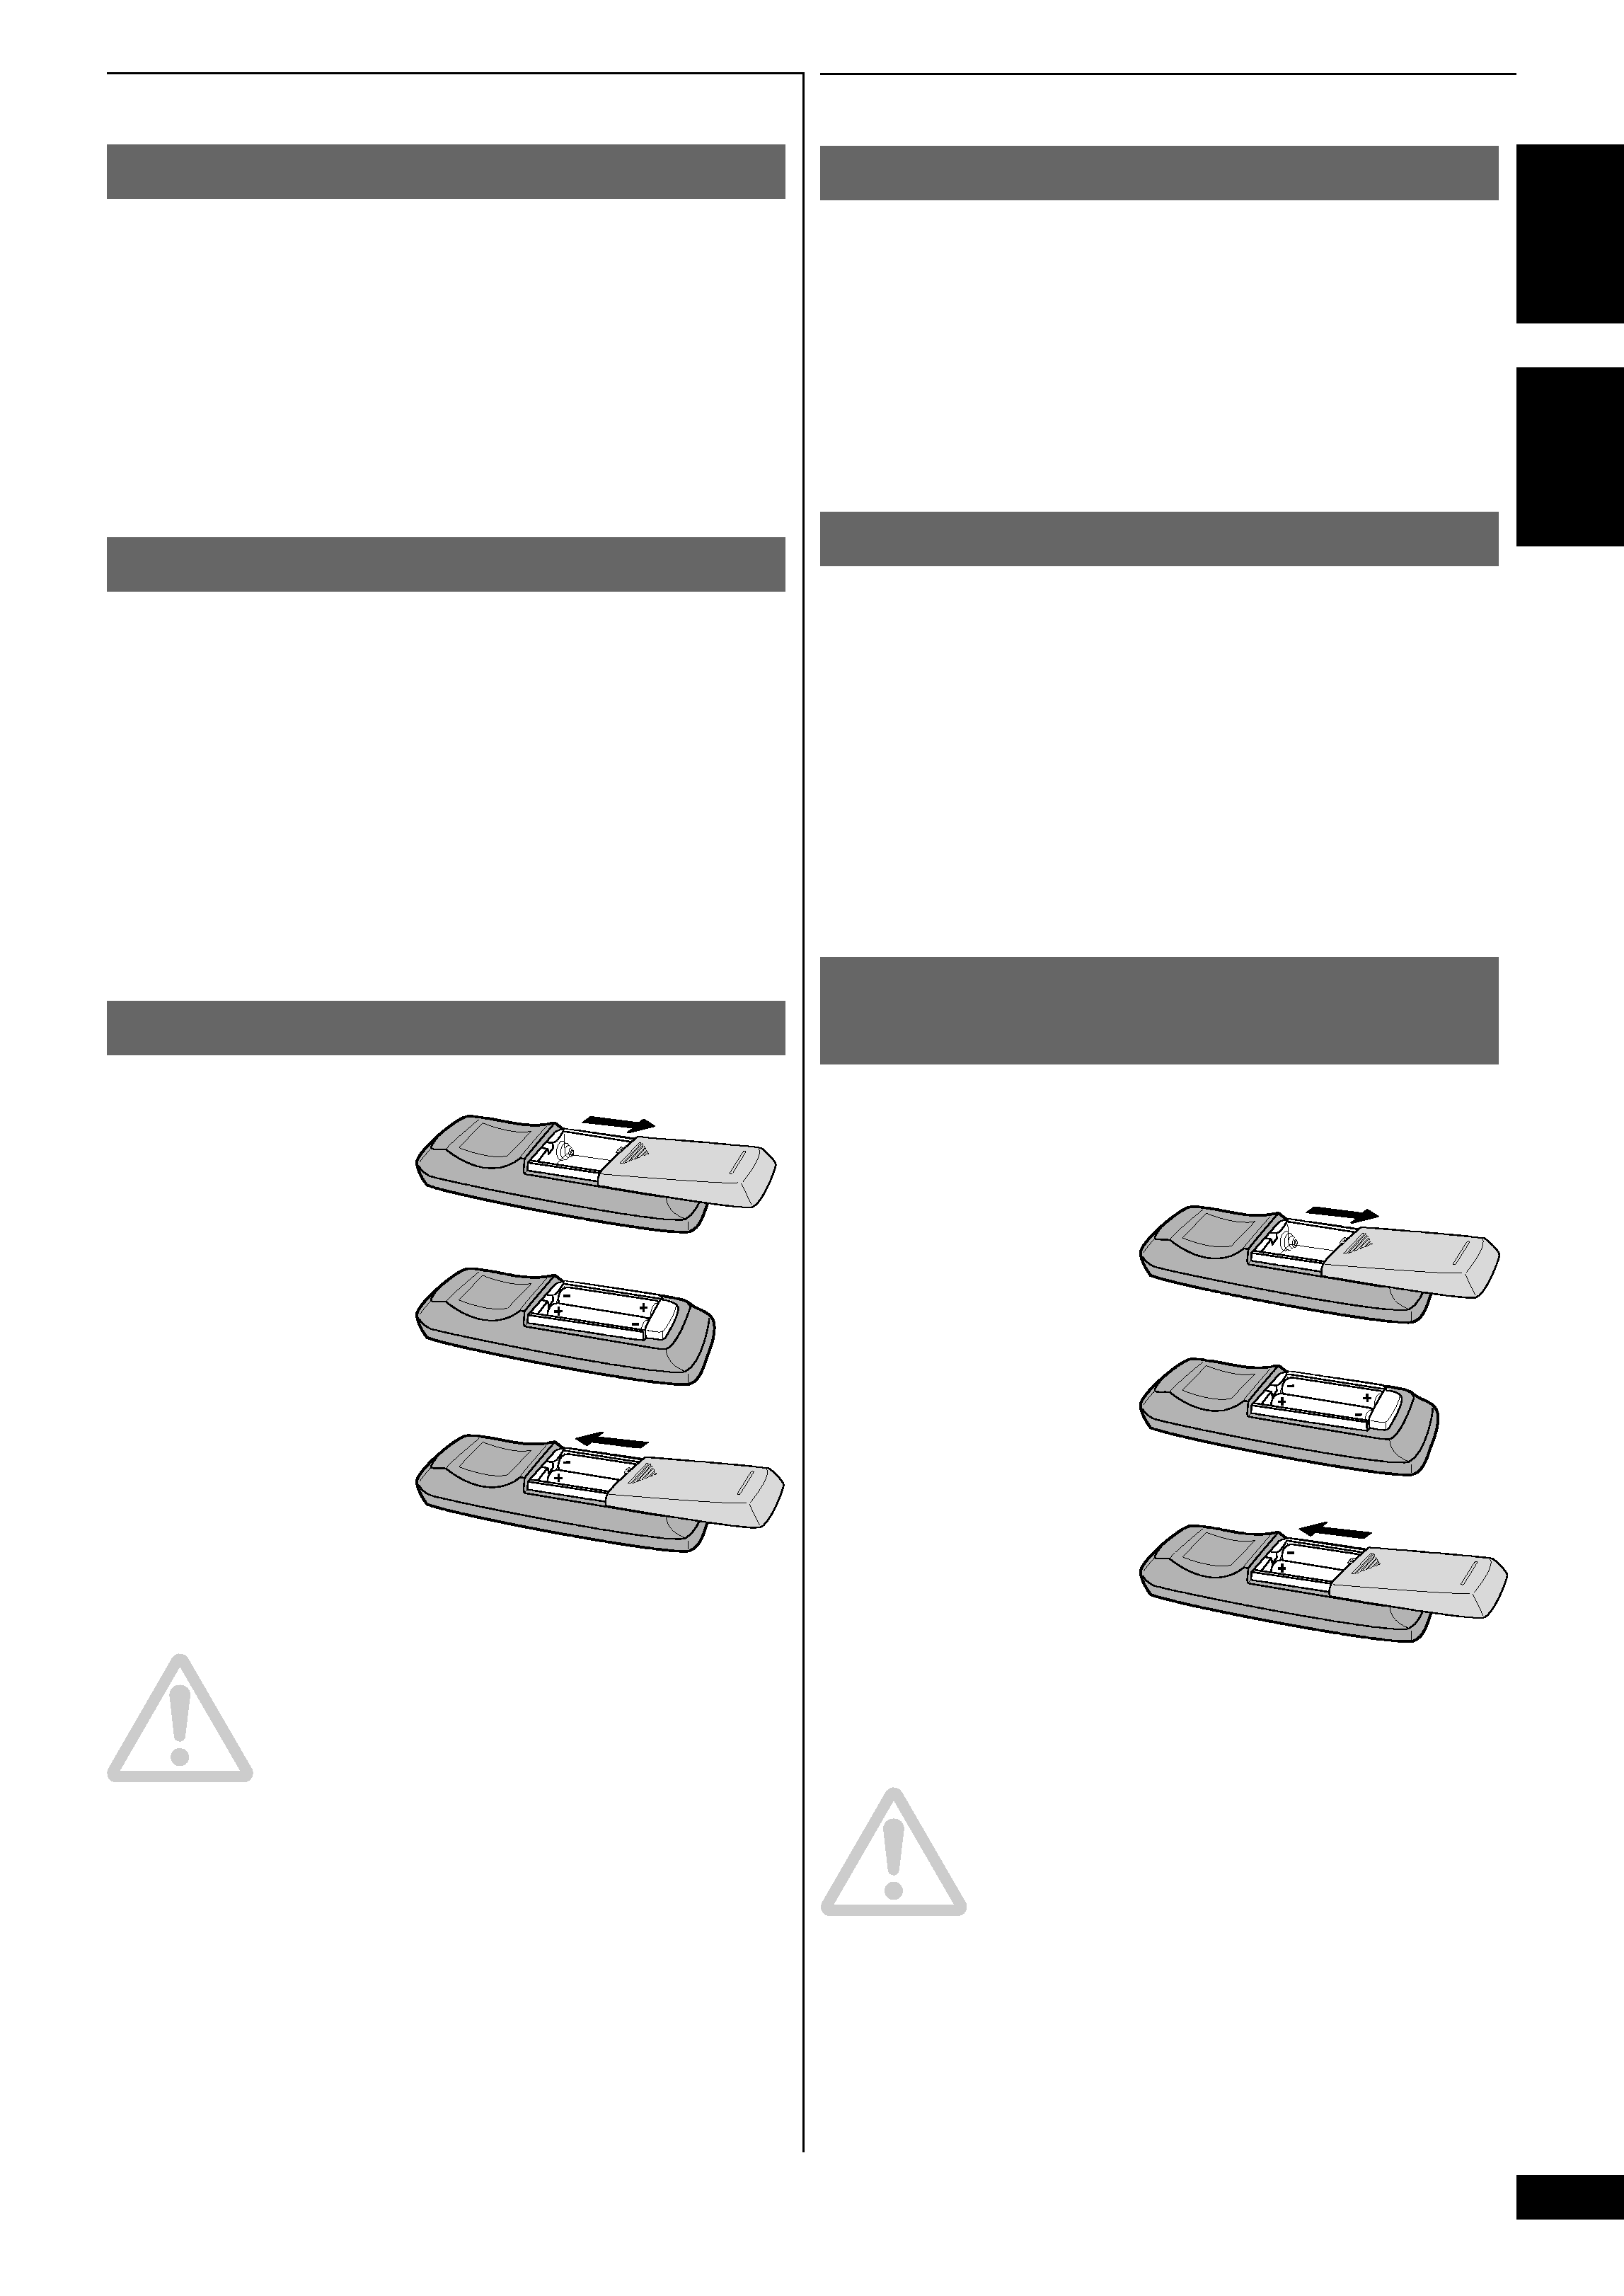
Insertion des piles dans la télécommande ........................... 5
Conseils pour l'installation .................................................. 6
Pour éviter les problèmes de condensation ......................... 6
Entretien de l'enregistreur CD ............................................. 7
Déplacement de l'appareil ................................................... 7
Dispositif de nettoyage de lentille CD ................................... 7
Note importante sur le câble d'alimentation ...................... 7
A propos des disques CD, CD-R et CD-RW ............................ 8
Disques grand public ............................................................ 8
Enregistrement de matériaux sous droits d'auteur ............. 9
Enregistrement et finalisation des disques .......................... 9
Lecture de disques partiellement enregistrés ..................... 10
2
Raccordements
Panneau arrière.................................................................. 12
Raccordement de cordons optiques ................................... 12
Raccordement de cordons coaxiaux .................................. 12
Raccordement de cordons audio stéréo ............................. 12
Raccordement du cordon de contrôle ................................ 12
Branchement ...................................................................... 12
Branchement d'un clavier ................................................. 13
Commandes du clavier ...................................................... 14
3
Commandes et Afficheur
Panneau avant ................................................................... 15
Télécommande ................................................................... 17
Afficheur ............................................................................. 19
4
Démarrage
Enregistrement rapide de CD ............................................. 21
Enregistrement de plages pendant la lecture .................... 22
Réglage du niveau de casque d'écoute .............................. 22
Lecture d'un CD .................................................................. 23
Modes de lecture ................................................................. 25
Démarrage de la lecture avec minuterie ........................... 26
Utilisation des fonctions de menu ..................................... 26
Commutation de l'affichage .............................................. 27
5
Fonctions d'enregistrement
Introduction ....................................................................... 32
Enregistrement d'un CD .................................................... 32
Enregistrement de plages individuelles ............................. 33
Enregistrement à partir d'un point sur le disque .............. 35
Enregistrement d'une sélection programmée ................... 36
Utilisation du texte CD ....................................................... 38
Édition du texte CD ............................................................ 40
Copie des noms de plage sur d'autres plages ..................... 41
Fondus d'enregistrement à l'entrée et à la sortie .............. 43
Numérotation automatique des plages ............................. 44
Réglage du seuil de silence ................................................ 45
Numérotation manuelle des plages ................................... 46
Démarrage des plages à intervalles de temps .................... 47
Modification de la vitesse d'enregistrement ...................... 48
Réglage du niveau d'enregistrement ................................. 48
Réglage de la balance ........................................................ 49
6
Finalisation et effacement
Finalisation d'un disque .................................................... 50
Effacement d'un CD-RW .................................................... 52
Marquage des plages enregistrées à sauter ........................ 54
Lecture d'un disque à code de saut .................................... 57
7
Fonctions de lecture
Programmation d'une liste de lecture (changeur 3 CD) ...... 58
Suppression de la liste de lecture ....................................... 59
Programmation d'une liste de lecture (CD-R) ................. 60
Emploi des modes de répétition ......................................... 61
Emploi du mode aléatoire ................................................. 62
Fondu à l'entrée et en sortie ............................................... 63
8
Enregistrement d'autres sources
Introduction ....................................................................... 64
Contrôle d'une source pour l'enregistrement .................... 65
Enregistrement synchro numérique .................................. 66
Enregistrement synchro analogique .................................. 68
Enregistrement manuel (analogique ou numérique) ...... 70
Enregistrement de sections vierges .................................... 72
9
Informations complémentaires
Manipulation des disques .................................................. 73
Rangement des disques ...................................................... 73
Disques à éviter ................................................................... 73
Enregistrement de CD ........................................................ 74
Sources numériques et analogiques .................................. 74
Limites des enregistrements numériques ............................. 74
Enregistrement numérique à partir d'une cassette DAT ....... 75
Interruptions du signal numérique ................................... 75
Pannes de courant .............................................................. 75
Informations diverses ......................................................... 75
Compréhension des messages affichés .............................. 77
Messages d'erreur ............................................................... 79
Dépannage pour l'enregistrement synchro numérique .... 79
Messages affichés en relation avec l'enregistrement ......... 81
Dépannage .......................................................................... 83
Caractéristiques techniques ............................................... 84
background image
5
En/Fr
1 Avant le démarrage
1 Before You Start
Checking what's in the box
Thank you for buying this Pioneer product. Before starting to set up
your new CD recorder, please check that you have received the
following supplied accessories:
· Stereo audio cords (x2)
· AC power cord
· Two 'AA' size R6P batteries · Remote control unit
· Keypad stickers
· Warranty card
· These operating instructions
Using this manual
This manual is for the PDR­W839 Compact Disc Recorder/Multi-
CD Changer. It is split into two sections; the first covers setting up,
and the second, using the recorder. Set up, which starts here, shows
you how to install and connect up the recorder to the rest of your
system.
In the second section of the manual, starting on page 15, you'll
learn how to use the various features of the recorder. The final part
of the manual provides a list of display messages, a troubleshooting
section, and technical specifications.
Putting the batteries in the remote
1 Turn over the remote control, then press and slide the
battery compartment
cover off.
2 Put in the batteries
supplied, taking care
to match the plus
and minus ends of
each battery with the
markings inside the
compartment.
3 Slide the cover back
on, and your remote
is ready for use.
Caution!
Incorrect use of batteries can result in hazards such as leakage and
bursting. Please observe the following:
· Don't mix new and old batteries together.
· Don't use different kinds of battery together--although they
may look similar, different batteries may have different
voltages.
· Make sure that the plus and minus ends of each battery
match the indications in the battery compartment.
· Remove batteries from equipment that isn't going to be used
for a month or more.
· When disposing of used batteries, please comply with
governmental regulations or environmental public
institution's rules that apply in your country or area.
English
Français
Vérification du contenu de la boîte
Merci d'avoir porté votre choix sur ce produit Pioneer. Avant de
mettre en service votre nouvel enregistreur de CD, vérifiez la
présence des accessoires fournis suivants dans la boîte:
· Cordons audio (x2)
· Cordon d'alimentation secteur
· Deux piles R6P de format AA
· Télécommande
· Autocollants de clavier
· Carte de garantie
· Ce mode d'emploi
Emploi de ce mode d'emploi
Ce mode d'emploi, prévu pour l'enregistreur/multichangeur de CD
PDR-W839, est divisé en deux parties: la première couvre
l'installation, et la seconde l'emploi de l'enregistreur. L'installation,
qui commence ici, vous explique comment installer et raccorder
l'enregistreur avec le reste de votre chaîne stéréo.
La seconde partie de ce mode d'emploi, qui commence à la page 15,
vous indiquera l'emploi des différentes fonctions de l'enregistreur. La
liste des messages affichés, la section dépannage et les spécifications
techniques sont regroupées à la fin de ce volume.
Insertion des piles dans la
télécommande
1 Retournez la télécommande, puis pressez et faites glisser le
couvercle du logement des piles pour le retirer.
2 Insérez les piles fournies, en alignant bien les polarités + et
- aux extrémités des
piles sur les marques
dans le logement.
3 Glissez le couvercle du
logement en place. La
télécommande est
maintenant prête à
fonctionner.
ATTENTION!
Un emploi incorrect des piles
peut se traduire par des
risques, tels que fuite ou
éclatement. Respectez les consignes suivantes:
· Ne mélangez pas des piles neuve et ancienne.
· Ne combinez pas des piles de types différents -- même si
elles ont l'air similaires, des piles différentes peuvent avoir
des tensions différentes.
· Vérifiez que les pôles + et - des piles sont bien alignés sur les
marques dans le logement.
· Retirez les piles de la télécommande si elle doit rester
inutilisée pendant un mois ou plus.
· Pour l'élimination de vos piles usagées, veuillez vous
conformer aux réglementations officielles en vigueur ou
aux dispositions de l'organisme public de protection de
l'environnement applicables dans votre pays ou zone
géographique.

Reviews

There are no reviews of this manual yet.