PIONEER PDK-FS01E Owner's Manual

Cover page of PIONEER PDK-FS01E Owner's Manual

Owner's Manual for PIONEER PDK-FS01E, downloadable as a PDF file.

Manual details

  • Immediate download after payment.
  • Delivered as a PDF file.
  • The manual has 52 pages
  • File size: 2.41 MB
  • Available language versions: Swedish, French, English, Spanish, Dutch, German, Italian
  • Different language versions may vary sligthly in file size and page count.

We guarantee that...

  • our manuals are complete,
  • our manuals are checked with antivirus,
  • We'll issue refund if the manual is damaged, incomplete or unreadable (our refund policy)

Sample pages

Thumbnail of page 1Thumbnail of page 2Thumbnail of page 3Thumbnail of page 4
Thumbnail of page 5Thumbnail of page 6Thumbnail of page 7Thumbnail of page 8
Thumbnail of page 9
background image
Operating instructions
Mode d'emploi
Bedienungsanleitung
Istruzioni per l'uso
Gebruiksaanwijzing
Bruksanvisning
Manual de instrucciones
Floor stand
Support de base
Bodenständer
Supporto per display
Vloerstandaard
Golvstativ
Soporte para colocar en el suelo
PDK-FS01E
background image
Operating instructions
Mode d'emploi
Bedienungsanleitung
Istruzioni per l'uso
Gebruiksaanwijzing
Bruksanvisning
Manual de instrucciones
Floor stand
Support de base
Bodenständer
Supporto per display
Vloerstandaard
Golvstativ
Soporte para colocar en el suelo
PDK-FS01E
background image
2
Thank you for buying this Pioneer product.
Please read through these operating instructions so you will
know how to operate your model properly. After you have
finished reading the instructions, put them away in a safe place
for future reference.
In some countries or regions, the shape of the power plug and
power outlet may sometimes differ from that shown in the
explanatory drawings. However the method of connecting and
operating the unit is the same.
K015 En
7 Special Features
¶ A design that creates an atmosphere in which
the display seems to float in space
¶ Easy to move thanks to the attached casters
¶ Its gooseneck lets you easily rotate the direction
of the screen (left or right 30°)
CAUTION
This symbol refers to a hazard or unsafe practice which
can result in personal injury or property damage.
Cautions
1.
Do not lean on the plasma display and do not get on
the shelf.
2.
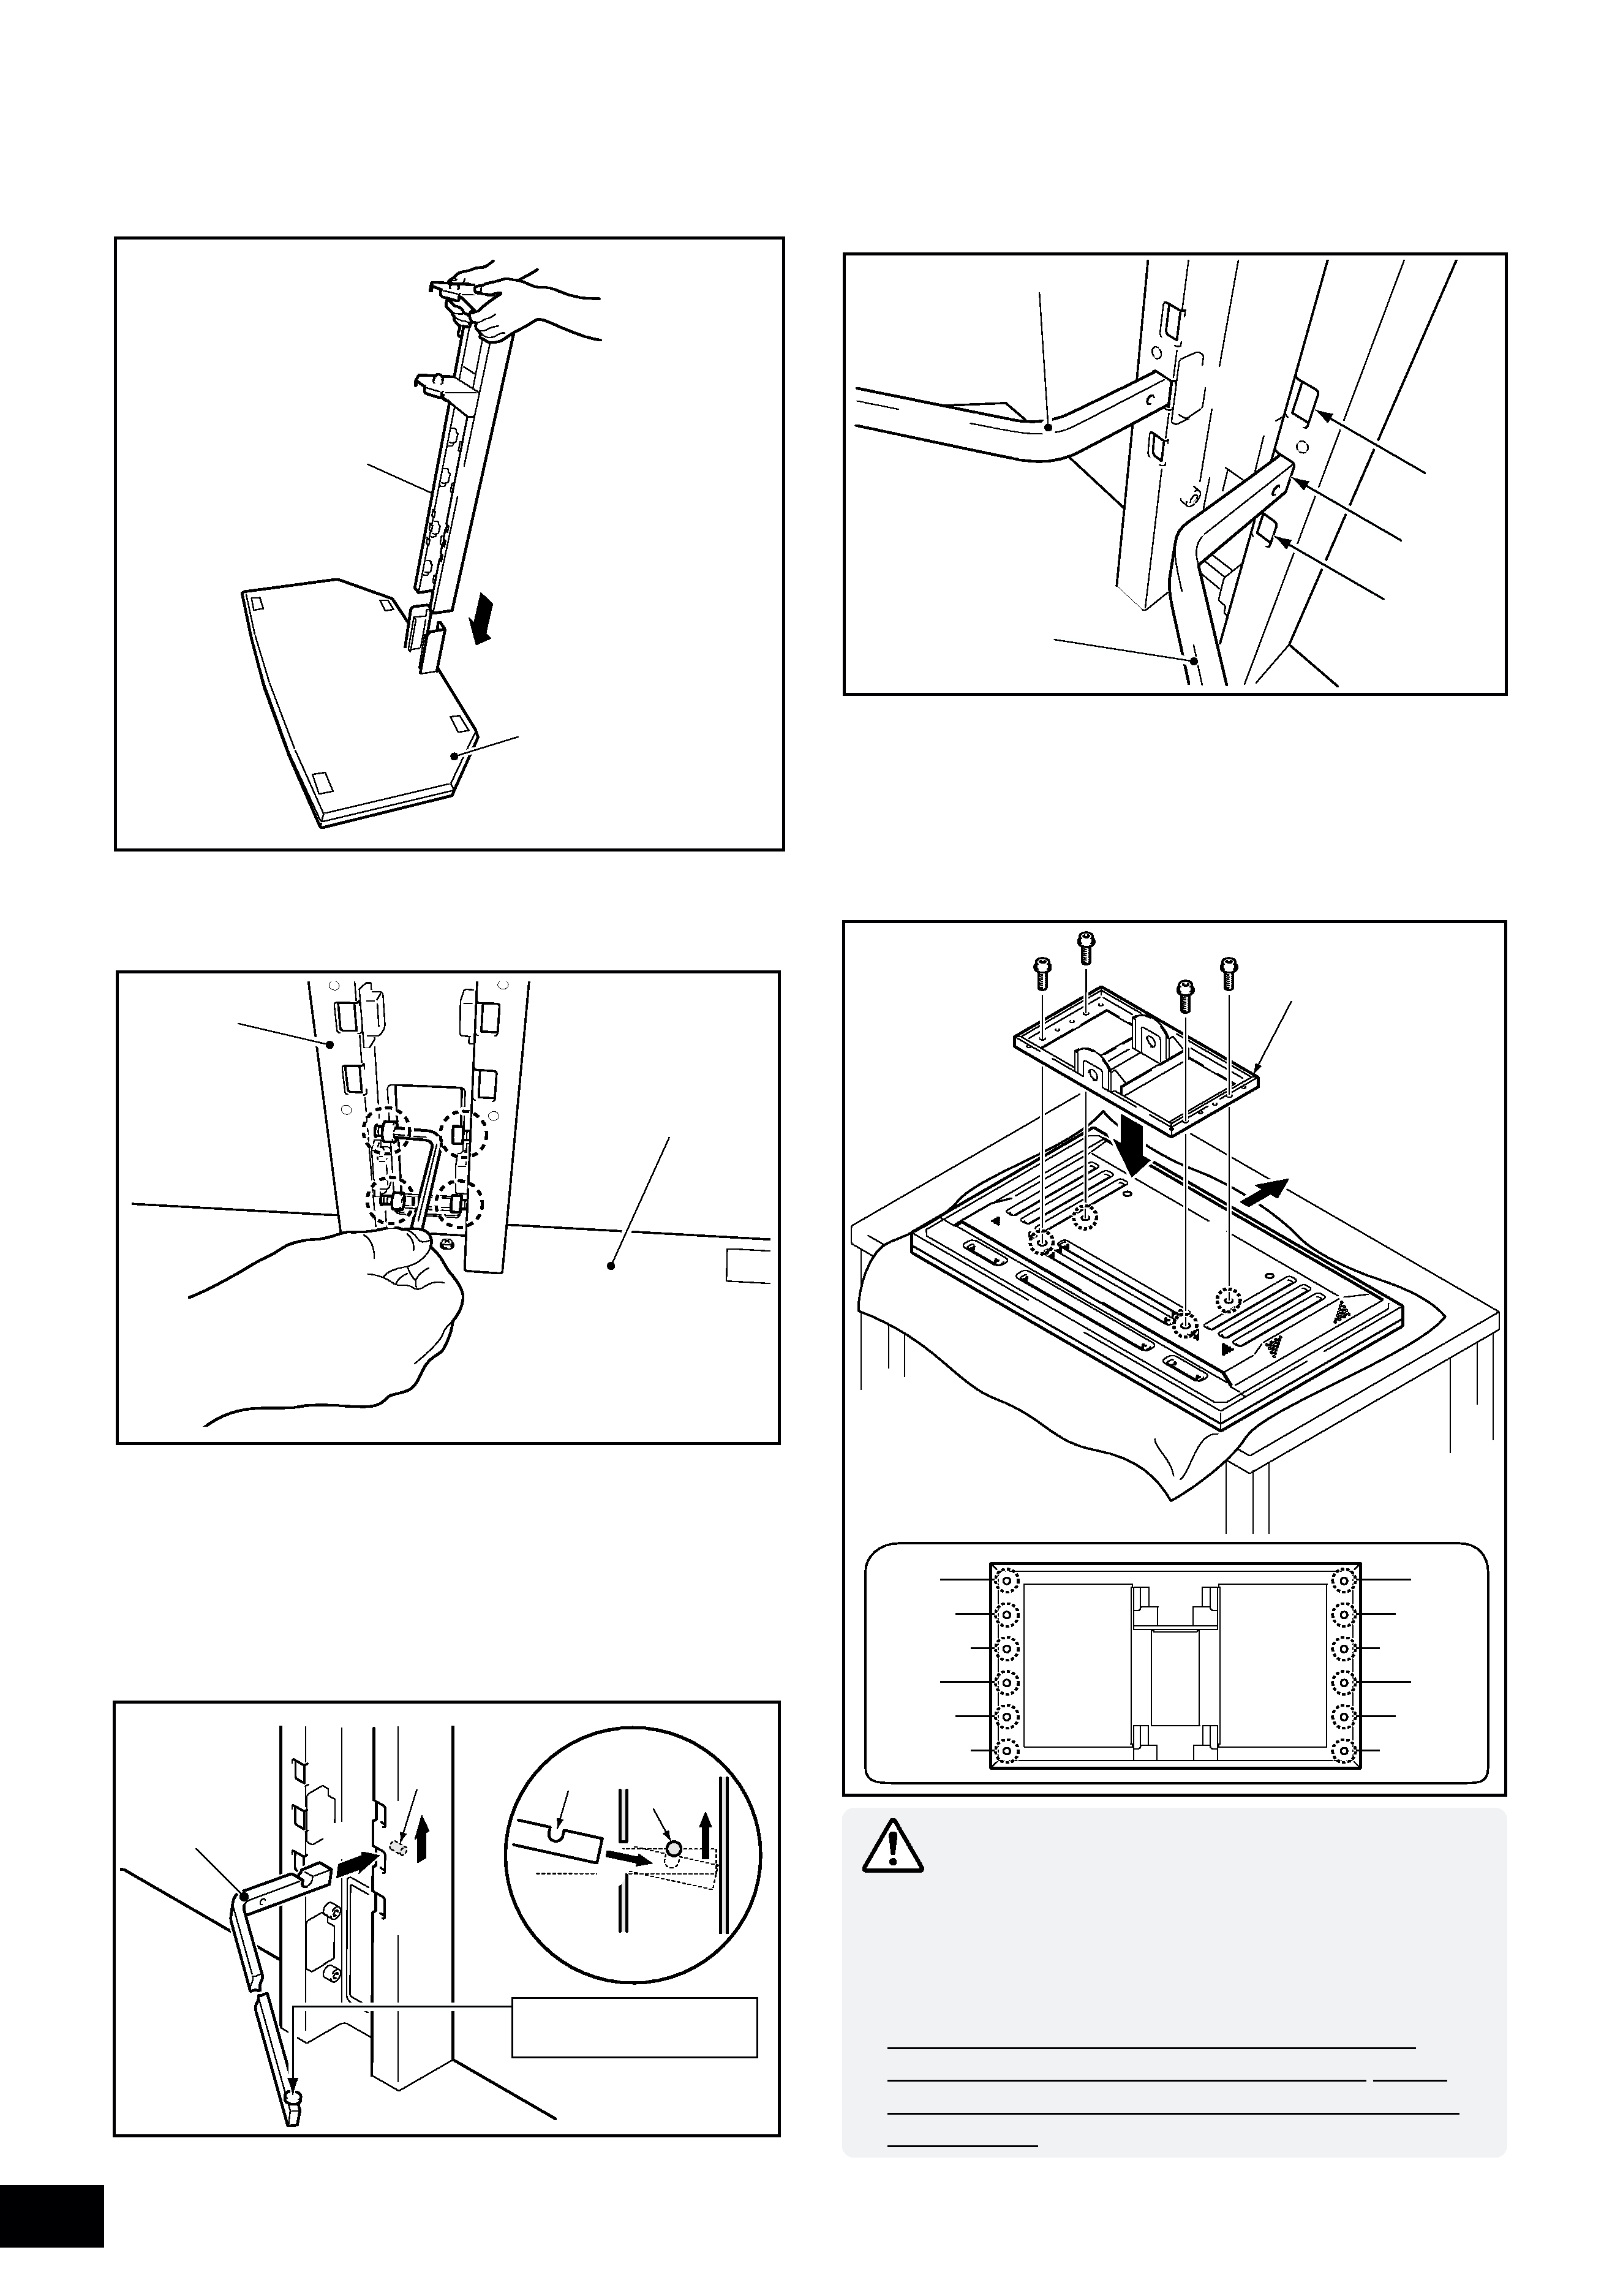
It is extremely dangerous to fail to install it properly,
because it might fall over or another accident might
occur. Always attach the brackets to the plasma
display after laying down the plasma display.
3.
Always choose an installation location that is strong
enough to bear the combined weight of the stand and
the display.
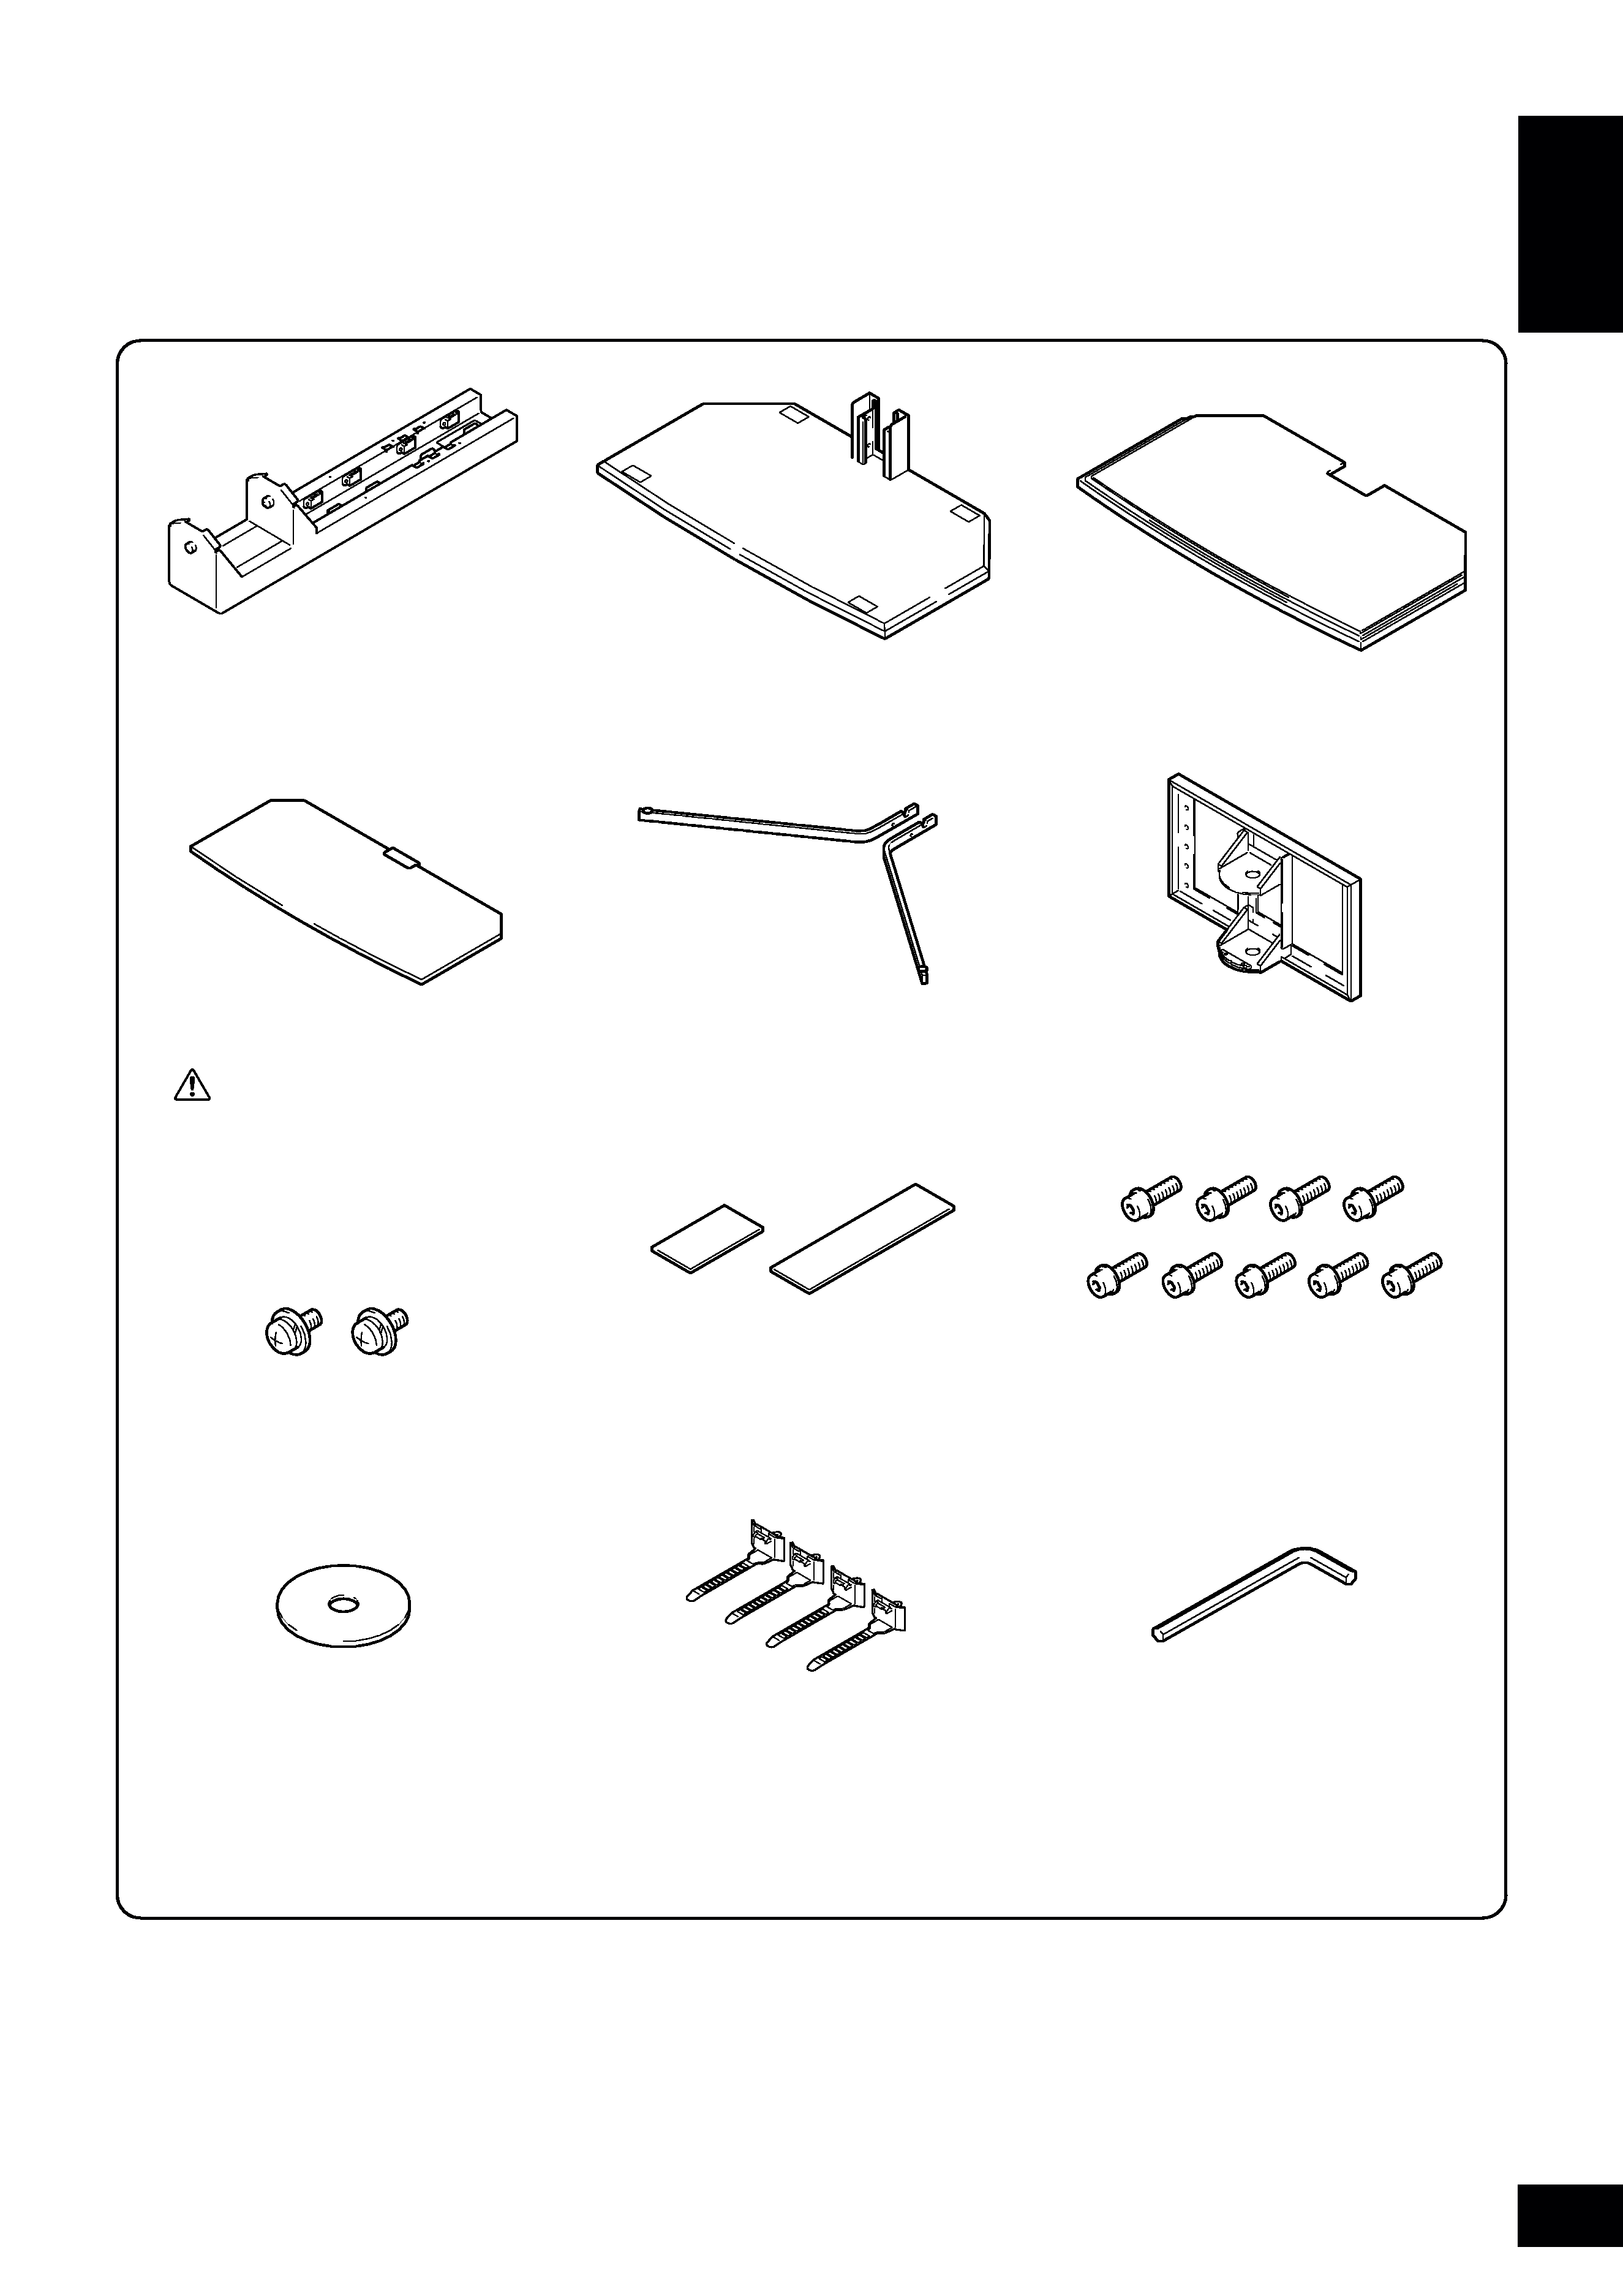
The product weights are listed on Page 8.
4.
Always be extremely careful to install it at a location
that is level, flat, stable, and can bear the load uni-
formly.
5.
Do not install it outdoors or near a hot spring bath or
the seashore.
6.
Do not install it where it is exposed to vibration or
impact.
7.
Do not install it on any plasma display other than the
designated plasma display, do not modify it, and do
not use it for any other purpose.
8.
Obey the installation instructions and firmly insert the
screws at all stipulated locations. If you do not, the
display may be damaged or fall over after it has been
installed.
9.
Always have at least two people install it on the display
so that the work is done safely.
10. Do not begin the installation work until after you have
disconnected the power to the display and to the
peripheral equipment, and have removed the power
plugs from the wall sockets.
11. Because of the characteristics of the glass, it breaks
easily if anything strikes its edge.
Do not let anything strike the edge of the glass.
And be extremely careful to prevent any small children
from striking the edge of the glass to protect them from
injury.
12. Be extremely careful to keep your hands out of the
oscillating part. If you do place your hand in this part,
you will injure it.
background image
English
3
7 Confirmation of constituent parts
Please check to make sure you have all the parts before beginning the installation.
* You will need a Philips (+) screwdriver.
Please obtain one.
¶ Column ........................... 1
¶ Shelf glass ...................... 1
¶ Glass stays
(left and right) ................. 1 each
¶ PDP attachment bracket ... 1
¶ Base ............................... 1
¶ Bolts M8........................ 9
¶ Screws (M4 x 8) ............. 2
¶ Cable covers (Attached to the
column by a magnet.)
(large , small) .................. 1each
¶ Hexagonal wrench ......... 1
¶ Ornamental base ............ 1
¶ Cable clamps .................. 4
¶ Operating instructions .... 1
Precaution
Because there is a danger of the
glass breaking accidentally, we
recommend that it be left in its
case until it is time to install it.
¶ Washer ........................... 1
background image
4
7 Installation method
1
Remove the cable covers and insert the col-
umn into the base.
2
Anchor the column with the bolt M8 (4 loca-
tions).
3
Attach the glass stays (left, right) to the col-
umn.
1 Hold the glass stays slightly downward as you insert
them into the holes.
2 Push the end of each glass stay downwards and fix
it in place by inserting the pin in the notch.
4
Attach the PDP attachment bracket to the
plasma display with the bolt M8. (4 locations)
¶ The height can be adjusted in three stages: high,
medium, and low.
The standard installation location is the medium
position hole.
Insert
Base
Column
Column
Base
Glass stay (left)
Top side of
plasma display
¶ Be sure to spread a sheet or similar protective material
to prevent scratches or damage to the display.
¶ Be sure to do this attachment with the plasma display
on a table or other flat surface.
¶ Be sure to use the middle and lower level screw
attachment positions on the plasma display. Do not
perform the attachment by combining the upper and
middle levels.
PDP attachment bracket
Glass stay (right)
¶ The height can be adjusted in three stages: high,
medium, and low.
The standard installation location is the medium
position hole.
2
1
2
1
Notch
Pin
Pin
High
Medium
Low
High
Medium
Low
High
Medium
Low
High
Medium
Low
High
Medium
Low
Locations of the attachment
holes on the PDP attachment
bracket
Grass stay
The side with the rubber
foot is the top side.
Precaution
background image
English
5
5 Attach the plasma display to the column.
Attach the washer and bolt M8 to the shaft of
the column.
Attach it by
aligning it with
shaft of the
column.
¶ Be sure to have two or more people perform the
attachment.
¶ Be extremely careful not to jam your figures while
doing this task.
¶ Be sure to attach the washer and bolt M8 to do this
step for safety.
Washer
Precaution
6
7 Pass the cable through the columns.
[Anchoring the system cables]
House the cables inside the column as shown below.
¶ Be extremely careful that the cable is not stretched and
that it is not partly jammed in the floor stand when the
plasma display is moved to the left or right (max. 30°).
[Passing the power cord (plasma display, media
receiver) through the hole]
Pass the cables through the hole in the column as shown
below.
[Attaching the cable clamp]
The extra cables can be bundled and anchored with the
cable clamp as shown below.
Cable clamp
Use the holes on the back of the base (4 holes) according to
circumstances.
Precaution
Precaution

Reviews

There are no reviews of this manual yet.