PIONEER AVM-P9000R/UC Owner's Manual

Cover page of PIONEER AVM-P9000R/UC Owner's Manual

Owner's Manual for PIONEER AVM-P9000R/UC, downloadable as a PDF file.

We also have service manual to this model.

Manual details

  • Immediate download after payment.
  • Delivered as a PDF file.
  • The manual has 104 pages
  • File size: 13.19 MB
  • Available language versions: French, English
  • Different language versions may vary sligthly in file size and page count.

We guarantee that...

  • our manuals are complete,
  • our manuals are checked with antivirus,
  • We'll issue refund if the manual is damaged, incomplete or unreadable (our refund policy)

Sample pages

Thumbnail of page 1Thumbnail of page 2Thumbnail of page 3Thumbnail of page 4
Thumbnail of page 5Thumbnail of page 6Thumbnail of page 7Thumbnail of page 8
Thumbnail of page 9
background image
Before
Using
This
Product
Multi-Channel AV Master Unit
Owner's Manual
AVM-P9000R
This product conforms to CEMA cord colors.
ENGLISH
background image
Before
Using
This
Product
Multi-Channel AV Master Unit
Owner's Manual
AVM-P9000R
This product conforms to CEMA cord colors.
ENGLISH
background image
1
Contents
Dear Customer ........................................................ 3
Before Using This Product .................. 4
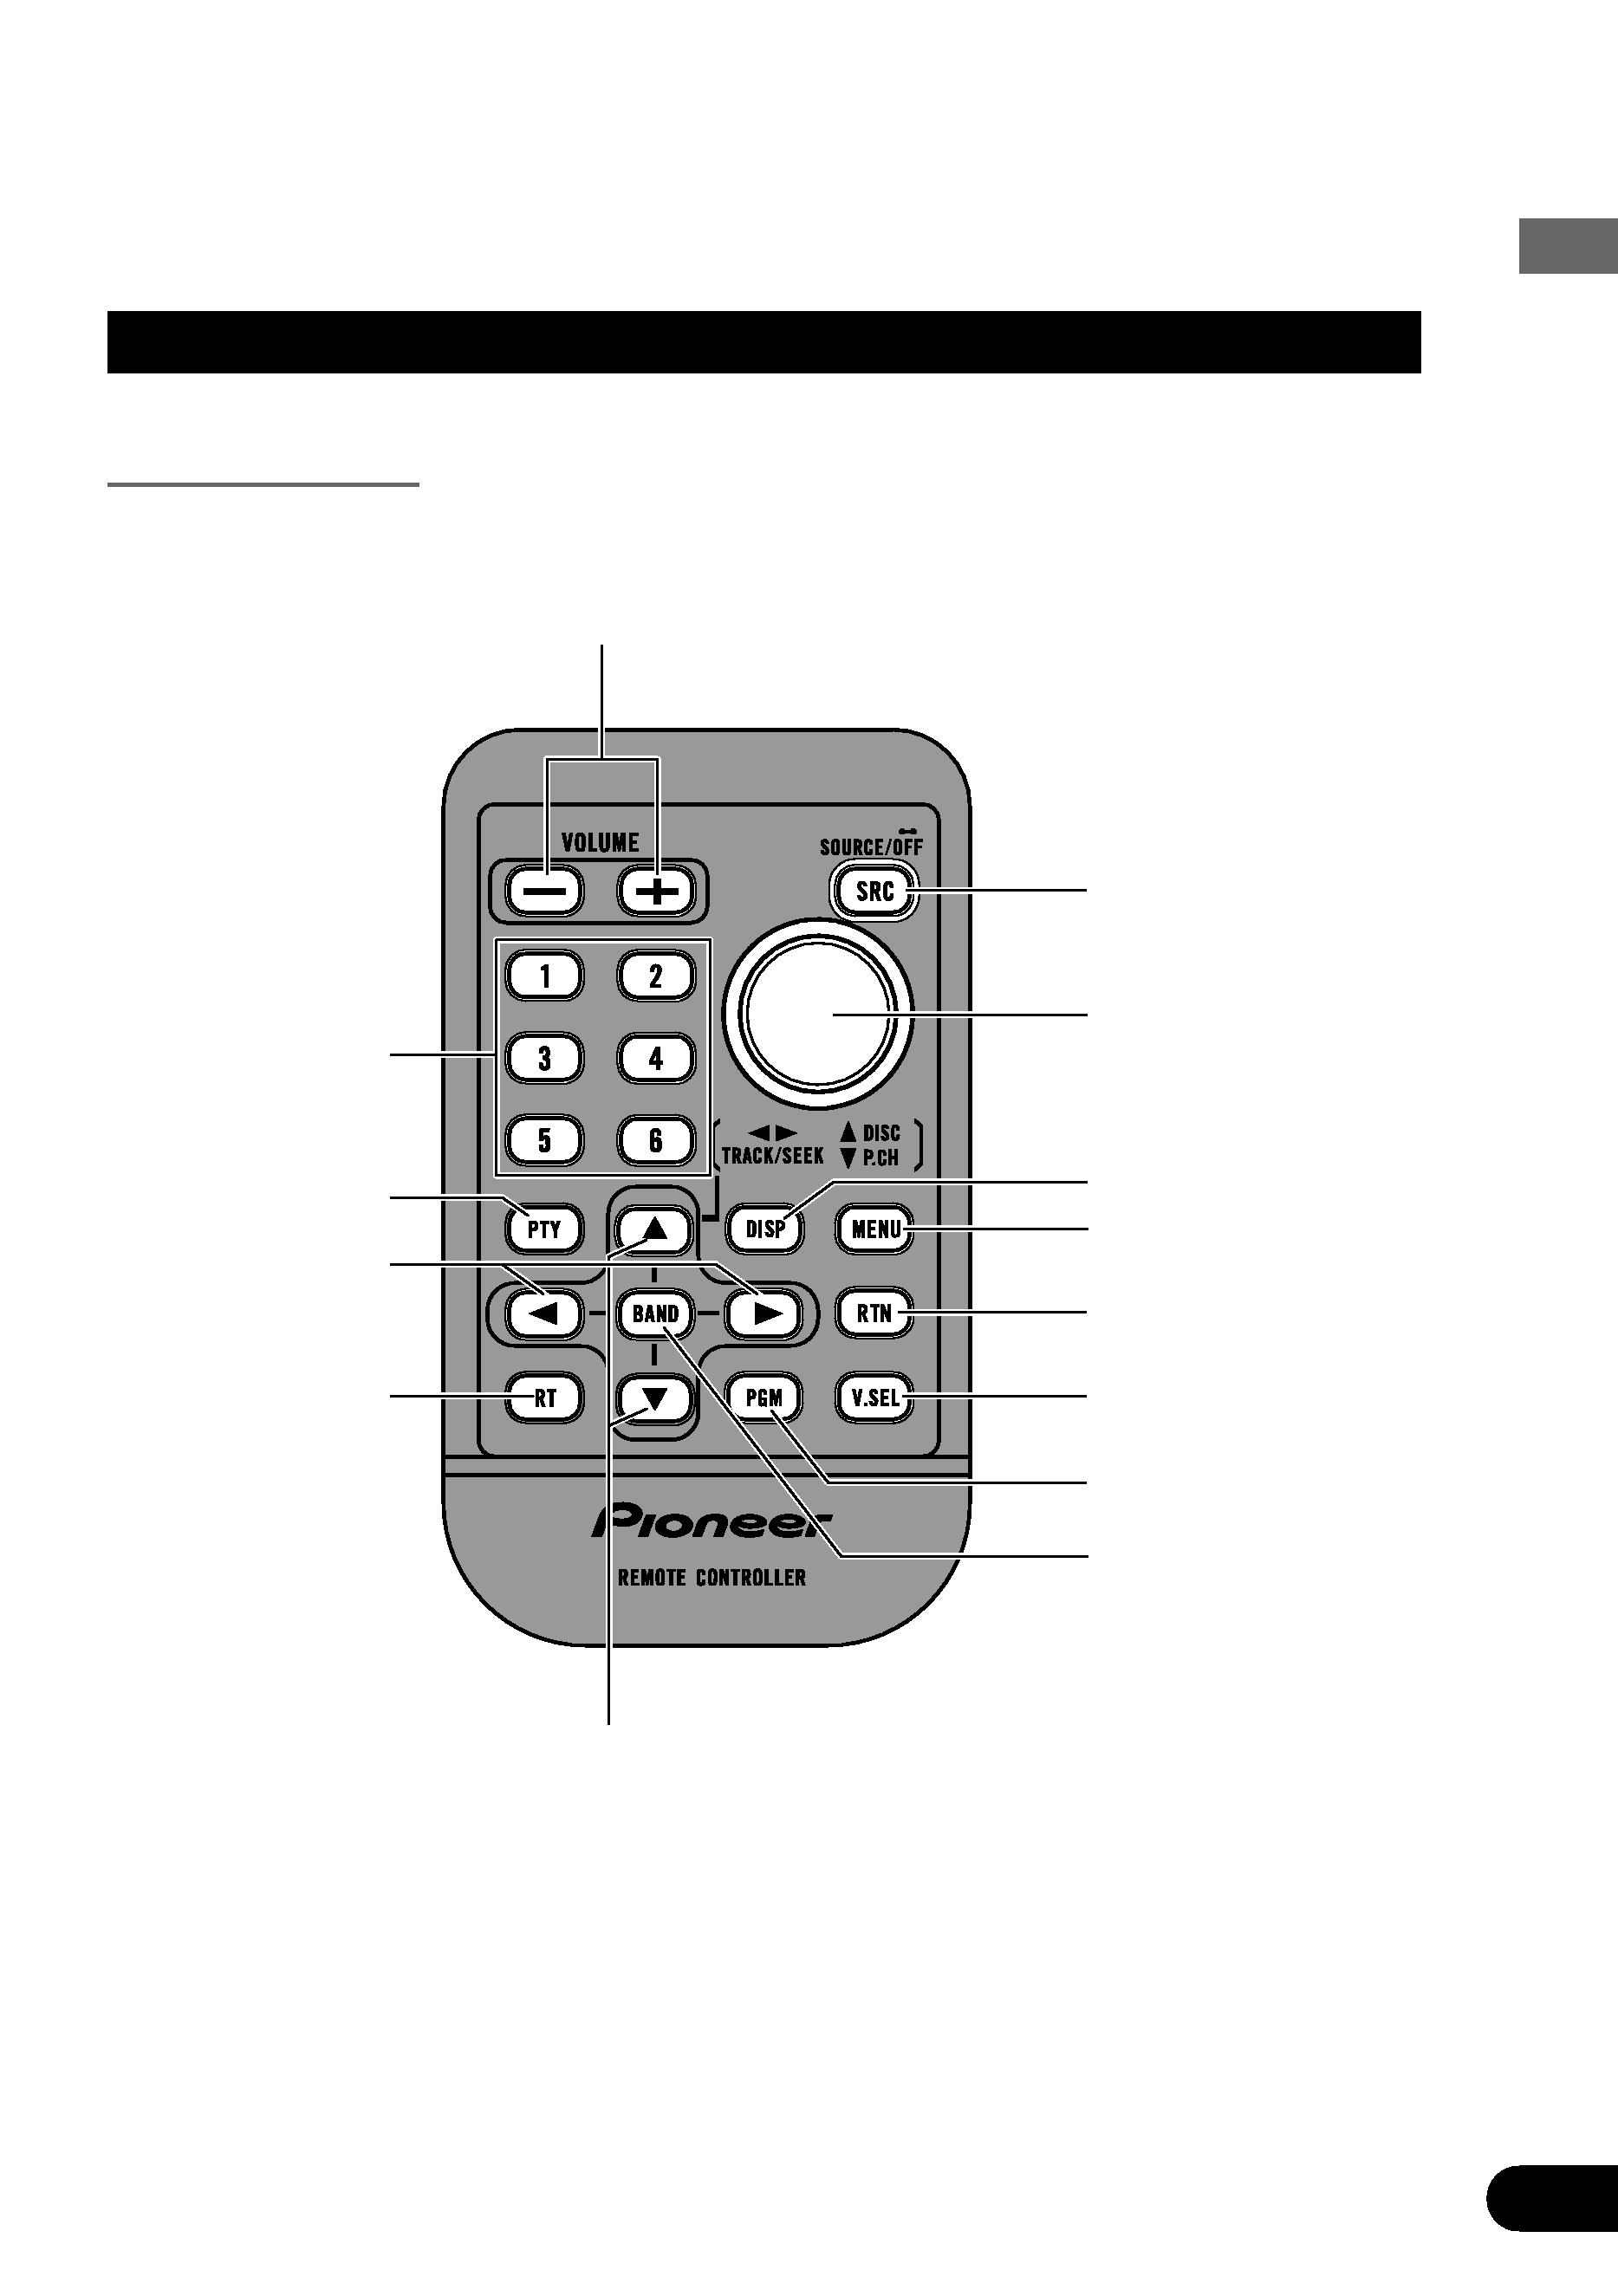
Key Finder ................................................................ 4
About This Product .................................................. 5
· Video System of a Connected
Component
· Output Setting of the DVD Player
About This Manual .................................................. 6
To Ensure Safe Driving ............................................ 6
· When Using a Display connected to
Rear Video Output
Important ................................................................ 6
Resetting the Microprocessor ................................ 7
Precaution................................................................ 7
When using the 50-Disc Type Multi-CD Player ...... 7
Remote Control and Care ........................................ 8
· Battery
Operation for Each Source Unit .......... 9
To Listen to Music .................................................. 9
· When connecting a Multi-DVD player
Virtual Theater Quick Tour ................ 11
Menu Structure...................................................... 12
Information Screen ................................................ 13
· Switching the Information Screen
Using the Screen Pictures
(Selecting the NAVI, VTR etc.) .... 15
Selecting the Mobile Navigation Picture .............. 15
Selecting the Video Source .................................. 15
· Switching the Video ON/OFF Mode
· Selecting the Video Source
Selecting the BGTV, BGVTR .................................. 16
Selecting the Picture to Rear Display.................... 17
Adjusting the Picture ............................................ 18
Built-In Tuner ........................................ 19
Basics .................................................................... 19
Operation at the Function Menu Screen .............. 20
· Accessing the Tuner Function Menu
Operating Each Function........................................ 21
· Best Stations Memory (BSM)
· Local Seek Tuning
· TA Function
· Seek Select
· PGM button
Display the Flip-Down Plate .................................. 23
Recalling Preset Stations by
Preset Frequency List .................................... 23
Using the RDS Functions .................... 24
PTY Function .......................................................... 24
· Searching the PTY
· PTY Alarm
· Canceling Announcements
TA Function............................................................ 27
· Activating/Deactivating the TA Function
Radio Text.............................................................. 29
· Radio Text display
· Storing Radio Text in memory
· Recalling preset Radio Text
Multi-DVD Player ................................ 31
Basics .................................................................... 31
Operation at the Function Menu Screen
(DVD, Video CD) ............................................ 32
· Accessing the DVD Function Menu (DVD,
Video CD)
Operating Each Function........................................ 33
· Repeat Play
· Pause
· PGM button
Operation at the Function Menu Screen (CD) ................ 35
· Accessing the DVD Function Menu (CD)
Operating Each Function........................................ 36
· Repeat Play
· Random Play
· Scan Play
· ITS Play
· Pause
· PGM button
Display the Flip-Down Plate .................................. 39
Disc Title Input for CD and Video CD .................. 39
Selecting Discs by Disc Title List .......................... 40
Multi-CD Player .................................... 41
Basics .................................................................... 41
Operation at the Function Menu Screen .............. 42
· Accessing the Multi-CD Function Menu
Operating Each Function........................................ 43
· Repeat Play
· Random Play
· Scan Play
· ITS Play
· Pause
· Compression and DBE
· PGM button
Display the Flip-Down Plate .................................. 46
Disc Title Input ...................................................... 47
Getting Text Displayed
(for CD TEXT compatible type) ...................... 48
Selecting Discs by Disc Title List .......................... 49
ITS (Instant Track Selection).................................. 49
· ITS Programming (ITS)
· Erase a Track Program
· Erase a Disc Program
background image
2
TV Tuner ................................................ 51
Basics .................................................................... 51
Operation at the Function Menu Screen .............. 52
· Accessing the TV Tuner Function Menu
CD Player .............................................. 53
Basics .................................................................... 53
Operation at the Function Menu Screen .............. 54
· Accessing the CD Function Menu
MD Player .............................................. 55
Basics .................................................................... 55
Operation at the Function Menu Screen .............. 56
· Accessing the MD Function Menu
Adjusting Audio (Basic) ...................... 57
Accessing the Audio Menu .................................. 57
Proper Setting for the In-car Acoustic
Characteristics .............................................. 58
Cabin Equalizer ...................................................... 58
· Operation at the Audio Setting Menu
Position Selector.................................................... 59
Balance Adjustment .............................................. 59
Adjustments for Speaker ...................................... 60
· Operation at the Speaker Setting Menu
Equalizer Curve ...................................................... 62
Source Level Adjustment (SLA)................................ 63
Sound Field Control (SFC) ...................................... 64
Dynamic Range Control ........................................ 65
Direct Control ON/OFF .......................................... 65
Loudness Adjustment ............................................ 66
Fine Adjusting Audio (Expert) ............ 67
Before Getting Started .......................................... 67
Adjusting for the Speakers In Use ........................ 67
· Accessing the Speaker Setting Menu
· Adjusting the Speakers' Output Levels using a
Test Tone
· Selecting a Crossover Frequency
· Correcting the Subwoofer's Phase
Adjusting the Cabin Equalizer (Expert) .................. 70
· Accessing the Expert Setting Menu
· Operation at the Expert Setting Menu
· Adjusting 3-Band Parametric Equalizer
· Adjusting the Speakers' Output Level
· Adjusting the Time Alignment
· Storing the Adjusted Cabin EQ into Memory
· Reset Adjusted Cabin EQ
Adjusting the Equalizer Curves.............................. 75
Changing the Initial Settings ............ 77
Accessing the Initial Settings Menu .................... 77
Correcting Distorted Sound .................................. 78
Setting the Time .................................................... 78
Adjusting the Display Position .............................. 79
Changing the Pattern of Plate .............................. 79
Other Functions .................................... 81
Switching the Center Screen and
Time Display in the Center Room.................. 81
Switching the Color of
the Spectrum Analyzer .................................. 81
Listening Sounds or Viewing Images from
Additional Units ............................................ 82
· Accessing the Set Up Menu
· Switching the AUX Source
· Switching the Video Mode
· Switching the Speaker Input Mode
AUX Title Input ...................................................... 84
Muting Function .................................................... 84
· Mobile Navigation Unit Muting
· Cellular Telephone Muting
Troubleshooting .................................... 85
Terms ...................................................... 88
Installation ............................................ 89
Specifications .................................... 101
background image
3
Selecting fine audio equipment such as the unit you've just purchased is only the start of your
musical enjoyment. Now it's time to consider how you can maximize the fun and excitement your
equipment offers. This manufacturer and the Electronic Industries Association's Consumer
Electronics Group want you to get the most out of your equipment by playing it at a safe level.
One that lets the sound come through loud and clear without annoying blaring or distortion--and,
most importantly, without affecting your sensitive hearing.
Sound can be deceiving. Over time your hearing "comfort level" adapts to higher volumes of
sound. So what sounds "normal" can actually be loud and harmful to your hearing. Guard against
this by setting your equipment at a safe level BEFORE your hearing adapts.
To establish a safe level:
· Start your volume control at a low setting.
· Slowly increase the sound until you can hear it comfortably and clearly, and without distor-
tion.
Once you have established a comfortable sound level:
· Set the dial and leave it there.
Taking a minute to do this now will help to prevent hearing damage or loss in the future. After all,
we want you listening for a lifetime.
We Want You Listening For A Lifetime
Used wisely, your new sound equipment will provide a lifetime of fun and enjoyment. Since
hearing damage from loud noise is often undetectable until it is too late, this manufacturer and the
Electronic Industries Association's Consumer Electronics Group recommend you avoid pro-
longed exposure to excessive noise. This list of sound levels is included for your protection.
Decibel
Level
Example
30
Quiet library, soft whispers
40
Living room, refrigerator, bedroom away from traffic
50
Light traffic, normal conversation, quiet office
60
Air conditioner at 20 feet, sewing machine
70
Vacuum cleaner, hair dryer, noisy restaurant
80
Average city traffic, garbage disposals, alarm clock at two feet.
THE FOLLOWING NOISES CAN BE DANGEROUS UNDER CONSTANT EXPOSURE
90
Subway, motorcycle, truck traffic, lawn mower
100
Garbage truck, chain saw, pneumatic drill
120
Rock band concert in front of speakers, thunderclap
140
Gunshot blast, jet plane
180
Rocket launching pad
Information courtesy of the Deafness Research Foundation.
background image
Before
Using
This
Product
4
Before Using This Product
Key Finder
Remote Controller
Buttons 1­6
PTY button
2/3 button
RT button
VOLUME
5/ button
SOURCE button
Joystick
DISPLAY button
MENU button
RETURN button
V.SEL button
PGM button
BAND button

Reviews

There are no reviews of this manual yet.