PIONEER AVD-W6010/UC Owner's Manual

Cover page of PIONEER AVD-W6010/UC Owner's Manual

Owner's Manual for PIONEER AVD-W6010/UC, downloadable as a PDF file.

We also have service manual to this model.

Manual details

  • Immediate download after payment.
  • Delivered as a PDF file.
  • The manual has 72 pages
  • File size: 0.94 MB
  • Available language versions: French, English
  • Different language versions may vary sligthly in file size and page count.

We guarantee that...

  • our manuals are complete,
  • our manuals are checked with antivirus,
  • We'll issue refund if the manual is damaged, incomplete or unreadable (our refund policy)

Sample pages

Thumbnail of page 1Thumbnail of page 2Thumbnail of page 3Thumbnail of page 4
Thumbnail of page 5Thumbnail of page 6Thumbnail of page 7Thumbnail of page 8
Thumbnail of page 9
background image
ENGLISH
FRANÇAIS
DEUTSCH
FRANÇAIS
ITALIANO
NEDERLANDS
Color LCD Display
Écran à Cristaux Liquides Couleur
This product conforms to CEMA cord colors.
Le code couleur des câbles utilisé pour ce produit est conforme à CEMA
Owner's Manual
AVD-W6010
Mode d'emploi
background image
ENGLISH
FRANÇAIS
DEUTSCH
FRANÇAIS
ITALIANO
NEDERLANDS
Color LCD Display
Écran à Cristaux Liquides Couleur
This product conforms to CEMA cord colors.
Le code couleur des câbles utilisé pour ce produit est conforme à CEMA
Owner's Manual
AVD-W6010
Mode d'emploi
background image
1
Contents
Contents ...................................................... 1
Dear Customer ............................................ 2
IMPORTANT SAFEGUARDS .................... 3
Please Read All of These Instructions
Regarding Your Display and Retain
them for Future Reference ........................ 3
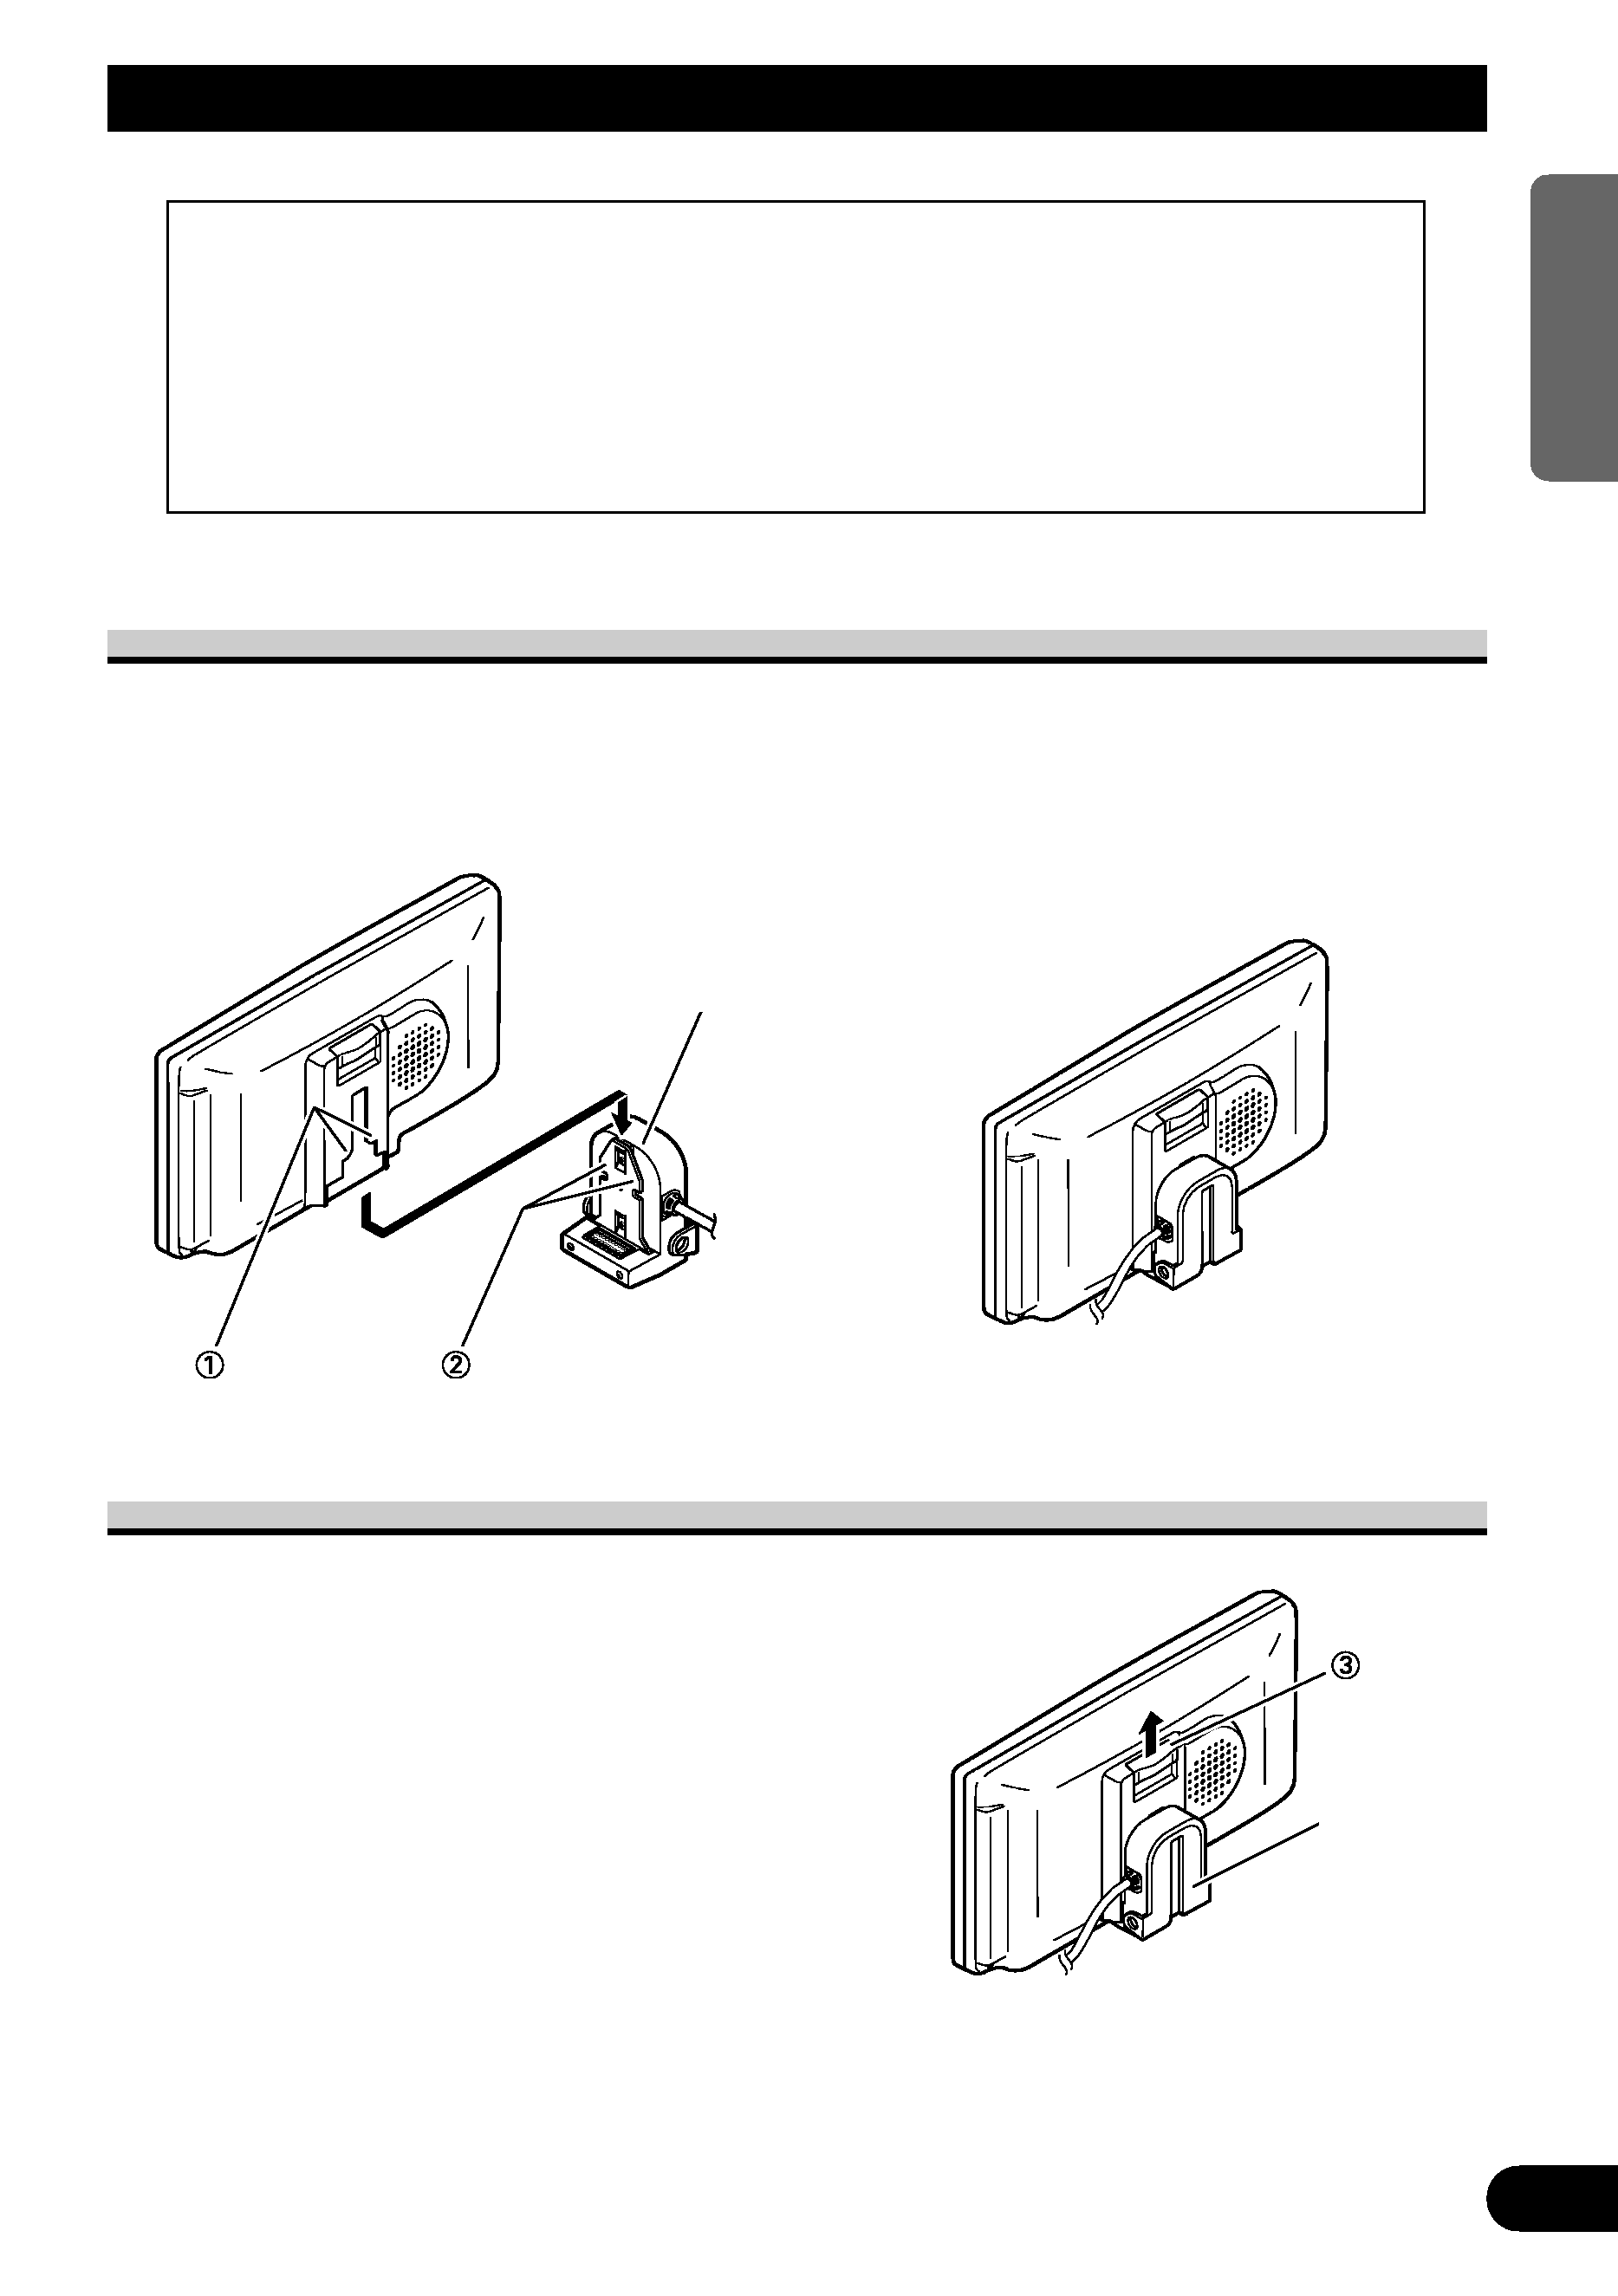
Fitting and Removing the Display .......... 4
To fit the display .............................................. 4
To remove the display ...................................... 4
IMPORTANT INFORMATION .................... 5
About This Product .......................................... 5
Precaution .......................................................... 5
Important .......................................................... 5
After-sales Service for Pioneer Products .......... 5
Before Using This Product ...................... 6
To Avoid Battery Exhaustion ............................ 6
To Protect the LCD Screen of the Display ........ 6
When Viewing is Difficult, use [BRIGHT] and
[DIMMER] to Adjust ................................ 6
To Ensure Safe Driving .................................... 7
Resetting the Microprocessor ............................ 7
Key Finder .................................................... 8
Component Parts and Features .......................... 8
Basic Operation ........................................ 9
Turn On Power .................................................. 9
Volume Adjustment .......................................... 9
Selecting the Source ........................................ 10
-
About the Corner Icons
-
About the RCA Video and Audio Outputs
of this Unit
Selecting the Audio, Video, and External
Output........................................................ 11
-
Selecting the Video for the Display
Independently
-
Selecting the Audio for Built-in Speaker
Independently
Changing the Wide Screen Mode .................... 13
-
Wide Modes Available
Operating the Setup Menu .................... 15
Entering the Setup Menu ................................ 15
Picture Adjust .................................................. 16
-
BRIGHT/CONTRAST/COLOR/HUE
-
DIMMER
Input Setting [VCR1/VCR2] .......................... 18
Display Setting ................................................ 19
-
Setting the Mixing of the Guidance Voice
[MIXING]
Forced VCR1 Input Setting ............................ 20
Using the Display Correctly .................. 21
Handling the Display ...................................... 21
About the Liquid Crystal Display (LCD)
Screen ...................................................... 22
Keeping the Display in Good Condition ........ 22
About the Small Fluorescent Tube .................. 22
Connecting the System .......................... 23
Names and Functions of Connection
Terminals .................................................. 25
Connecting the Power Cable .......................... 26
Connection Diagram (VCR input) .................. 27
Connection Diagram (RGB input) .................. 28
Connecting the RCA Audio and
Video Output ............................................ 29
Connecting "AUTOMATIC INPUT
SWITCHING" Lead ................................ 30
Installation ................................................ 31
Before Installing and Fixing ............................ 32
Before Affixing the Adhesive Tape ................ 32
Installing the Hide-away Unit ........................ 33
-
Installation Precautions
-
Hide-away Unit Installation
Specifications .......................................... 34
background image
2
ENGLISH
ESPA
Ñ
OL
DEUTSCH
FRAN
Ç
AIS
ITALIANO
NEDERLANDS
Selecting fine audio equipment such as the unit you've just purchased is only the start of your
musical enjoyment. Now it's time to consider how you can maximize the fun and excitement your
equipment offers. This manufacturer and the Electronic Industries Association's Consumer
Electronics Group want you to get the most out of your equipment by playing it at a safe level.
One that lets the sound come through loud and clear without annoying blaring or distortion--and,
most importantly, without affecting your sensitive hearing.
Sound can be deceiving. Over time your hearing "comfort level" adapts to higher volumes of
sound. So what sounds "normal" can actually be loud and harmful to your hearing. Guard against
this by setting your equipment at a safe level BEFORE your hearing adapts.
To establish a safe level:
· Start your volume control at a low setting.
· Slowly increase the sound until you can hear it comfortably and clearly, and without distor-
tion.
Once you have established a comfortable sound level:
· Set the dial and leave it there.
Taking a minute to do this now will help to prevent hearing damage or loss in the future. After all,
we want you listening for a lifetime.
We Want You Listening For A Lifetime
Used wisely, your new sound equipment will provide a lifetime of fun and enjoyment. Since
hearing damage from loud noise is often undetectable until it is too late, this manufacturer and the
Electronic Industries Association's Consumer Electronics Group recommend you avoid pro-
longed exposure to excessive noise. This list of sound levels is included for your protection.
Decibel
Level
Example
30
Quiet library, soft whispers
40
Living room, refrigerator, bedroom away from traffic
50
Light traffic, normal conversation, quiet office
60
Air conditioner at 20 feet, sewing machine
70
Vacuum cleaner, hair dryer, noisy restaurant
80
Average city traffic, garbage disposals, alarm clock at two feet.
THE FOLLOWING NOISES CAN BE DANGEROUS UNDER CONSTANT EXPOSURE
90
Subway, motorcycle, truck traffic, lawn mower
100
Garbage truck, chain saw, pneumatic drill
120
Rock band concert in front of speakers, thunderclap
140
Gunshot blast, jet plane
180
Rocket launching pad
Information courtesy of the Deafness Research Foundation.
background image
3
Please Read All of These Instructions Regarding Your Display
and Retain them for Future Reference
1. Read this manual fully and carefully before operating your display.
2. Keep this manual handy for future reference.
3. Pay close attention to all warnings in this manual and follow the instructions care-
fully.
4. Never allow others to use the system until they have read and understood the
operating instructions.
5. Do not install the display where it may (i) obstruct the driver's vision, (ii) impair
the performance of any of the vehicle's operating systems or safety features,
including airbags, or (iii) impair the driver's ability to safely operate the vehicle.
6. As with any accessory in your vehicle's interior, the display should not divert
your attention from the safe operation of your vehicle. If you experience difficul-
ty in operating the system or reading the display, please park safely before mak-
ing adjustments.
7. Do not attempt to install or service your display by yourself. Installation or ser-
vicing of the display by persons without training and experience in electronic
equipment and automotive accessories may be dangerous and could expose you
to the risk of electric shock or other hazards.
8. Please remember to wear your seat belt at all times while operating your vehicle.
If you are ever in an accident, your injuries can be considerably more severe if
your seat belt is not properly buckled.
9. Use of this product is subject to any local laws regarding placement or use.
PIONEER Corporation cannot accept any liability for any problems, damage or
loss incurred as a result of the product being used with an incorrect setting or in
violation of any local laws.
10. This function is designed for use with a back-up camera only. Users may connect
the VTR 1 input with "AUTOMATIC INPUT SWITCHING" only to such a
back-up camera. Users must not connect any other devices to the VTR 1 input
with "AUTOMATIC INPUT SWITCHING".
IMPORTANT SAFEGUARDS
background image
To fit the display
To remove the display
· Pull the lock release lever 3
upward and hold in that position,
then slide the display upward and
detach it from its base.
· To prevent theft of the display, remove
the display when leaving the vehicle.
2. Slide the display downward until it
clicks into place.
1. Fit part 1 of the display into the
grooves 2 on the left and right of
the base.
Precaution:
· To prevent failure, be sure to turn the ignition switch or system power OFF before fitting or
removing the display. Also take care not to grip the screen or buttons too firmly or to drop the
display.
· Do not let any water get on the terminals on the display or on the base and do not allow the ter-
minals to be shorted by a metal object or the like. This can cause system breakdown.
· Be careful not to touch terminals on the display or on the base. Doing so may cause connection
failures. If any terminals are stained, wipe them with a clean dry cloth.
4
ENGLISH
ESPA
Ñ
OL
DEUTSCH
FRAN
Ç
AIS
ITALIANO
NEDERLANDS
Fitting and Removing the Display
Base
Base

Reviews

There are no reviews of this manual yet.