KENWOOD KTC-V500P Owner's Manual

Cover page of KENWOOD KTC-V500P Owner's Manual

Owner's Manual for KENWOOD KTC-V500P, downloadable as a PDF file.

We also have service manual to this model.

Manual details

  • Immediate download after payment.
  • Delivered as a PDF file.
  • The manual has 12 pages
  • File size: 0.52 MB
  • Available language versions: Japanese, English, Chinese Traditional
  • Different language versions may vary sligthly in file size and page count.

We guarantee that...

  • our manuals are complete,
  • our manuals are checked with antivirus,
  • We'll issue refund if the manual is damaged, incomplete or unreadable (our refund policy)

Sample pages

Thumbnail of page 1Thumbnail of page 2Thumbnail of page 3Thumbnail of page 4
Thumbnail of page 5Thumbnail of page 6Thumbnail of page 7Thumbnail of page 8
Thumbnail of page 9
background image
KTC-V500P
TV TUNER
INSTRUCTION MANUAL
© PRINTED IN JAPAN B64-2142-10 (M) (DT)
background image
KTC-V500P
TV TUNER
INSTRUCTION MANUAL
© PRINTED IN JAPAN B64-2142-10 (M) (DT)
background image
Installation
2
Securing to audio board
Installation the TV Tuner Unit
Accessories
G
F
E
A
B
C
D
The use of any accessories except for those provided might result in damage to the unit.
Make sure only to use the accessories shipped with the unit, as shown above.
(Accessory F)
(Accessory G)
(Accessory E)
background image
3
Installing the Antenna Units
· Attach the antenna to the inner glass surface of the rear window using double-sided
tape. Carefully check the installation location as the tape can only be stuck on once.
· If the surface temperature of the glass of the rear window is low, warm it by turning
on the power of the rear defogger.
A cold window glass surface will weaken the adhesive strength of the double-sided
tape.
Also, if installation inside the cabin is performed on a day with high humidity or when
it is raining, the high humidity level will weaken the adhesive strength of the double-
sided tape.
· Do not install the antenna in a location where it may obstruct the field of view during
driving, such as on the windshield.
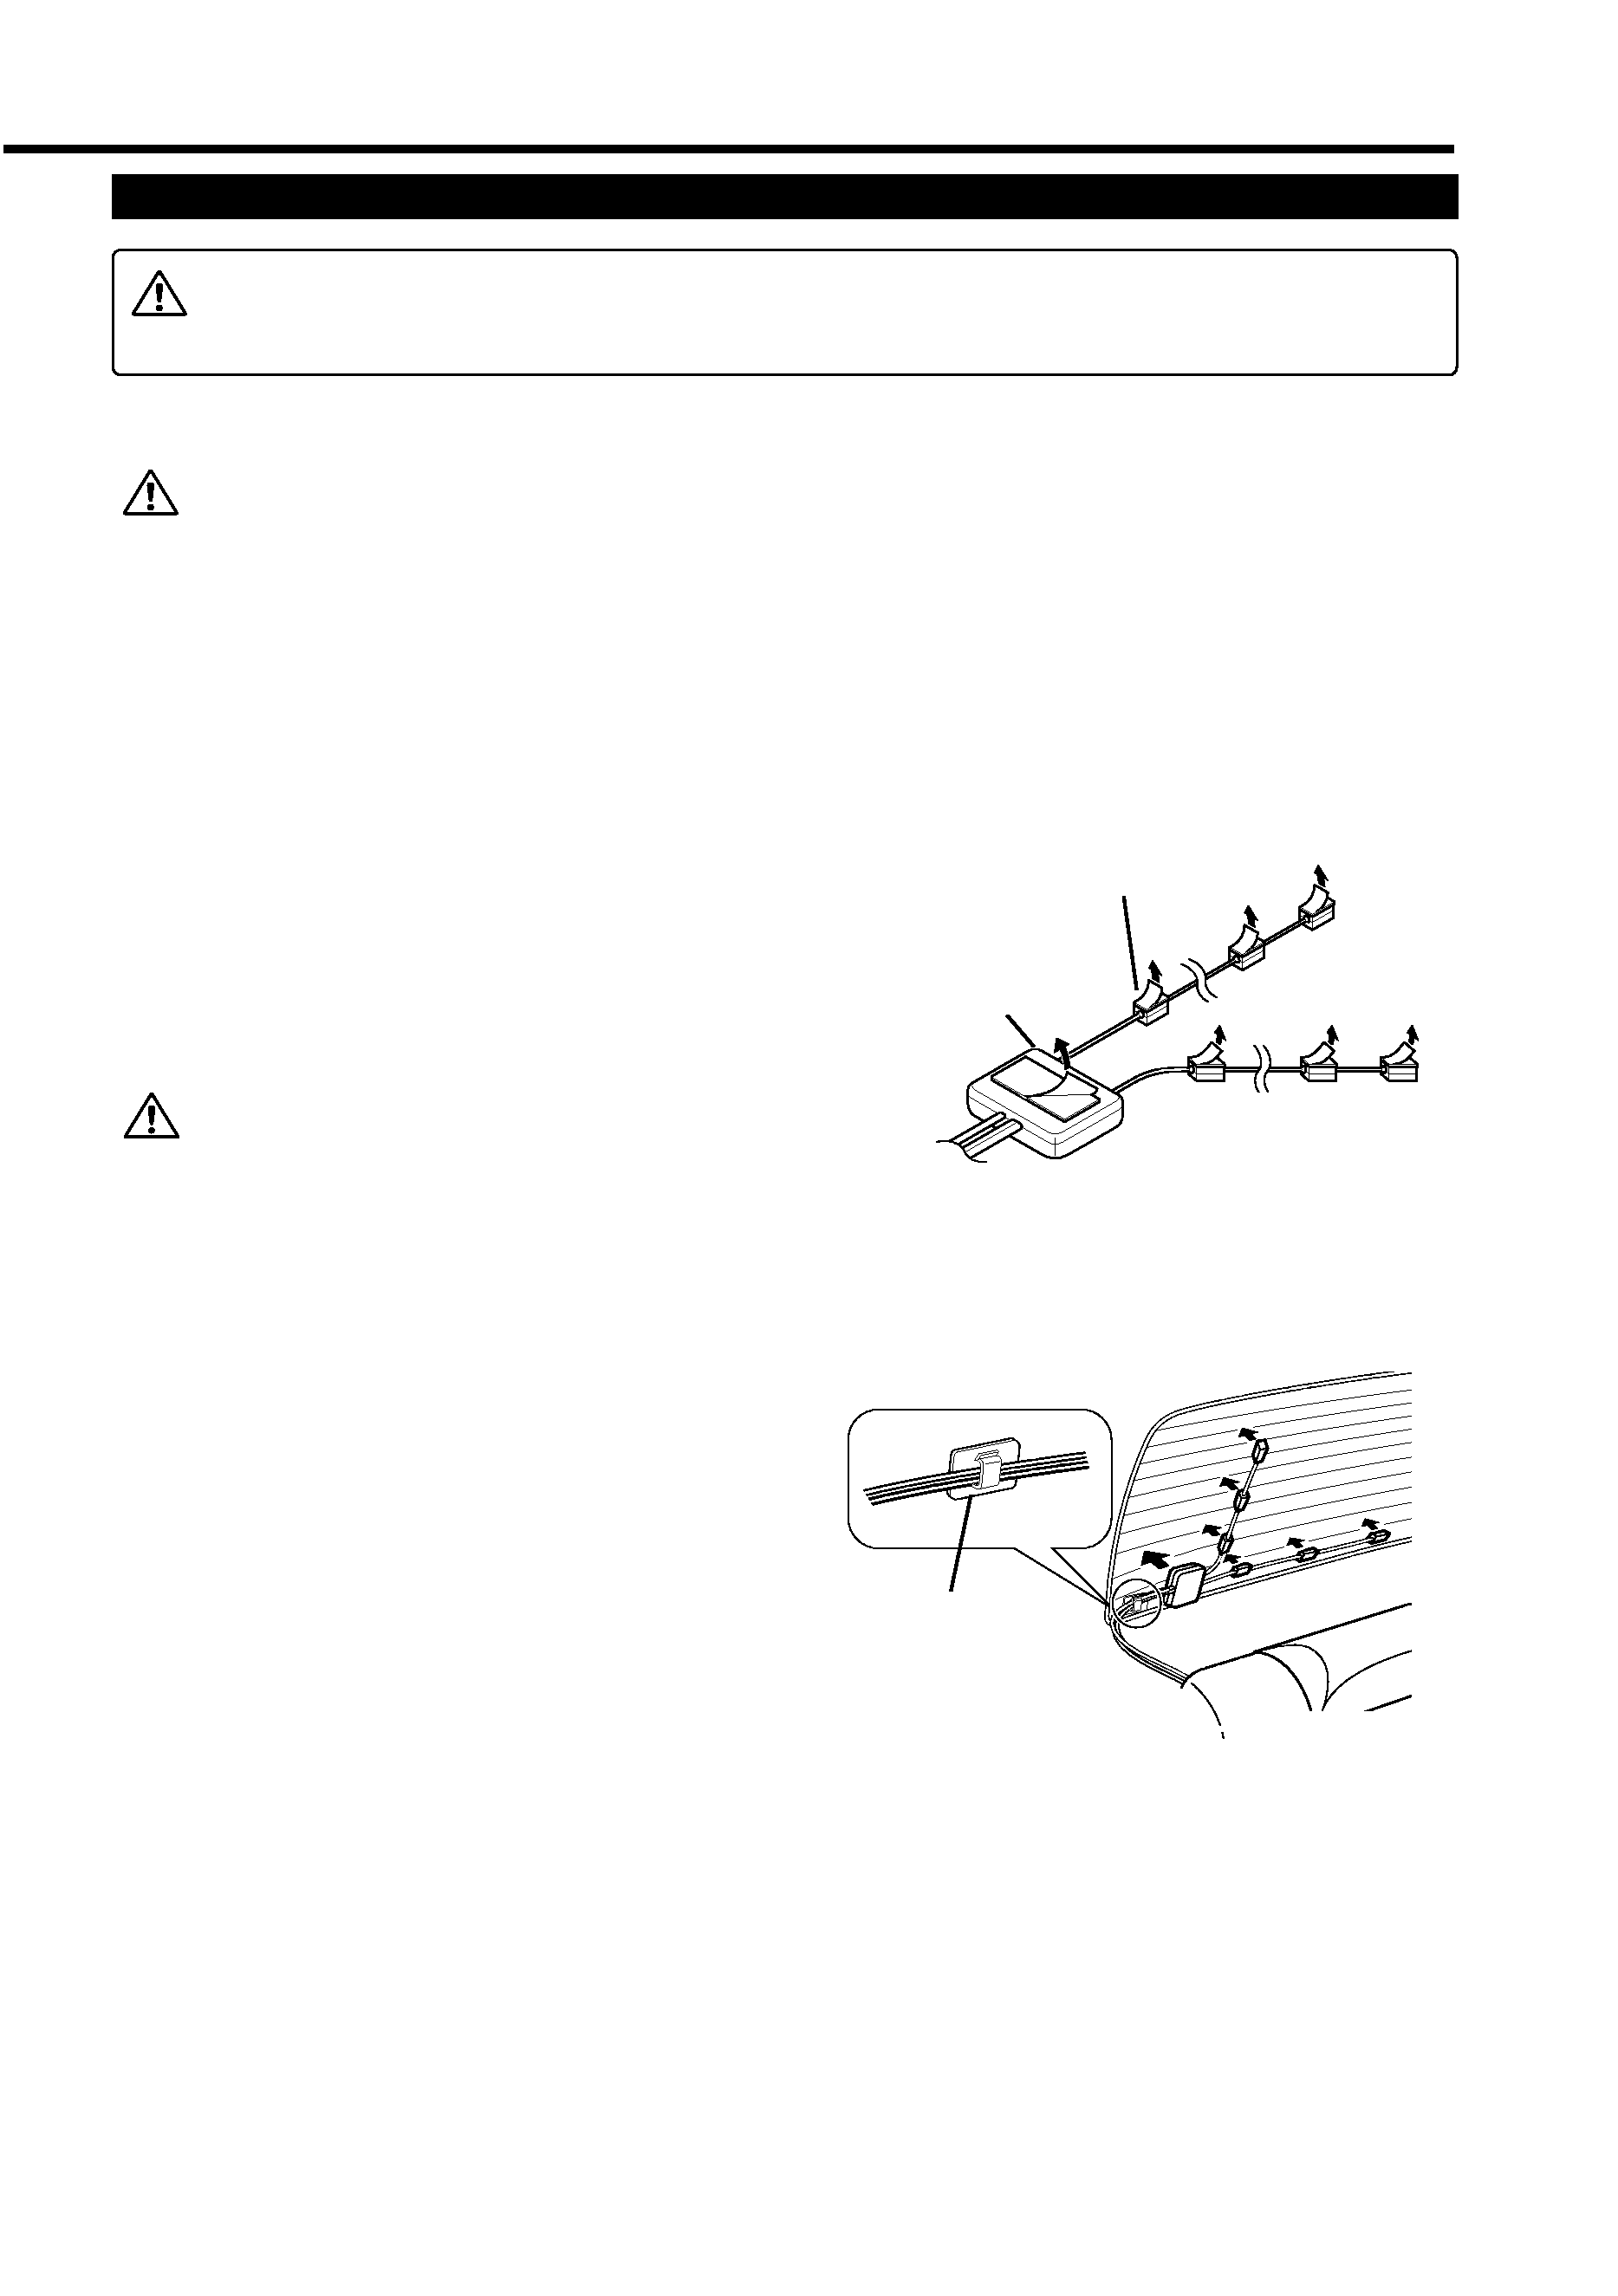
Check the location where the antenna is to be
attached.Clean off any grease or dirt from the
installation location using the supplied glass
cleaner (Accessory B), clean the area with water
and allow to dry.
Clean the glass thoroughly as failure to
clean the glass can not only weaken the
adhesive strength of the double-sided
tape, but may also cause it to come loose.
Remove the protective strips from the antenna
parts and the back of the antenna unit.
Attach the double-sided tape of the antenna
parts and the antenna unit to the rear windshield
glass. Attach the double-sided tape by firmly
pressing down from the top. Secure cables
using the supplied clampers.
After attaching the antenna with the double-
sided tape, allow it to sit undisturbed for 24
hours. Take care not to apply force to the
antenna or allow it to get wet during this time.
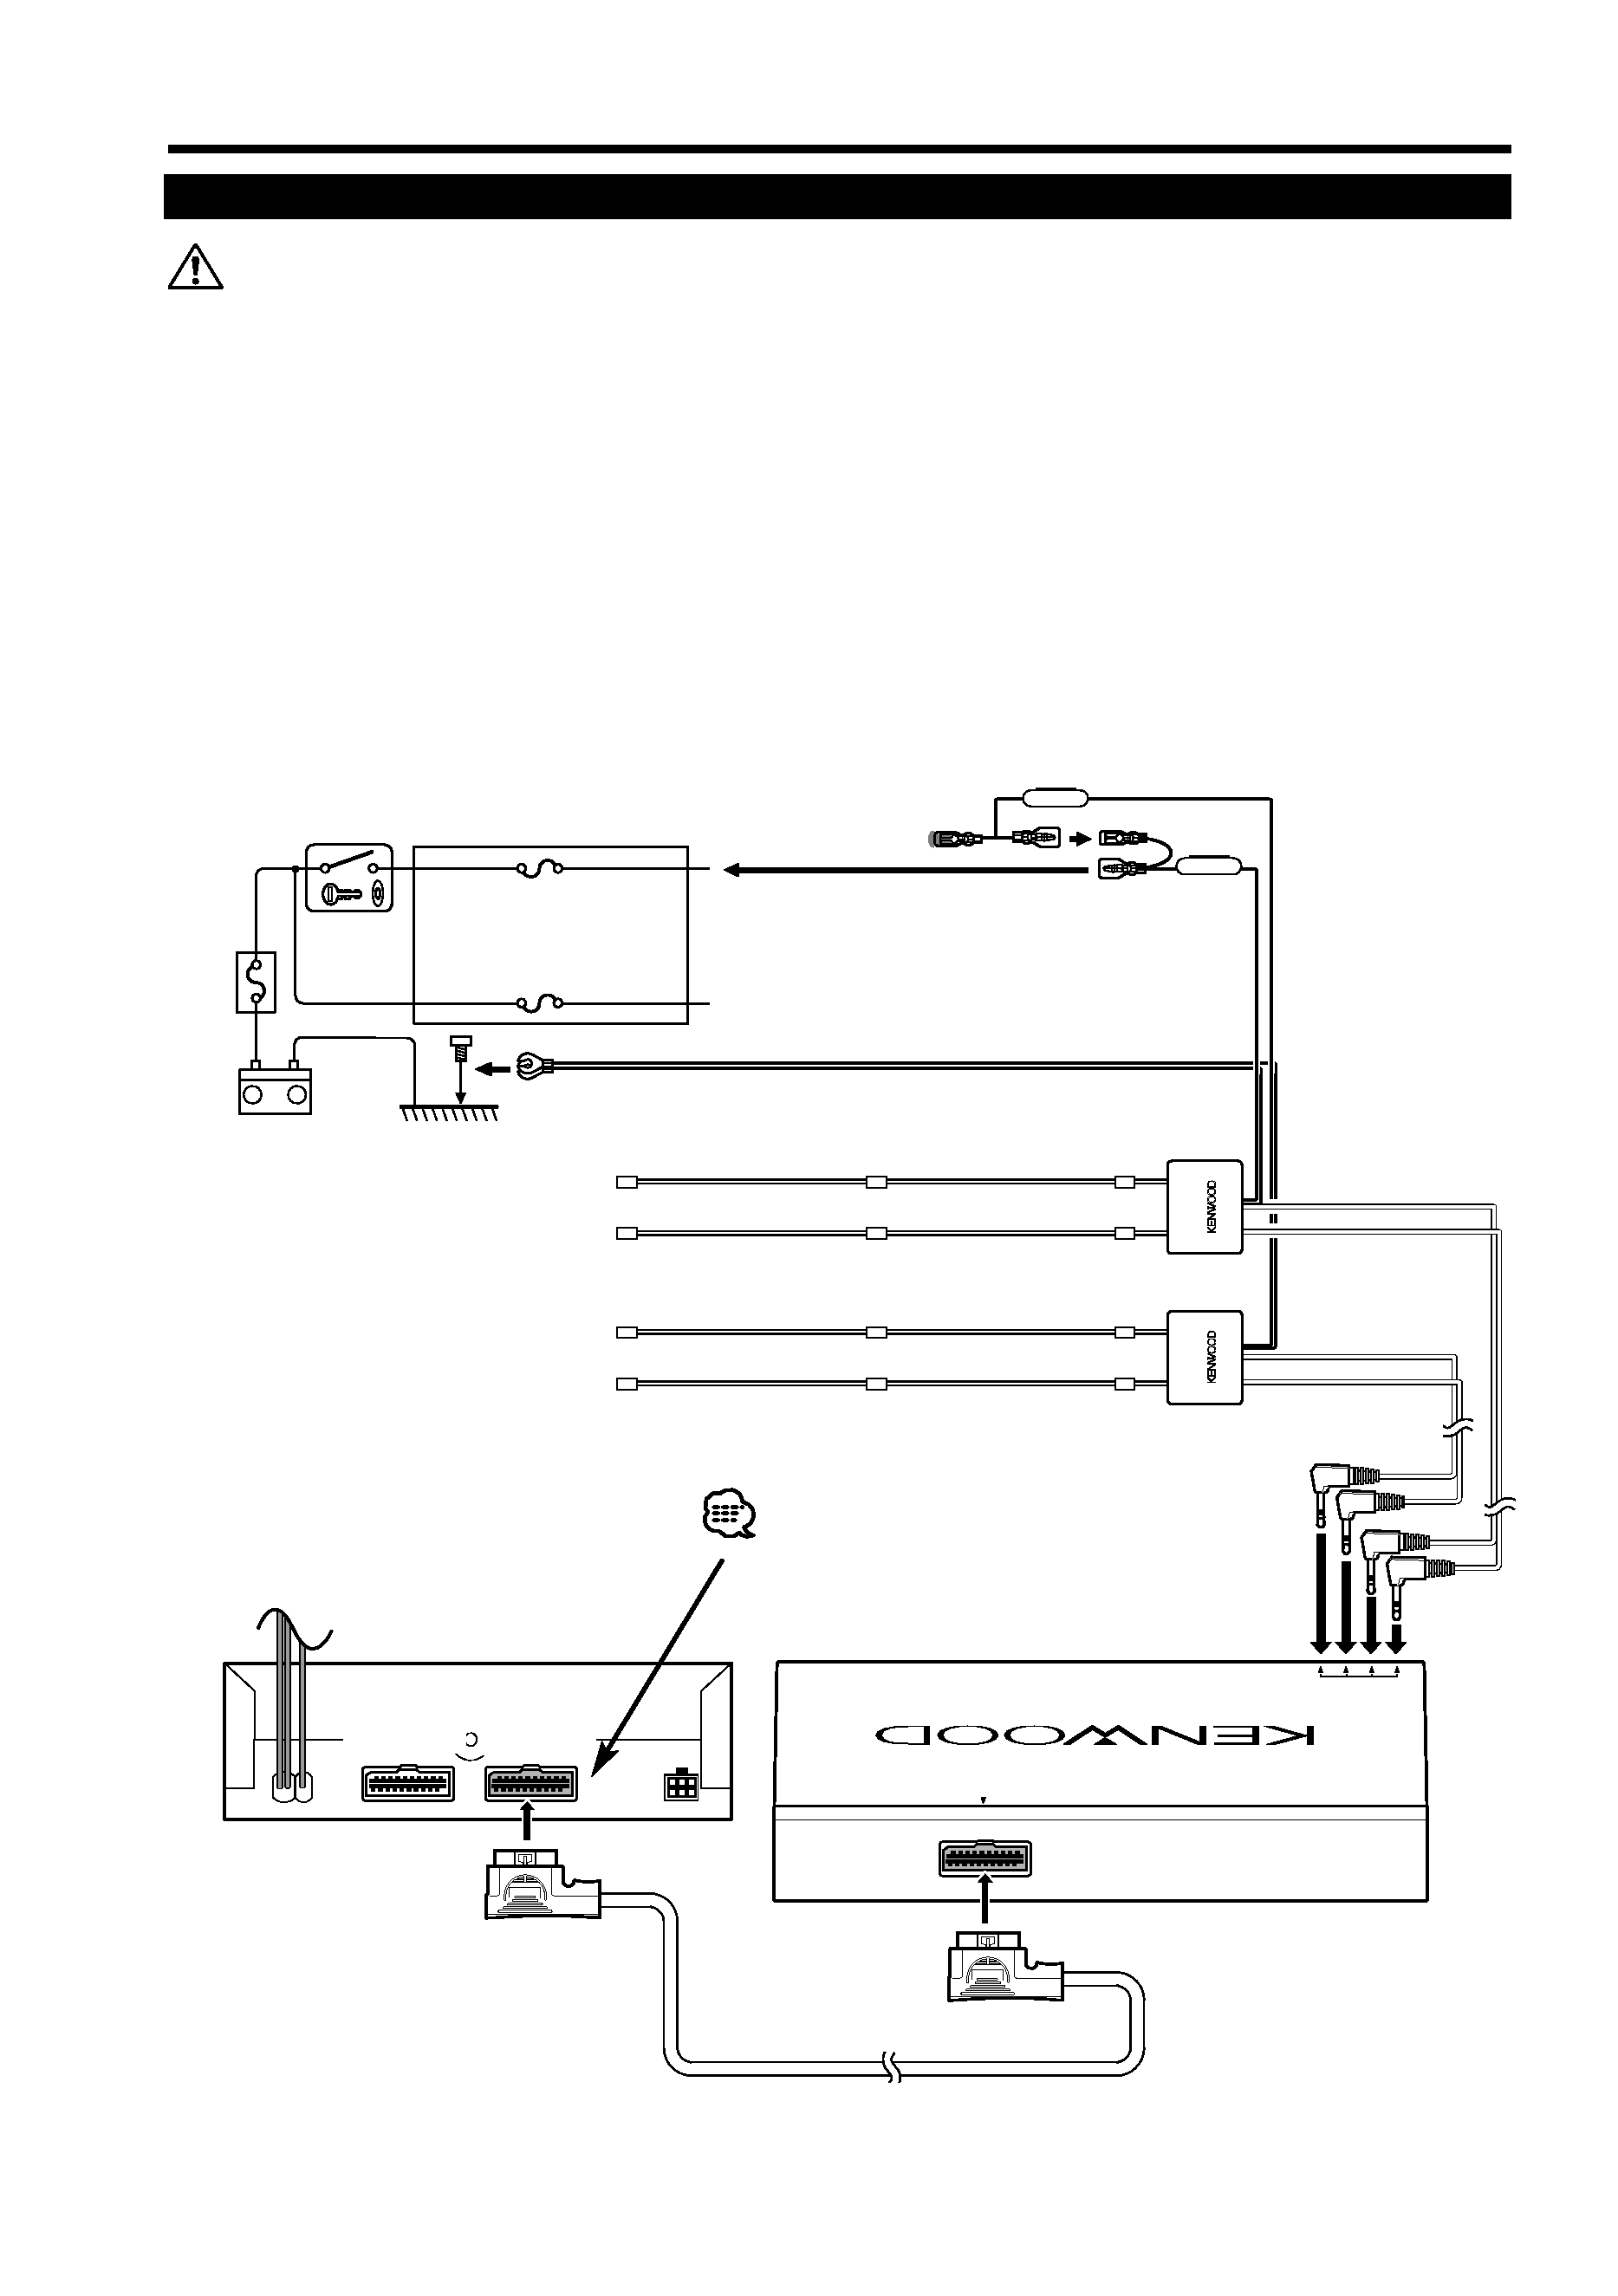
Wire the antenna cable to TV tuner unit.
5
4
3
2
1
Rear seat
Rear window
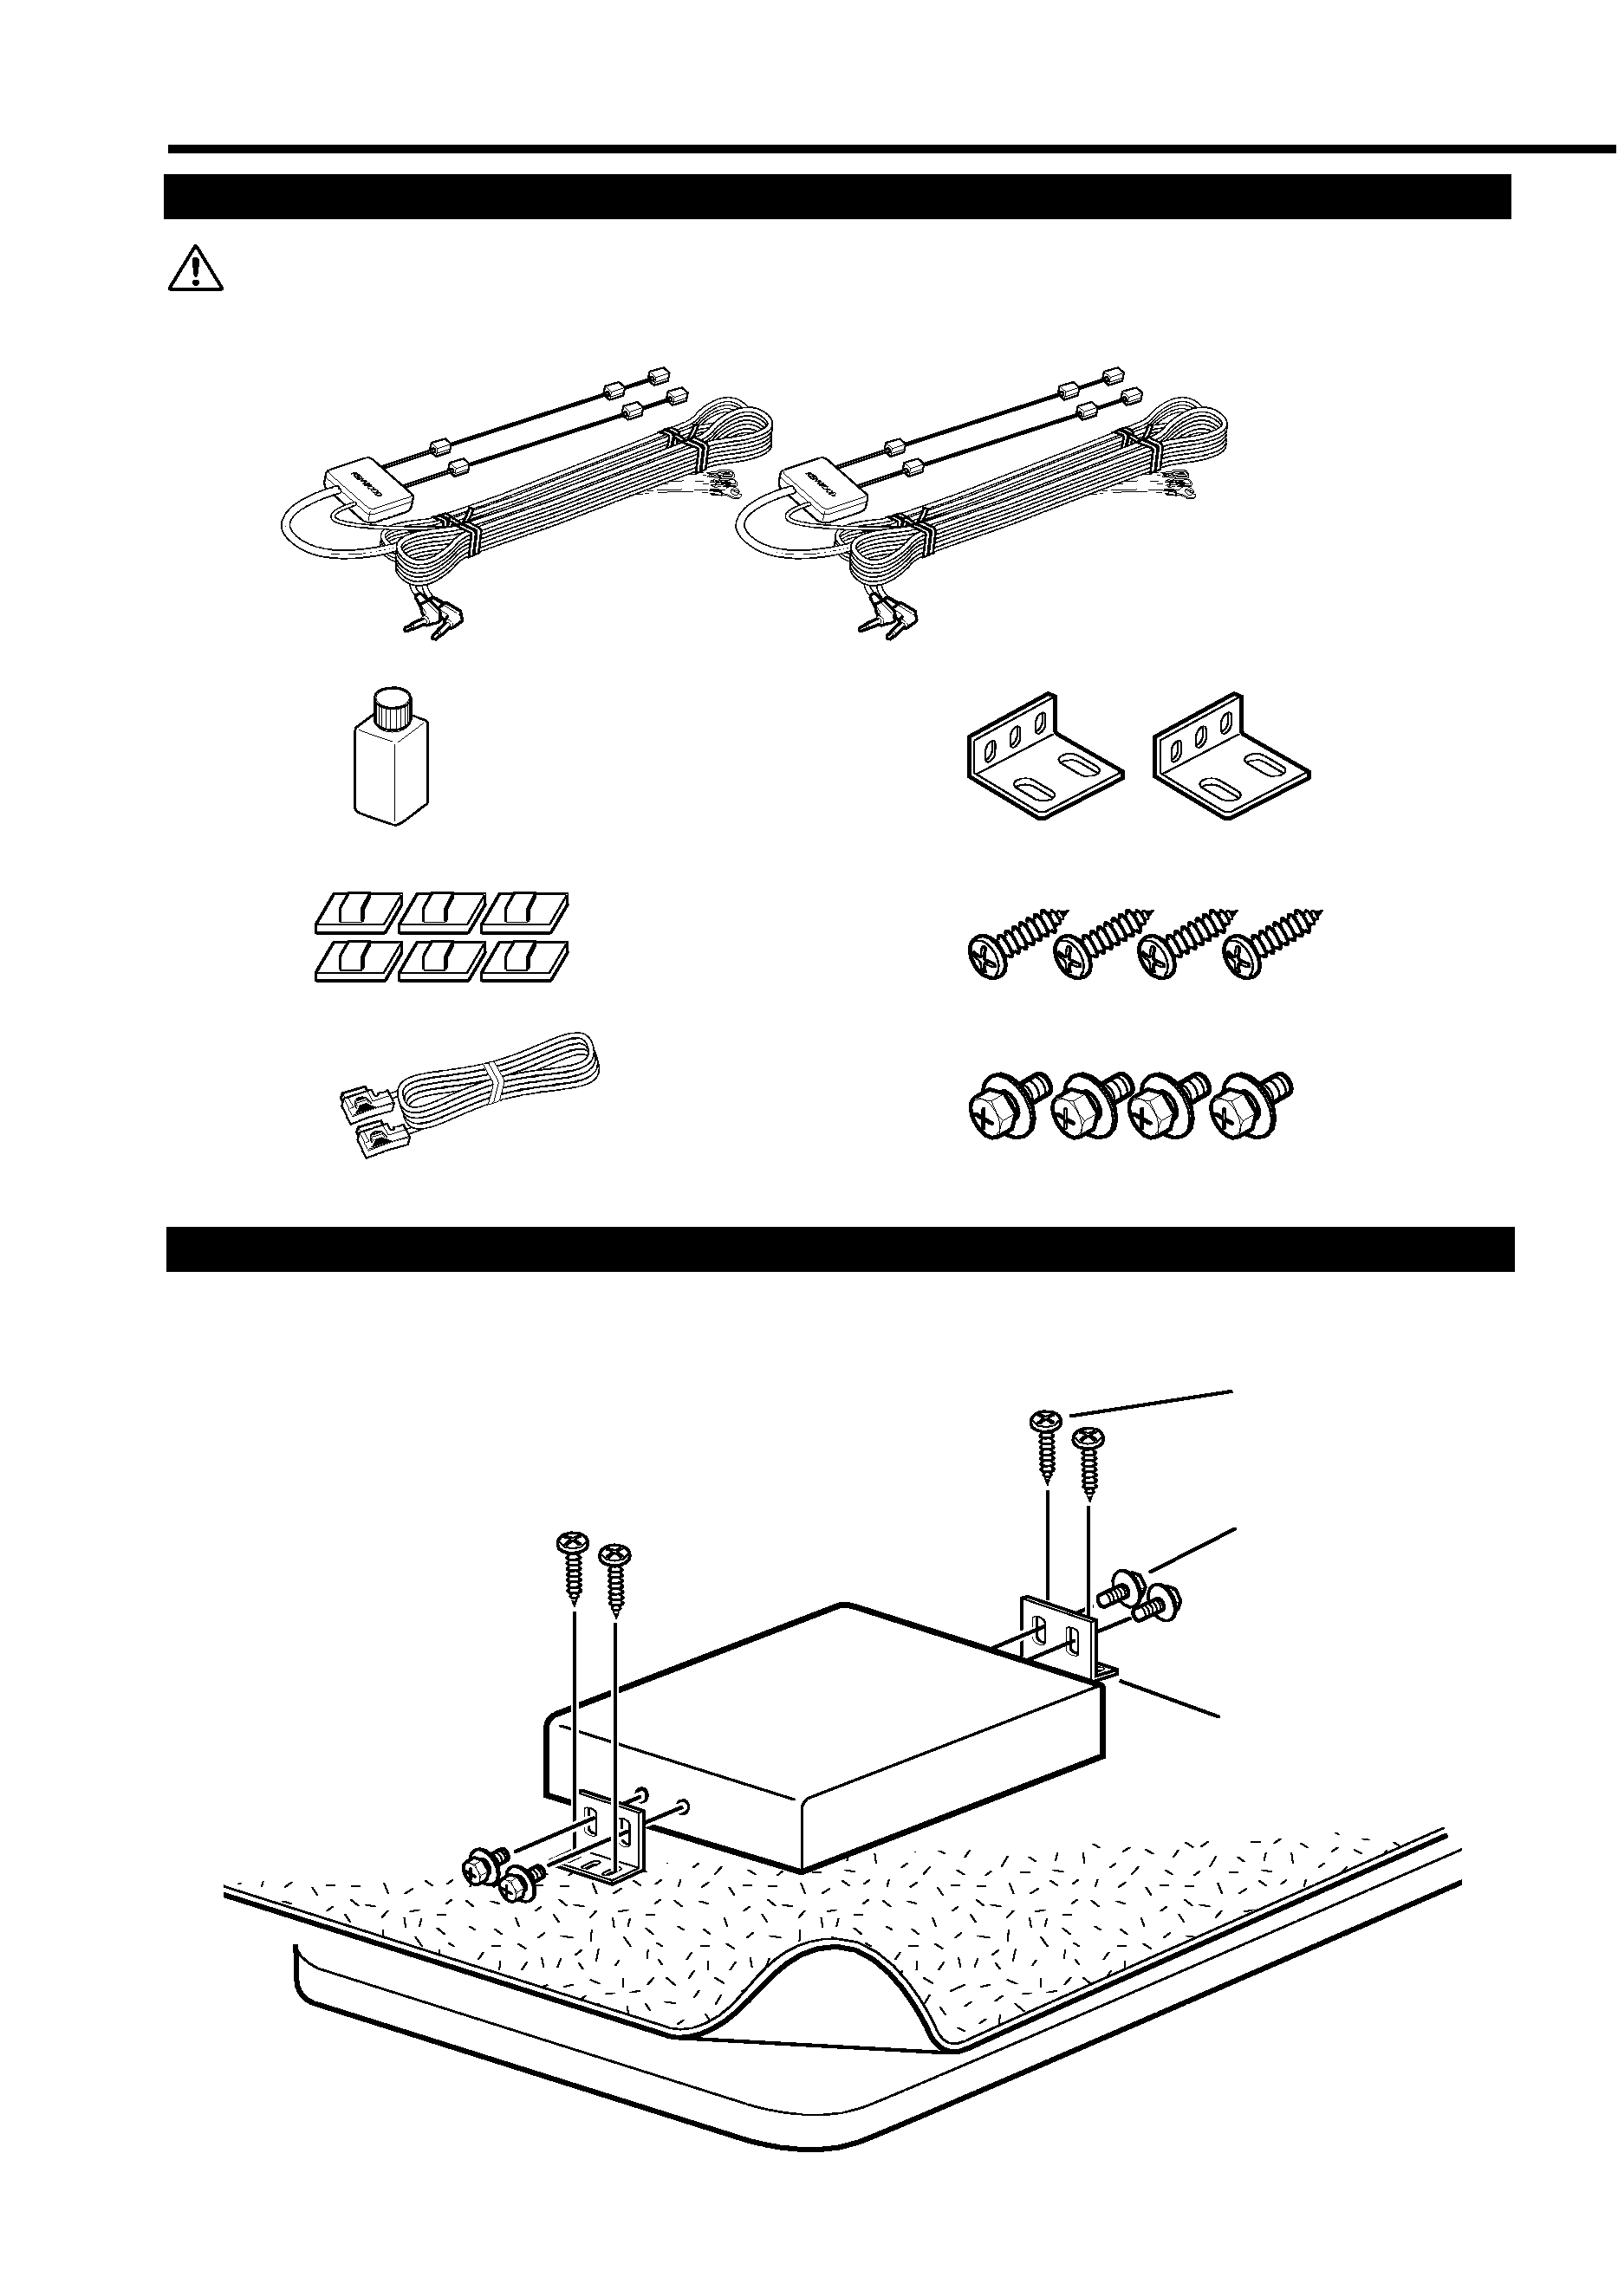
Bundle cables with the
clamper bar
(Accessory C)
Antenna parts
Antenna unit
Incar antennas have a lower reception sensitivity than antennas intended for outside
mounting. The picture may not appear or may be disturbed if the signal in your area is
weak.
background image
Installation
4
Connection
( 1A )
TVANTENNA
INPUT
TOMONIT
ORUNIT
( 1A )
­
+
(Accessory A)
(Accessory D)
Ignition wire (Red)
ª12V
ACC
Ignition key switch
Ground wire (Black)
· (To car chassis)
Battery
Car
fuse
box
(Main
fuse)
·Make sure to ground the unit to a negative 12V DC power supply.
· If your car's ignition does not come with an ACC position, connect the ignition wires
to a power source that can be turned on and off with the ignition key. If you connect
the ignition wire to a power source that receives a constant voltage supply, as with
battery wires, the battery may die.
· If the fuse blows, first make sure that the wires have not caused a short circuit, then
replace the old fuse with one with the same rating.
· After the unit is installed, check whether the brake lamps, blinkers, wipers, etc. on the
car are working properly.
· Thoroughly wipe away oil and other dirt from the installation surface.
Please avoid installation on uneven surfaces.
(Black)
Remove the protective sheet on
the black connector before the
KTC-V500P is connected.
(White)
background image
5
Specifications subject to change without notice.
Specifications
TV Tuner Section
Color system ..................................................................................................PAL
Television system & Channel converge
Television system
PAL-B/G
PAL-I
PAL-D
Channel converge
VHF
2 - 12ch
1A - 11ch
0 - 12ch
1-12ch
UHF
21-69ch
21-69ch
28-69ch
21-69ch
13-57ch
Channel selection system................................PLL frequency synthesizer system
Demoduration system ............................................................Split carrier system
Antenna input ................................................4-ch diversity (75 /3.5 ø mini jack)
General
Operating voltage ..............................................................14.4 V DC (11 to 16 V)
Consumed current ....................................................................................280 mA
Operational temperature range ....................................................­10°C to +60°C
Storage temperature range ..........................................................­30°C to +85°C
Size ..........................................................................192(W) x 30(H) x 147(D) mm
Mass ............................................................................................................730 g
TV Antenna
Output impedance ................................................................75 /3.5 ø mini plug
Operating voltage ..............................................................14.4 V DC (11 to 16 V)
Consumed current ....................................................................................200 mA
Cable length ....................................................................................................5 m
Size ............................................................................50(W) x 15(H) x 452(D) mm
Mass ......................................................................................................300 g x 2

Reviews

There are no reviews of this manual yet.