TEAC TH300DAB Owner's Manual

Cover page of TEAC TH300DAB Owner's Manual

Owner's Manual for TEAC TH300DAB, downloadable as a PDF file.

We also have service manual to this model.

Manual details

  • Immediate download after payment.
  • Delivered as a PDF file.
  • The manual has 24 pages
  • File size: 0.54 MB
  • Available language versions: English
  • Different language versions may vary sligthly in file size and page count.

We guarantee that...

  • our manuals are complete,
  • our manuals are checked with antivirus,
  • We'll issue refund if the manual is damaged, incomplete or unreadable (our refund policy)

Sample pages

Thumbnail of page 1Thumbnail of page 2Thumbnail of page 3Thumbnail of page 4
Thumbnail of page 5Thumbnail of page 6Thumbnail of page 7Thumbnail of page 8
Thumbnail of page 9
background image
9A09878900
CQX1A860Z
T-H300DAB
DAB/AM/FM Stereo Tuner
OWNER'S MANUAL
Z
background image
9A09878900
CQX1A860Z
T-H300DAB
DAB/AM/FM Stereo Tuner
OWNER'S MANUAL
Z
background image
2
IMPORTANT(for U.K.Customers)
DO NOT cut off the mains plug from this equipment. If
the plug fitted is not suitable for the power points in
your home or the cable is too short to reach a power
point, then obtain an appropriate safety approved
extension lead or consult your dealer.
If nonetheless the mains plug is cut off, remove the
fuse and dispose of the plug immediately, to avoid a
possible shock hazard by inadvertent connection to
the mains supply.
If this product is not provided with a mains plug, or one
has to be fitted, then follow the instructions given
below:
IMPORTANT. DO NOT make any connection to the
larger terminal which is marked with the letter E or by
the safety earth symbol | or coloured GREEN or
GREEN-and-YELLOW.
The wires in the mains lead on this product are
coloured in accordance with the following code:
BLUE
: NEUTRAL
BROWN : LIVE
As these colours may not correspond with the
coloured markings identifying the terminals in your
plug proceed as follows:
The wire which is coloured BLUE must be connected
to the terminal which is marked with the letter N or
coloured BLACK.
The wire which is coloured BROWN must be
connected to the terminal which is marked with the
letter L or coloured RED.
When replacing the fuse only a correctly rated
approved type should be used and be sure to re-fit the
fuse cover.
IF IN DOUBT -- CONSULT A COMPETENT
ELECTRICIAN.
Contents
Thank you for choosing TEAC. Read this manual
carefully to get the best performance from this unit.
Important (for U.K. Custmers) . . . . . . . . . . . . . . . . . . . . . . 2
Before Use . . . . . . . . . . . . . . . . . . . . . . . . . . . . . . . . . . . . . . 3
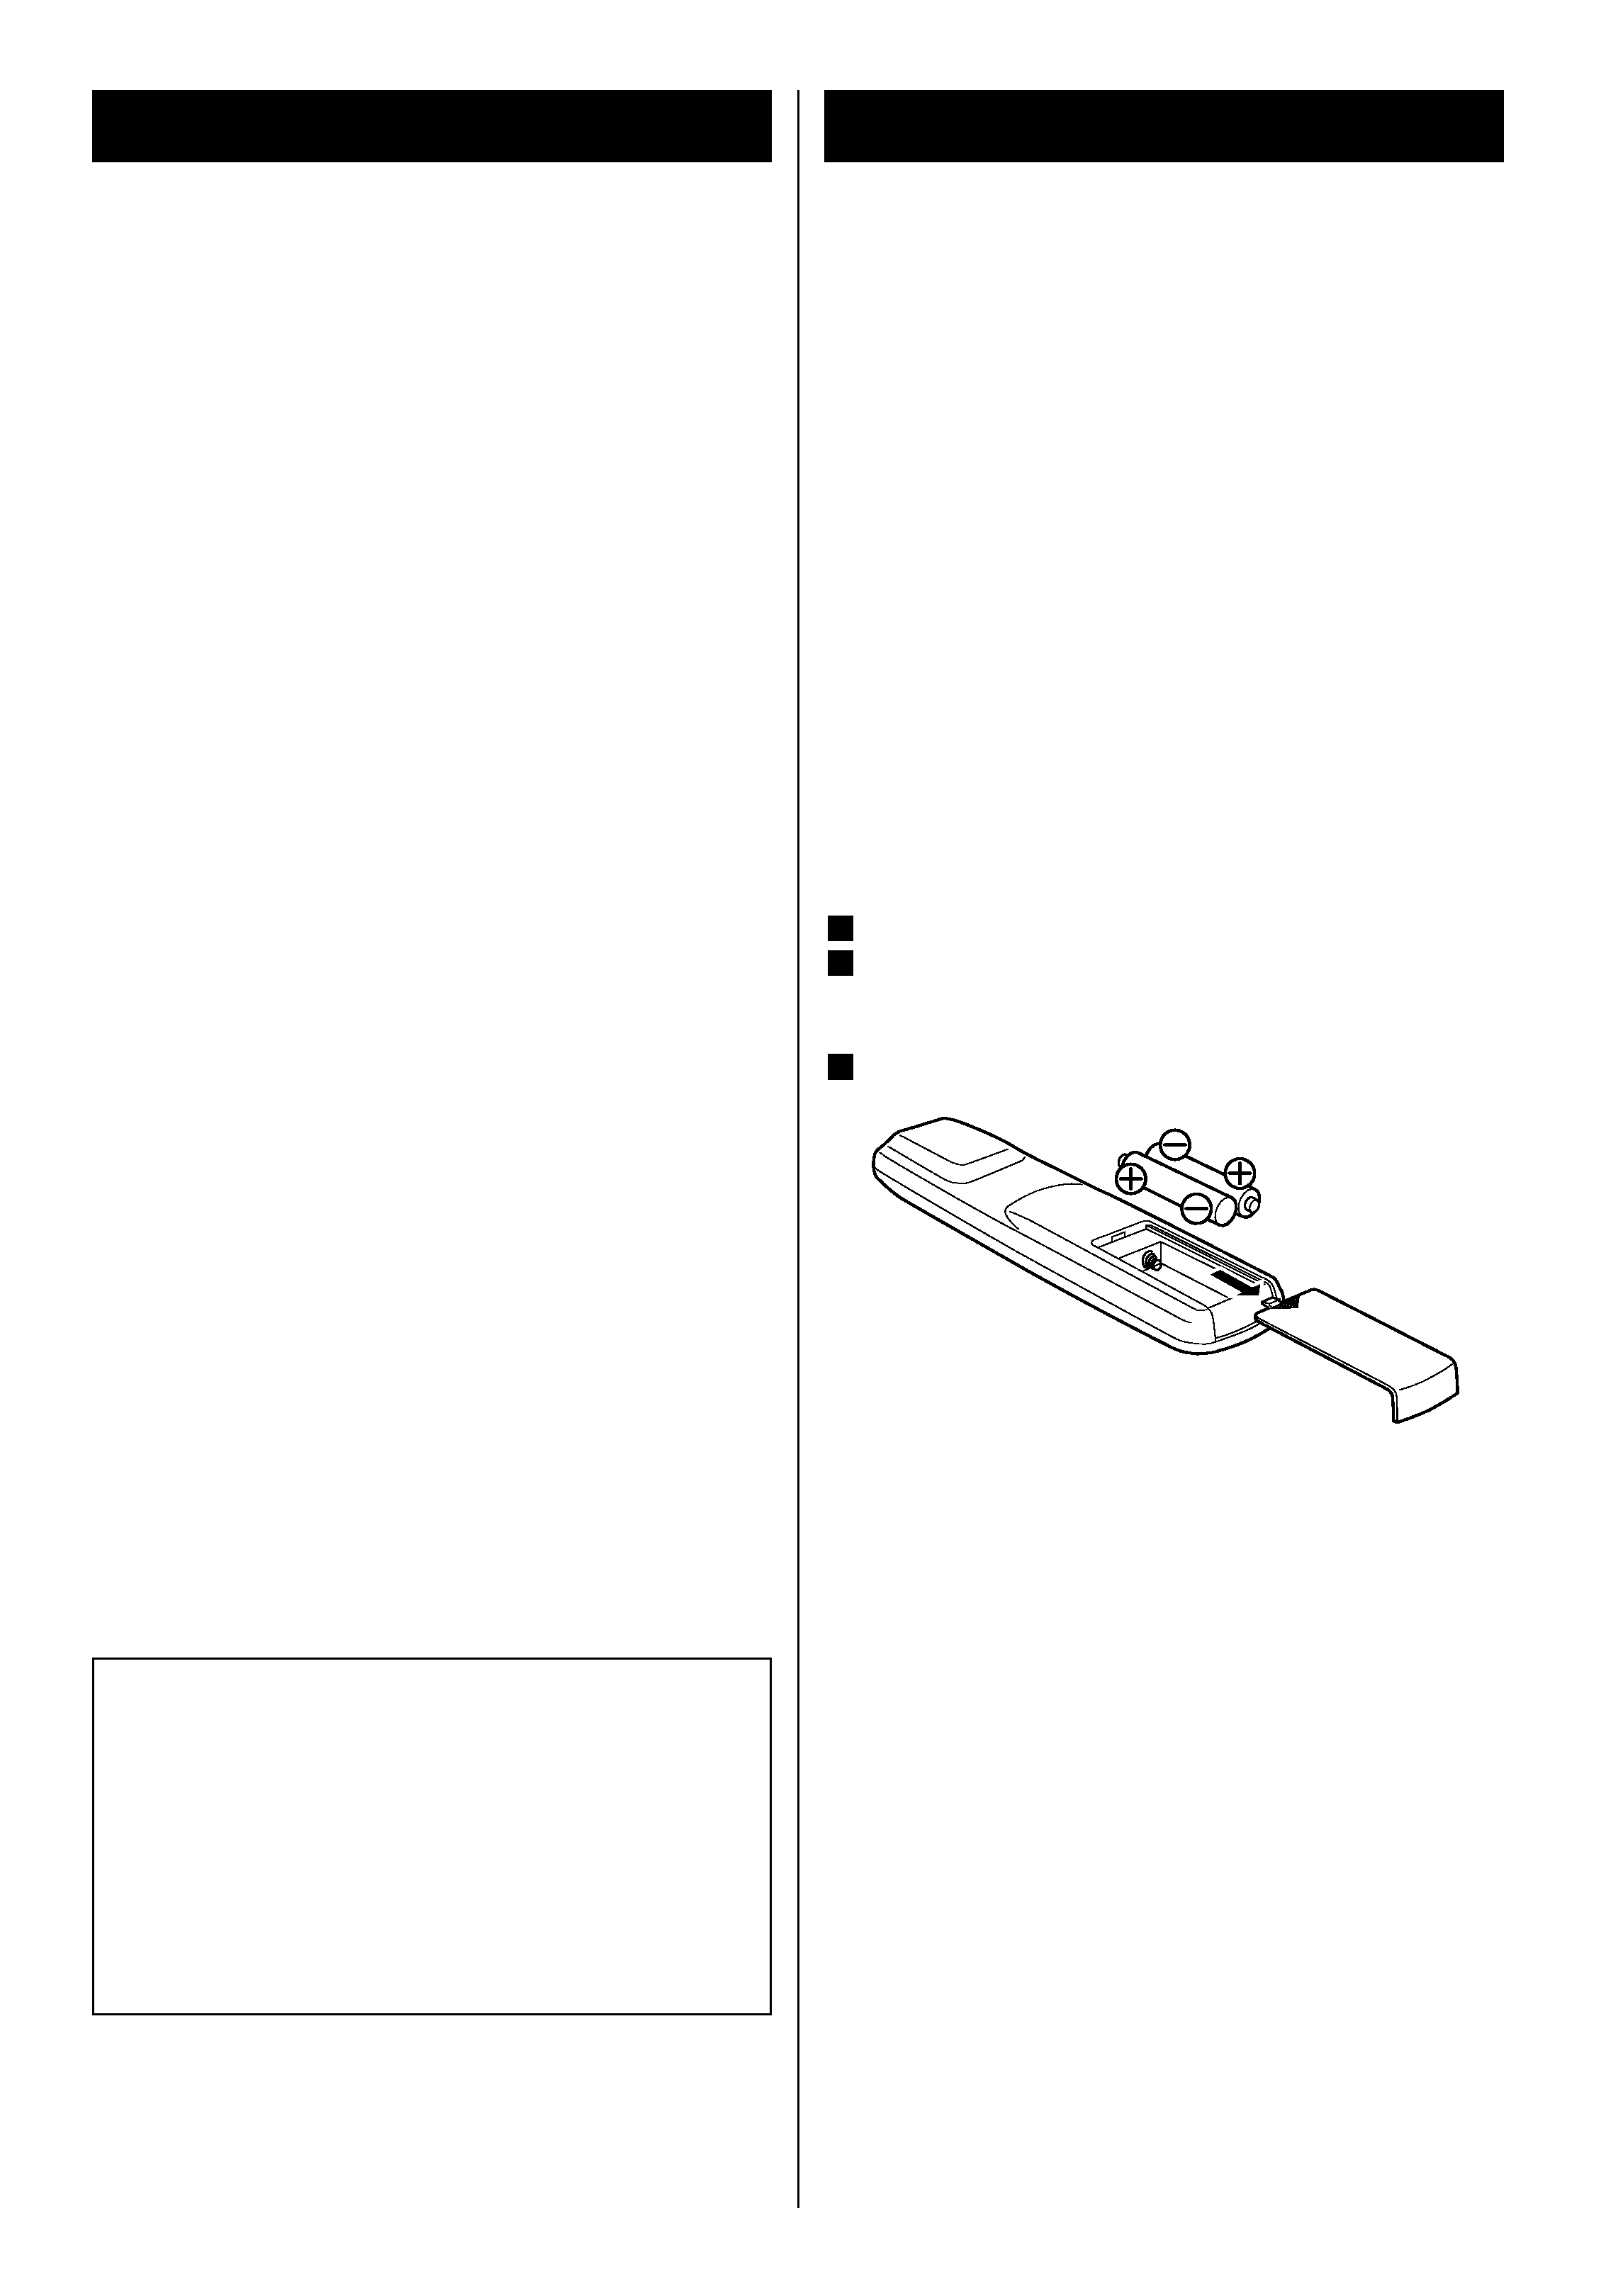
Remote Control Unit . . . . . . . . . . . . . . . . . . . . . . . . . . . . . . 3
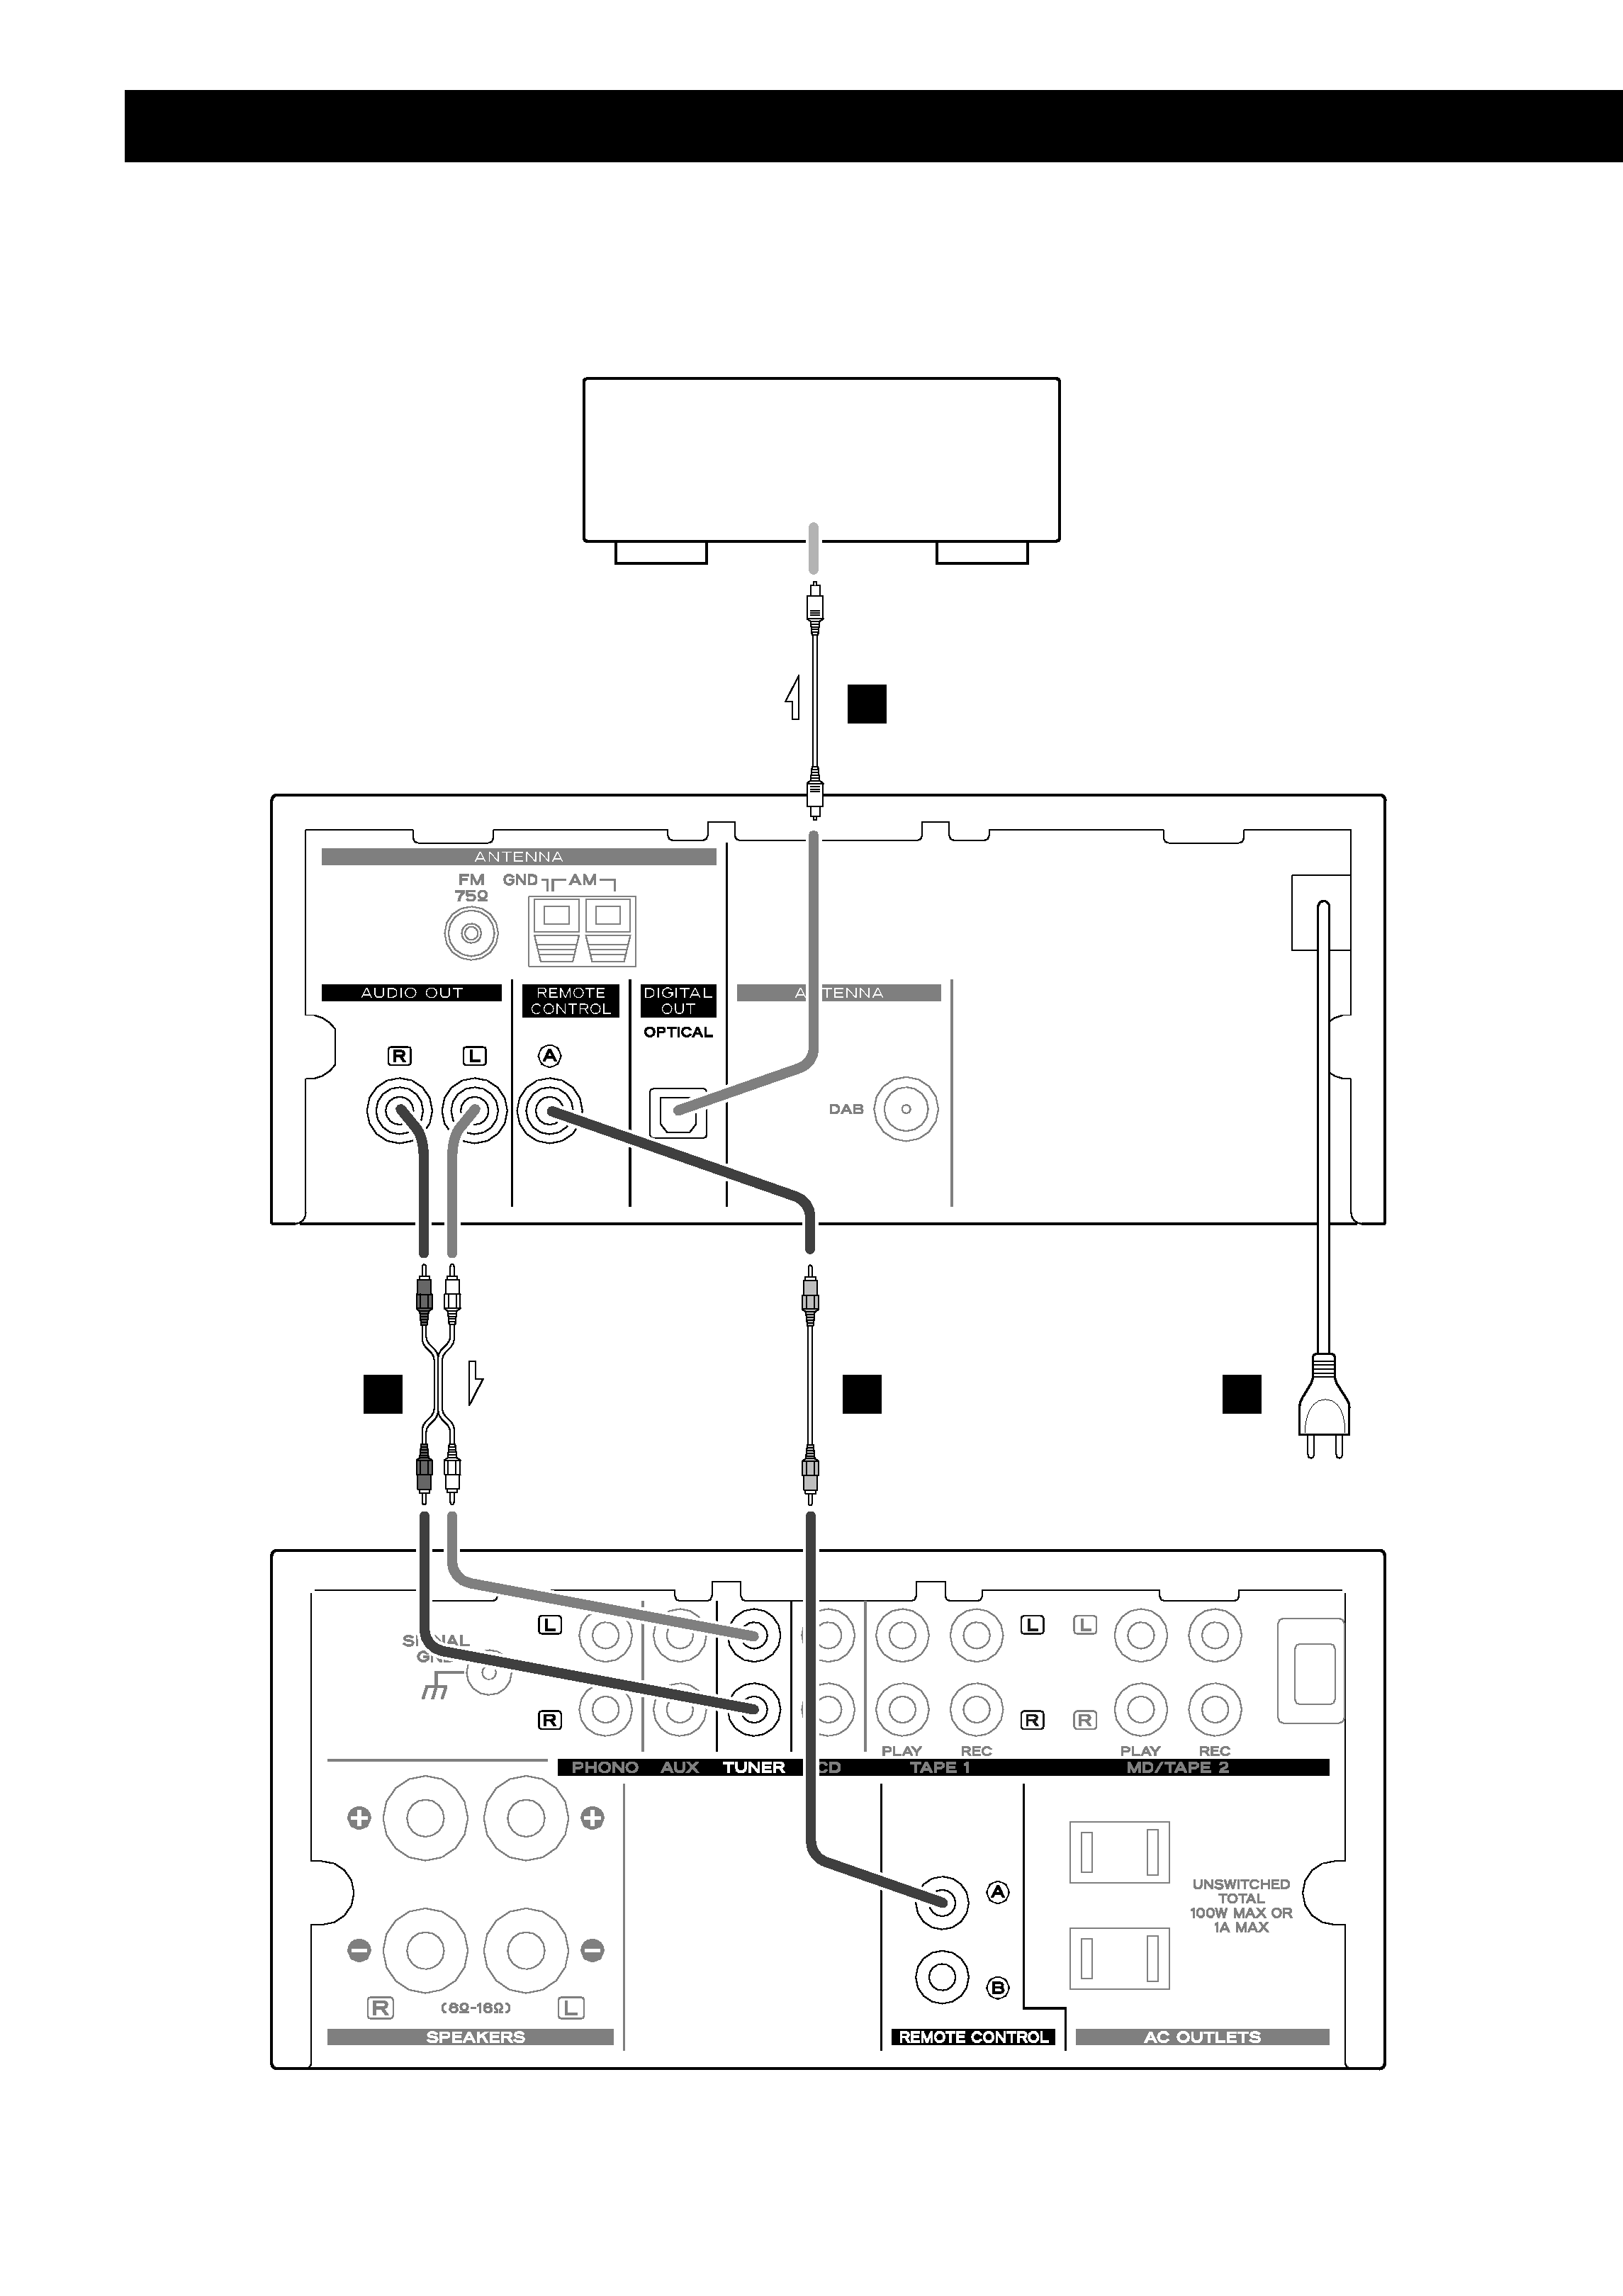
Connection . . . . . . . . . . . . . . . . . . . . . . . . . . . . . . . . . . . . . . 4
Connecting Antennas . . . . . . . . . . . . . . . . . . . . . . . . . . . . . 6
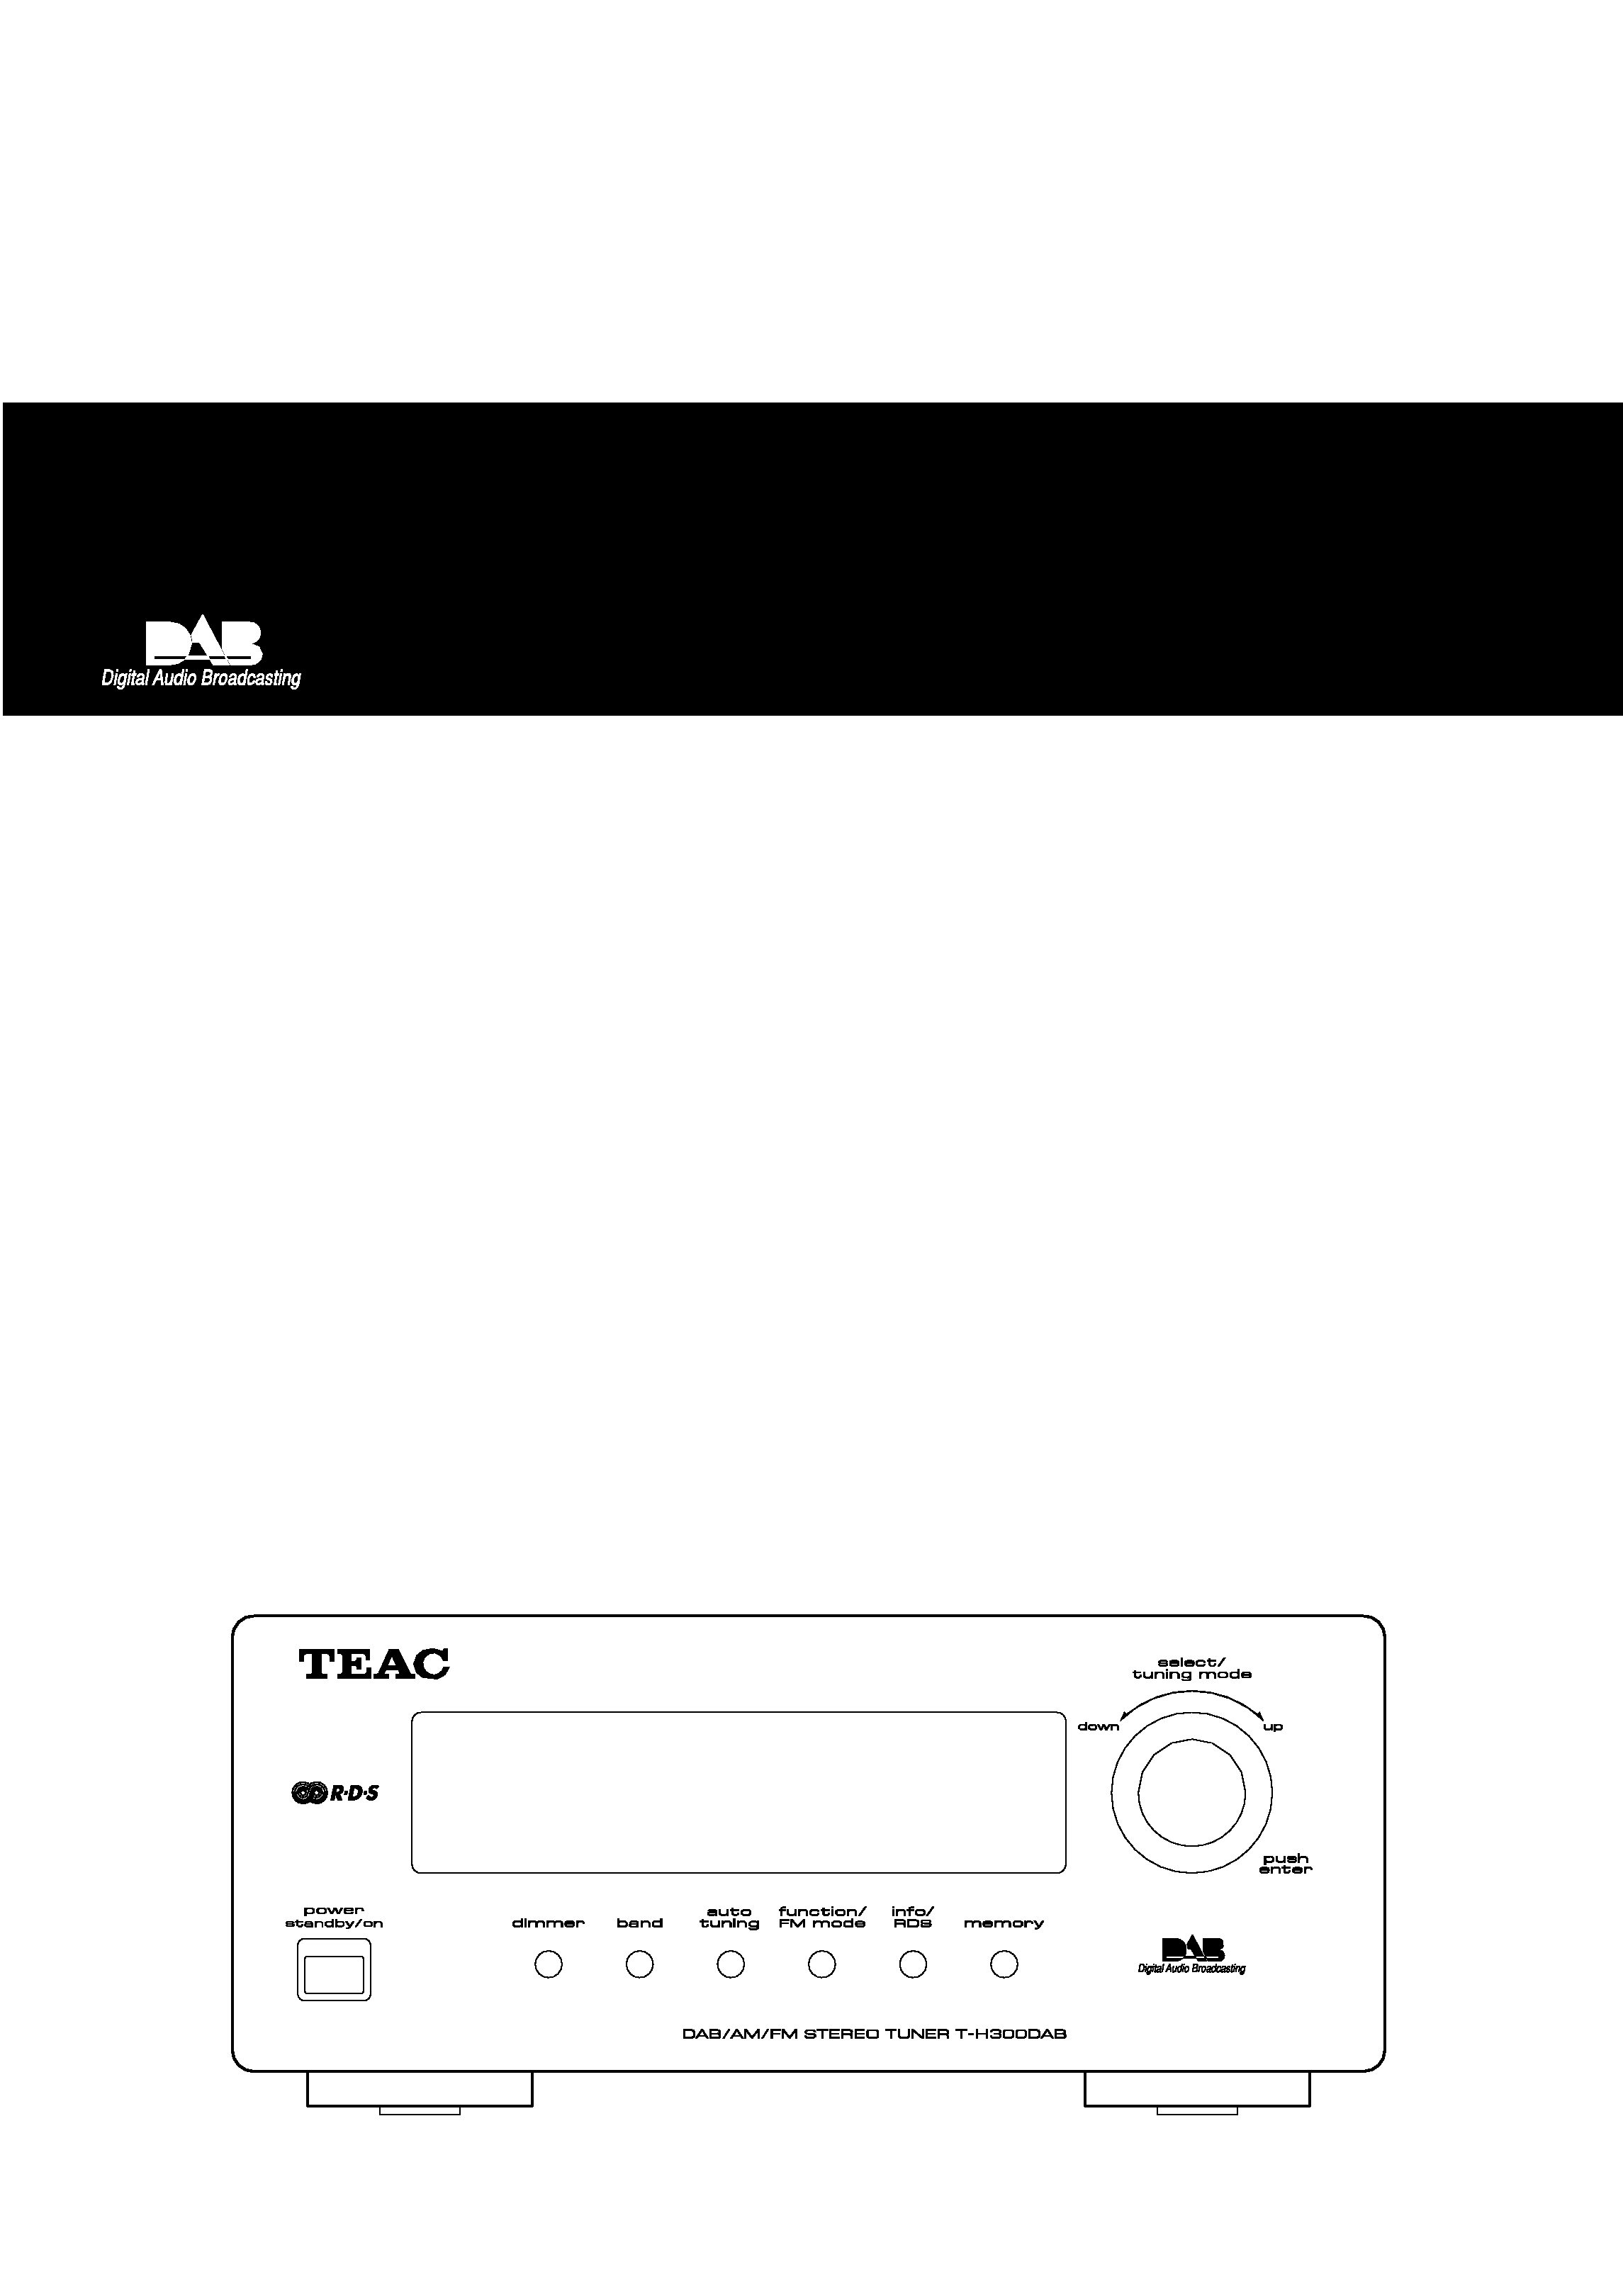
Names of Each Control . . . . . . . . . . . . . . . . . . . . . . . . . . . . 8
About Digital Audio Broadcasts . . . . . . . . . . . . . . . . . . . 10
Setting up your DAB Tuner . . . . . . . . . . . . . . . . . . . . . . . 10
Using the Channel List . . . . . . . . . . . . . . . . . . . . . . . . . . . 11
Using Function Control
Station order . . . . . . . . . . . . . . . . . . . . . . . . . . . . . . . . 12
Sig error rate . . . . . . . . . . . . . . . . . . . . . . . . . . . . . . . . 13
Preset tune . . . . . . . . . . . . . . . . . . . . . . . . . . . . . . . . . . 13
Sw version . . . . . . . . . . . . . . . . . . . . . . . . . . . . . . . . . . 14
DRC value . . . . . . . . . . . . . . . . . . . . . . . . . . . . . . . . . . . 14
Manual tune . . . . . . . . . . . . . . . . . . . . . . . . . . . . . . . . . 15
Auto Tuning . . . . . . . . . . . . . . . . . . . . . . . . . . . . . . . . . . . . . 15
Changing Display Settings . . . . . . . . . . . . . . . . . . . . . . . . 16
Listening to FM/AM . . . . . . . . . . . . . . . . . . . . . . . . . . . . . . 17
Presetting . . . . . . . . . . . . . . . . . . . . . . . . . . . . . . . . . . . . . . 18
RDS . . . . . . . . . . . . . . . . . . . . . . . . . . . . . . . . . . . . . . . . . . . . 19
PTY Search. . . . . . . . . . . . . . . . . . . . . . . . . . . . . . . . . . . . . . 20
PTY Programmes . . . . . . . . . . . . . . . . . . . . . . . . . . . . . . . . 21
Factory Reset . . . . . . . . . . . . . . . . . . . . . . . . . . . . . . . . . . . 21
Sleep Timer . . . . . . . . . . . . . . . . . . . . . . . . . . . . . . . . . . . . . 22
Specifications . . . . . . . . . . . . . . . . . . . . . . . . . . . . . . . . . . . 22
Troubleshooting . . . . . . . . . . . . . . . . . . . . . . . . . . . . . . . . . 23
CAUTION
The product shall not be exposed to dripping or
splashing and that no object filled with liquids, such
as vases, shall be placed on the product.
Do not install this equipment in a confined space
such as a book case or similar unit.
This symbol means that the product is
double insulated and you do not need an
earth connection
This symbol means that this product
keeps to the European safety and
electrical interference directives
background image
3
Read this before operation
< The voltage supplied to the unit should match the
voltage as printed on the rear panel. If you are in any
doubt regarding this matter, consult an electrician.
< Choose the installation location of your unit carefully.
Avoid placing it in direct sunlight or close to a source
of heat. Also avoid locations subject to vibrations
and excessive dust, heat, cold or moisture.
< Do not place the unit on the amplifier/receiver.
< Do not open the cabinet as this might result in
damage to the circuitry or electrical shock. If a
foreign object should get into the set, contact your
dealer.
< When removing the power plug from the wall outlet,
always pull directly on the plug, never yank the cord.
< Do not attempt to clean the unit with chemical
solvents as this might damage the finish. Use a
clean, dry cloth.
< Keep this manual in a safe place for future reference.
Maintenance
If the surface of the unit gets dirty, wipe with a soft
cloth or use diluted mild soap liquid. Be sure to remove
any excess completely. Do not use thinner, benzine or
alcohol as they may damage the surface of the unit.
Before Use
CAUTION Regarding Placement
To maintain proper ventilation, be sure to leave a
space around the unit (from the largest outer
dimensions including projections) equal to, or
greater than, shown below.
Left and Right Panels : 10 cm
Rear Panel
: 5 cm
Top Panel
: 2 cm
Remote Control Unit
Battery Installation
Remove the battery compartment cover.
Insert two "AAA" (R03, UM-4) dry batteries. Make
sure that the batteries are inserted with their positive
"+" and negative "_" poles positioned correctly.
Close the cover.
Battery Replacement
If the distance required between the remote control unit
and main unit decreases, the batteries are exhausted. In
this case replace the batteries with new ones.
Precautions concerning batteries
< Be sure to insert the batteries with correct positive
"+" and negative "_" polarities.
< Use batteries of the same type. Never use different
types of batteries together.
< Rechargeable and non-rechargeable batteries can
be used. Refer to the precautions on their labels.
< When the remote control unit is not to be used for a
long time (more than a month), remove the batteries
from the remote control unit to prevent them from
leaking. If they leak, wipe away the liquid inside the
battery compartment and replace the batteries with
new ones.
< Do not heat or disassemble batteries and never
dispose of old batteries by throwing them in a fire.
3
2
1
The provided Remote Control Unit allows the unit to be
operated from a distance.
When operating the remote control unit, point it towards
the REMOTE SENSOR on the front panel of the unit.
< Even if the remote control unit is operated within the
effective range, remote control operation may be
impossible if there are any obstacles between the
unit and the remote control.
< If the remote control unit is operated near other
appliances which generate infrared rays, or if other
remote control devices using infrared rays are used
near the unit, it may operate incorrectly. Conversely,
the other appliances may operate incorrectly.
background image
4
Connection
B
D
A
C
OPTICAL
T-H300DAB
Digital recorder/decoder
A-H300 or other amplifier
DIGITAL IN
background image
5
CAUTION
Turn off the power of all the equipment before
making connections.
Read instructions of each component you intend to
use with this unit.
< Be sure to insert each plug securely. To prevent
hum and noise, do not bundle the connection
cords with the power cord.
AUDIO OUT jack
Analogue 2-channel audio signal is output from
this jack.
Connect the component with RCA pin cable.
AUDIO OUT (T-H300DAB) w TUNER IN (amplifier)
Make sure to connect :
white plug w white jack (L: left)
red plug w red jack (R: right)
DIGITAL OUT terminal
DAB's digital audio signal is output from this
terminal. If you want to record digitally, or decode
the signal using an external digital decoder,
connect the component with an optical cable.
DIGITAL OUT (T-H300DAB)
w
DIGITAL IN (decoder, CD-R, MD, etc.)
Power cord (AC)
Be sure to connect the power cord to an AC outlet
which supplies the correct voltage.
Hold the power plug when plugging or unplugging
the power cord.
C
B
A
REMOTE CONTROL jack
If you have TEAC Reference 300 series, Convenient
sysytem control operations are possible.
< By pressing the POWER STANDBY button of the
Reference 300 series Amplifier/Receiver, you can
switch ON/standby all the unit connected with
remote control cord.
< When you press the PLAY button of the source, the
INPUT SELECTOR of the Reference 300 series
Amplifier/Receiver will be set to the source
automatically.
< The source you select by the INPUT SELECTOR of
the Reference 300 series Amplifier/Receiver will
start playback automatically.
< When you turn ON the system, the source that was
selected
last
time
will
start
playback
automatically.
< You can use the system remote control unit to
operate all the unit connected with remote control
cords.
Connect the remote control jack (A or B) of each
component with remote control cords.
D

Reviews

There are no reviews of this manual yet.