TEAC RCL800 Owner's Manual

Cover page of TEAC RCL800 Owner's Manual

Owner's Manual for TEAC RCL800, downloadable as a PDF file.

Manual details

  • Immediate download after payment.
  • Delivered as a PDF file.
  • The manual has 104 pages
  • File size: 3.02 MB
  • Available language versions: French, English, Spanish, Dutch, German, Italian
  • Different language versions may vary sligthly in file size and page count.

We guarantee that...

  • our manuals are complete,
  • our manuals are checked with antivirus,
  • We'll issue refund if the manual is damaged, incomplete or unreadable (our refund policy)

Sample pages

Thumbnail of page 1Thumbnail of page 2Thumbnail of page 3Thumbnail of page 4
Thumbnail of page 5Thumbnail of page 6Thumbnail of page 7Thumbnail of page 8
Thumbnail of page 9
background image
9A09573100
RC-L800/RC-L2
Remote Control Unit
OWNER'S MANUAL ................2
MANUEL DU PROPRIETAIRE.....36
MANUAL DEL USUARIO ..........70
background image
9A09573100
RC-L800/RC-L2
Remote Control Unit
OWNER'S MANUAL ................2
MANUEL DU PROPRIETAIRE.....36
MANUAL DEL USUARIO ..........70
background image
Table of Contents
2
Important Safety Instructions . . . . . . . . . . . . . . 2
Features . . . . . . . . . . . . . . . . . . . . . . . . . . . . . . . . 3
Precautions . . . . . . . . . . . . . . . . . . . . . . . . . . . . . 3
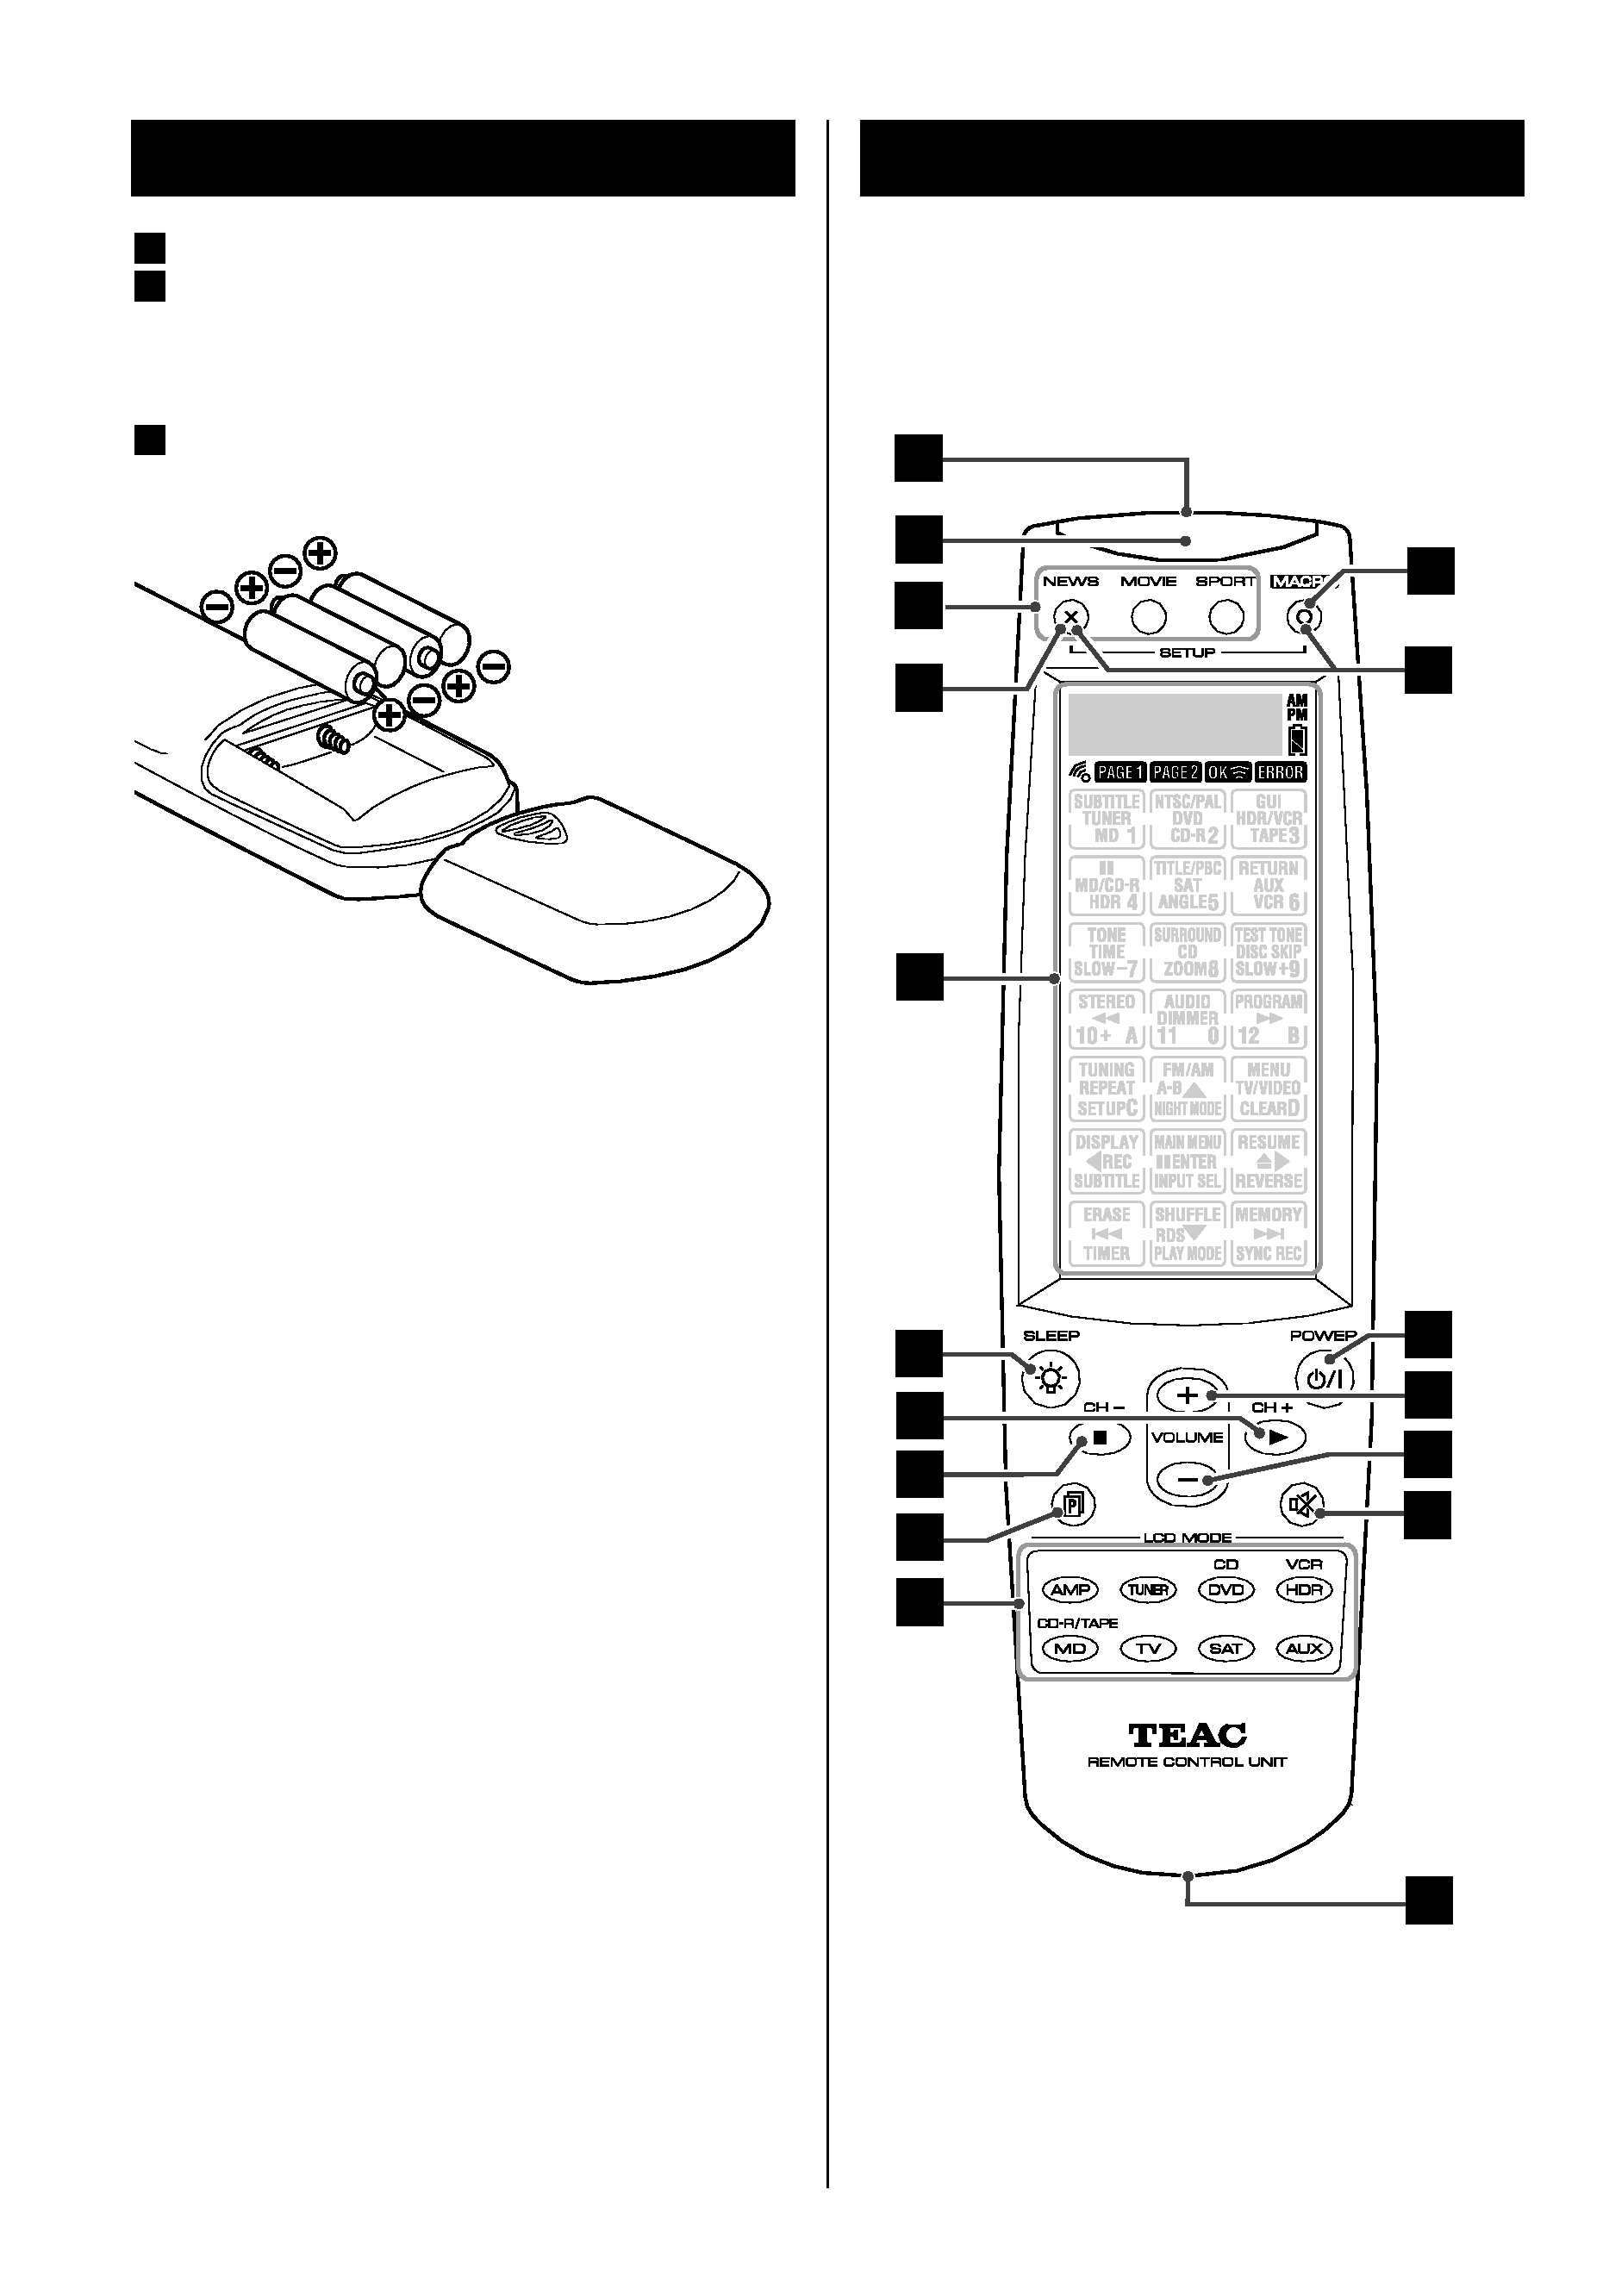
Battery Installation . . . . . . . . . . . . . . . . . . . . . . . 4
Name of Each Control . . . . . . . . . . . . . . . . . . . . 4
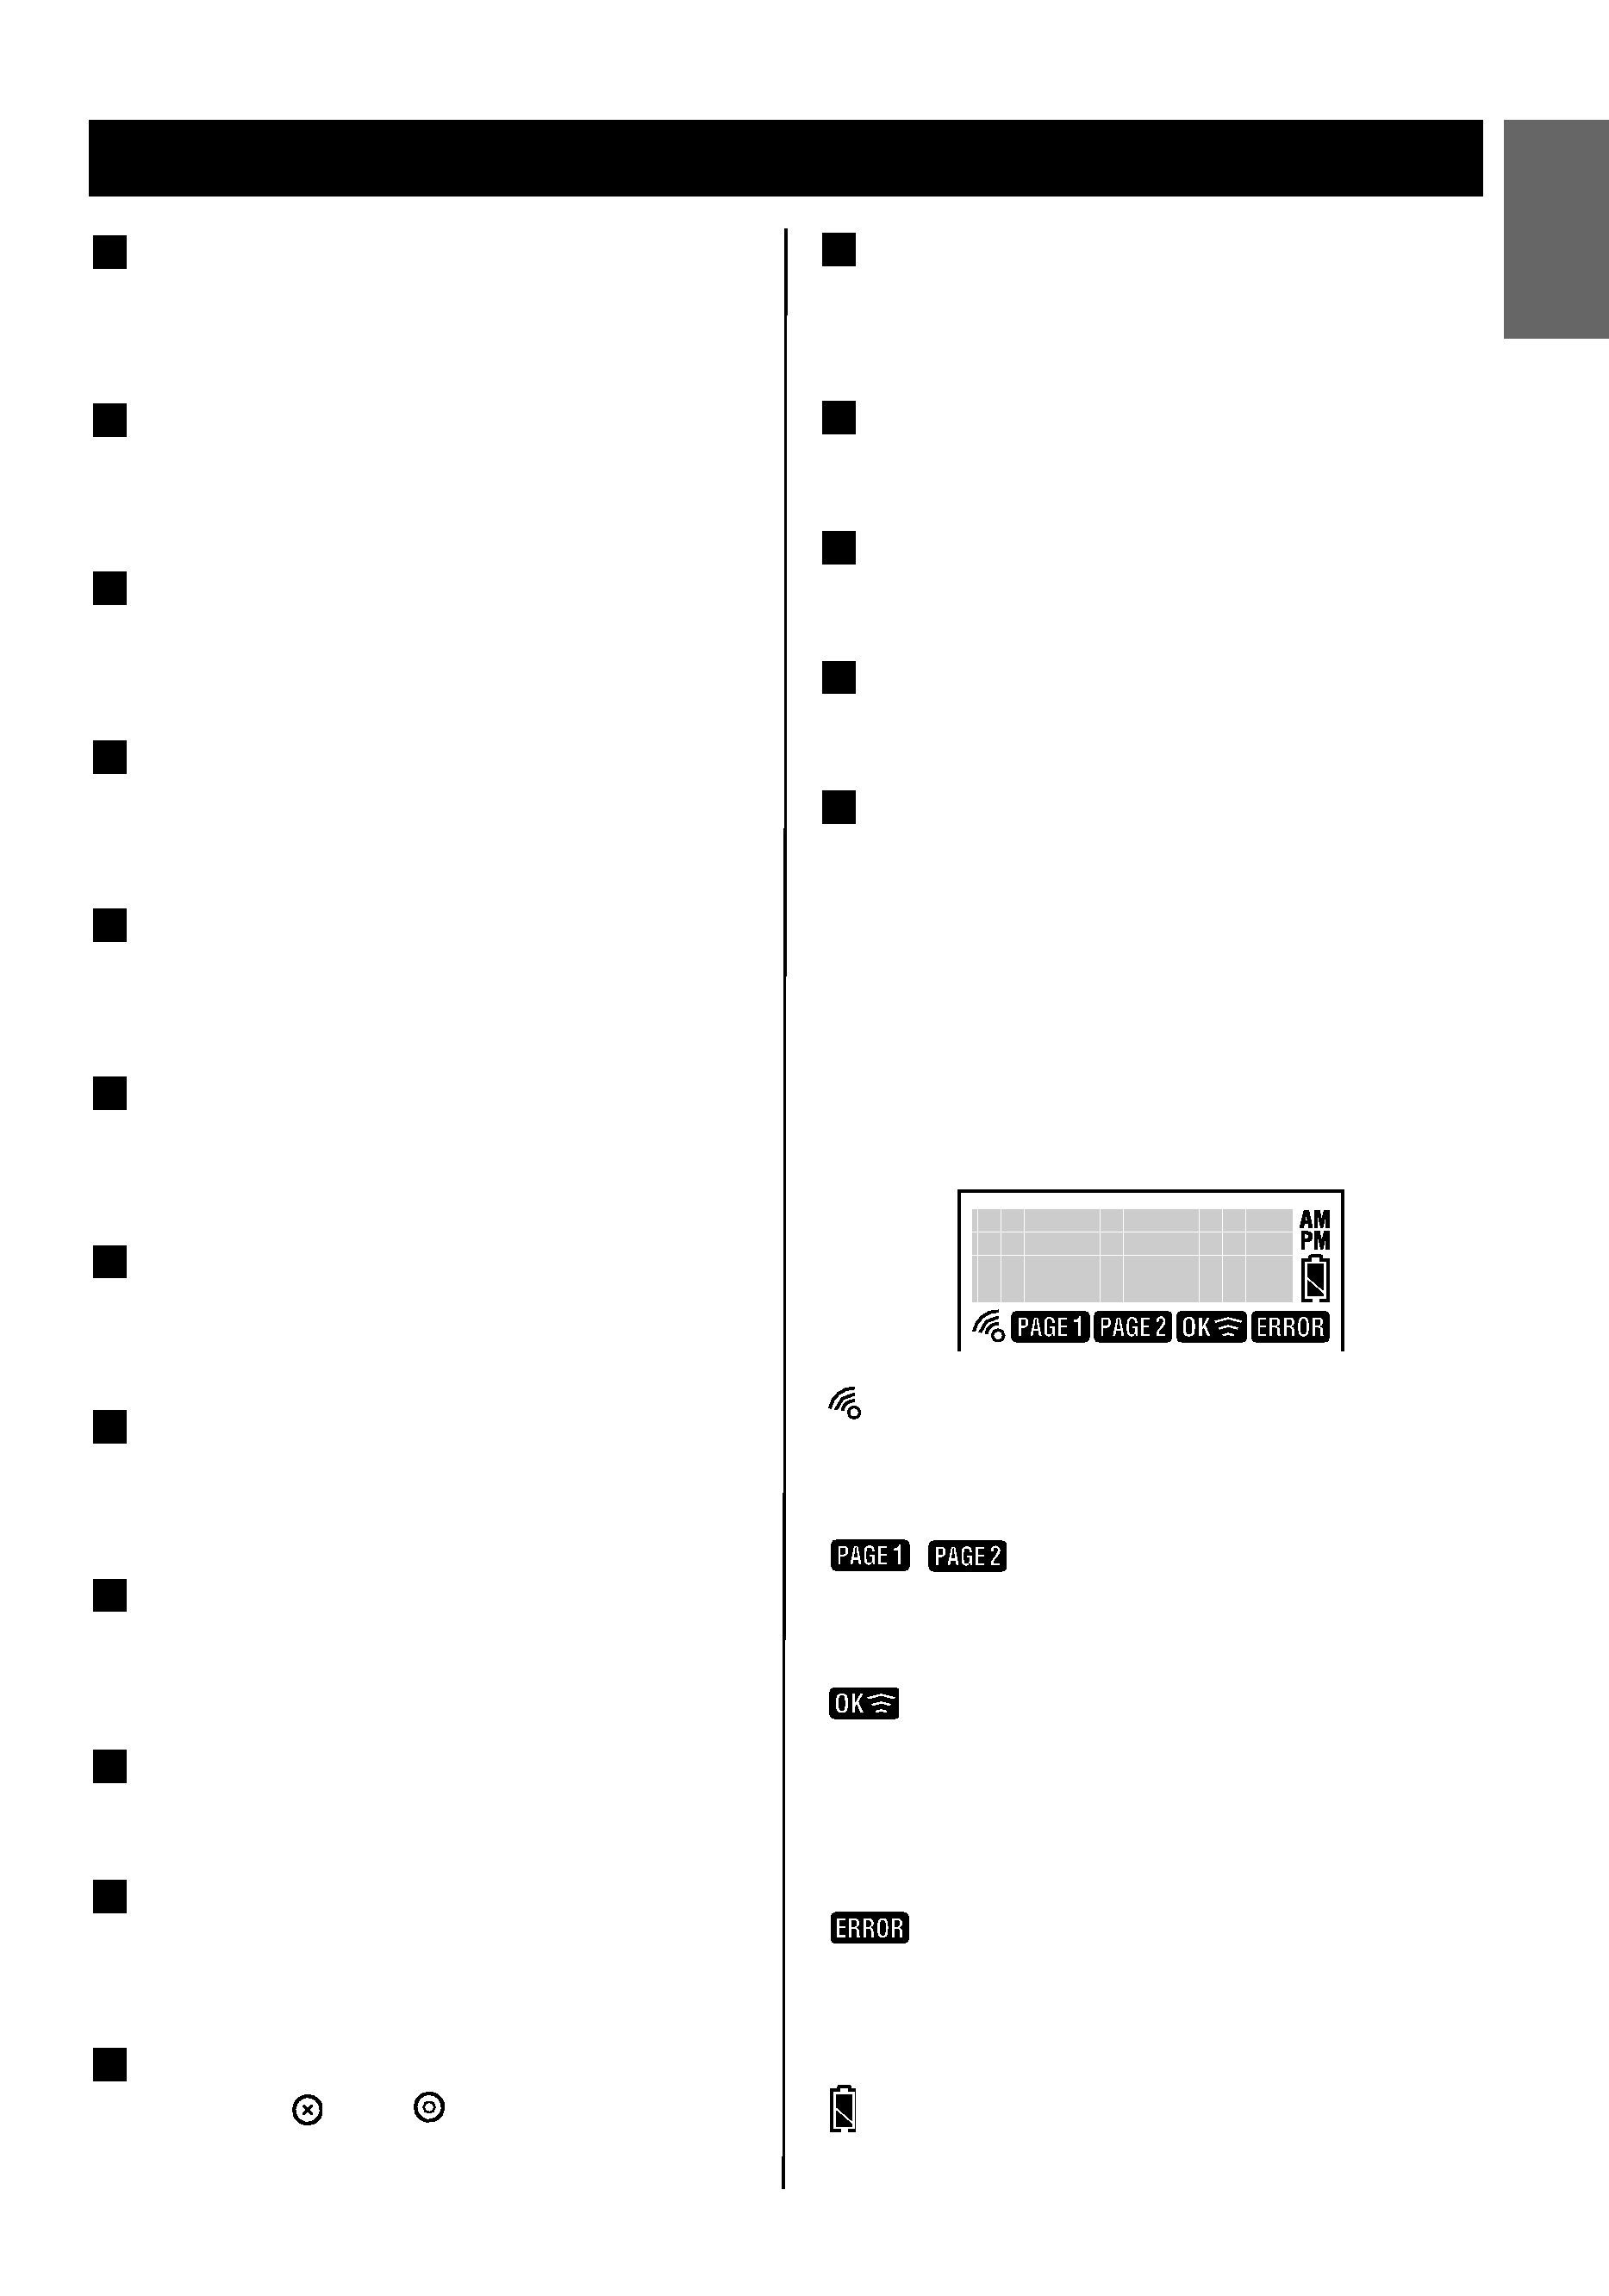
Setup Mode
How to enter the setup mode . . . . . . . . . . . 7
Setting Key Codes
Pre-programmed Code Setting . . . . . . . . . . 8
Learning a Device . . . . . . . . . . . . . . . . . . . . 11
Deleting Key Code
Deleting an Individual Key Code . . . . . . . 13
Deleting Whole Key Codes of a Device . 14
Changing Key Layout
Changing Key Layout . . . . . . . . . . . . . . . . . 15
Macro Function
Setting up Macros . . . . . . . . . . . . . . . . . . . 16
Viewing Macros . . . . . . . . . . . . . . . . . . . . . 18
Deleting Macro-Assigned Key . . . . . . . . . 19
Channel Assignment
Setting the Assignment . . . . . . . . . . . . . . . 20
Viewing an Assigned Channel . . . . . . . . . 21
Deleting a Channel Assignment . . . . . . . 22
Re-labeling Assignment Key Labels . . . . 23
Timer/Macro Mode
Setting Timer/Macro Mode . . . . . . . . . . . . 24
Setting Device
Creating a New Device . . . . . . . . . . . . . . . 25
Re-labeling a Device . . . . . . . . . . . . . . . . . 26
Deleting a Device . . . . . . . . . . . . . . . . . . . . 27
Other Settings
Setting Date and Time . . . . . . . . . . . . . . . . 28
Display Date and Time . . . . . . . . . . . . . . . . 28
Auto Power OFF . . . . . . . . . . . . . . . . . . . . . . 29
Back-light . . . . . . . . . . . . . . . . . . . . . . . . . . . 30
Beep on/off . . . . . . . . . . . . . . . . . . . . . . . . . . 31
Viewing Version Numbers . . . . . . . . . . . . . 32
Data Transmission
Loading Data from a PC . . . . . . . . . . . . . . . 32
Loading Data from Another RC-L800/RC-L2 . . 33
Re-setting Unit . . . . . . . . . . . . . . . . . . . . . . . . . . 34
Debugging Code . . . . . . . . . . . . . . . . . . . . . . . . 34
Troubleshooting . . . . . . . . . . . . . . . . . . . . . . . . 35
Specifications . . . . . . . . . . . . . . . . . . . . . . . . . . 35
TO THE USER
This equipment has been tested and found
to comply with the limits for a Class B
digital device, pursuant to Part 15 of the
FCC Rules. These limits are designed to
provide reasonable protection against
interference in a residential area. This
device generates and uses radio
frequency energy and if not installed and
used in accordance with the instructions,
it may cause interference to radio or TV
reception. If this unit does cause
interference with TV or radio reception
you can try to correct the interference by
one or more of the following measures :
a) Reorient or relocate the receiving
antenna.
b) Increase the separation between the
equipment and the receiver.
c) Plug the equipment into a different
outlet so that it is not on the same
circuit as the receiver. If necessary,
consult the dealer or an experienced
radio/TV technician for additional
suggestions.
CAUTION
Changes or modifications to this
equipment not expressly approved by
TEAC CORPORATION for compliance
could void the user's authority to operate
this equipment.
For U.S.A.
Important Safety Instructions
background image
ENGLISH
FRAN
Ç
AIS
E
SPA
Ñ
OL
3
Precautions
Precautions
< Avoid storage or use in high temperatures,
exposed to direct sunshine or near the room
heaters.
< Do not attempt to disassemble or modify the
product. This could damage the product or
cause injury.
< Do not splash water or liquid on the product.
This can cause the product to malfunction.
< Do not drop or subject to rough handling. This
can damage the product.
< For the cleaning, do not use benzene, thinner or
alcohol. These can deform or discolor the
product. Use soft, dry cloth when cleaning.
< Do not touch the touch screen with sharp
object. This can damage the screen.
< Even if the remote control unit is operated
within the effective range, remote control
operation may be erratic if there are any
obstacles between the receiving unit and the
remote control.
< If the remote control unit is operated near other
appliances which generate infrared rays, or if
other remote control devices using infrared
rays are used near the unit, it may operate
incorrectly. Conversely, the other appliances
may operate incorrectly.
Features
TEAC RC-L800/RC-L2 Features
< This remote control supports use of with the
listed models in the Pre-Programmed Code List.
(see page 8)
< Touch-screen, universal remote control perfect
for home theater systems.
< Learn and emulate up to 16 remote controls, 48
buttons per device.
< One-touch buttons for frequently used functions
< Assign Macros of up to 60 commands long,
including time delays.
< Macros, all commands are displayed on the
screen in sequence.
< Rename devices and change touch screen icon
layout.
< Three channel classifications make grouping of
your favorite channels easy.
< LCD backlight button lights up the entire touch
screen and buttons.
< Clock and calendar built in.
< Auto power off.
< Loading data from a PC (CD-ROM and USB
cable supplied).
background image
4
Name of each Control 1
A
B
E
F
J
D
C
L
K
G
H
I
Q
M
P
O
N
Battery Installation
Remove the battery compartment cover.
Insert four AAA (R03, UM-4) batteries. Make
sure that the batteries are inserted with their
positive + and negative _ poles positioned
correctly.
Close the cover.
Battery Replacement
If the distance required between the remote
control unit and main unit decreases, the batteries
are getting weak. In this case replace the batteries
with new ones. The battery power is indicated
with a battery icon in the screen.
Precautions concerning batteries
< Be sure to insert the batteries with correct
positive + and negative _ polarities.
< Use batteries of the same type. Never use
different types of batteries together.
< When the remote control unit is not to be used
for a long time (more than a month), remove the
batteries from the remote control unit to
prevent them from leaking. If they leak, wipe
away the liquid inside the battery compartment
and replace the batteries with new ones.
< Do not heat or disassemble batteries and never
dispose of old batteries by throwing them in a
fire.
3
2
1
background image
5
Name of each Control 2
ENGLISH
FRAN
Ç
AIS
E
SPA
Ñ
OL
Screen Icons and Indicators
:
Displays when key beep is on.
:
Indicates the device's screen key page number.
:
Indicates transmission of remote control signals.
Lights when the attempted process has been
completed successfully.
:
Lights when an invalid key is pressed or the
attempted process has failed.
:
Indicates the battery power.
Power Button
Turns on this remote control and functions as
the power switch for preset devices.
Volume + Button
Raises the volume of preset devices.
Volume ­ Button
Lowers the volume of preset devices.
Mute Button
Mutes the sound of preset devices.
Learning Eye
Receives the transmitted signal of other
remote controls when learning remote control
codes.
Q
P
O
N
M
Remote Control Transmitting Area
Transmits the remote control signal to
components.
Light Sensor
Measures ambient light levels to turn on/off
back-light illumination.
Quick Channel Button
Calls up listing of channels grouped by
content.
Return Button
Press this button during setup to cancel an
operation or toggle off the setup screen.
LCD/Touch Screen
Displays soft keys, features, modes and allows
operation of the soft keys.
Backlit/Sleep Button
Use to turn on this remote control, turn on the
back light and enter the sleep mode.
CH +/PLAY Button
Scrolls up through preset TV channels and
plays audio devices.
CH ­/STOP Button
Scrolls down through preset TV channels and
stops audio devices.
Page Button
Toggles between the pages of a device
screen.
Device Buttons
Lets you select devices.
Macro Button
Used to display keys to which a Macro has
been assigned.
Setup Button
Pressing
and
buttons at the same
time, enters the setup mode.
L
K
J
I
H
G
F
E
D
C
B
A

Reviews

There are no reviews of this manual yet.