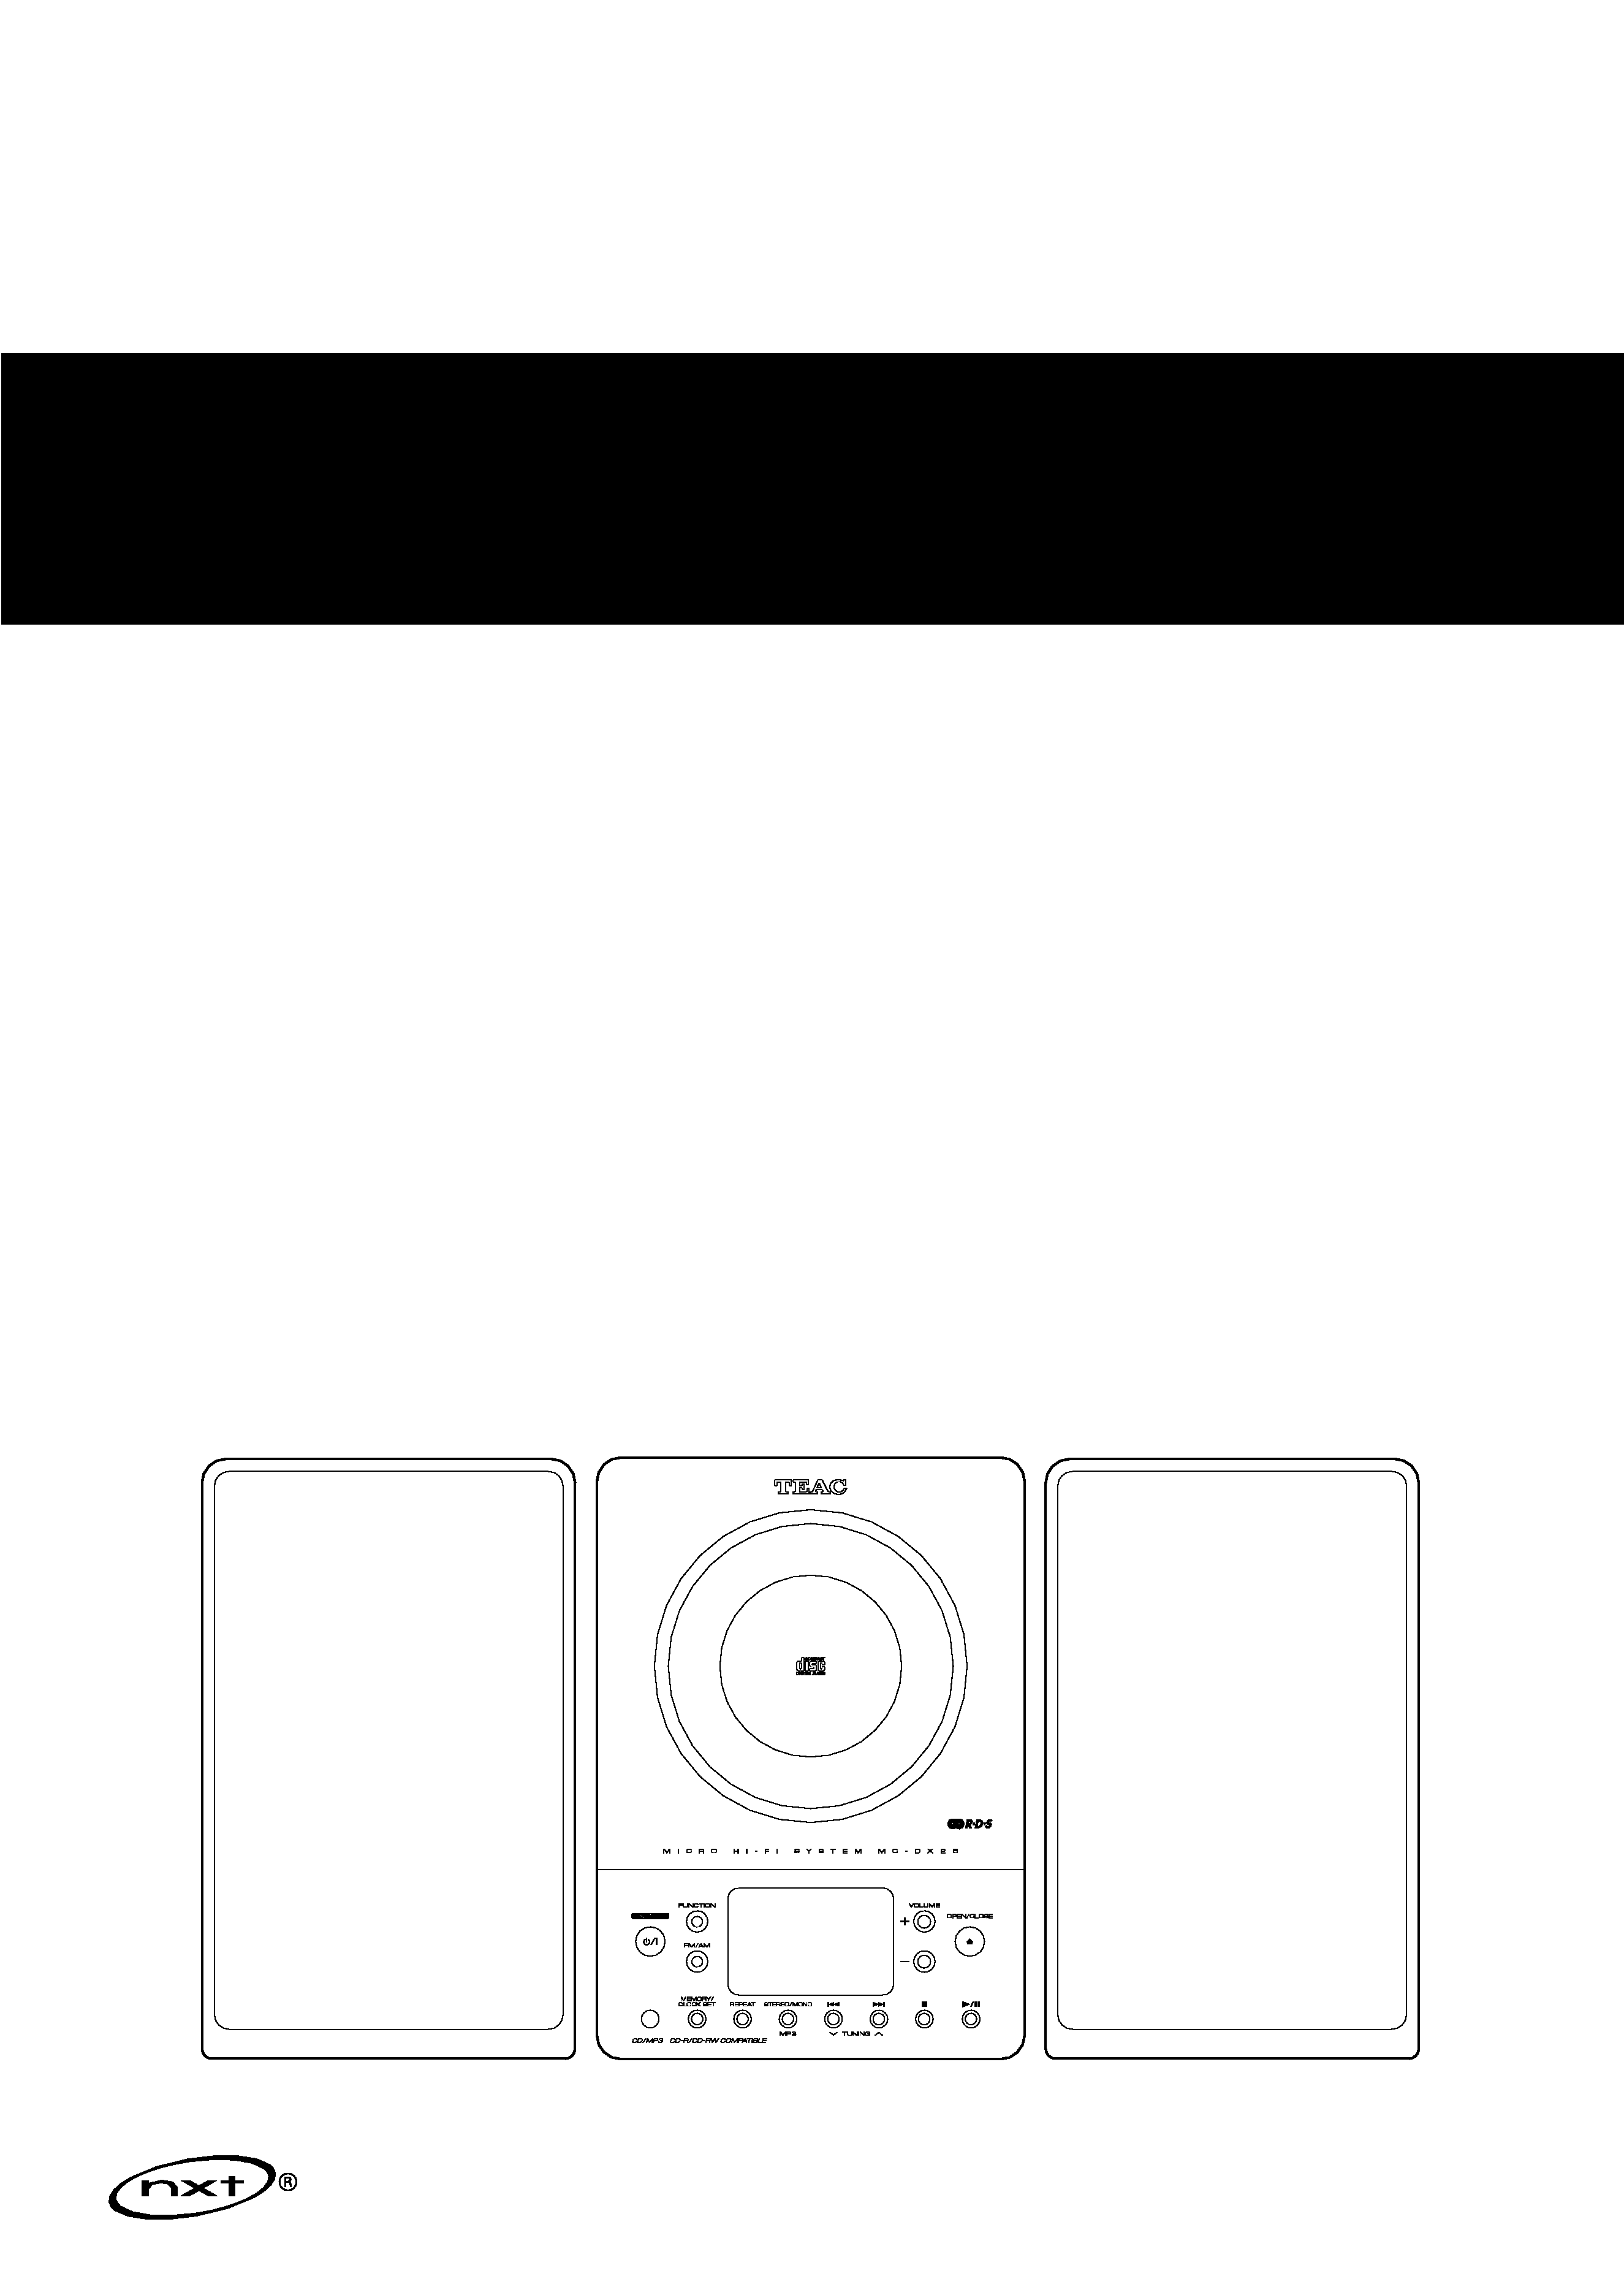
TEAC MCDX25 Owner's Manual

Cover page of TEAC MCDX25 Owner's Manual

Owner's Manual for TEAC MCDX25, downloadable as a PDF file.

We also have service manual to this model.

Manual details

  • Immediate download after payment.
  • Delivered as a PDF file.
  • The manual has 24 pages
  • File size: 0.67 MB
  • Available language versions: Swedish, English, Danish, Finnish
  • Different language versions may vary sligthly in file size and page count.

We guarantee that...

  • our manuals are complete,
  • our manuals are checked with antivirus,
  • We'll issue refund if the manual is damaged, incomplete or unreadable (our refund policy)

Sample pages

Thumbnail of page 1Thumbnail of page 2Thumbnail of page 3Thumbnail of page 4
Thumbnail of page 5Thumbnail of page 6Thumbnail of page 7Thumbnail of page 8
Thumbnail of page 9
background image
9A10300100
OWNER'S MANUAL
Micro Hi-Fi System
Z
MC-DX25
background image
9A10300100
OWNER'S MANUAL
Micro Hi-Fi System
Z
MC-DX25
background image
2
Contents
Before Use
Read this before operation
<
As the unit may become warm during operation, always leave
sufficient space around the unit for ventilation.
<
The voltage supplied to the unit should match the voltage as
printed on the rear panel of the supplied subwoofer. If you
are in any doubt regarding this matter, consult an electrician.
<
Choose the installation location of your unit carefully. Avoid
placing it in direct sunlight or close to a source of heat. Also
avoid locations subject to vibrations and excessive dust, heat,
cold or moisture.
<
Do not place the unit on an amplifier/receiver or any other
electronic device that generates heat.
<
Do not open the sealed cabinet as this might result in damage
to the circuitry or electrical shock. If a foreign object should
get inside the unit, contact your dealer or service agency.
<
When removing the power plug from the wall outlet, always
pull directly on the plug, never yank the cord.
<
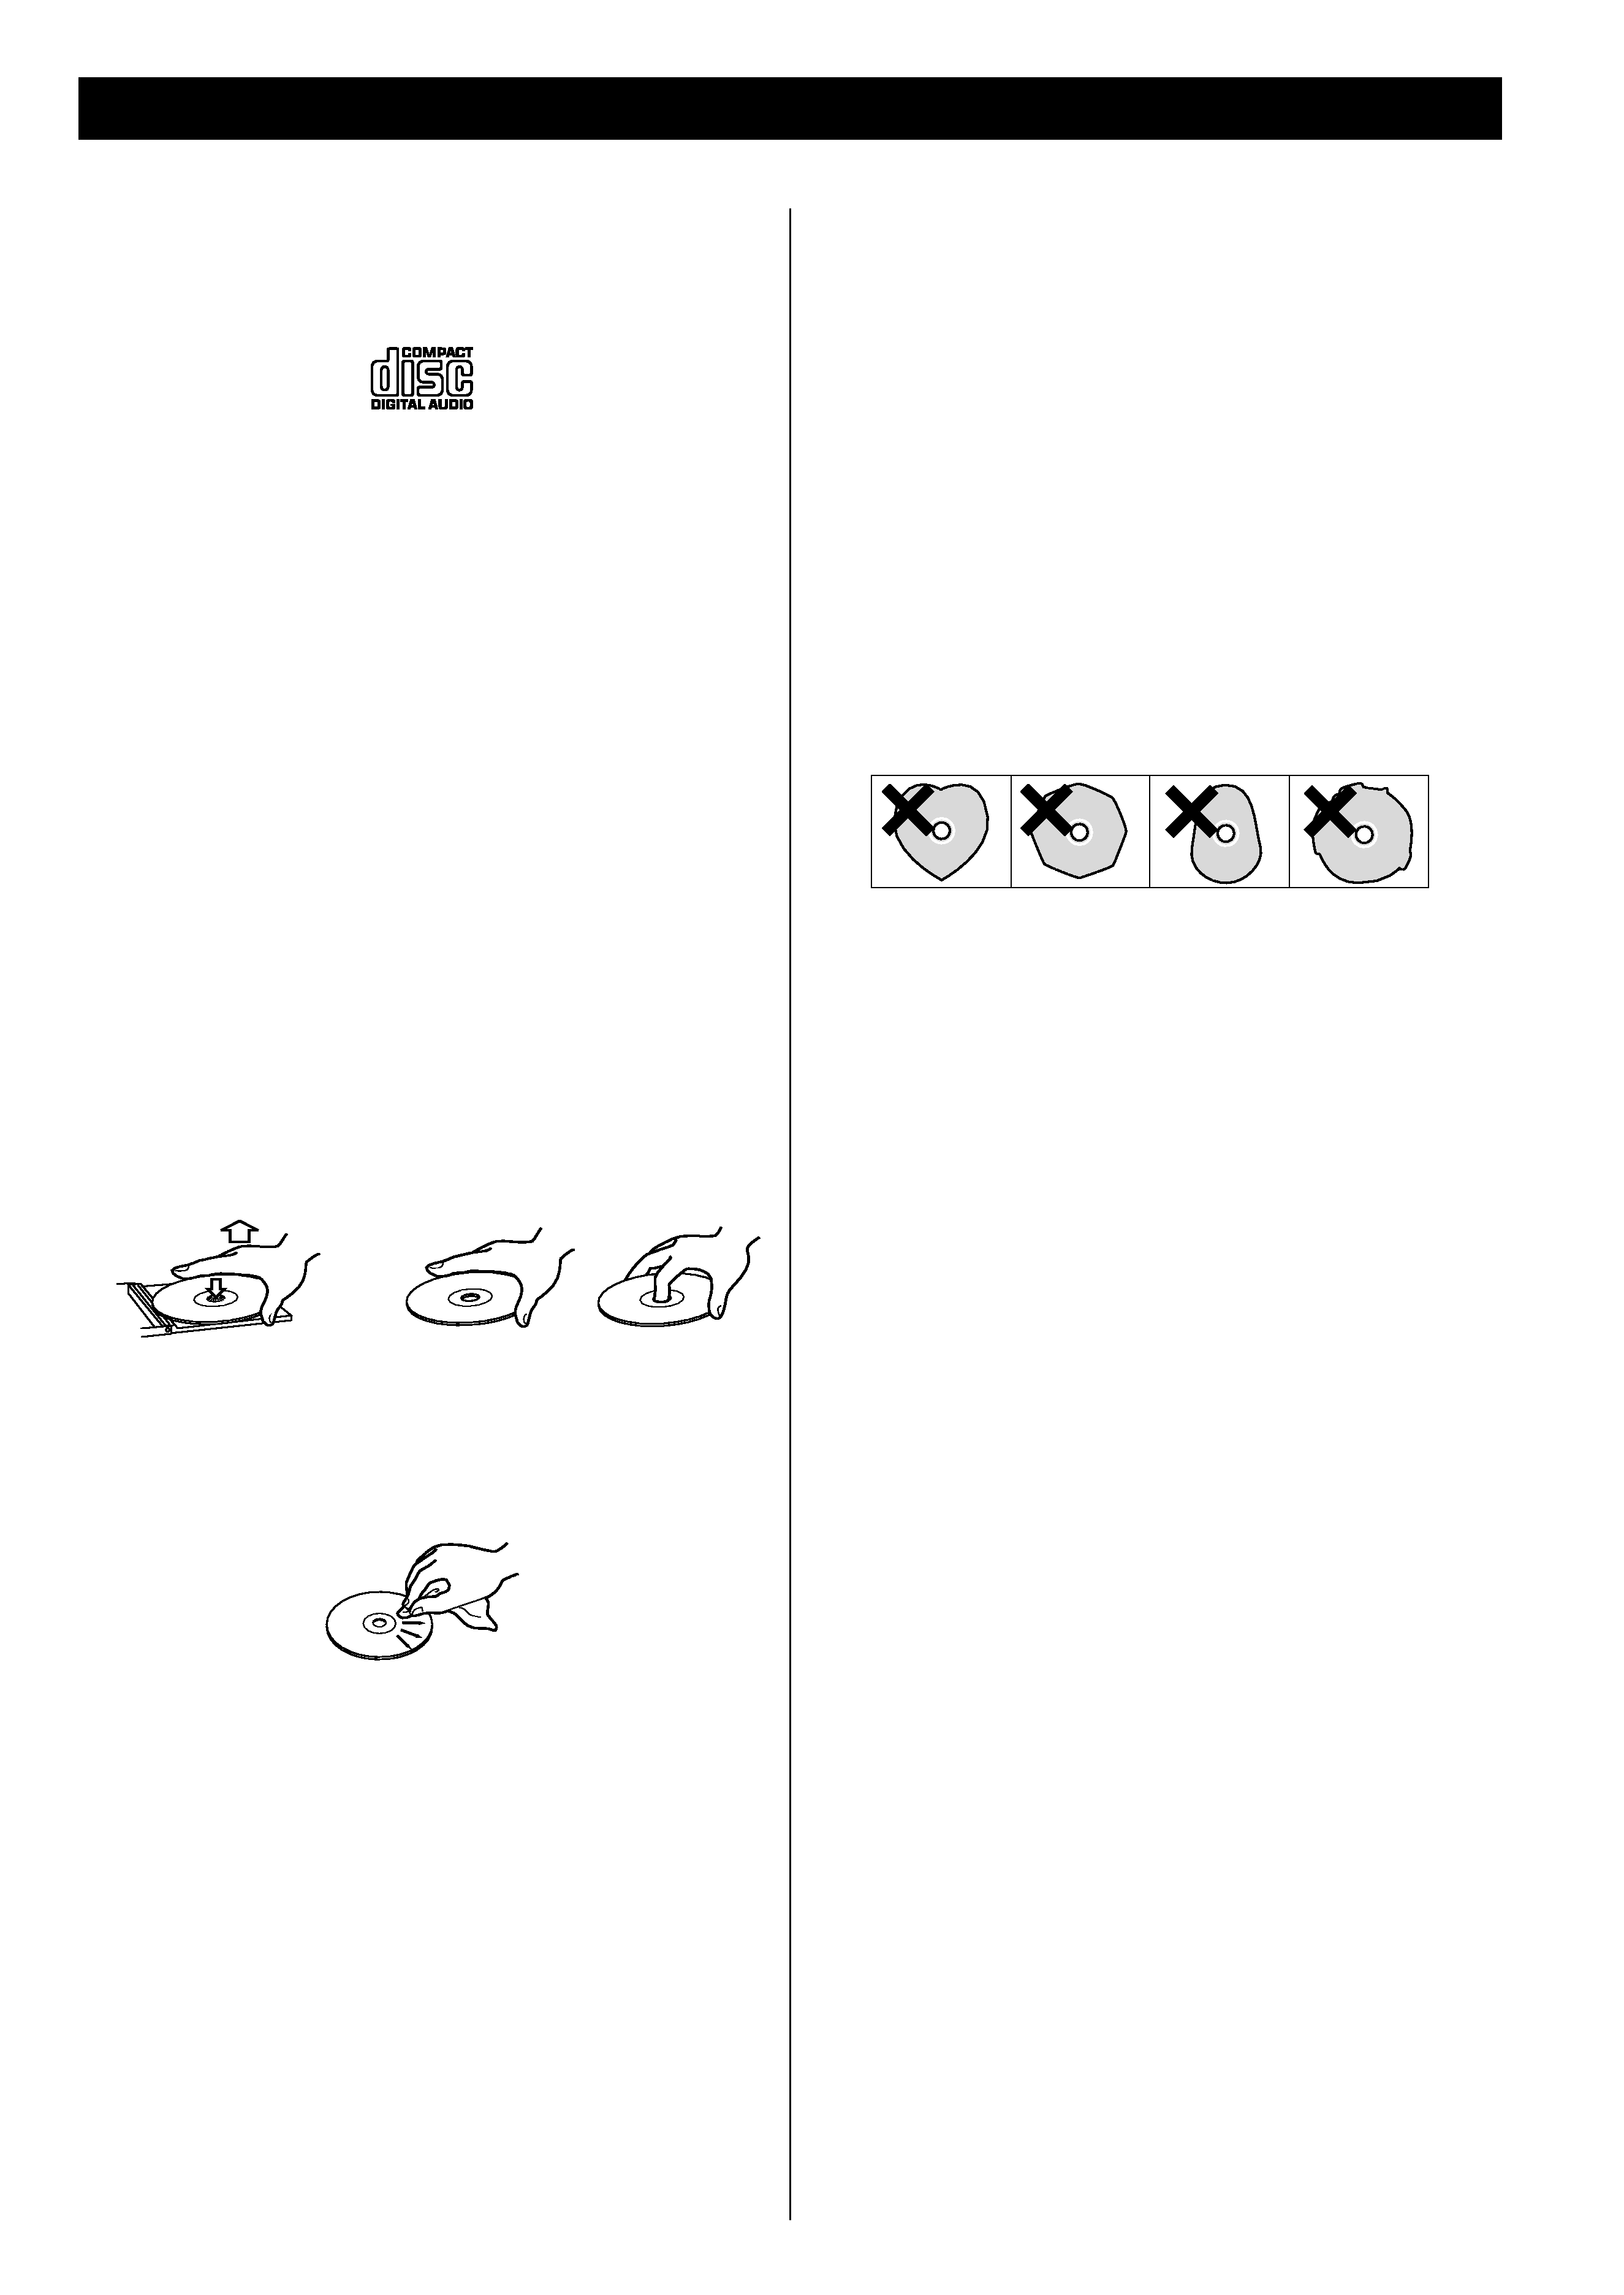
To keep the laser pickup clean, do not touch it, and always
close the CD door.
<
Do not attempt to clean the unit with chemical solvents as
this might damage the finish. Use a clean, dry cloth.
<
Keep this manual in a safe place for future reference.
DO NOT MOVE THE UNIT DURING PLAYBACK
During playback, the disc rotates at high speed. Do NOT lift or
move the unit during playback. Doing so may damage the
disc or the laser assembly.
WHEN MOVING THIS UNIT
When relocating or packing the unit for moving, be sure to
remove the disc. Moving this unit with the disc loaded may
result in damage to this unit.
CAUTION
Do not expose this unit to liquids of any kind. Keep any
objects containing liquids such as vases, water glasses, potted
plants, et cetera off the top of this unit.
Do not install this equipment in a confined space such as a
bookcase or similar unit.
trademark of New Transducers Ltd.
VARING: APPARATEN INNEHÅLLER LASER KOMPONENT MED
STRÅLNING ÖVERSTIGANDE KLASS 1.
`ADVARSEL: USYNLIG LASERSTRÅLING VED ÅBNING NAR
SIKKERHEDSAFBRYDERE ER UDE AF FUNKTION. UNDGÅ
UDSAETTELSE FOR STRÅLING'
`VAROITUS! SUOJAKOTELOA EI SAA AVATA. LAITE SISÄLTÄÄ
LASERDIODIN. JOKA LÄHETTÄ (NÄKYMÄTÖNTÄ) SILMILLE
VAARALLISTA LASERSÄTEILYÄ'.
ADVARSEL: USYNLIG LASERBESTRÅLING NÅR DENNE DELEN ER
ÅPEN OG SIKKERHETSSPERREN ER UTKOBLET UNNGÅ
UTSETTELSE FOR STRÅLING.
Thank you for choosing TEAC. Read this manual carefully
to get the best performance from this unit.
Before Use . . . . . . . . . . . . . . . . . . . . . . . . . . . . . . . . . . . . . . . . 2
Discs . . . . . . . . . . . . . . . . . . . . . . . . . . . . . . . . . . . . . . . . . . . . . 3
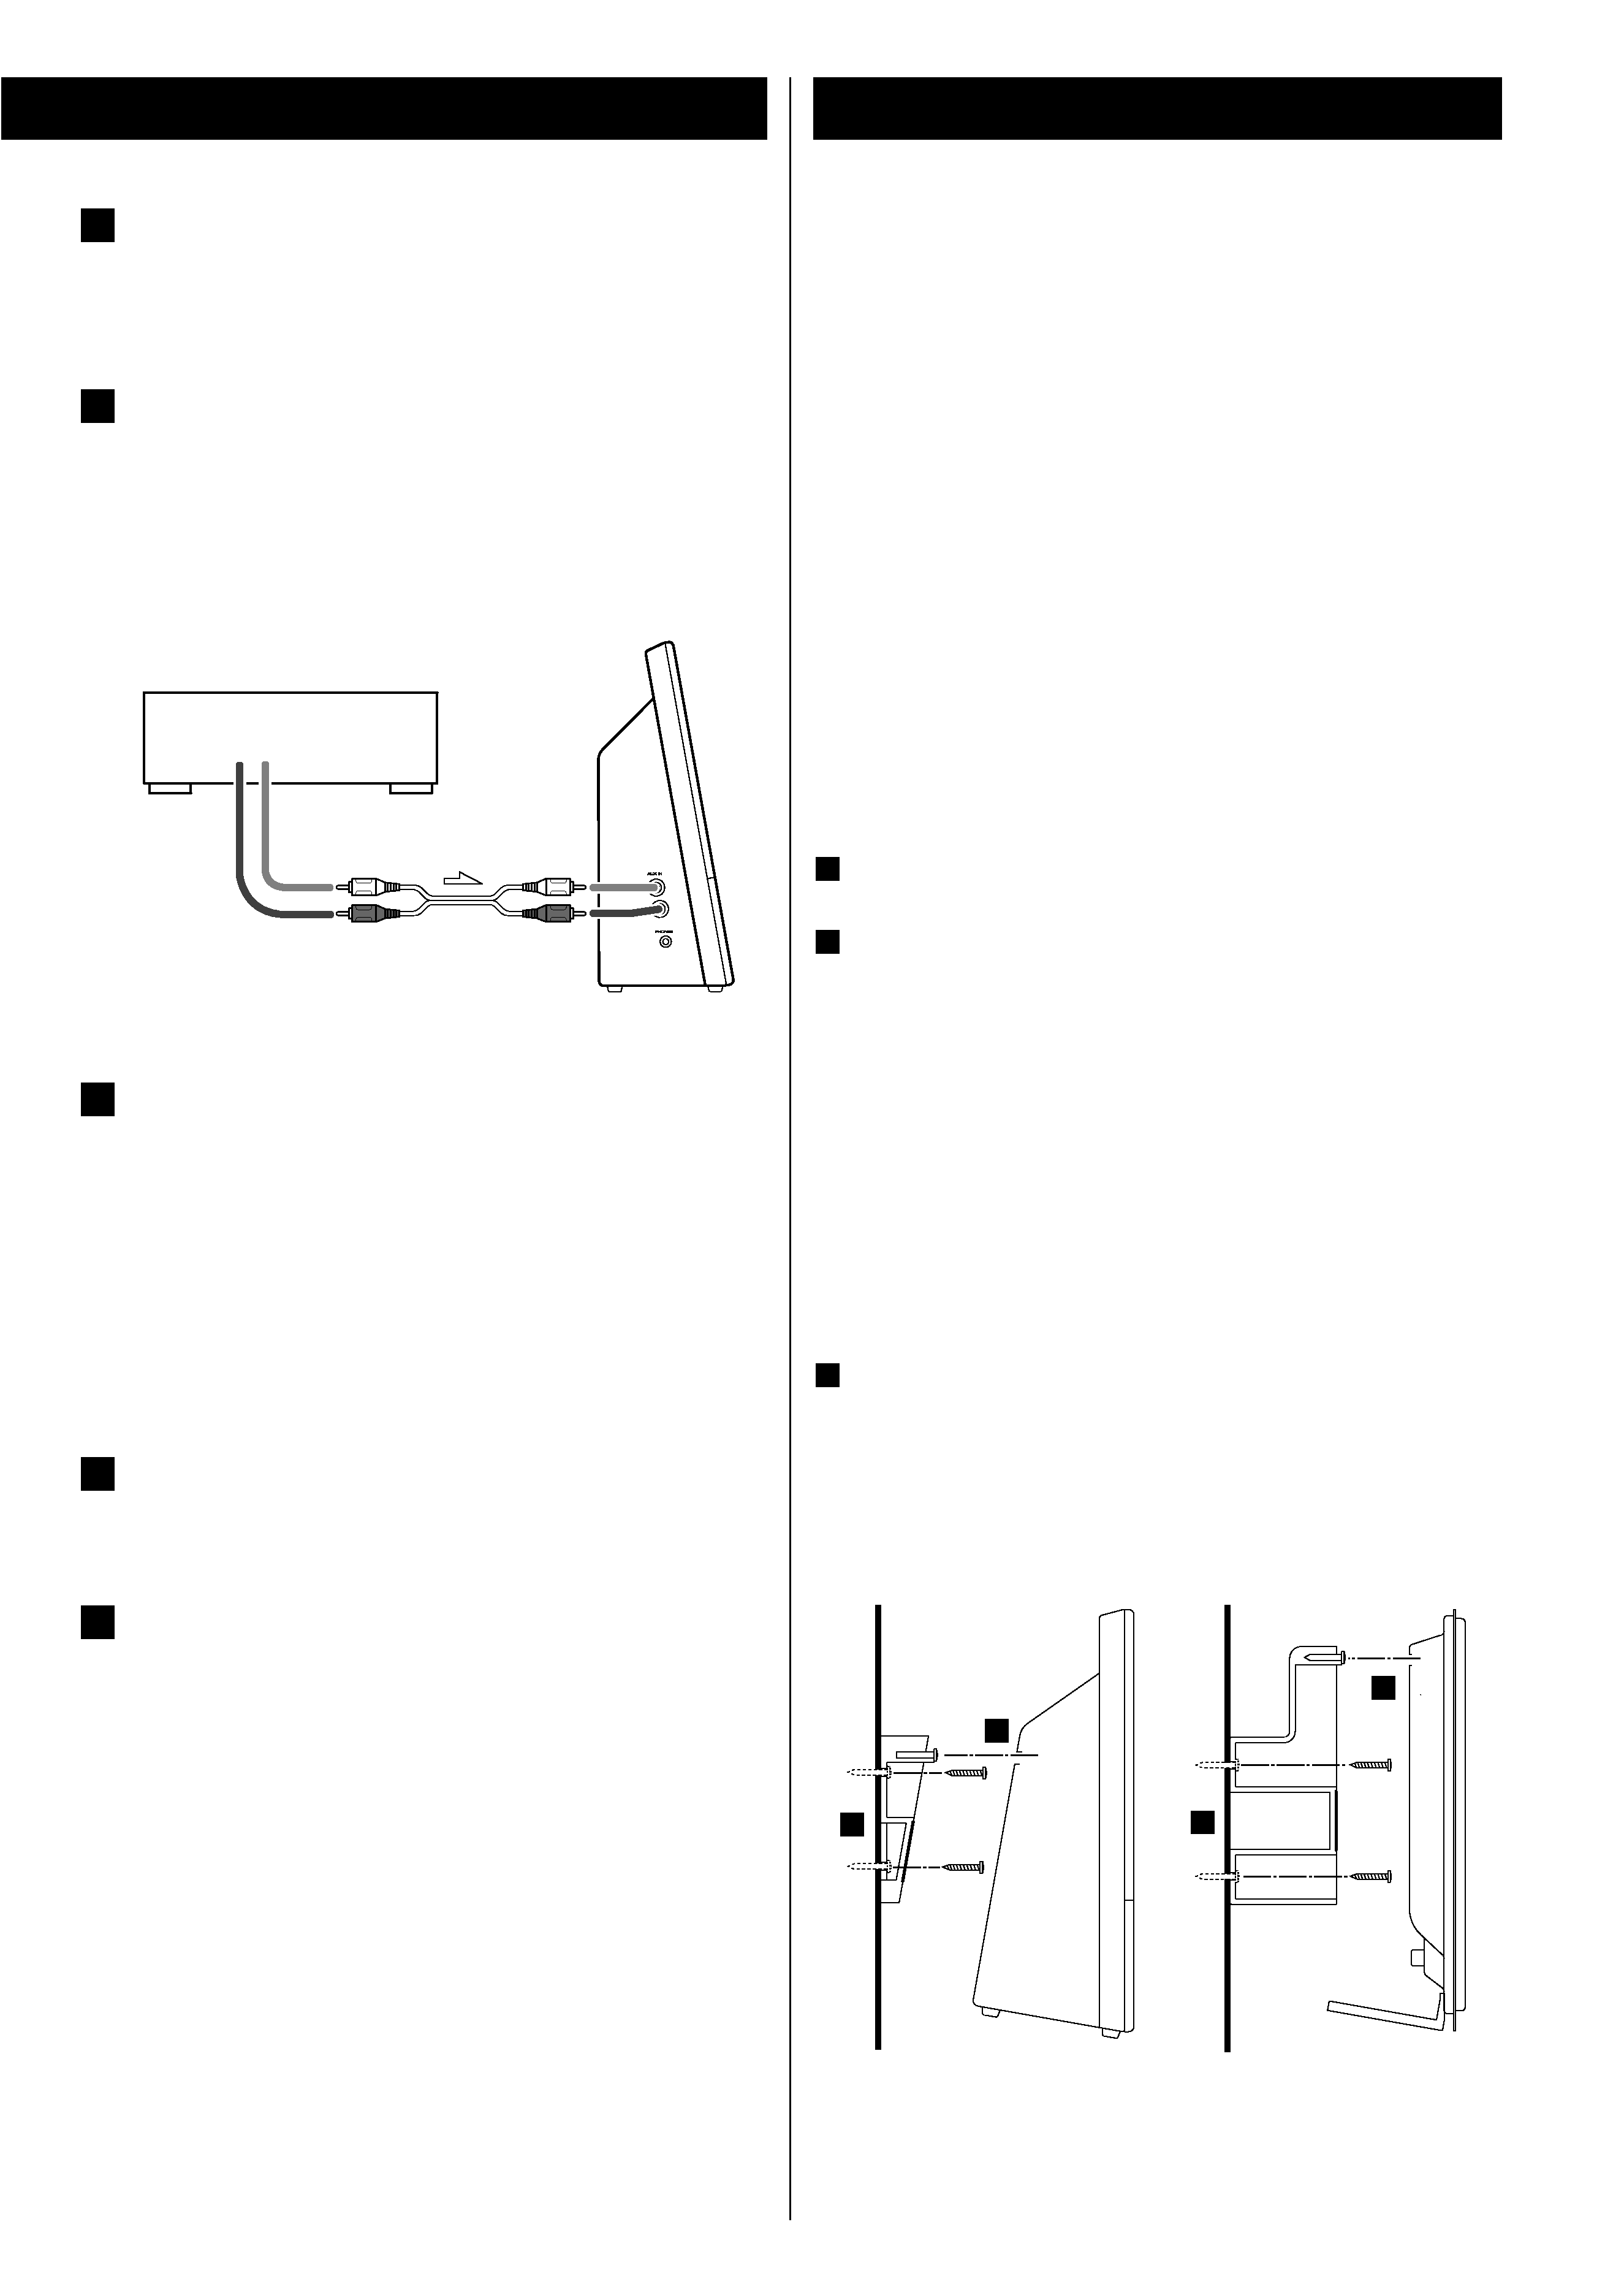
Connection. . . . . . . . . . . . . . . . . . . . . . . . . . . . . . . . . . . . . . . . 4
Wall Mounting . . . . . . . . . . . . . . . . . . . . . . . . . . . . . . . . . . . . . 5
Names of Each Control . . . . . . . . . . . . . . . . . . . . . . . . . . . . . . . 6
Remote Control Unit. . . . . . . . . . . . . . . . . . . . . . . . . . . . . . . . . 7
Basic Operation. . . . . . . . . . . . . . . . . . . . . . . . . . . . . . . . . . . . . 8
Listening to CD/MP3 . . . . . . . . . . . . . . . . . . . . . . . . . . . . . . . . . 9
Search Mode (MP3 only) . . . . . . . . . . . . . . . . . . . . . . . . . . . . . 11
Programmed Playback. . . . . . . . . . . . . . . . . . . . . . . . . . . . . . . 12
Repeat Playback . . . . . . . . . . . . . . . . . . . . . . . . . . . . . . . . . . . 14
Shuffle Playback . . . . . . . . . . . . . . . . . . . . . . . . . . . . . . . . . . . 14
Listening to the Radio . . . . . . . . . . . . . . . . . . . . . . . . . . . . . . . 15
Preset Tuning . . . . . . . . . . . . . . . . . . . . . . . . . . . . . . . . . . . . . 16
RDS . . . . . . . . . . . . . . . . . . . . . . . . . . . . . . . . . . . . . . . . . . . . 17
RDS (PTY Search) . . . . . . . . . . . . . . . . . . . . . . . . . . . . . . . . . . 18
Setting the Clock . . . . . . . . . . . . . . . . . . . . . . . . . . . . . . . . . . 19
Setting the Timer . . . . . . . . . . . . . . . . . . . . . . . . . . . . . . . . . . 20
Troubleshooting . . . . . . . . . . . . . . . . . . . . . . . . . . . . . . . . . . . 22
Specifications . . . . . . . . . . . . . . . . . . . . . . . . . . . . . . . . . . . . . 23
background image
3
Discs
<
Printable CD-R discs aren't recommended, as the label side
might be sticky and damage the unit.
<
Do not stick papers or protective sheets on the discs and do
not use any protective coating spray.
<
Use a soft oil-based felt-tipped pen to write the information
on the label side. Never use a ball-point or hard-tipped pen,
as this may cause damage to the recorded side.
<
Never use a stabilizer. Using commercially available CD
stabilizers with this unit will damage the mechanisms and
cause them to malfunction.
<
Do not use irregular shape CDs (octagonal, heart-shape, etc.).
CDs of this sort can damage the unit.
Discs that can be played on this unit:
· Commercial audio CD's bearing the `Compact Disc Digital
Audio' logo:
· Properly finalized CD-R and CD-RW discs
Note:
<
Depending on the quality of the disc and/or the condition of
the recording, some CD-R discs may not be playable.
<
Copy-protected discs and other discs which do not conform
to the CD standard may not play back correctly in this player.
If you use such discs in this unit, TEAC Corporation and its
subsidiaries cannot be responsible for any consequences or
guarantee the quality of reproduction. If you experience
problems with such non-standard discs, you should contact
the producers of the disc.
<
Always load the disc with the label side facing you. (Compact
discs can be played or recorded only on one side.)
<
To remove a disc from its storage case, press down on the
center of the case and lift the disc out, holding it carefully by
the edges.
How to remove the disc
How to hold the disc
<
Should the disc become dirty, wipe the surface radially with a
soft, dry cloth. Never clean the disc using a circular motion.
<
If you are in any doubt as to the care and handling of a CD-
R/CD-RW disc, read the precautions supplied with the disc, or
contact the disc manufacturer directly.
<
Never use such chemicals as record sprays, antistatic sprays or
fluid, benzene or thinner to clean the discs. Such chemicals
will do irreparable damage to the disc's plastic surface.
<
Discs should be returned to their cases after use to avoid dust
and scratches that could cause the laser pickup to `skip.'
<
Do not expose discs to direct sunlight or high humidity and
temperature for extended periods. Long exposure to high
temperatures will warp the disc.
<
CD-R discs are more sensitive to the effects of heat and
ultraviolet rays than ordinary CDs. It is important that they are
not stored in a location where direct sunlight will fall on them
and which is away from sources of heat such as radiators or
heat-generating electrical devices.
MP3 compatibility
<
File names of MP3 should be alphanumeric characters. This
unit cannot display symbols and full-size or 2 bytes-wide
characters (such as Japanese, Chinese, etc.) correctly. Also, be
sure to use the file extension `.mp3'.
<
The disc must be finalized in order to play.
<
The CD-ROM must be ISO 9660 compatible.
<
When more than 200 files or folders are recorded on the disc,
the unit might not be able to play it correctly.
<
Mono or stereo MPEG-1 Audio Layer 3 format, 44.1 or
48 kHz, fixed bit-rate.
<
Audio encoded at 128 Kbps should sound close to regular
audio CD quality. Although this player will play lower bit-rate
MP3 tracks, the sound quality becomes noticeably worse at
lower bit-rates.
background image
4
Connection
MAIN UNIT
SUBWOOFER
SPEAKER (R)
SPEAKER (L)
AM loop antenna
Position the antenna for the best sound.
If you want, you can hook the AM antenna on a wall as
shown below:
A
CAUTION
Turn off the power of all the equipment before making
connections.
Read instructions of each component you intend to use with
this unit.
<
Be sure to insert each plug securely. To prevent hum and
noise, do not bundle the connection cords with the power
cord.
FM antenna
While in FM mode, tune in an FM station and extend the
lead to find the best position for reception. This antenna
may need to be repositioned if you move your unit to a new
location.
B
Outdoor FM Antenna (75)
FM Outdoor Antenna
In an area where FM signals are weak, it will be necessary to
use a 75-ohm unbalanced-type outdoor FM antenna using
an optional (not supplied) matching transformer connected
to an external antenna. Generally, a 3-element antenna will
be sufficient; if you live in an area where the FM signals are
particularly weak, it may be necessary to use one with 5 or
more elements.
B
A
C
E
F
G
background image
5
Wall Mounting
You can mount the main unit and/or the left and right speakers
on a wall.
Precautions
<
Be aware that the length of the cables are approximately 3 m.
Do not attempt to mount the main unit and the speakers too
far from the subwoofer.
<
Drill holes into solid wall support, such as wooden frame or
concrete wall.
<
TEAC supplies these brackets as a convenience to the product
owner. Consult your local building codes and exercise all
necessary caution when mounting these brackets. If you are
unsure how to use the supplied brackets, consult with a local
tradesmen or building supply expert.
To hook on the wall
Use the supplied template to determine drilling points.
Secure the brackets on the wall using the supplied screws.
<
As a convenience, a set of tapered plastic anchors is supplied.
If you chose to use these anchors, drill a pilot hole using
either a 6mm drill bit then tap the anchor into the pilot hole.
Only use these anchors if they are appropriate for the
materials onto which the unit is to be mounted. Consult your
local hardware store if you are uncertain.
Note:
Before going on, make connections between the main unit
and the speakers by referring to page 4-5.
Hang the main unit and/or the speakers to the mounting
tabs.
3
2
1
Speaker
Main Unit
2
3
3
2
Subwoofer
Make the connection between the `TO SUBWOOFER' and
`FROM MAIN' sockets using the supplied cable.
AUX IN
You can connect a DVD player, VCR etc. to this unit.
Connect the component with RCA pin cords.
Make sure to connect the white plug to the white jacks
(Left) and the red plug to the red jacks (Right).
D
C
SPEAKERS
Connect the left speaker's plug to L, and the right speaker's
plug to R.
<
When using speakers other than those supplied with the
system, the impedance should be 3 ohms or more.
<
Do not connect anything other than speakers to these
terminals.
AC Power Cord
Plug this AC power cord into an AC wall socket.
Power Switch
Use this switch to turn the system on or off.
The main unit is powered via the subwoofer. You need to
first turn this switch on.
G
F
E
LINE OUT
RL
DVD, TV, etc.

Reviews

There are no reviews of this manual yet.