TEAC CRH225 Owner's Manual

Cover page of TEAC CRH225 Owner's Manual

Owner's Manual for TEAC CRH225, downloadable as a PDF file.

We also have service manual to this model.

Manual details

  • Immediate download after payment.
  • Delivered as a PDF file.
  • The manual has 36 pages
  • File size: 1.1 MB
  • Available language versions: French, English, Spanish, Dutch, German, Italian
  • Different language versions may vary sligthly in file size and page count.

We guarantee that...

  • our manuals are complete,
  • our manuals are checked with antivirus,
  • We'll issue refund if the manual is damaged, incomplete or unreadable (our refund policy)

Sample pages

Thumbnail of page 1Thumbnail of page 2Thumbnail of page 3Thumbnail of page 4
Thumbnail of page 5Thumbnail of page 6Thumbnail of page 7Thumbnail of page 8
Thumbnail of page 9
background image
9A10355400
CR-H225
OWNER'S MANUAL
CD/Receiver
Z
background image
9A10355400
CR-H225
OWNER'S MANUAL
CD/Receiver
Z
background image
2
Contents
Thanks you for choosing TEAC. Read this manual
carefully to get the best performance from this
unit.
Before Use . . . . . . . . . . . . . . . . . . . . . . . . . . . . . . . . 3
Compact Disc . . . . . . . . . . . . . . . . . . . . . . . . . . . . . . 4
MP3 and WMA . . . . . . . . . . . . . . . . . . . . . . . . . . . . . 5
How to Reset the Settings to
the Factory Defaults . . . . . . . . . . . . . . . . . . . . . . . 5
Connections . . . . . . . . . . . . . . . . . . . . . . . . . . . . . . . 6
Connecting Antennas (AM/FM) . . . . . . . . . . . . . . . . . 8
Remote Control Unit . . . . . . . . . . . . . . . . . . . . . . . . . 9
Names of Each Control . . . . . . . . . . . . . . . . . . . . . . 10
Basic Operation. . . . . . . . . . . . . . . . . . . . . . . . . . . . 14
Listening to CD/MP3/WMA (discs) . . . . . . . . . . . . . . 16
Listening to a USB device . . . . . . . . . . . . . . . . . . . . 17
Search. . . . . . . . . . . . . . . . . . . . . . . . . . . . . . . . . . . 17
Basic Playback . . . . . . . . . . . . . . . . . . . . . . . . . . . . . 18
Repeat Playback . . . . . . . . . . . . . . . . . . . . . . . . . . . 19
Programmed Playback. . . . . . . . . . . . . . . . . . . . . . . 20
Shuffle Playback . . . . . . . . . . . . . . . . . . . . . . . . . . . 21
Display . . . . . . . . . . . . . . . . . . . . . . . . . . . . . . . . . . 22
Time Display . . . . . . . . . . . . . . . . . . . . . . . . . . . . . . 22
Before Recording . . . . . . . . . . . . . . . . . . . . . . . . . . 23
Setting the Record Mode . . . . . . . . . . . . . . . . . . . . 23
Recording to USB . . . . . . . . . . . . . . . . . . . . . . . . . . 24
Delete a file from USB . . . . . . . . . . . . . . . . . . . . . . . 24
Listening to FM/AM. . . . . . . . . . . . . . . . . . . . . . . . . 25
Preset Tuning . . . . . . . . . . . . . . . . . . . . . . . . . . . . . 26
RDS. . . . . . . . . . . . . . . . . . . . . . . . . . . . . . . . . . . . . 28
PTY Search . . . . . . . . . . . . . . . . . . . . . . . . . . . . . . . 29
PTY (Programme Type) . . . . . . . . . . . . . . . . . . . . . . 30
Setting the Clock . . . . . . . . . . . . . . . . . . . . . . . . . . 31
Setting the Timer . . . . . . . . . . . . . . . . . . . . . . . . . . 32
Sleep Timer . . . . . . . . . . . . . . . . . . . . . . . . . . . . . . . 33
Listening to the External Sources . . . . . . . . . . . . . . . 33
Troubleshooting . . . . . . . . . . . . . . . . . . . . . . . . . . . 34
Specifications . . . . . . . . . . . . . . . . . . . . . . . . . . . . . 35
Disposal of your old appliance
1. When
this
crossed-out
wheeled
bin
symbol
is
attached to a product it
means the product is covered
by the European Directive
2002/96/EC.
2. All electrical and electronic
products should be disposed of separately from
the municipal waste stream via designated
collection facilities appointed by the government
or the local authorities.
3. The correct disposal of your old appliance will
help prevent potential negative consequences for
the environment and human health.
4. For more detailed information about disposal of
your old appliance, please contact your city
office, waste disposal service or the shop where
you purchased the product.
background image
CAUTION
The product shall not be exposed to dripping or
splashing and that no object filled with liquids, such
as vases, shall be placed on the product.
Do not install this equipment in a confined space
such as a book case or similar unit.
3
Read this before operation
<
As the unit may become warm during operation,
always leave sufficient space around the unit for
ventilation.
<
The voltage supplied to the unit should match the
voltage as printed on the rear panel. If you are in
any doubt regarding this matter, consult an
electrician.
<
Choose the installation location of your unit
carefully. Avoid placing it in direct sunlight or close
to a source of heat. Also avoid locations subject to
vibrations and excessive dust, heat, cold or
moisture.
<
Do not place the unit on an amplifier/receiver.
<
Do not open the cabinet as this might result in
damage to the circuitry or electrical shock. If a
foreign object should get into the set, contact your
dealer or service agency.
<
When removing the power plug from the wall
outlet, always pull directly on the plug, never yank
the cord.
<
To keep the laser pickup clean, do not touch it, and
do not forget to close the disc tray when not using
the CD player.
<
Do not attempt to clean the unit with chemical
solvents as this might damage the finish. Use a
clean, dry cloth.
<
Keep this manual in a safe place for future
reference.
DO NOT MOVE THE UNIT DURING PLAYBACK
During playback, the disc rotates at high speed. Do
NOT lift or move the unit during playback. Doing so
may damage the disc.
WHEN MOVING THIS UNIT
When changing places of installation or packing
the unit for moving, be sure to remove the disc and
return the disc table to its original position in the
player. Then, press the power switch to turn the
power off, and disconnect the power cord. Moving
this unit with the disc loaded may result in damage
to this unit.
Before Use
Maintenance
If the surface of the unit gets dirty, wipe with a soft
cloth or use diluted neutral cleaning liquid. Be sure to
remove any fluid completely. Do not use thinner,
benzine or alcohol as they may damage the surface of
the unit.
Beware of condensation
When the unit (or a disc) is moved from a cold to a
warm place, or used after a sudden temperature
change, there is a danger of condensation; vapor in
the air could condense on the internal mechanism,
making correct operation impossible. To prevent this,
or if this occurs, leave the unit for one or two hours
with the power turned on. The unit will stabilize at the
temperature of its surroundings.
background image
Compact Disc
Discs which can be played on this unit:
· Conventional audio CDs bearing the CD-DA logo
on the label:
· Properly finalized CD-R and CD-RW discs
Note:
<
Depending on the quality of the disc and/or the
condition of the recording, some CD-R/CD-RW
discs may not be playable.
<
Copy-protected discs and other discs which do not
conform to the CD standard may not play back
correctly in this player. If you use such discs in this
unit, TEAC Corporation and its subsidiaries cannot
be responsible for any consequences or guarantee
the quality of reproduction. If you experience
problems with such non-standard discs, you should
contact the producers of the disc.
<
Discs should be returned to their cases after use to
avoid dust and scratches that could cause the laser
pickup to `skip'.
<
Do not expose discs to direct sunlight or high
humidity and temperature for extended periods.
Long exposure to high temperatures will warp the
disc.
<
Do not play any disc that is warped, deformed or
damaged. Playing such discs may cause irreparable
harm to the playing mechanisms.
<
CD-R and CD-RW discs are more sensitive to the
effects of heat and ultraviolet rays than ordinary
CDs. It is important that they are not stored in a
location where direct sunlight will fall on them, and
which is away from sources of heat such as
radiators or heat-generating electrical devices.
<
Printable CD-R and CD-RW discs aren't
recommended, as the label side might be sticky and
damage the unit.
<
Do not stick papers or protective sheets on the
discs and do not use any protective coating spray.
<
Use a soft oil-based felt-tipped pen to write the
information on the label side. Never use a ball-point
or hard-tipped pen, as this may cause damage to
the recorded side.
<
Never use a stabilizer. Using commercially available
CD stabilizers with this unit will damage the
mechanisms and cause them to malfunction.
<
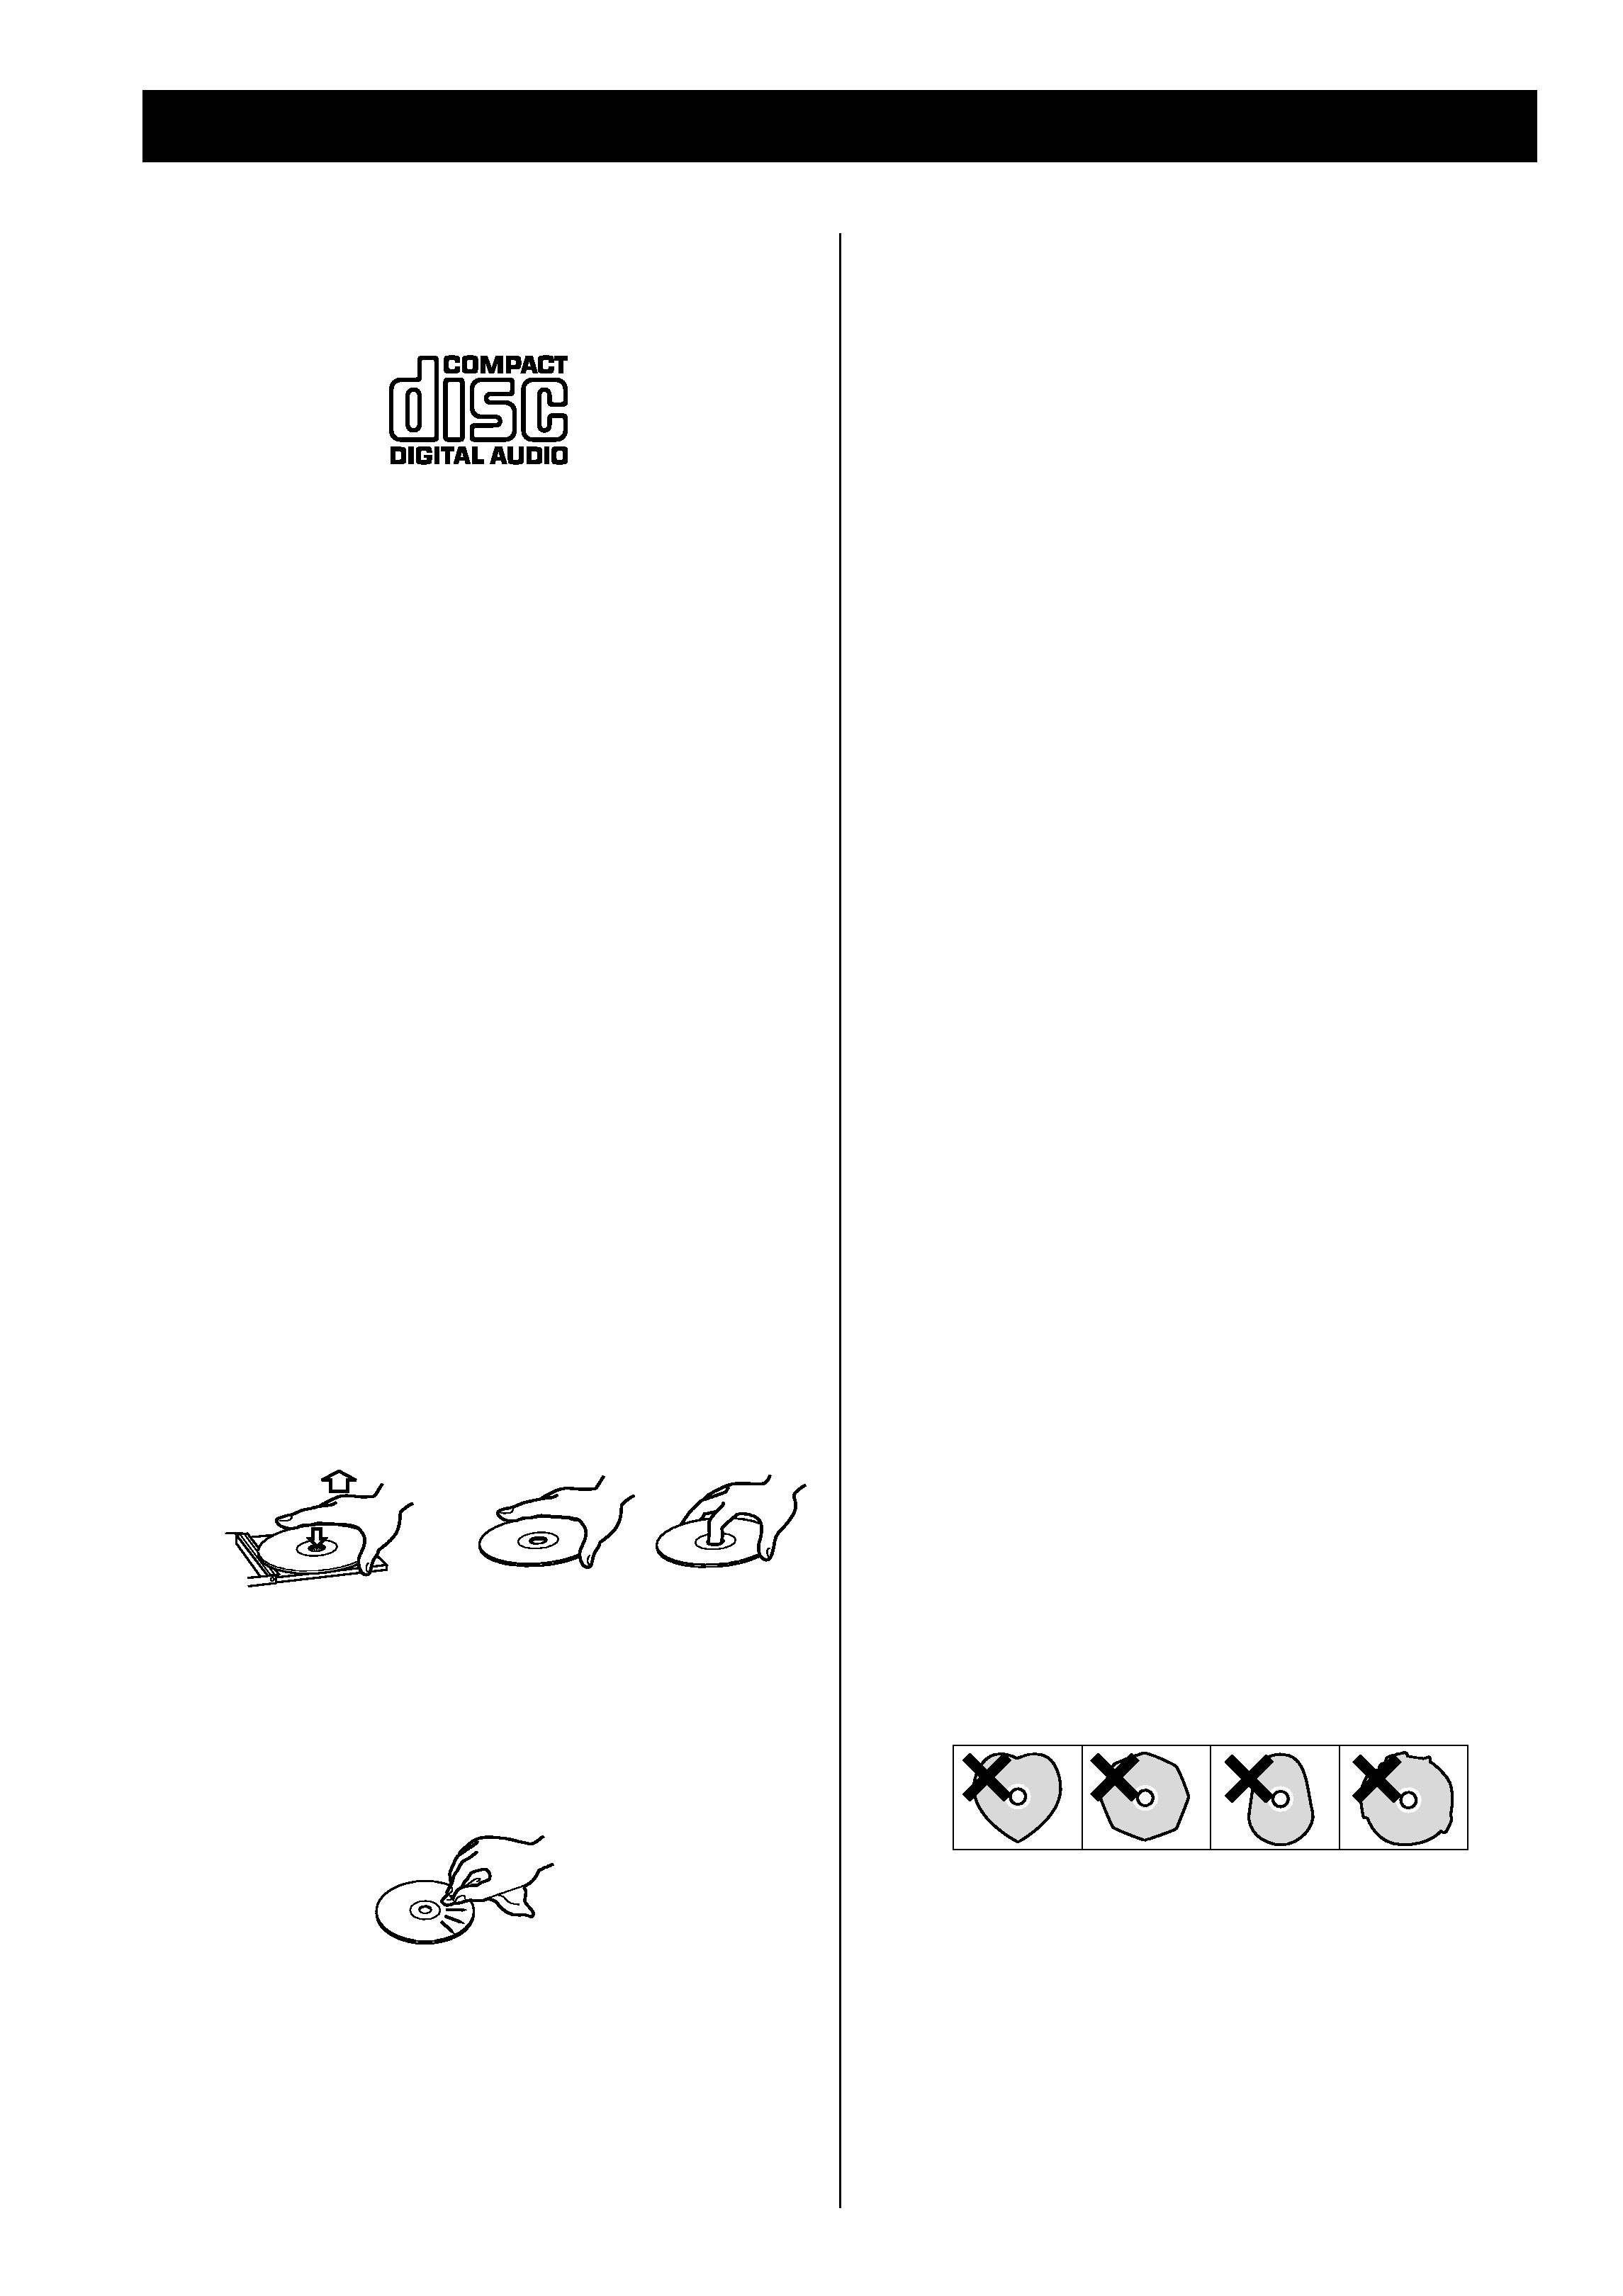
Do not use irregular shape CDs (octagonal, heart
shaped, business card size, etc.). CDs of this sort
can damage the unit:
<
If you are in any doubt as to the care and handling
of a CD-R/CD-RW disc, read the precautions
supplied with the disc, or contact the disc
manufacturer directly.
<
Always place the disc on the disc tray with the label
side uppermost. (Compact discs can be played or
recorded only on one side.)
<
To remove a disc from its storage case, press down
on the center of the case and lift the disc out,
holding it carefully by the edges.
How to remove the disc
How to hold the disc
<
Should the disc become dirty, wipe the surface
radially (from the center hole outward towards the
outer edge) with a soft, dry cloth:
<
Never use such chemicals as record sprays,
antistatic sprays or fluid, benzine or thinner to clean
the discs. Such chemicals will do irreparable
damage to the disc's plastic surface.
4
background image
5
MP3 and WMA
<
This unit can play MP3 and WMA files recorded on
a CD-R, CD-RW or USB storage device.
<
File names of MP3 or WMA should be alphanumeric
characters. This unit cannot display symbols and
full-size or double-byte characters (such as
Japanese, Chinese, etc.) correctly. Also, be sure to
use the file extension. (`.mp3' for MP3 files, `.wma'
for WMA files.)
<
MP3 files are mono or stereo MPEG-1 Audio Layer 3
format. This unit can play MP3 files with sampling
frequency 44.1 kHz or 48 kHz, bit-rate320 kbps or
less.
<
This unit can play WMA files with sampling
frequency 44.1 kHz, bit-rate 192 kbps or less.
WMA means Windows Media Audio.
<
Audio encoded at 128 Kbps should sound close to
regular audio CD quality. Although this player will
play lower bit-rate MP3 tracks, the sound quality
becomes noticeably worse at lower bit-rates.
Discs
<
The disc must be finalized in order to play.
<
The CD-ROM must be ISO 9660 compatible.
<
When more than 255 files are recorded on the disc,
the unit might not be able to play it correctly.
USB
<
This unit supports USB 1.1 FULL SPEED (12Mbps).
<
This unit can play MP3 files recorded in various
external USB storage devices such as USB flash
memory, MP3 player or HDD.
The HDD must be formatted FAT 16 or FAT 32, but
not NTFS.
<
When more than 2000 files are recorded on the
USB memory, the unit might not be able to play it
correctly.
How to Reset the Settings
to the Factory Defaults
The unit will be turned on, and all the settings are
reset to the default settings.
If the power supply is interrupted for 14 days or
longer, all the settings kept in memory (such as preset
stations and timer settings) will be erased.
It will take more than 3 days after plugging the power
cord into the outlet to charge enough electricity for
the memory backup function.
If you want to manually initialize the settings,
hold down the FUNCTION/FM MODE button for
more than 4 seconds in stanby mode.

Reviews

There are no reviews of this manual yet.