TEAC AGH350 Owner's Manual

Cover page of TEAC AGH350 Owner's Manual

Owner's Manual for TEAC AGH350, downloadable as a PDF file.

We also have service manual to this model.

Manual details

  • Immediate download after payment.
  • Delivered as a PDF file.
  • The manual has 80 pages
  • File size: 1.81 MB
  • Available language versions: French, English, Spanish, German, Italian
  • Different language versions may vary sligthly in file size and page count.

We guarantee that...

  • our manuals are complete,
  • our manuals are checked with antivirus,
  • We'll issue refund if the manual is damaged, incomplete or unreadable (our refund policy)

Sample pages

Thumbnail of page 1Thumbnail of page 2Thumbnail of page 3Thumbnail of page 4
Thumbnail of page 5Thumbnail of page 6Thumbnail of page 7Thumbnail of page 8
Thumbnail of page 9
background image
9A08901300
AG-H350
AV Digital Home Theater Receiver
OWNER'S MANUAL
MANUEL DU PROPRIETAIRE
BEDIENUNGSANLEITUNG
MANUALE D'ISTRUZIONI
MANUAL DEL USUARIO
Thanks for buying a TEAC. Read this manual carefully to get the best performance from this unit.
Nous vous remercions pour l'achat d'un appareil TEAC.
Lire ce manuel avec attention pour obtenir les meilleures performances possibles de cet appareil.
Vielen Dank für den Kauf dieses TEAC-Geräts. Bitte lesen Sie diese Anleitung sorgfältig durch,
um die Leistungs-fähigkeit dieses Geräts optimal nutzen zu können.
Grazie per aver acquistato un prodotto TEAC.
Leggere attentamente questo manuale per ottenere le migliori prestazioni da questo apparecchio.
Enhorabuena por la adquisición de un TEAC.
Lea detenidamente este manual a fin de obtener el mejor rendimiento de esta unidad.
background image
ENGLISH
FRANÇAIS
2
Contents
Sommaire
WARNING:
TO PREVENT FIRE OR SHOCK HAZARD,
DO NOT EXPOSE THIS APPLIANCE TO
RAIN OR MOISTURE.
CAUTION: TO REDUCE THE RISK OF ELECTRIC
SHOCK, DO NOT REMOVE COVER (OR BACK). NO
USER-SERVICEABLE PARTS INSIDE. REFER
SERVICING TO QUALIFIED SERVICE PERSONNEL.
Y
E
R
THE
LIGHTNING
FLASH
WITH
ARROWHEAD SYMBOL, WITHIN AN
EQUILATERAL
TRIANGLE,
IS
INTENDED TO ALERT THE USER TO
THE PRESENCE OF UNINSULATED "DANGEROUS
VOLTAGE" WITHIN THE PRODUCT'S ENCLOSURE
THAT MAY BE OF SUFFICIENT MAGNITUDE TO
CONSTITUTE A RISK OF ELECTRIC SHOCK TO
PERSONS.
THE EXCLAMATION POINT WITHIN
AN EQUILATERAL TRIANGLE IS
INTENDED TO ALERT THE USER TO
THE PRESENCE OF IMPORTANT
OPERATING AND MAINTENANCE (SERVICING)
INSTRUCTIONS
IN
THE
LITERATURE
ACCOMPANYING THE APPLIANCE.
IMPORTANT (for U.K.Customers)
DO NOT cut off the mains plug from this
equipment. If the plug fitted is not suitable
for the power points in your home or the
cable is too short to reach a power point,
then obtain an appropriate safety approved
extension lead or consult your dealer.
If nonetheless the mains plug is cut off,
remove the fuse and dispose of the plug
immediately, to avoid a possible shock
hazard by inadvertent connection to the
mains supply.
If this product is not provided with a mains
plug, or one has to be fitted, then follow the
instructions given below:
IMPORTANT. DO NOT make any connection
to the larger terminal which is marked with
the letter E or by the safety earth symbol |
or coloured GREEN or GREEN-and-YELLOW.
The wires in the mains lead on this product
are coloured in accordance with the
following code:
BLUE
: NEUTRAL
BROWN : LIVE
As these colours may not correspond with
the coloured markings identifying the
terminals in your plug proceed as follows:
The wire which is coloured BLUE must be
connected to the terminal which is marked
with the letter N or coloured BLACK.
The wire which is coloured BROWN must
be connected to the terminal which is
marked with the letter L or coloured RED.
When replacing the fuse only a correctly
rated approved type should be used and be
sure to re-fit the fuse cover.
IF IN DOUBT -- CONSULT A COMPETENT
ELECTRICIAN.
Before Use ......................................................4
Before Connection .........................................6
Positioning of the Speakers.........................8
Connection ..............................................10~16
Connecting Antennas............................18~20
Remote Control Unit ..............................22~24
Basic Opeartions ...................................26~30
Radio Reception.....................................32~38
RDS (Radio Data System) .....................40~44
PTY Search....................................................46
Video Operations ...................................48~50
Playing Video Sources ..........................48
Video Dubbing ........................................50
S.A.V.E System Function.......................50
Available Surround Modes ..................52~58
Speaker Configuration..........................60~64
Delay Time ....................................................66
Test Tone .......................................................68
Troubleshooting ...........................................70
Specifications ..............................................73
Avant utilisation.............................................4
Avant d'effectuer les raccordements.........6
Positionnement des enceintes ....................8
Connexions .............................................10~16
Raccordements d'antenne ...................18~20
Télécommande.......................................22~24
Fonctionnement de base ......................26~30
Reception de la radio............................32~38
RDS (Radio Data System) .....................40~45
Recherche PTY .............................................46
Fonctionnement Vidéo ..........................48~50
Lecture de sources vidéo .....................48
Copie de bande vodéo...........................50
Function S.A.V.E System ......................50
Modes Surround disponibles ..............52~58
Configuration de haut-parleurs...........60~64
Retard .............................................................66
Test de tonalité.............................................68
Dépannage ....................................................70
Spécifications ..............................................74
background image
DEUTSCH
ITALIANO
ESPAÑOL
3
Vor Inbetriebnahme.......................................5
Bevor Sie beginnen .......................................7
Aufstellungsort der Lautsprecherboxen....9
Anschluß ..................................................11-17
Antemmenamschluß ..............................17-21
Fernbedienungseinheit .........................23-25
Grundlegende Bedienung .....................27-31
Hörfunk-Empfang....................................33-39
RDS (Radio Data System) ......................41-45
PTY-Suchlauf ................................................47
Video -Betriebsarten .............................49-51
Wiedergabe von
Videoaufzeichnungen............................49
Überspielbetrieb.....................................51
S.A.V.E-Funktion.....................................51
Verfügbare Surround-Modi ..................53-59
Lautsprecherkonfiguration ...................61-65
Surround Effekte ..........................................67
Testtonfunktion ............................................69
Fehlerbeseitigung ........................................71
Technische Daten ........................................75
Prima dell'uso ................................................5
Operazioni preliminari ..................................7
Posizionamento dei diffusori .......................9
Collegamento ..........................................11-17
Collegamento delle antenne ................17-21
Unitá di Telecomando ...........................23-25
Oerazioni fondamentali .........................27-31
Ricezione radio .......................................33-39
RDS (Radio Data System) ......................41-45
Riceraca PTY ................................................47
Azionamenti Video .................................49-51
Riproduzione da sorgenti video ...........49
Duplicazione di un nastro video ..........51
Funzionamento system S.A.V.E ...........51
Modalitá di suono
avvolgente disponibili ...........................53-59
Configurazione degli altoparlanti .......61-65
Effetti Surround ............................................67
Test Tone .......................................................69
Ricerca guasti ..............................................72
Dati tecnici....................................................76
Previo al empleo............................................5
Antes de la conexión ....................................7
Emplazamiento de los altavoces ................9
Conexión ..................................................11-17
Conexión de antenas .............................17-21
Control Remoto .......................................23-25
Funcionamiento básico .........................27-31
Recepción de radio ................................33-39
RDS (Radio Data System) ......................41-45
Recherche PTY .............................................47
Operaciónes de Video ...........................49-51
Reproducción de fuentes de video .....49
Copia de cinta video ..............................51
Función S.A.V.E .....................................51
Modos de difusión de
sonido disponibles ................................53-59
Configuración de altavoz ......................61-65
Difusión de sonido .......................................67
Prueba de sonido .........................................69
Solución de problemas ...............................72
Especificaciones .........................................77
Inhalt
Indice
Indice
background image
ENGLISH
FRANÇAIS
4
Before Use
Avant Utilisation
Back-up Memory Function
This is the function which preserves the
preset memory and most-recent memory
functions. In the event of a power failure, or if
the power cord of this unit is disconnected
from the electric outlet, the back-up memory
will preserve the preset memory and most-
recent memory functions for as long as
approximately 3 days.
To Prevent Erasing the Memory
If the power supply is interrupted for 3 days
or longer, the memory settings will be
erased.
RESET Switch
In the following cases, function buttons may
not work properly.
1) When the system is damaged by some
electrical shock.
2) When the power is irregular or has
electrical noises.
In these cases, press the RESET switch once
or twice with a pencil or a ball-point pen
lightly.
* If you press this RESET switch, all the
memories will be erased. In this case,
please preset stations again.
Fonction de mémoire de soutien
C'est la fonction qui retient la mémoire des
préréglages et les fonctions mémoire les plus
récentes. Dans le cas d'une panne de
courant, ou si le cordon d'alimentation de cet
appareil est débranché de la prise de
courant, la mémoire de soutien retiendra la
mémoire des préréglages et les fonctions
mémoire les plus récentes pendant 3 jours
environ.
Pour éviter d'effacer la mémoire
Si l'alimentation est interrompue pendant 3
jours ou plus, les réglages de la mémoire
seront effacés.
Commutateur RESET
Dans les cas suivants, les boutons de
fonctions peuvent ne pas fonctionner
correctement
1) Quand le système est endommagé par un
choc électrique.
2) Quand l'alimentation est irrégulière ou
bruyante
Dans ces cas, appuyer la touche RESET une
ou deux fois avec un crayon ou un stylo.
Lire ceci avant de faire fonctionner
l'appareil
< Choisir avec soin l'endroit où vous
placerez votre appareil. Eviter de le placer
directement au soleil ou près d'une
source de chaleur. Eviter aussi les
endroits sujets à des vibrations, à de la
poussière excessive, à la chaleur, au froid
ou à l'humidité.
< Les trous de ventilation ne doivent pas
être couverts. S'assurer qu'il y a un
espace d'au moins 10 cm au dessus et à
côté de l'amplificateur/récepteur. Ne pas
placer un lecteur CD ou un autre appareil
sur le dessus de l'amplificateur/
récepteur.
< Ne pas ouvrir le coffret car ceci risquerait
de provoquer des dommages aux circuits
ou des chocs électriques. Si un objet
rentre dans l'appareil, contacter votre
revendeur.
< Lors du débranchement du cordon
d'alimentation de la prise murale, toujours
tirer sur la fiche et non sur le cordon.
< Ne pas essayer de nettoyer l'appareil
avec des solvants chimiques car ceci
pourrait endommager le fini de l'appareil.
Utiliser un chiffon propre et sec.
< Garder soigneusement ce manuel
d'instructions pour une référence
ultérieure.
Read this before operation
< Choose the installation location of your
unit carefully. Avoid placing it in direct
sunlight or close to a source of heat. Also
avoid locations subject to vibrations and
excessive dust, heat, cold or moisture.
< The ventilation holes should not be
covered. Make sure there is at least 50 cm
of space above and at least 10 cm of
space on each side of the receiver. Do not
place a CD player or other equipment on
top of the receiver.
< Do not open the cabinet as this might
result in damage to the circuitry or
electrical shock. If a foreign object should
get into the set, contact your dealer.
< When removing the power plug from the
wall outlet, always pull directly on the
plug, never yank the cord.
< Do not attempt to clean the unit with
chemical solvents as this might damage
the finish. Use a clean, dry cloth.
< Keep this manual in a safe place for future
reference.
CAUTION Regarding Placement
To maintain proper ventilation, be sure to
leave a space around the unit (from the
largest outer dimensions including
projections) equal to, or greater than,
shown below.
Left and Right Panels
: 10 cm
Rear Panel
: 10 cm
Top Panel
: 50 cm
background image
DEUTSCH
ITALIANO
ESPAÑOL
5
Bitte vor Inbetriebnahme lesen
< Wählen Sie einen geeigneten Standort für
den Receiver. Nicht geeignet sind Standorte,
die direkter Sonneneinstrahlung, Heizquellen,
Vibrationen, Staubeinwirkung, starken
Temperaturschwankungen oder Feuchtigkeit
ausgesetzt sind.
< Auf einwandfreien Temperaturausgleich
achten. Die Ventilationsöffnungen freihalten
und über dem Receiver mindestens 50 cm,
neben dem Receiver mindstens 10 cm
Abstand einhalten. Keine anderen Geräte
(CD-Player etc.) auf dem Receiver plazieren!
< Niemals das Gehäuse öffnen, da hierdurch
Schäden an der Elektronik und/oder
elektrische Schläge verursacht werden
können. Falls ein Fremdkörper in das
Geräteinnere gelangen sollte, wenden Sie
sich bitte an Ihren Fachhändler.
< Bei Abziehen des Netzkabels darauf achten,
das Kabel am Stecker zu halten. Niemals am
Kabel ziehen.
< Zur Gehäusereinigung niemals Lösungsmittel
verwenden,
da
hierdurch
die
Gehäuseoberfläche beschädigt werden
kann. Ein sauberes trockenes Tuch
verwenden.
< Bewahren Sie diese Bedienungsanleitung
auf, um bei eventuell später auftauchenden
Fragen darin nachschlagen zu können.
Gangreserve-Speicher
Die Preset-Abspeicherungen und die
weiteren jeweils aktuellen abgespeicherten
Einstellungen
werden
vor
Löschung
geschützt, falls ein Stromausfall auftritt oder
das Netzkabel abgezogen wird.
Dieser Gangreserve-speicher arbeitet für bis
zu ca. 3 Tage.
Vermeidung der Speicherdatenlöschung
Falls für mehr mindestens 3 Tage keine
Spannungsversorgung am Gerät anliegt,
werden alle Speicherdaten gelöscht.
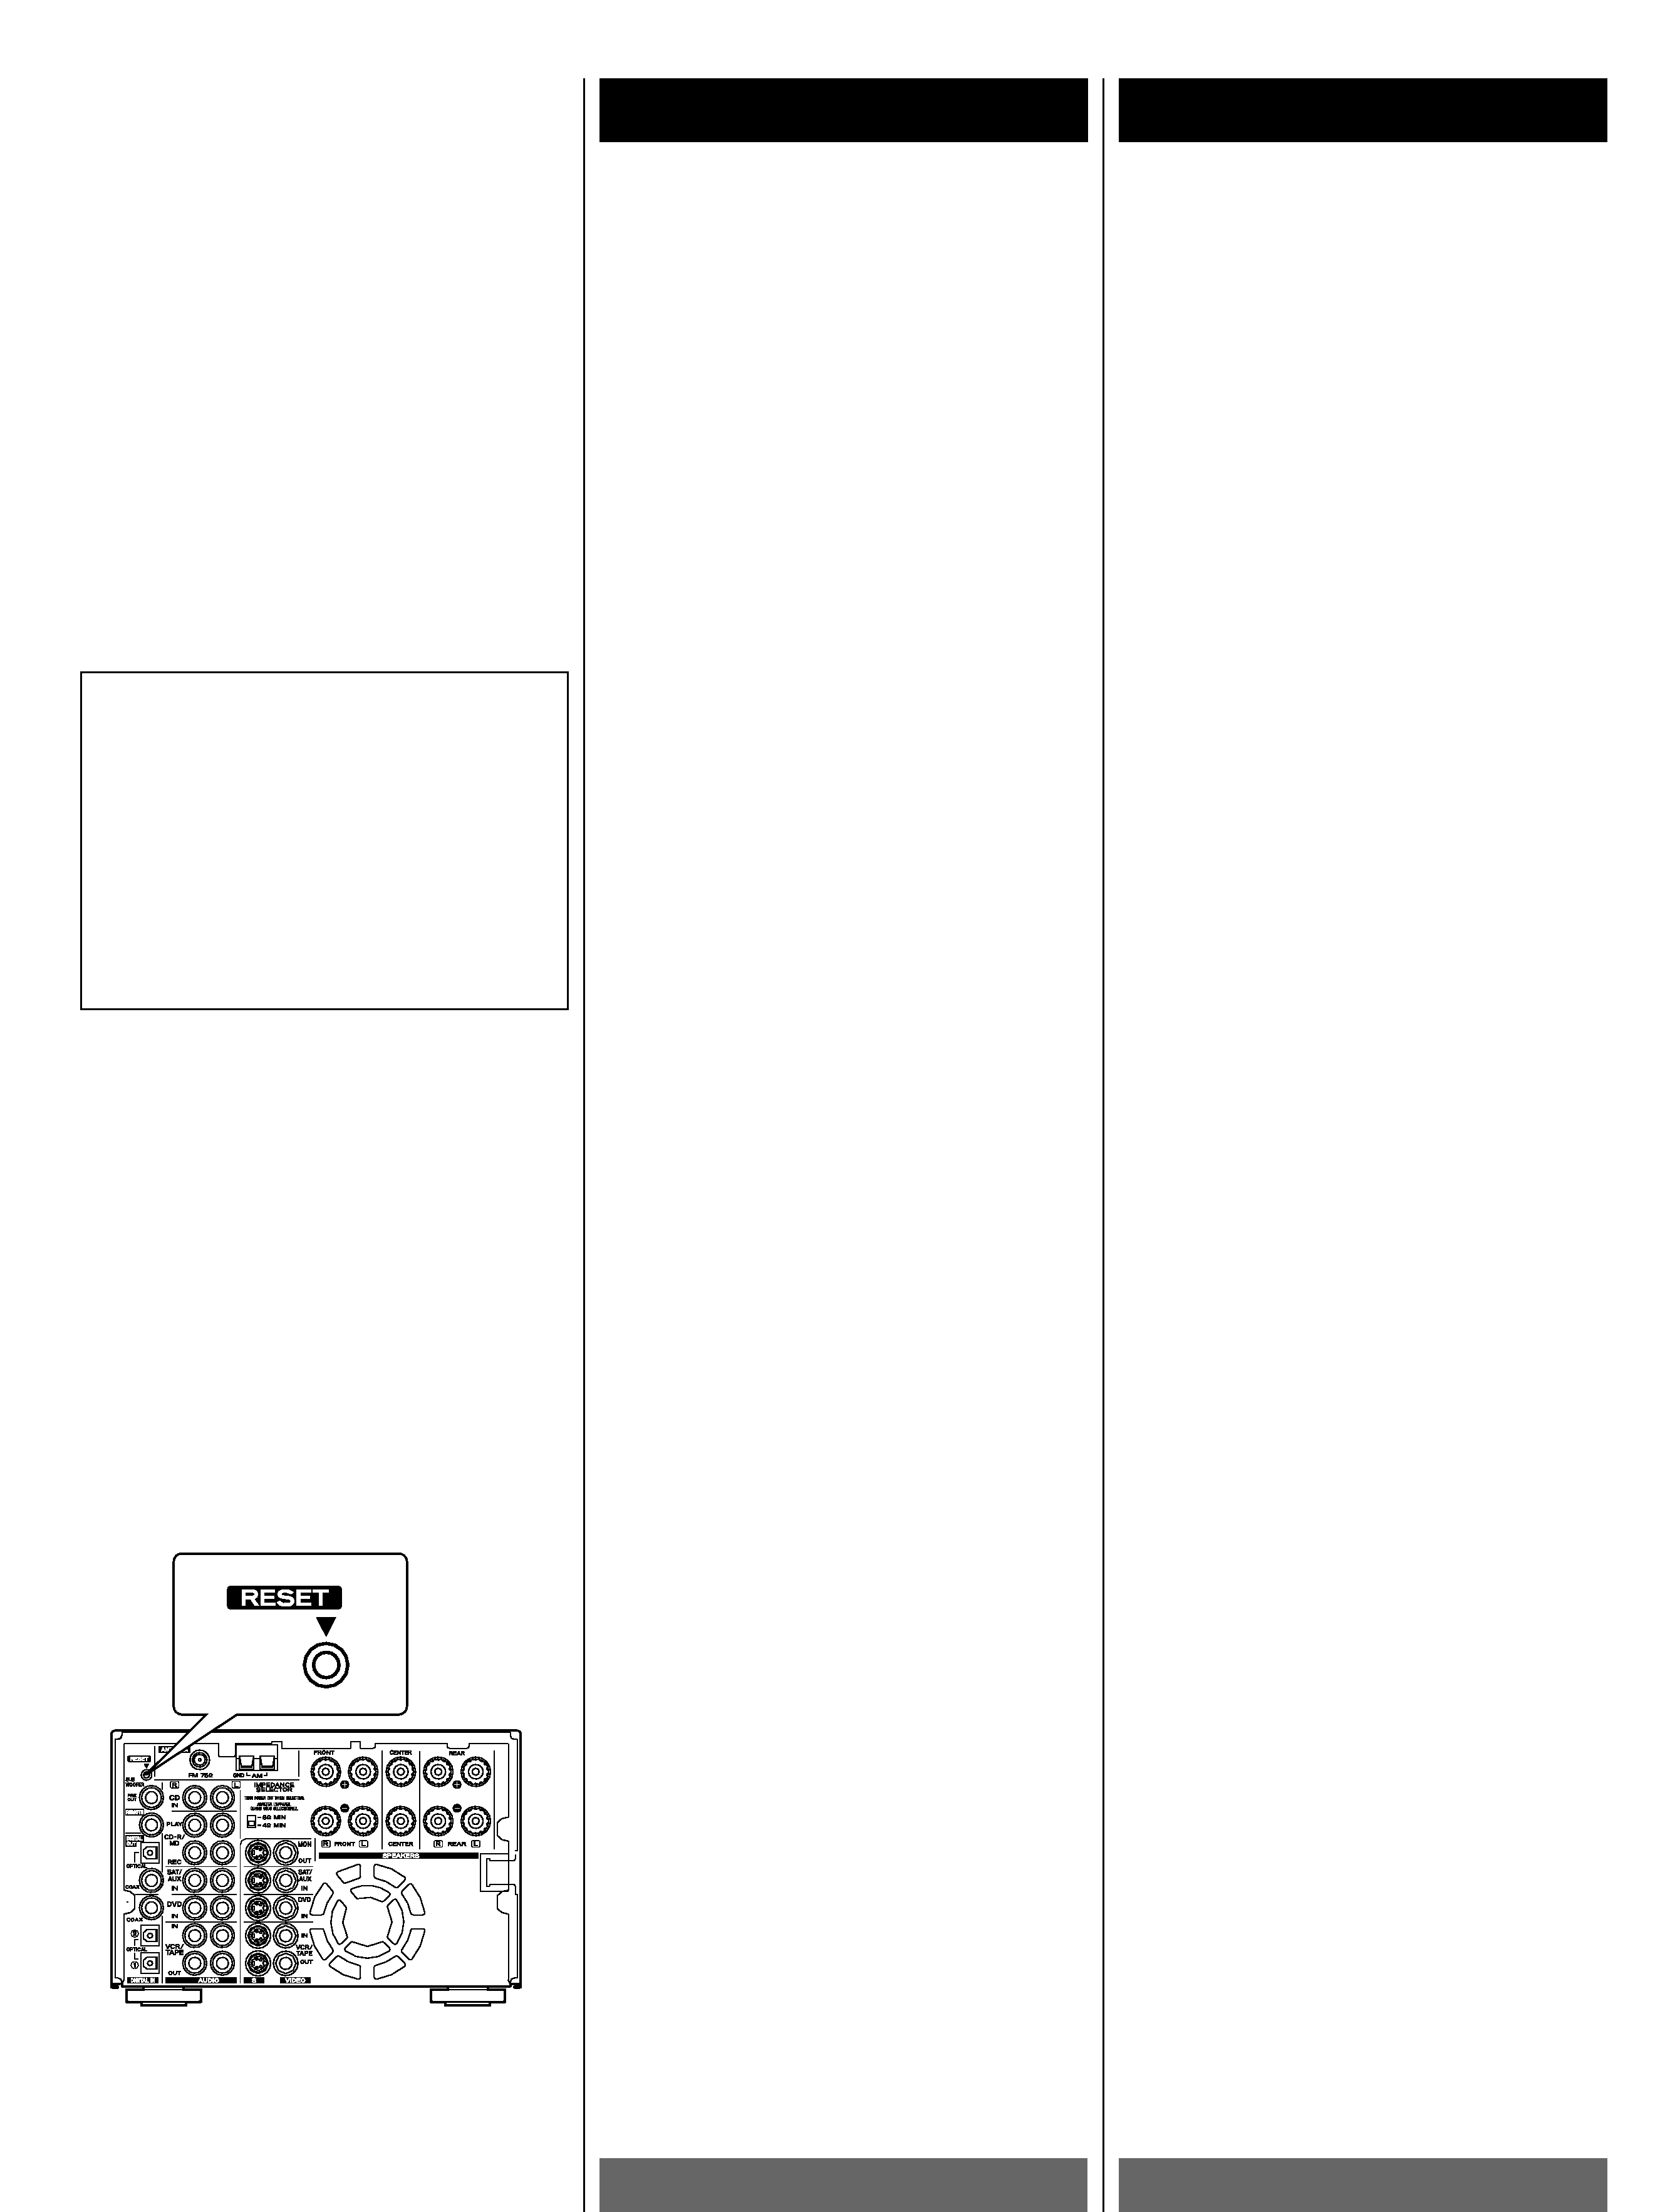
RESET-Schalter
In den folgenden Fällen kann es sein , daß
Funktionstasten
nicht
einwandfrei
funktionieren.
1) Wenn
das
System
durch
einen
elektrischen Spannungsstoß beschädigt
wurde.
2) Wenn die Stromversorgung schwankt
oder elektrische Störfrequenzen enthält.
Betätigen Sie in diesen Fällen ein- oder
zweimal den RESET-Schalter vorsichtig mit
einem Bleistift oder einem Kugelschreiber.
* Wenn Sie den RESET-Schalter betätigen,
werden alle Speicher gelöscht. In einem
solchen Fall müssen Sie die Sender neu
einstellen.
Leggere questo manuale prima di procedere
all'uso
< Scegliere con cura il luogo in cui installare
l'apparecchio. Evitare di esporlo alla diretta
luce del sole o ad una sorgente di calore.
Evitare inoltre luoghi soggetti a vibrazioni o ad
eccessive accumulazioni di polvere, calore,
freddo od umidità.
< Le fessure di ventilazione non devono venire
coperte. Controllare che vi siano almeno 50
cm di spazio sopra ed almeno 10 cm sui lati
del sintomizzatore. Non posare lettori CD o
altri
componenti
direttamente
sul
sintomizzatore.
< Non aprire la cassa dell'apparecchio. Ciò
potrebbe danneggiarne la circuitazione o
causare scariche elettriche. Se un qualche
oggetto estraneo dovesse essere entrato
nell'apparecchio stesso, rivolgersi al
rivenditore.
< Per staccare la spina dalla presa di rete, agire
direttamente sulla spina stessa, evitando di
tirare il cavo.
< Evitare di pulire l'apparecchio con solventi
chimici poichè ciò potrebbe danneggiare la
rifinitura esterna. Fare semplicemente uso di
un panno pulito ed asciuto.
< Tenere questo manuale in un luogo di facile
accesso, per ogni eventuale futuro
riferimento.
Funzione di appoggio della
memoria
Questa funzione consente di conservare le
predisposizioni effettuate e le funzioni
memorizzate per ultime. In caso di cadute
della corrente di alimentazione, o in caso di
distacco del cavo di alimentazione dalla
presa di corrente di rete, la memoria di
appoggio serve a conservare, per un
massimo di circa 3 giorni, le predisposizioni
effettuate e le ultime funzioni utilizzate.
Condizioni di cancellazione dei dati in memoria
Se l'alimentazione rimane interrotta per oltre 3
giorni, tutte le predisposizioni eventualmente
presenti in memoria vengono cancellate.
Interruttore RESET
Nei casi seguenti i tasti di funzione
potrebbero non funzionare correttamente.
1) Quando il sistema ha subito danni a causa
di shock elettrico.
2) Quando la corrente erogata è irregolare o
contiene disturbo elettrico.
In tutti questi casi, premere l'interruttore
RESET una o due volte, usando la punta di
una matita o di una penna a sfera e facendo
lieve pressione.
* Se premete questo interruttore RESET
l'intera memoria viene cancellata. In questo
caso sarà necessario preimpostare
nuovamente le stazioni.
Lea lo siguiente antes de poner en
funcionamiento el aparato
< Elija con cuidado el lugar de instalación
para su aparato. No lo coloque a la luz
solar directa o cerca de fuentes que
generen calor. Evite también lugares
expuestos
a
vibraciones
y
muy
polvorientos, calurosos, fríos o húmedos.
< Los orificios de ventilación no deben ser
cubiertos. Asegúrese de que haya un
mínimo de 50 cm (20puladas) de espacio
arriba y un mínino de 10 cm (4 pulgadas)
de espacio a los lados del receptor. No
coloque el reproductor de CD u otro
equipamiento sobre el receptor.
< No abra el gabinete ya que esto podría
producir daños en los circuitos o
electrochoques. S i entrara algún objeto
en el interior del aparato, póngase en
contacto con su concesionario.
< Al
desenchufar
el
cordón
del
tomacorriente, tire siempre de la clavija,
nunca del cordón.
< No utilice solventes químicos para limpiar
el aparato ya que podría dañar el
acabado. Use un paño seco y limpio.
< Guarde este manual en un lugar seguro
para usarlo como referencia en el futuro.
Función de memoria de apoyo
Esta
función
mantiene
la
memoria
preajustada y la memoria de funciones más
recientes. En caso de un corte de energía
eléctrica, o si desconecta el cable de
alimentación
de
esta
unidad
del
tomacorriente, la memoria de apoyo
conservará la memoria preajustada y las
funciones de memoria más reciente durante
3 días aproximadamente.
Para evitar borrar la memoria
Si
se
interrumpe
el
suministro
de
alimentación durante 3 días o más, se
borrarán los ajustes de memoria.
Interruptor RESET
Los botones de las funciones pueden no
responder correctamente en los siguientes
casos.
1) Cuando alguna descarga eléctrica haya
dañado el sistema.
2) Cuando la corriente sea irregular o
experimente perturbaciones eléctricas.
En estos casos, pulse ligeramente una o dos
veces el interruptor RESET con un lápiz o
bolígrafo.
* Al pulsar este interruptor RESET se borran
todas las memorias. En ese caso, preajuste
de nuevo las emisoras.
Prima dell'uso
Vor Inbetriebnahme
Previo al empleo

Reviews

There are no reviews of this manual yet.