SHERWOOD V-768 Owner's Manual

Cover page of SHERWOOD V-768 Owner's Manual

Owner's Manual for SHERWOOD V-768, downloadable as a PDF file.

Manual details

  • Immediate download after payment.
  • Delivered as a PDF file.
  • The manual has 44 pages
  • File size: 1.03 MB
  • Available language versions: English
  • Different language versions may vary sligthly in file size and page count.

We guarantee that...

  • our manuals are complete,
  • our manuals are checked with antivirus,
  • We'll issue refund if the manual is damaged, incomplete or unreadable (our refund policy)

Sample pages

Thumbnail of page 1Thumbnail of page 2Thumbnail of page 3Thumbnail of page 4
Thumbnail of page 5Thumbnail of page 6Thumbnail of page 7Thumbnail of page 8
Thumbnail of page 9
background image
2
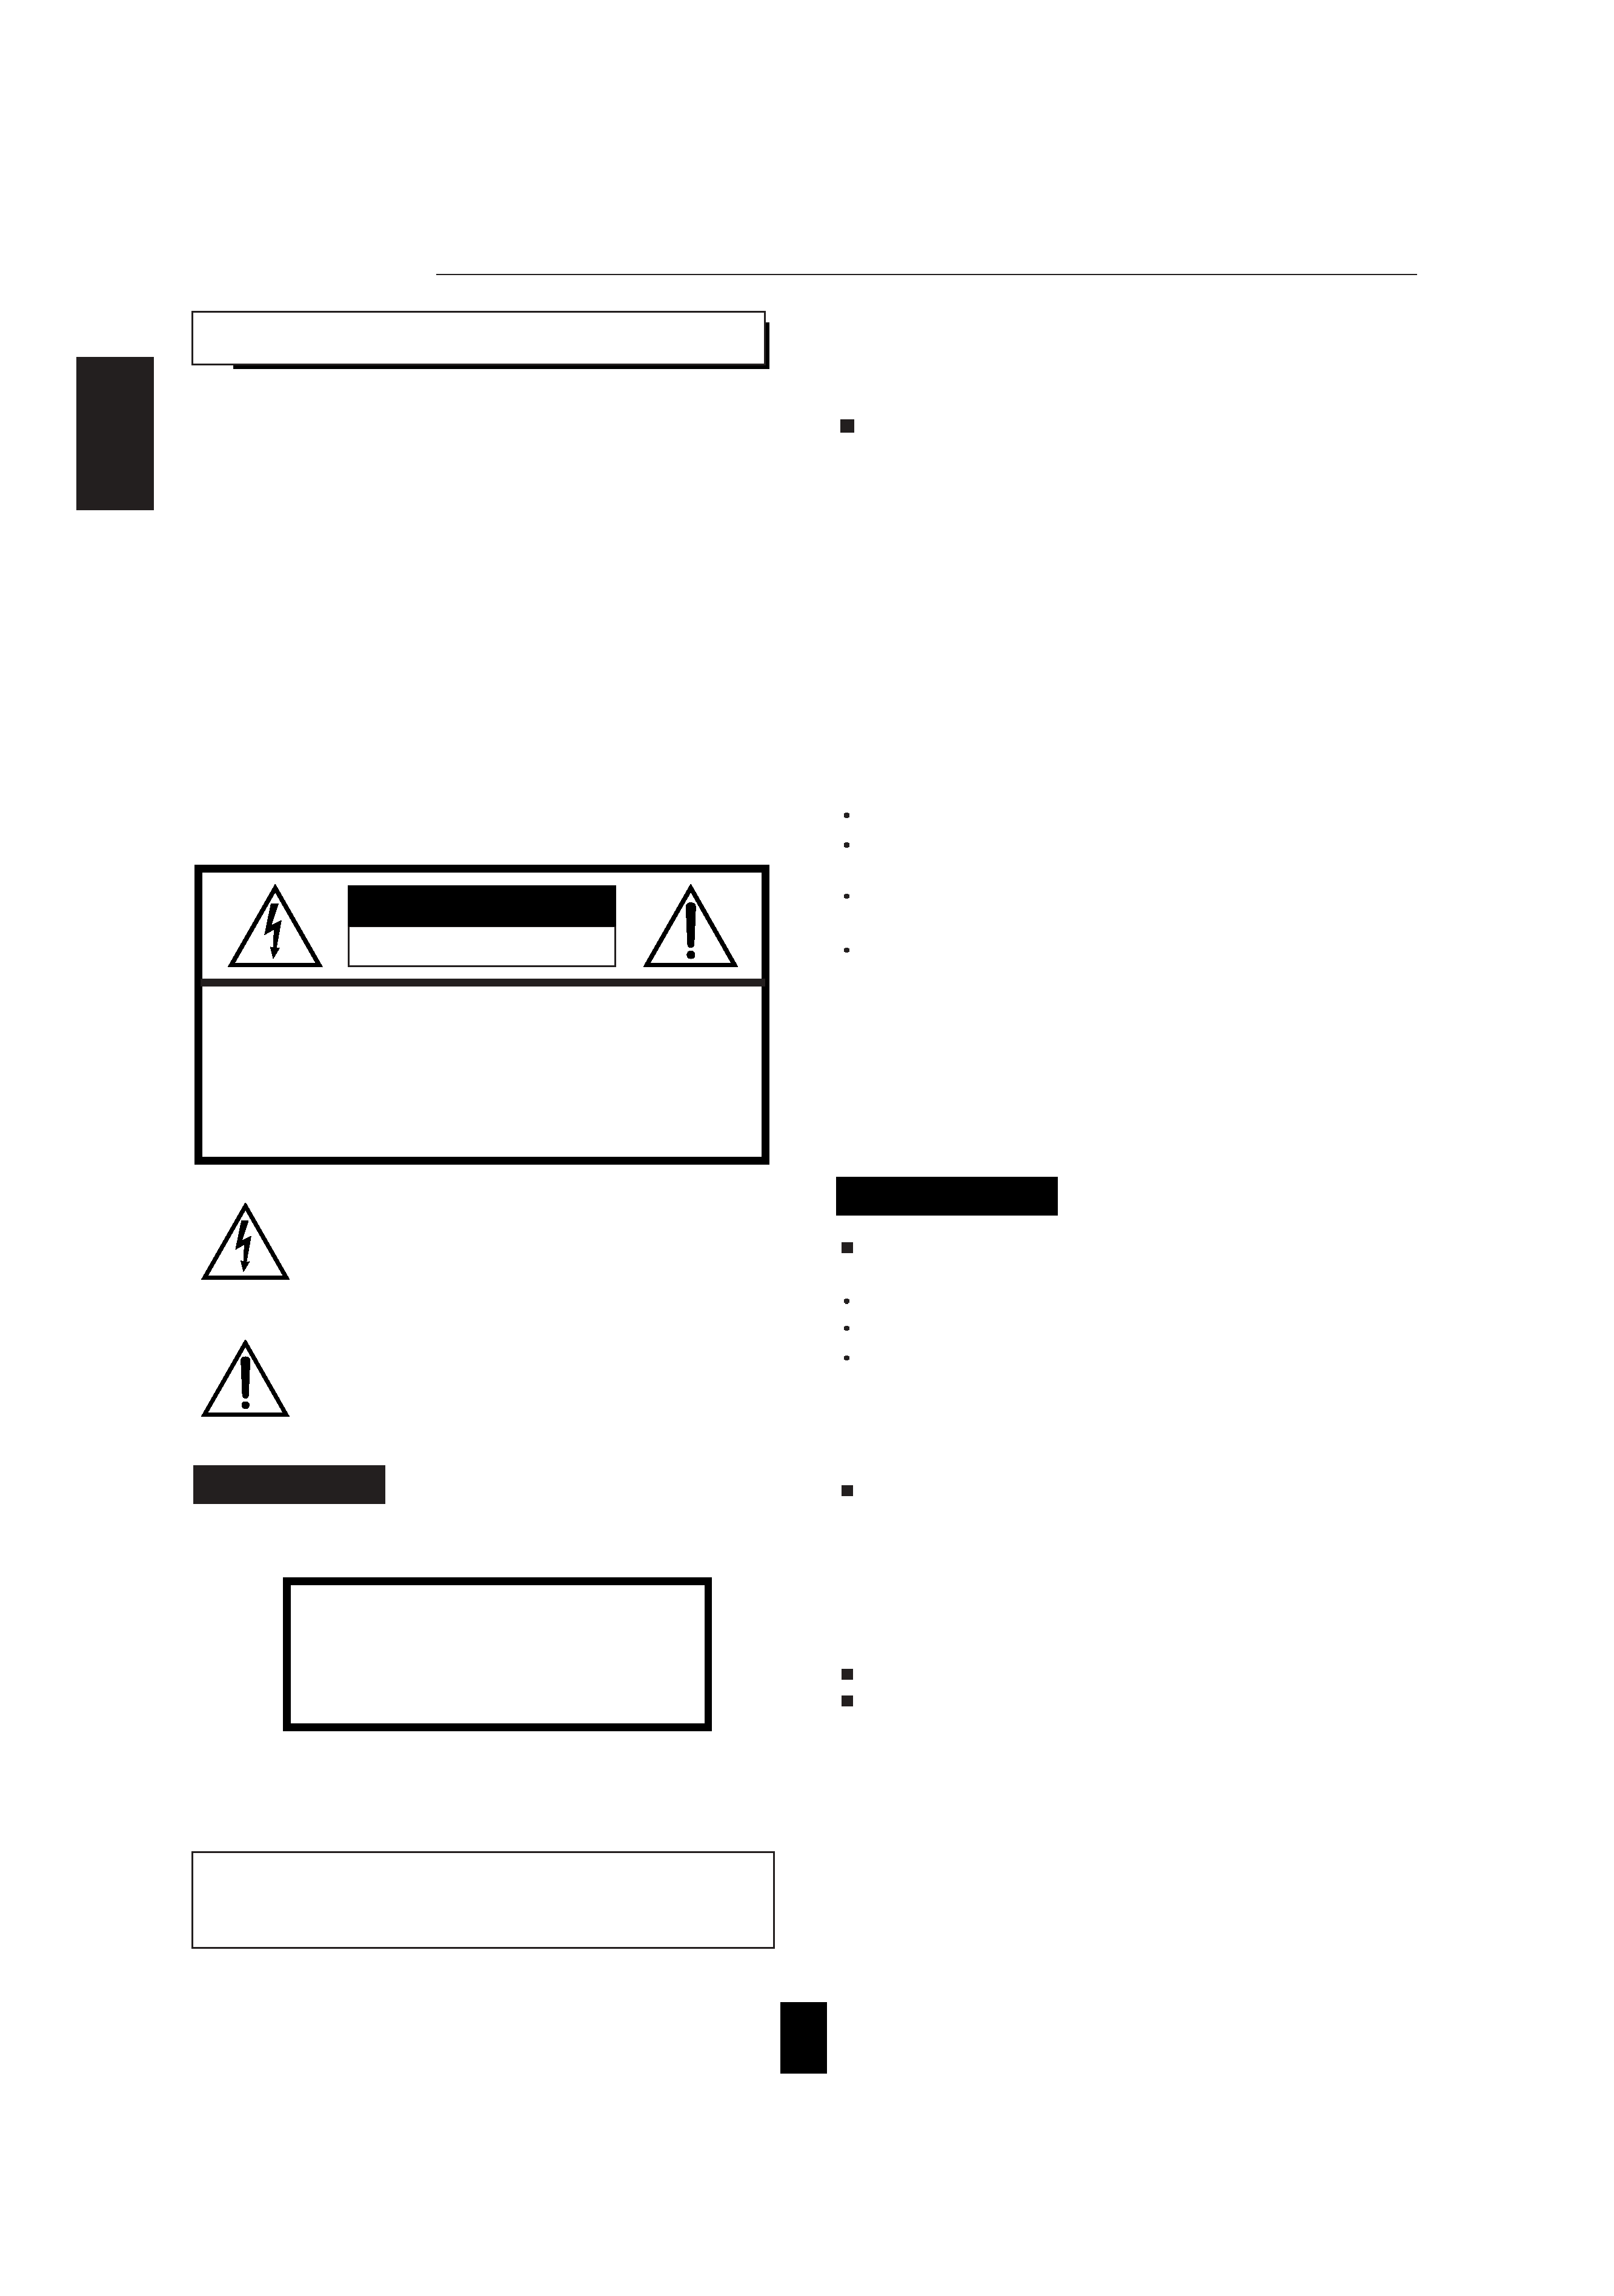
CAUTION : TO REDUCE THE RISK OF
ELECTRIC SHOCK, DO NOT
REMOVE COVER (OR BACK).
NO USER-SERVICEABLE PARTS
INSIDE. REFER SERVICING TO
QUALIFIED SERVICE PERSONNEL.
Congratulations on Your Purchase!
Your new DVD Video Player is designed to deliver maximum
enjoyment and years of trouble free service.
Please take a few moments to read this manual thoroughly.
It will explain the features and operation of your unit and
help ensure a trouble free installation.
Please unpack your unit carefully. We recommend that you
save the carton and packing material. They will be helpful if
you ever need to move your unit and may be required if you
ever need to return it for service. Your unit is designed to be
placed in a horizontal position and it is important to allow at
least two inches of space behind your unit for adequate
ventilation and cabling convenience.
To avoid damage, never place the unit near radiators, in
front of heating vents, in direct sunlight, in excessively
humid, dusty locations or near sources of strong magnetic
fields. Connect your complementary components as
illustrated in the following section.
RISK OF ELECTRIC SHOCK
DO NOT OPEN
This symbol is intended to alert the user to the
presence of uninsulated "dangerous voltage"
within the product's enclosure that may be of
sufficient magnitude to constitute a risk of
electric shock to persons.
This symbol is intended to alert the user to the
presence of important operating and
maintenance (servicing) instructions in the
literature accompanying the appliance.
To reduce the risk of fire or electric shock, do not expose
this appliance to rain or moisture.
FOR U.S.A
FCC INFORMATION
This equipment has been tested and found to comply with
the limits for a Class B digital device, pursuant to Part 15 of
the FCC Rules. These limits are designed to provide
reasonable protection against harmful interference in a
residential installation. This equipment generates, uses and
can radiate radio frequency energy and, if not installed and
used in accordance with the instructions, may cause harmful
interference to radio communications. However, there is no
guarantee that interference will not occur in a particular
installation. If this equipment does cause harmful
interference to radio or television reception, which can be
determined by turning the equipment off and on, the user is
encouraged to try to correct the interference by one or more
of the following measures:
Reorient or relocate the receiving antenna.
Increase the separation between the equipment and
receiver.
Connect the equipment into an outlet on a circuit different
from that to which the receiver is connected.
Consult the dealer or an experienced radio/TV technician
for help.
CAUTION:
Any changes or modifications in construction of
this device which are not expressly approved by
the party responsible for compliance could void
the user's authority to operate the equipment.
Moisture condensation
Moisture may form on the lens in the following conditions.
Immediately after a heater has been turned on.
In a steamy or very humid room.
When this unit is moved from a cold place to a warm one.
If moisture forms inside this unit, it may not operate
properly.
In this case, turn on the power and wait about one hour for
the moisture to evaporate.
If there is noise interference on the TV while a broadcast
is being received.
Depending on the reception condition of the TV,
interference may appear on the TV screen while you are
watching a TV broadcast and this unit is left on. This is not
a malfunction of this unit or the TV. To watch a TV
broadcast, turn off this unit.
Do not transport this unit with discs left in it.
Do not place on the component such as amplifier or
receiver that generates heat.
If so, the temperature inside this unit rises and malfunction
may occur.
CAUTION
Invisible laser radiation when the unit is open. Do not
stare into beam.
WARNING
PRECAUTIONS
UNPACKING
AND
ENGLISH
CAUTION : USE OF ANY CONTROLS, ADJUSTMENTS, OR
PROCEDURES OTHER THAN THOSE SPECIFIED HEREIN
MAY RESULT IN HAZARDOUS RADIATION EXPOSURE.
CLASS 1
LASER PRODUCT
CAUTION
background image
3
FOR U.S.A AND CANADA............................... 120 V
Units shipped to the U.S.A and Canada are
designed for operation on 120 V AC only.
Safety precaution with use of a polarized AC plug.
However, some products may be supplied with a
nonpolarized plug.
CAUTION :
To prevent electric shock, match wide
blade of plug to wide slot, fully insert.
ATTENTION :
Pour eviter les choc electriques,
introduire la lame la plug large de la borne
correspondante de la prise et poussre jusqu'au fond.
FOR YOUR SAFETY
FOR CHINA, EUROPE, AUSTRALIA AND OTHER COUNTRIES
............................................................... 100V - 240 V
The available power supply voltage differs according
to country or region. However, this unit is equipped
with an Automatic Voltage Selector.
The power supply voltage of the area where the unit
will be used automatically meets the required voltage
within the range of AC 100 - 240 V, without any
manual voltage adjustment.
To ensure safe operation, the three-pin plug supplied
must be inserted only into a standard three-pin
power point which is effectively earthed through the
normal household wiring. Extension cords used with
the equipment must be three-core and be correctly
wired to provide connection to earth.
Improper extension cords are a major cause of
fatalities. The fact that the equipment operates
satisfactorily does not imply that the power point is
earthed and that the installation is completely safe.
For your safety, if in any doubt about the effective
earthing of the power point, consult a qualified
electrician.
FOR YOUR SAFETY
READ THIS BEFORE OPERATING
ENGLISH
background image
4
CONTENTS
Introduction
UNPACKING AND INSTALLATION ........................................................................................................................................ 2
READ THIS BEFORE OPERATING YOUR UNIT .................................................................................................................... 3
System Connections
CONNECTING TO A/V AMPLIFIER OR RECEIVER .............................................................................................................. 5
CONNECTING TO TV WITH AUDIO AND VIDEO INS .......................................................................................................... 7
CONNECTING SYSTEM CONTROL ..................................................................................................................................... 7
CONNECTING TO TV AND VCR WITH SCART CONNECTORS(Regional Option) ............................................................. 8
Front Panel & Remote Controls ........................................................................................................................................ 9
REMOTE CONTROL OPERATION RANGE ......................................................................................................................... 11
LOADING BATTERIES ......................................................................................................................................................... 11
Preliminary Knowledge About Discs
PLAYABLE DISC TYPES ..................................................................................................................................................... 12
NOTES ON DVD VIDEOS .................................................................................................................................................... 12
NOTES ON COPYRIGHT ..................................................................................................................................................... 12
SYMBOL ABOUT INVALID OPERATION ............................................................................................................................ 13
CARE AND HANDLING OF DISCS ...................................................................................................................................... 13
Operations
BASIC PLAYBACK ................................................................................................................................................................ 14
DISPLAYING DISC INFORMATION DURING PLAYBACK .................................................................................................. 18
PLAYING THE DESIRED SECTION OF DISC (TITLE/CHAPTER/TIME SEARCH : DVD Video/CD only) ......................... 19
PLAYING A SPECIFIC ITEM [DVD Video only] .................................................................................................................... 20
REPEAT PLAYBACK ............................................................................................................................................................. 21
PLAYING TRACKS IN DESIRED ORDER [CD only] ............................................................................................................ 22
PLAYING TRACKS IN RANDOM ORDER [CD/MP3 disc only] ............................................................................................. 23
CHANGING THE AUDIO LANGUAGE [DVD Video only] ...................................................................................................... 24
CHANGING THE SUBTITLE LANGUAGE [DVD Video only] ................................................................................................ 24
CHANGING THE CAMERA ANGLE [DVD Video only] ......................................................................................................... 25
PLAYING A SCENE CLOSE-UP [DVD Video only] ............................................................................................................... 25
CHANGING THE VIDEO SIGNAL FORMAT.......................................................................................................................... 26
CHANGING THE COMPONENT VIDEO OUTPUT SIGNAL ................................................................................................. 26
LISTENING WITH HEADPHONES ........................................................................................................................................ 27
Initial Settings ........................................................................................................................................................................ 28
SETTING THE LANGUAGE SETUP ..................................................................................................................................... 30
SETTING THE VIDEO SETUP .............................................................................................................................................. 32
SETTING THE AUDIO SETUP .............................................................................................................................................. 35
SETTING THE CUSTOM SETUP .......................................................................................................................................... 37
SETTING THE OTHERS ....................................................................................................................................................... 40
Definition Of Terms ............................................................................................................................................................ 42
Troubleshooting Guide ..................................................................................................................................................... 43
Specifications ...................................................................................................................................................................... 44
DVD Language Code List ................................................................................................................................................. 45
ENGLISH
background image
5
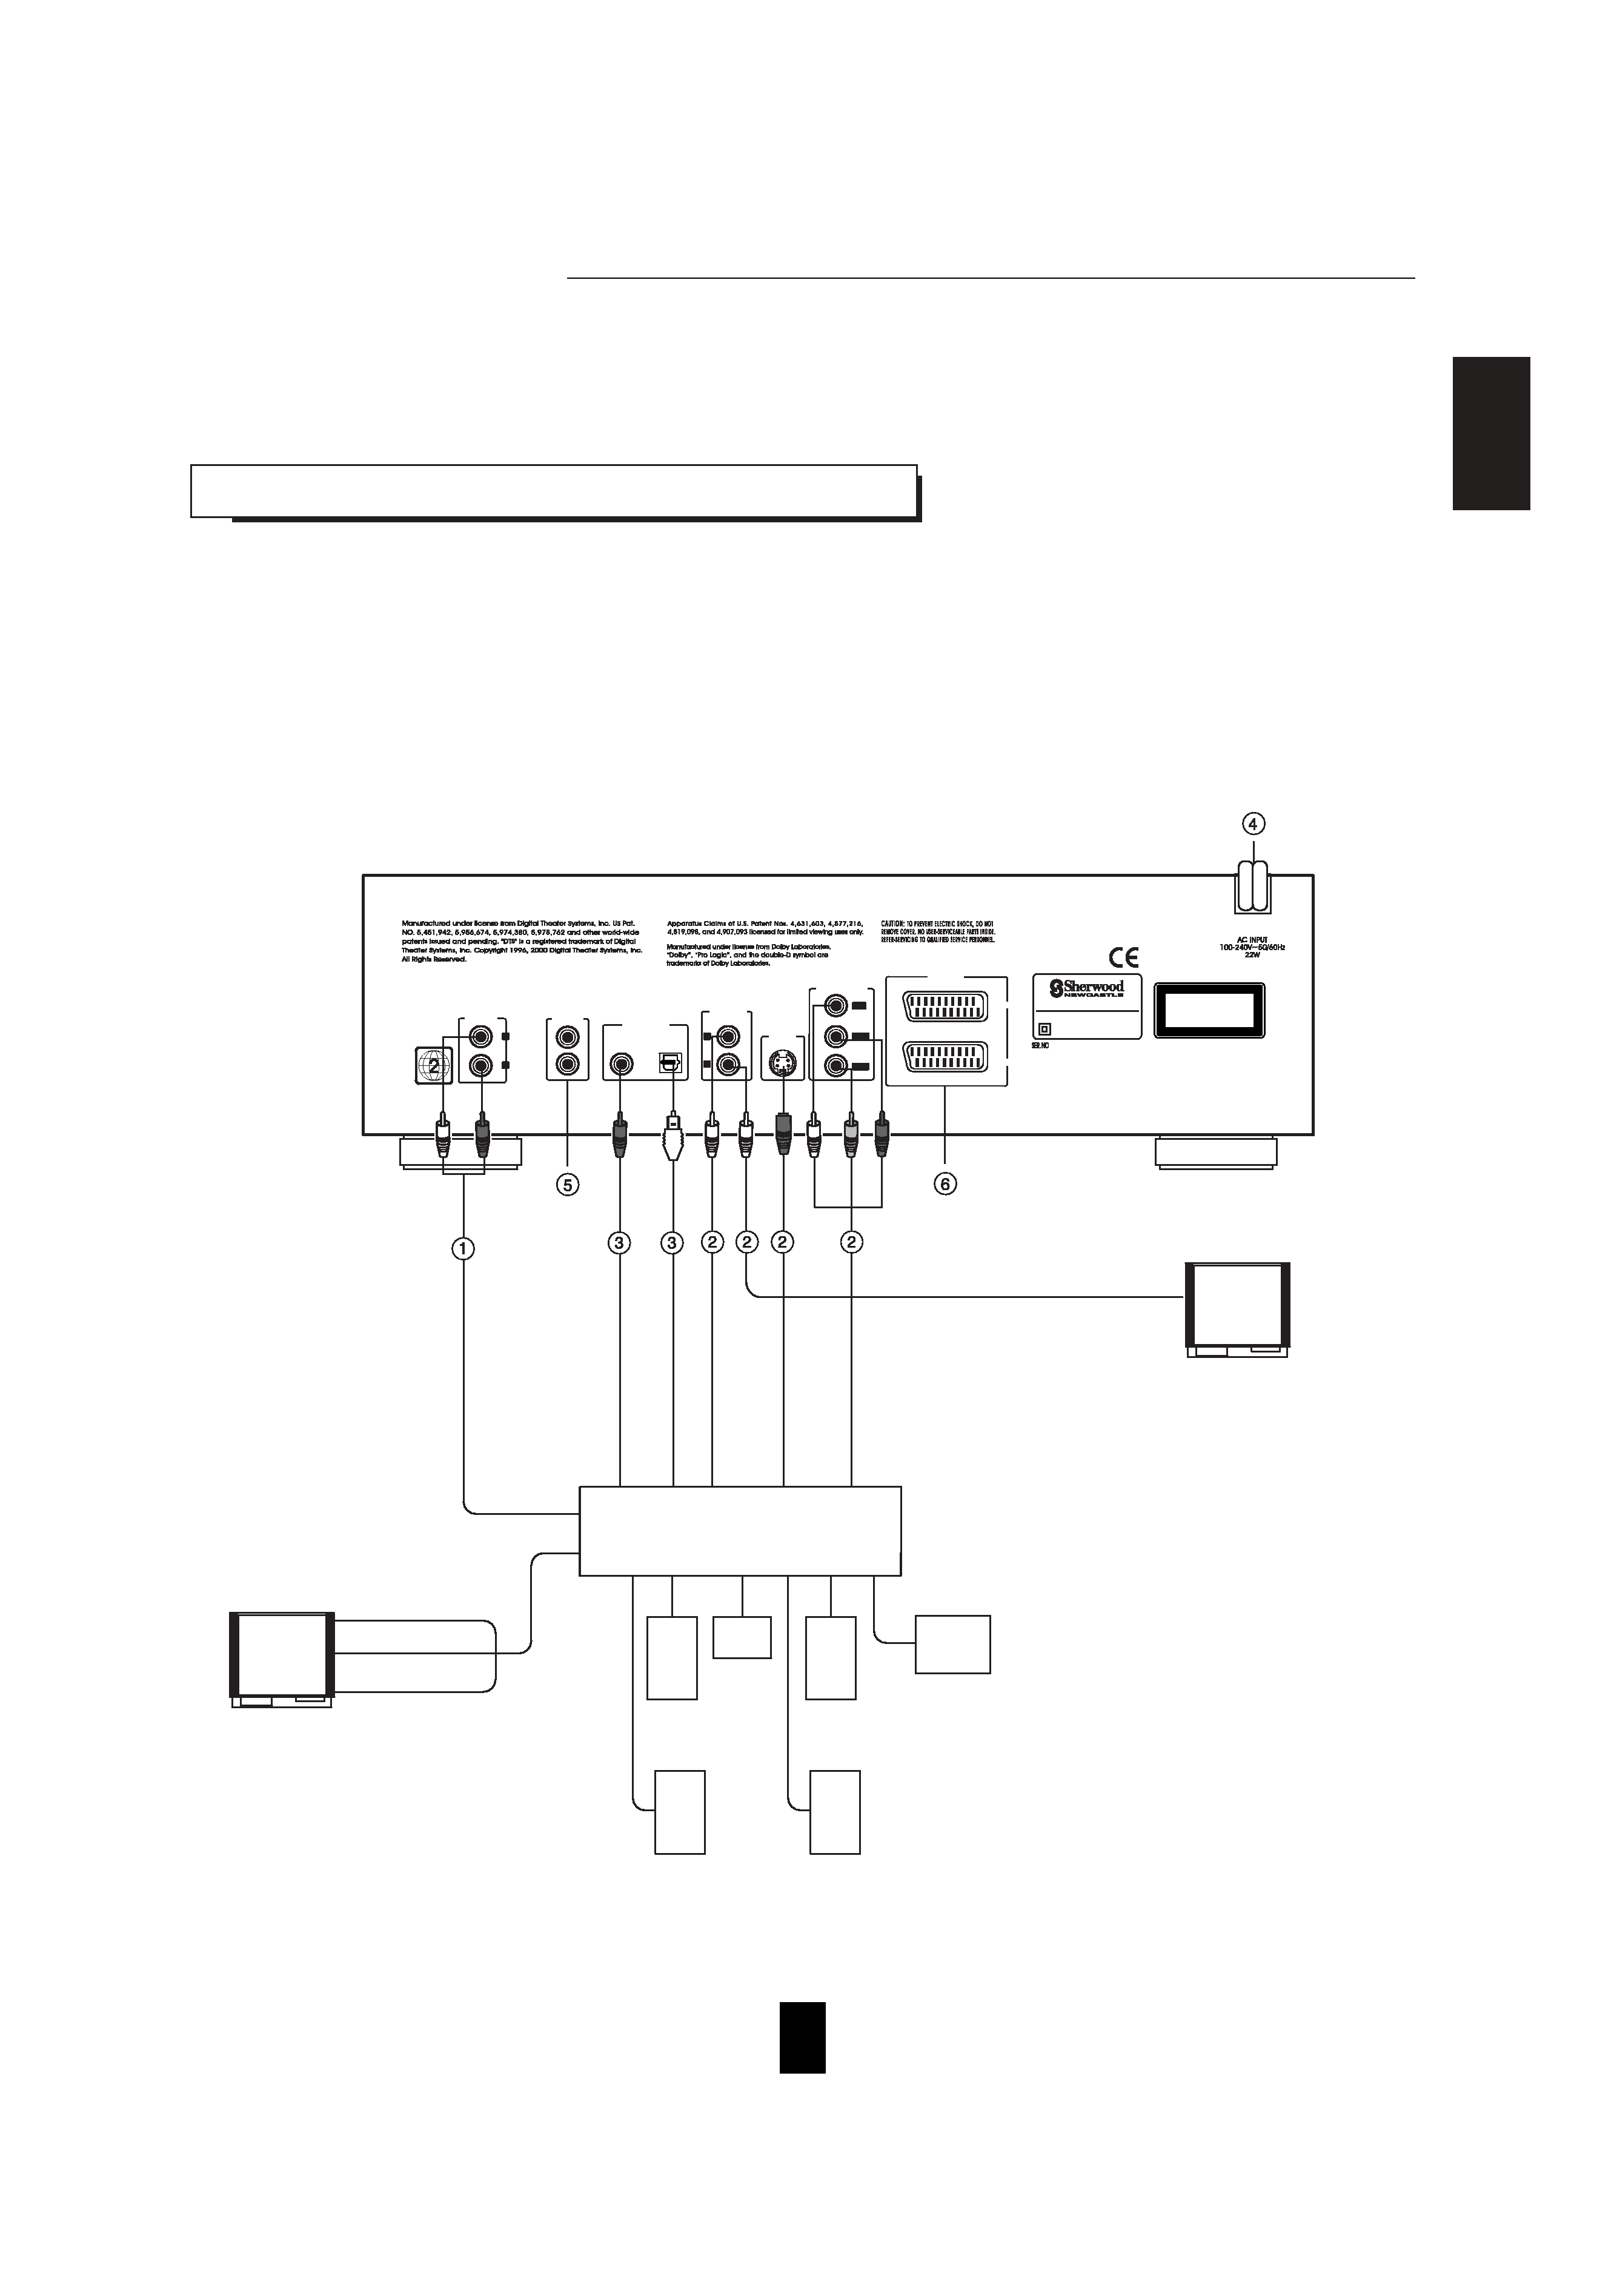
· Do not connect the AC input cord into the AC outlet when plugging and unplugging connection cords.
· Since different components often have different terminal names, carefully read the operating instructions of the component
connected.
· Be sure to observe the color coding when connecting audio and video cords.
· Some TVs or monitors are equipped with COMPONENT VIDEO INs that are capable of reproducing a
progressively scanned video signal. Connecting to these INs allows you to view high-density pictures with less
flickers.
· When DVD Videos recorded in Dolby Digital, DTS or MPEG II are played, Dolby Digital, DTS or MPEG bitstream
signals can be output from the DIGITAL OUTs of this unit. If the COAXIAL or OPTICAL DIGITAL OUT of this
unit is connected to an external Dolby Digital, DTS or MPEG II decoder or an amplifier with built-in decoder, you
can enjoy theater-quality audio in your home.
· The supplied cords are a(stereo) audio cord, a composite video cord and a system control cord only. Other
cords are commercially-available cords.
CONNECTING TO A/V AMPLIFIER OR
ENGLISH
AUDIO OUT
DIGILINK
COAXIAL
DIGITAL OUT
OPTICAL
COMPOSITE
OUT
COMPONENT OUT
A/V SCART
VCR
TV
S-VIDEO
OUT
Cr/Pr
Cb/Pb
Y/PY
2
1
R
L
MODEL NO. V-768
DVD PLAYER
DESIGNED IN USA
ASSEMBLED IN KOREA
CLASS 1
LASER PRODUCT
KLASSE 1 LASER PRODUKT
LUOKAN 1 LASER LAITE
KLASS 1
LASER APPARAT
TV
Additional monitor TV
COMPONENT VIDEO IN
COMPOSITE VIDEO IN
COMPONENT
VIDEO
IN
COMPOSITE
VIDEO
IN
COAXIAL
DIGIT
AL
IN
S-VIDEO IN
VIDEO IN
Front
speaker
(left)
Front
speaker
(right)
Center
speaker
Powered
subwoofer
Surround
speaker
(left)
Surround
speaker
(right)
(2 CH)
AUDIO IN
S-VIDEO
IN
OPTICAL
DIGIT
AL
IN
(MONITOR) VIDEO OUT
A/V Amplifier
or Receiver
Red
Green
Blue
background image
6
1. Connecting AUDIO OUTs
Connect these jacks to the AUDIO INs of DVD(, AUX, CD,
etc.) of your amplifier or receiver.
Note :
· While playing a multi channel (5.1 channel) program source
recorded in Dolby Digital, DTS, etc., the 5 discrete
channels(front L/R, center and surround L/R) are mixed
down to these front and headphone channels. In this case,
you can hear sound from the front speakers and
headphones.
2. Connecting VIDEO OUTs
The COMPONENT VIDEO OUTs of this unit are capable of
outputting either conventional interlacing video signal or
progressively scanned video signal(that can reproduce high-
density pictures with less flicker).
· According to VIDEO OUTs, the excellence in picture quality
is as follows:
Progressive "COMPONENT" > Interlaced "COMPONENT" >
"S-VIDEO" > "COMPOSITE"
· When making COMPONENT VIDEO connections, connect
"Y/PY" to "Y", "Cb/Pb" to "Cb"(, "Pb", "B-Y"), "Cr/Pr" to "Cr"(,
"Pr", "R-Y").
· Depending on the type of the COMPONENT VIDEO INs of
TV, be sure to set the COMPONENT OUT to the
corresponding setting.(Refer to "When selecting the
COMPONENT OUT" on page 33 or "CHANGING THE
COMPONENT VIDEO OUTPUT SIGNAL" on page 26.)
· If there are both VIDEO INs and (MONITOR) VIDEO OUTs
on your amplifier or receiver, connect these jacks to the
corresponding VIDEO IN jacks of your amplifier or receiver
and (MONITOR) VIDEO OUT jacks of that to the
corresponding VIDEO IN jacks of the TV respectively.
· If there are no VIDEO jacks, connect these jacks to the TV
directly. (Refer to "CONNECTING TO TV WITH AUDIO AND
VIDEO INS" on the next page.)
· You can connect the COMPOSITE VIDEO 2 jack to an
additional monitor TV.
Notes:
· When the COMPONENT OUT is set to PROGRESSIVE, the
S-VIDEO and COMPOSITE VIDEO OUTs can not output the
normal video signals. Therefore, it causes the picture to
break up and shake.
· When the progressive video signals are input into the non-
progressive COMPONENT VIDEO INs of your TV, the
picture may not be shown normally, too.
Therefore, when the progressive COMPONENT VIDEO INs
of TV are not connected to, you should set the
COMPONENT OUT to INTERLACED.
· Do not connect the unit to the TV through a VCR. Otherwise
the picture may be disturbed due to the copy protection
function.
3. Connecting DIGITAL OUTs
You can enhance the sound quality by connecting these
COAXIAL and OPTICAL DIGITAL OUTs to the corresponding
DIGITAL INs of an amplifier, MD recorder, etc.
The digital audio signal from a disc is directly transferred. If
you connect to a DTS, Dolby Digital or MPEG-II decoder or an
amplifier with built-in decoder, you can enjoy theater-quality
audio in your home.
Notes :
· When you connect the audio equipment with a digital input,
before using, set the AUDIO SETUP correctly according to the
connected audio equipment with a digital input.
When the AUDIO SETUP is not set correctly, loud noise or
no sound may be heard from the speakers, and it may be
harmful to your ears and damages the speakers.(Refer to
"SETTING THE AUDIO SETUP" on page 35.)
· When you connect the MD or CD recorder with a digital input
for digital recording, the LPCM SELECT should be set to
LPCM 48K. If not, the digital recording do not perform
properly. (Refer to "SETTING THE AUDIO SETUP" on page
35.)
· When making the COAXIAL DIGITAL connection, be sure to
use a 75 COAXIAL cord, not a conventional AUDIO cord.
· All of the commercially-available optical fiber cords cannot
be used for audio equipments. If there is an optical fiber cord
which cannot be connected to your audio equipments,
consult your dealer or nearest service organization.
Audio output from the unit's DIGITAL OUTs
Note 1 : The type of audio output from the DIGITAL OUTs can
be selected by the DIGITAL OUT settings.
Note 2 : Sound having 96 kHz sampling is converted into 48
kHz sampling when it is output from the unit's
DIGITAL OUTs.(Refer to "SETTING THE AUDIO
SETUP" on page 35.)
· Linear PCM is a signal recording format used in music CDs.
While music CDs are recorded in 44.1 kHz/16 bit, DVD
Videos are recorded in 48 kHz/16 bit to 96 kHz/24 bit.
4. AC INPUT CORD
Plug this cord into a wall AC outlet.
5. DIGI LINK JACKs
Refer to "CONNECTING SYSTEM CONTROL" on the next
page.
6. A/V SCART CONNECTORs (Regional Option)
Refer to "CONNECTING TO TV AND VCR WITH SCART
CONNECTORS(Regional Option)" on page 8.
Disc
Audio recording
format
Audio output
DVD
Video
Dolby Digital
Dolby Digital bitstream
(2~5.1ch) or PCM(48 kHz/16bit)
(2ch) (Note 1)
DTS
DTS bitstream or PCM(48 kHz/
16 bit) (2ch) (Note 1)
Linear PCM
(48/96 kHz,
16/20/24bit)
Linear PCM (48 kHz/16bit)
(2ch) (Note 2) or original signal
MPEG-II
MPEG bitstream or PCM(48 kHz/
16 bit) (2ch) (Note 1)
Linear PCM
CD/
MP3 disc
Linear PCM (44.1 kHz)
ENGLISH

Reviews

There are no reviews of this manual yet.