PIONEER XV-DV55/AYXJ Owner's Manual

Cover page of PIONEER XV-DV55/AYXJ Owner's Manual

Owner's Manual for PIONEER XV-DV55/AYXJ, downloadable as a PDF file.

We also have service manual to this model.

Manual details

  • Immediate download after payment.
  • Delivered as a PDF file.
  • The manual has 120 pages
  • File size: 4.03 MB
  • Available language versions: Portuguese, French, Swedish, English, Spanish, Dutch, German, Italian
  • Different language versions may vary sligthly in file size and page count.

We guarantee that...

  • our manuals are complete,
  • our manuals are checked with antivirus,
  • We'll issue refund if the manual is damaged, incomplete or unreadable (our refund policy)

Sample pages

Thumbnail of page 1Thumbnail of page 2Thumbnail of page 3Thumbnail of page 4
Thumbnail of page 5Thumbnail of page 6Thumbnail of page 7Thumbnail of page 8
Thumbnail of page 9
background image
XV-DV55
DVD TUNER
COMBINÉ RADIO / DVD
S-DV55SW-K
S-DV55SW-Q
POWERED SUBWOOFER
ENCEINTE ACTIVE D'EXTRÊMES GRAVES
S-DV55ST-K
S-DV55ST-Q
SATELLITE SPEAKER
ENCEINTES SATELLITE
Operating Instructions
Mode d'emploi
background image
XV-DV55
DVD TUNER
COMBINÉ RADIO / DVD
S-DV55SW-K
S-DV55SW-Q
POWERED SUBWOOFER
ENCEINTE ACTIVE D'EXTRÊMES GRAVES
S-DV55ST-K
S-DV55ST-Q
SATELLITE SPEAKER
ENCEINTES SATELLITE
Operating Instructions
Mode d'emploi
background image
2
En/Fr
WARNING: TO PREVENT FIRE OR SHOCK HAZARD,
DO NOT EXPOSE THIS APPLIANCE TO RAIN OR MOISTURE.
THE STANDBY/ON BUTTON IS SECONDARY CONNECTED AND
THEREFORE DOES NOT SEPARATE THE UNIT FROM MAINS POWER
IN STANDBY POSITION.
ATTENTION: AFIN DE PREVENIR TOUS RISQUES DE
CHOC ELECTRIQUE OU DE DEBUT D'ENCENDIE, NE PAS EXPOSER
CET APPAREIL A L'HUMIDITE OU A LA PLUIE.
LE BOUTON STANDBY/ON EST RACCORDE SECONDAIREMENT ET PAR
CONSEQUENT NE SEPARE PAS L'APPAREIL DE L'ALIMENTATION
SECTEUR SUR LA POSITION D'ATTENTE.
RISK OF ELECTRIC SHOCK
DO NOT OPEN
CAUTION
IMPORTANT
CAUTION:
TO PREVENT THE RISK OF ELECTRIC SHOCK, DO
NOT REMOVE COVER (OR BACK).
NO USER-
SERVICEABLE PARTS INSIDE. REFER SERVICING TO
QUALIFIED SERVICE PERSONNEL.
The exclamation point within an equilateral triangle is
intended to alert the user to the presence of important
operating and maintenance (servicing) instructions in
the literature accompanying the appliance.
The lightning flash with arrowhead symbol, within an
equilateral triangle, is intended to alert the user to the
presence of uninsulated "dangerous voltage" within the
product's enclosure that may be of sufficient magnitude
to constitute a risk of electric shock to persons.
IMPORTANT
Do not connect either wire to the earth terminal of a
three - pin plug.
NOTE
After replacing or changing a fuse, the fuse cover in the
plug must be replaced with a fuse cover which corre-
sponds to the colour of the insert in the base of the plug
or the word that is embossed on the base of the plug, and
the appliance must not be used without a fuse cover. If
lost replacement fuse covers can be obtained from:
your dealer.
Only 5 A fuses approved by B.S.I. or A.S.T.A. to B.S.
1362 should be used.
The cut-off plug should be disposed of and must not be
inserted into any 13 amp socket as this can result in electric
shock. The plug or adaptor or the distribution panel should
be provided with 5 amp fuse. As the colours of the wires in
the mains lead of this appliance may not correspond with
coloured markings identifying the terminals in your plug,
proceed as follows :
The wire which is coloured blue must be connected to the
terminal which is marked with the letter N or coloured black.
The wire which is coloured brown must be connected
to the terminal which is marked with the letter L or coloured
red.
FOR USE IN THE UNITED
KINGDOM
The wires in this mains lead are coloured in
accordance with the following code :
Blue
: Neutral
Brown
: Live
If the plug provided is unsuitable for your socket
outlets, the plug must be cut off and a suitable plug
fitted.
This product complies with the Low Voltage Directive (73/23/EEC),
EMC Directives (89/336/EEC, 92/31/EEC) and CE Marking Directive
(93/68/EEC).
This product incorporates copyright protection technology that is protected
by method claims of certain U. S. patents and other intellectual property
rights owned by Macrovision Corporation and other rights owners. Use of
this copyright protection technology must be Authorized by Macrovision
Corporation, and is intended for home and other limited viewing uses
only unless otherwise authorized by Macrovision Corporation. Reverse
engineering or disassembly is prohibited.
Thank you for buying this Pioneer product.
Please read through these operating instructions so you will know
how to operate your model properly. After you have finished
reading the instructions, put them away in a safe place for future
reference.
In some countries or regions, the shape of the power plug and
power outlet may sometimes differ from that shown in the
explanatory drawings. However, the method of connecting and
operating the unit is the same.
Nous vous remercions pour cet achat d´un produit Pioneer.
Nous vous demandons de lire soigneusement ce mode d´emploi;
vous serez ainsi à mê me de faire fonctionner l´appareil
correctement. Après avoir bien lu le mode d´emploi, le ranger dans
un endroit sûr pour pouvoir s´y référer ultériurement.
Dans certains pays ou certaines régions, la forme de la fiche
d´alimentation et de la prise d´alimentation peut différer de
celle qui figure sur les schémas, mais les branchements et le
fonctionnement de l´appareil restent les mêmes.
Ce produit est conforme à la directive relative aux appareils basse tension
(73/23/CEE), aux directives relatives à la compatibilité
électromagnétique (89/336/CEE, 92/31/CEE) et à la directive CE relative
aux marquages (93/68/CEE).
Cet appareil fait appel à divers circuits et principes destinés á interdire la
piraterie des oeuvres protégées par des droits d'auteurs, circuits et principes
qui sont couverts aux Etats-Unis soit par des brevets détenus par Macrovision
Corporation et d'autres sociétés, soit par d'autres formes de propriété
intellectuelle appartenant également á Macrovision et à d'autres sociétés.
L'utilisation de la technologie visant à la protection des droits dàuteur doit
être autorisée par Macrovision Corporation, et doit être limitée à des fins
domestiques, ou similaires, sauf accord préalable de Macrovision
Corporation. La rétro-technique et le désassemblage sont proscrits.
RISK OF ELECTRIC SHOCK
DO NOT OPEN
CAUTION
These labels can be found on the unit's bottom panel.
Ces étiquettes se trouvent sur le fond de l'appareil.
ATTENTION
DANGER D'ELECTROCUTION
NE PAS OUVRIR
background image
3
En/Fr
POWER-CORD CAUTION
Handle the power cord by the plug. Do not pull out the plug by tugging the
cord and never touch the power cord when your hands are wet as this could
cause a short circuit or electric shock. Do not place the unit, a piece of
furniture, etc., on the power cord, or pinch the cord. Never make a knot in
the cord or tie it with other cords. The power cords should be routed such
that they are not likely to be stepped on. A damaged power cord can cause
fire or give you an electrical shock. Check the power cord once in a while.
When you find it damaged, ask your nearest PIONEER authorized service
center or your dealer for a replacement.
NOTE IMPORTANTE SUR LE CABLE
D'ALIMENTATION
Tenir le câble d'alimentation par la fiche. Ne pas débrancher la prise en
tirant sur le câble et ne pas toucher le câble avec les mains mouillées. Cela
risque de provoquer un court-circuit ou un choc électrique. Ne pas poser
l'appareil ou un meuble sur le câble. Ne pas pincer le câble. Ne pas faire de
noeud avec le câble ou l'attacher à d'autres câbles. Les câbles d'alimentation
doivent être posés de façon à ne pas être écrasés. Un câble abîmé peut
provoquer un risque d'incendie ou un choc électrique. Vérifier le câble
d'alimentation de temps en temps. Contacter le service après-vente PIONEER
le plus proche ou le revendeur pour un remplacement.
CAUTION
This product contains a laser diode of higher class than
1. To ensure continued safety, do not remove any
covers or attempt to gain access to the inside of the
product.
Refer all servicing to qualified personnel.
The following caution label appears on your unit.
Location: bottom of the unit
CAUTION
:
VORSICHT
:
ADVARSEL
:
VARNING
:
VARO!
:
LASER RADIATION WHEN OPEN.
AVOID EXPOSURE TO BEAM.
LASERSTRAHLUNG, WENN ABDECKUNG GEÖFFNET
NICHT DEM STRAHL AUSSETZEN!
LASERSTRÅLING VED ÅBNING UNDGÅ
UDSÆTTELSE FOR STRÅLING.
LASERSTRÅLNING NÄR DENNA DEL ÄR
ÖPPNAD BETRAKTA EJ STRÅLEN.
AVATTAESSA ALTISTUT LASERSÄTEIL YLLE.
ÄLÄ KATSO SÄTEESEN.
VRW1697
CLASS 1
LASER PRODUCT
CAUTIONS REGARDING
HANDLING
Ventilation
When installing this unit, make sure to leave space around the unit
for ventilation to improve heat radiation (at least 25 cm at top, 10
cm at rear, and 10 cm at each side). If not enough space is provided
between the unit and walls or other equipment, heat will build up
inside, interfering with performance or causing malfunctions.
ATTENTION
Ce produit renferme une diode à laser d'une catégorie
supérieure à 1. Pour garantir une sécurité constante, ne
pas retirer les couvercles ni essayer d'accéder à
l'intérieur de l'appareil.
Pour toute réparation, s'adresser à un personnel
qualifié.
L'avertissement suivant apparaît sur votre appareil.
Endroit : partie inférieure de l'appareil
CLASS 1
LASER PRODUCT
CAUTION
:
VORSICHT
:
ADVARSEL
:
VARNING
:
VARO!
:
LASER RADIATION WHEN OPEN.
AVOID EXPOSURE TO BEAM.
LASERSTRAHLUNG, WENN ABDECKUNG GEÖFFNET
NICHT DEM STRAHL AUSSETZEN!
LASERSTRÅLING VED ÅBNING UNDGÅ
UDSÆTTELSE FOR STRÅLING.
LASERSTRÅLNING NÄR DENNA DEL ÄR
ÖPPNAD BETRAKTA EJ STRÅLEN.
AVATTAESSA ALTISTUT LASERSÄTEIL YLLE.
ÄLÄ KATSO SÄTEESEN.
VRW1697
AVERTISSEMENTS
CONCERNANT L'EMPLOI
Ventilation
Lors de l'installation de l'appareil, veillez à laisser suffisamment
d'espace autour pour permettre une bonne ventilation et
l'évacuation de la chaleur (au moins 25 cm au-dessus, 10 cm à
l'arrière et 10 cm de chaque côté). S'il n'y a pas suffisamment
d'espace entre l'appareil et les parois ou les autres équipements qui
l'entourent, la chaleur s'accumule à l'intérieur de l'appareil et
affectera ses performances ou causera des dysfonctionnements.
background image
4
En/Fr
Using the System Correctly
Précautions d'installation
· Installez les appareils de manière qu'un espace libre soit
ménagé au-dessus et sur chacun de leurs côtés, et que les
ouïes d'aération soient dégagées. Veillez à ce que 10 cm,
au moins, séparent l'appareil d'un mur ou d'une paroi,
comme le montre les illustrations. Des ouïes d'aération
sont également placées sur le panneau de fond; ne posez
donc pas les appareils sur une moquette ou une surface
similaire qui pourrait les obstruer.
· Utilisez un aspirateur périodiquement pour nettoyer la
porte du haut-parleur d'extrême grave pour qu'il n' y ait
pas de poussière.
Installation Precautions
· Install components so that there are no obstructions above
or either side of them, or by ventilation holes. Also install
10cm away from the wall as shown in the figures.
Components feature ventilation holes on the bottom so do
not install on thick pile carpets or other surfaces that may
block them.
· Use a vacuum cleaner periodically to clean the port of the
subwoofer to keep it free of dust.
Powered subwoofer unit (S-DV55SW)
Enceinte active d'extrêmes graves (S-DV55SW)
DVD tuner system (XV-DV55)
Combiné radio/DVD (XV-DV55)
Rear: 10 cm or more
Arrière: au moins 10 cm
10 cm or more
Au moins 10 cm
10 cm or more
Au moins 10 cm
25 cm or more
Au moins 25 cm
10 cm or
more
Au moins
10 cm
25 cm or more
Au moins 25 cm
Rear: 10 cm or more
Arrière: au moins 10 cm
background image
5
En/Fr
Table des matières
1
Préparatifs
Caractéristiques .................................................................. 8
Utilisation de ce manuel ..................................................... 8
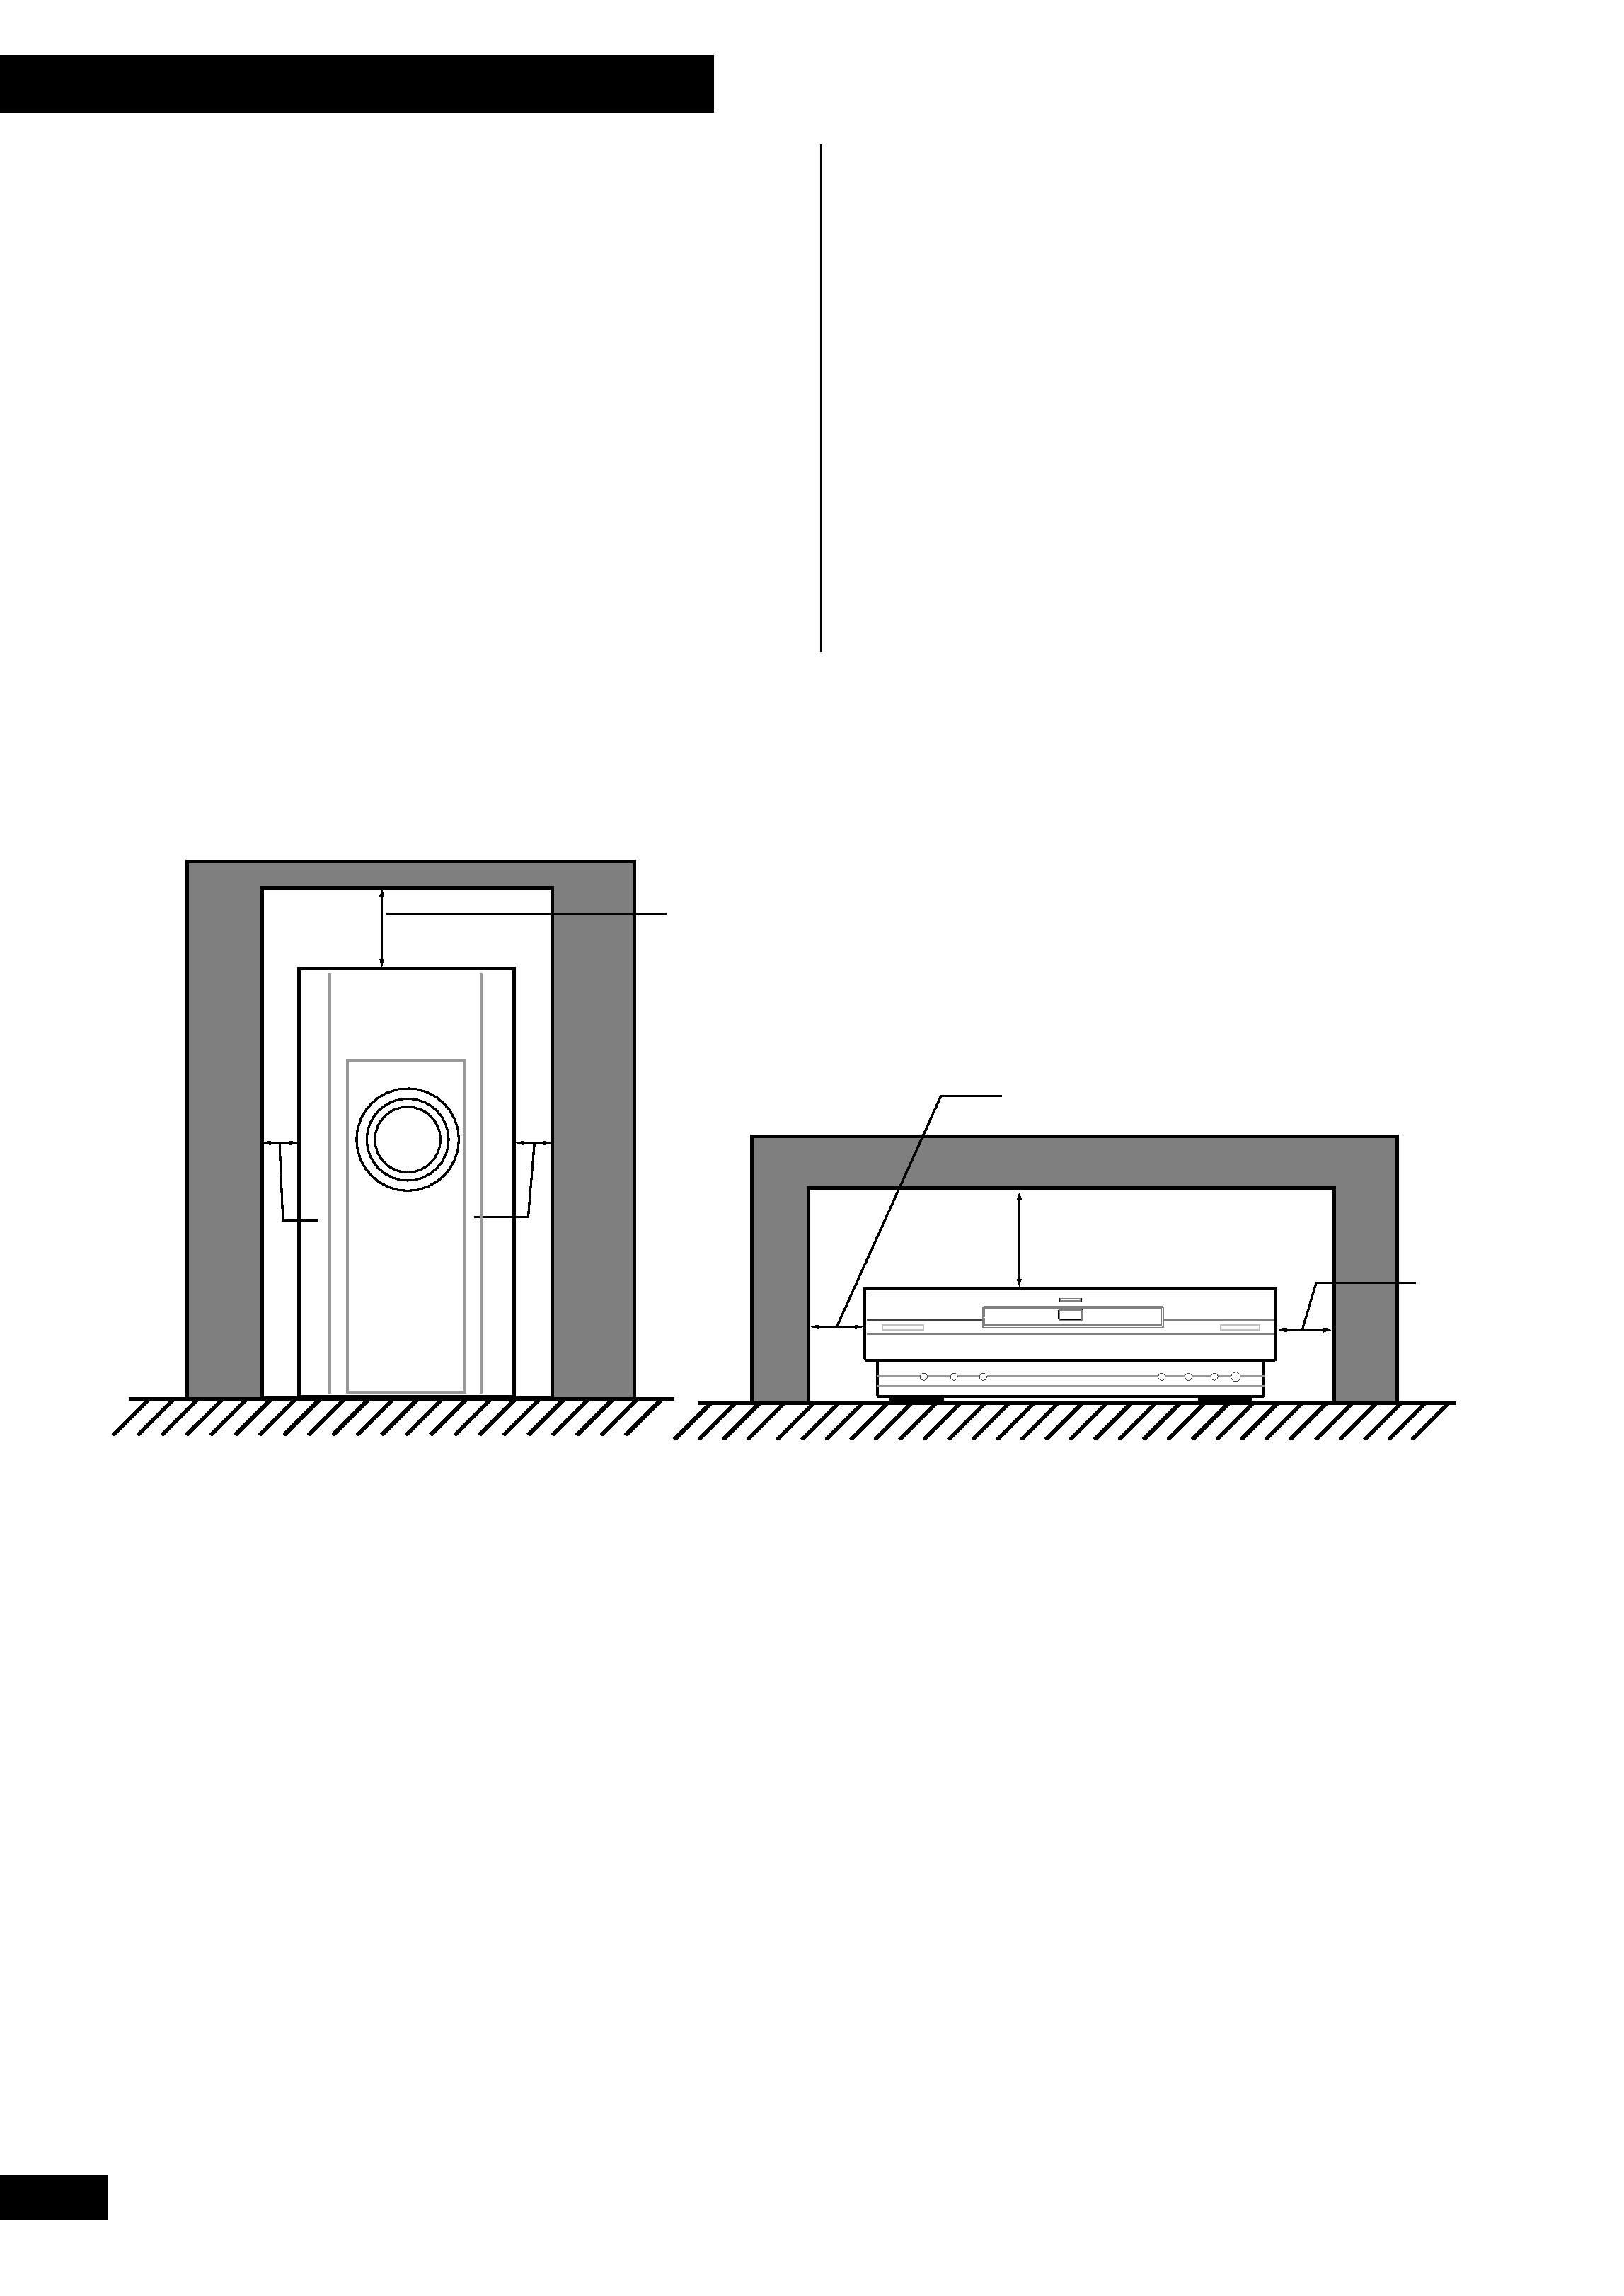
Suggestions pour l'installation ........................................... 9
Comment éviter les problèmes de condensation .............. 9
Déplacement de la chaîne ................................................... 9
Disques compatibles avec cette chaîne ............................ 10
Régions des DVD vidéo ..................................................... 10
2
Commandes et affichages
Panneau frontal .................................................................. 11
Afficheur ............................................................................. 11
Télécommande .................................................................... 15
3
Mise en service
Introduction ........................................................................ 17
Allumage et réglage de l'horloge ....................................... 17
Configuration du son surround ......................................... 18
Réglage de la distance des enceintes ................................ 18
Comment équilibrer le son surround ............................... 20
Utilisation du Setup Navigator ......................................... 21
Lecture de disques DVD vidéo .......................................... 23
Lecture de CD .................................................................... 26
Lecture de CD vidéo ......................................................... 27
Écoute de la radio ............................................................. 29
Amélioration du son FM stéréo ........................................ 29
Écoute d'autres composants ............................................ 30
Comment passer d'une source numérique à une source
analogique ......................................................................... 31
4
Configuration du son
Réglage des graves et des aigus ........................................ 32
Utilisation de P.Bass .......................................................... 32
Utilisation des modes de son ........................................... 33
Écoute de sources sonores surround avec effets
spatiaux .............................................................................. 33
Écoute d'autres sources avec des effets spatiaux ............ 34
Ecoute à bas volume .......................................................... 35
Réglage des niveaux de volume du canal .......................... 36
5
Utilisation du lecteur DVD
Introduction ....................................................................... 37
Comment trouver ce que vous souhaitez sur un disque . 37
Changement des angles de caméra (DVD seulement) .... 38
Changement des sous-titres (DVD seulement) ............... 38
Changement de la langue audio (DVD seulement) ......... 39
Programmation des répertoires ........................................ 39
Programmation d'un répertoire de DVD .......................... 40
Programmation d'un répertoire de CD/CD vidéo ........... 41
Options de programmation supplémentaires .................. 42
Utilisation de la lecture répétée ....................................... 43
Utilisation de la lecture aléatoire ..................................... 44
Indexation d'un endroit du disque (DVD/CD vidéo) ...... 45
Mémorisation des réglages d'un disque (DVD
seulement) ......................................................................... 46
Affichage de l'information du disque ............................... 47
6
Utilisation du tuner
Mémorisation de stations préréglées ............................... 48
Écoute de stations préréglées .......................................... 49
Utilisation du RDS ............................................................. 50
Affichage de l'information RDS ......................................... 51
Recherche d'un type de programme ................................ 52
7
Utilisation de la minuterie
Utilisation de la minuterie de réveil .................................. 53
Activation/désactivation de la minuterie de réveil .......... 54
Vérification des réglages de la minuterie ......................... 55
Utilisation de la minuterie de sommeil ............................. 56
Contents
1
Before You Start
Features ................................................................................ 8
Using this manual ................................................................ 8
Hints on installation ............................................................ 9
Avoiding problems with condensation ............................... 9
Moving the system ............................................................... 9
Discs compatible with this system ..................................... 10
DVD Video regions ............................................................ 10
2
Controls and Displays
Front panel ......................................................................... 11
Display ................................................................................ 11
Remote control ................................................................... 13
3
Getting Started
Introduction ........................................................................ 17
Switching on and setting the clock .................................... 17
Setting up for surround sound .......................................... 18
Setting the speaker distances ............................................ 18
Balancing the surround sound .......................................... 20
Using the setup navigator ................................................. 21
Playing DVD Video discs .................................................... 23
Playing CDs ........................................................................ 26
Playing Video CDs ............................................................. 27
Listening to the radio ........................................................ 29
Improving FM stereo sound .............................................. 29
Listening to other components ........................................ 30
Switching between digital and analog sources ................ 31
4
Shaping the Sound
Adjusting the bass and treble ........................................... 32
Using P.Bass ....................................................................... 32
Using sound modes ........................................................... 33
Listening to surround-sound sources
with room effects ............................................................. 33
Listening to other sources with room effects .................. 34
Listening at low volume ..................................................... 35
Adjusting channel volume levels ....................................... 36
5
Using the DVD Player
Introduction ....................................................................... 37
Finding what you want on a disc ....................................... 37
Switching camera angles (DVD only) ............................... 38
Switching subtitles (DVD only) ......................................... 38
Switching audio language (DVD only) ............................. 39
Programming playlists ....................................................... 39
Programming a DVD playlist ............................................. 40
Programming a CD/Video CD playlist .............................. 41
More programming options .............................................. 42
Using repeat play .............................................................. 43
Using random play ............................................................ 44
Bookmarking a place in a disc (DVD/Video CD) ............. 45
Memorizing disc settings (DVD only) ............................... 46
Displaying disc information .............................................. 47
6
Using the Tuner
Saving station presets ....................................................... 48
Listening to station presets .............................................. 49
Using RDS .......................................................................... 50
Displaying RDS information .............................................. 51
Searching for a type of program ...................................... 52
7
Using the Timer
Using the wake up timer ................................................... 53
Activating/deactivating the wake up timer ...................... 54
Checking the timer settings .............................................. 55
Using the sleep timer ........................................................ 56

Reviews

There are no reviews of this manual yet.