PIONEER XR-A670/DBDXJ Owner's Manual

Cover page of PIONEER XR-A670/DBDXJ Owner's Manual

Owner's Manual for PIONEER XR-A670/DBDXJ, downloadable as a PDF file.

We also have service manual to this model.

Manual details

  • Immediate download after payment.
  • Delivered as a PDF file.
  • The manual has 64 pages
  • File size: 2.21 MB
  • Available language versions: Arabic, English, Russian
  • Different language versions may vary sligthly in file size and page count.

We guarantee that...

  • our manuals are complete,
  • our manuals are checked with antivirus,
  • We'll issue refund if the manual is damaged, incomplete or unreadable (our refund policy)

Sample pages

Thumbnail of page 1Thumbnail of page 2Thumbnail of page 3Thumbnail of page 4
Thumbnail of page 5Thumbnail of page 6Thumbnail of page 7Thumbnail of page 8
Thumbnail of page 9
background image
XR-A370SW
S-A370
'
STEREO CD CASSETTE DECK RECEIVER
-
l
N?
U?
"
«
Ý
D?
u?
«
½
U?
G?
O?
d?
...
Ë
oe
,,
Â
U?
Ý
O?
X?
Ë
--
«
oe
¹
u?
Ý
²?
d?
¹
u?
SPEAKER SYSTEM
½
E
U
Â
Ý
L
U
Z
U
Operating Instructions
ð
F
K
O
L
U
«
Ã
²
A
G
O
q
background image
XR-A370SW
S-A370
'
STEREO CD CASSETTE DECK RECEIVER
-
l
N?
U?
"
«
Ý
D?
u?
«
½
U?
G?
O?
d?
...
Ë
oe
,,
Â
U?
Ý
O?
X?
Ë
--
«
oe
¹
u?
Ý
²?
d?
¹
u?
SPEAKER SYSTEM
½
E
U
Â
Ý
L
U
Z
U
Operating Instructions
ð
F
K
O
L
U
«
Ã
²
A
G
O
q
background image
2
En
Energy-saving design
÷ This system is designed to use minimal electricity when power is
switched OFF (during Standby).
÷ Regarding the value of the Power Consumption in standby mode,
refer to "Specifications" on page 61.
WARNING: TOPREVENTFIREORSHOCKHAZARD,
DO NOT EXPOSE THIS APPLIANCE TO RAIN OR
MOISTURE.
CAUTION
RISK OF ELECTRIC SHOCK
DO NOT OPEN
IMPORTANT
The lightning flash with arrowhead symbol, within an
equilateral triangle, is intended to alert the user to the
presence of uninsulated "dangerous voltage" within the
product's enclosure that may be of sufficient magnitude
to constitute a risk of electric shock to persons.
CAUTION:
TO PREVENT THE RISK OF ELECTRIC SHOCK, DO
NOT REMOVE COVER (OR BACK). NO USER-
SERVICEABLE PARTS INSIDE. REFER SERVICING
TO QUALIFIED SERVICE PERSONNEL.
The exclamation point within an equilateral triangle is
intended to alert the user to the presence of important
operating and maintenance (servicing) instructions in
the literature accompanying the appliance.
This equipment has been tested and found to comply with the limits for a Class B digital device, pursuant to Part 15 of the FCC Rules. These limits
are designed to provide reasonable protection against harmful interference in a residential installation. This equipment generates, uses, and can
radiate radio frequency energy and, if not installed and used in accordance with the instructions, may cause harmful interference to radio
communications. However, there is no guarantee that interference will not occur in a particular installation. If this equipment does cause harmful
interference to radio or television reception, which can be determined by turning the equipment off and on, the user is encouraged to try to correct
the interference by one or more of the following measures:
-- Reorient or relocate the receiving antenna.
-- Increase the separation between the equipment and receiver.
-- Connect the equipment into an outlet on a circuit different from that to which the receiver is connected.
-- Consult the dealer or an experienced radio/TV technician for help.
Information to User
Alteration or modifications carried out without appropriate authorization may invalidate the user's right to operate the equipment.
CAUTION
÷ Use of controls or adjustments or performance of procedures other than those specified herein may result in hazardous radiation exposure.
÷ The use of optical instruments with this product will increase eye hazard.
Location
Install the unit in a well-ventilated location where it will not be
exposed to high temperatures or humidity.
Do not install the unit in a location which is exposed to direct rays
of the sun, or near stoves or radiators. Excessive heat can
adversely affect the cabinet and internal components. Installation
of the unit in a damp or dusty environment may also result in a
malfunction or an accident (avoid installation near cookers, etc.,
where the unit may be exposed to oily smoke, steam or heat).
Ventilation
When installing this unit, make sure to leave space around the
unit for ventilation to improve heat radiation (at least 30 cm at top,
15 cm at rear and 15 cm at each side). If not enough space is
provided between the unit and walls or other equipment, heat
will build up inside, interfering with performance or causing
malfunctions.
Precautions regarding installation
÷ Placing and using the unit for long periods on heat-generating
sources will affect performance. Avoid placing the unit on
heat-generating sources.
÷ InstalltheunitasfarawayaspossiblefromyourTV.Installation
in close proximity to such equipment may cause noise or
degradation of the picture.
÷ Such noise may be particularly noticeable when an indoor
antenna is used. In such cases, make use of an outdoor
antenna, or turn off the power to the unit.
÷ Please place this unit on a level surface.
Condensation
When this unit is brought into a warm room from previously cold
surroundings or when the room temperature rises sharply,
condensation may form inside, and the unit may not be able to
attain its full performance. To prevent this, allow the unit to stand
for about an hour before switching it on, or raise the room
temperature gradually.
CAUTIONS REGARDING
HANDLING
Thank you for buying this Pioneer product.
Please read through these operating instructions so you will
know how to operate your model properly. After you have
finished reading the instructions, put them away in a safe place
for future reference.
In some countries or regions, the shape of the power plug and
power outlet may sometimes differ from that shown in the
explanatory drawings. However, the method of connecting and
operating the unit is the same.
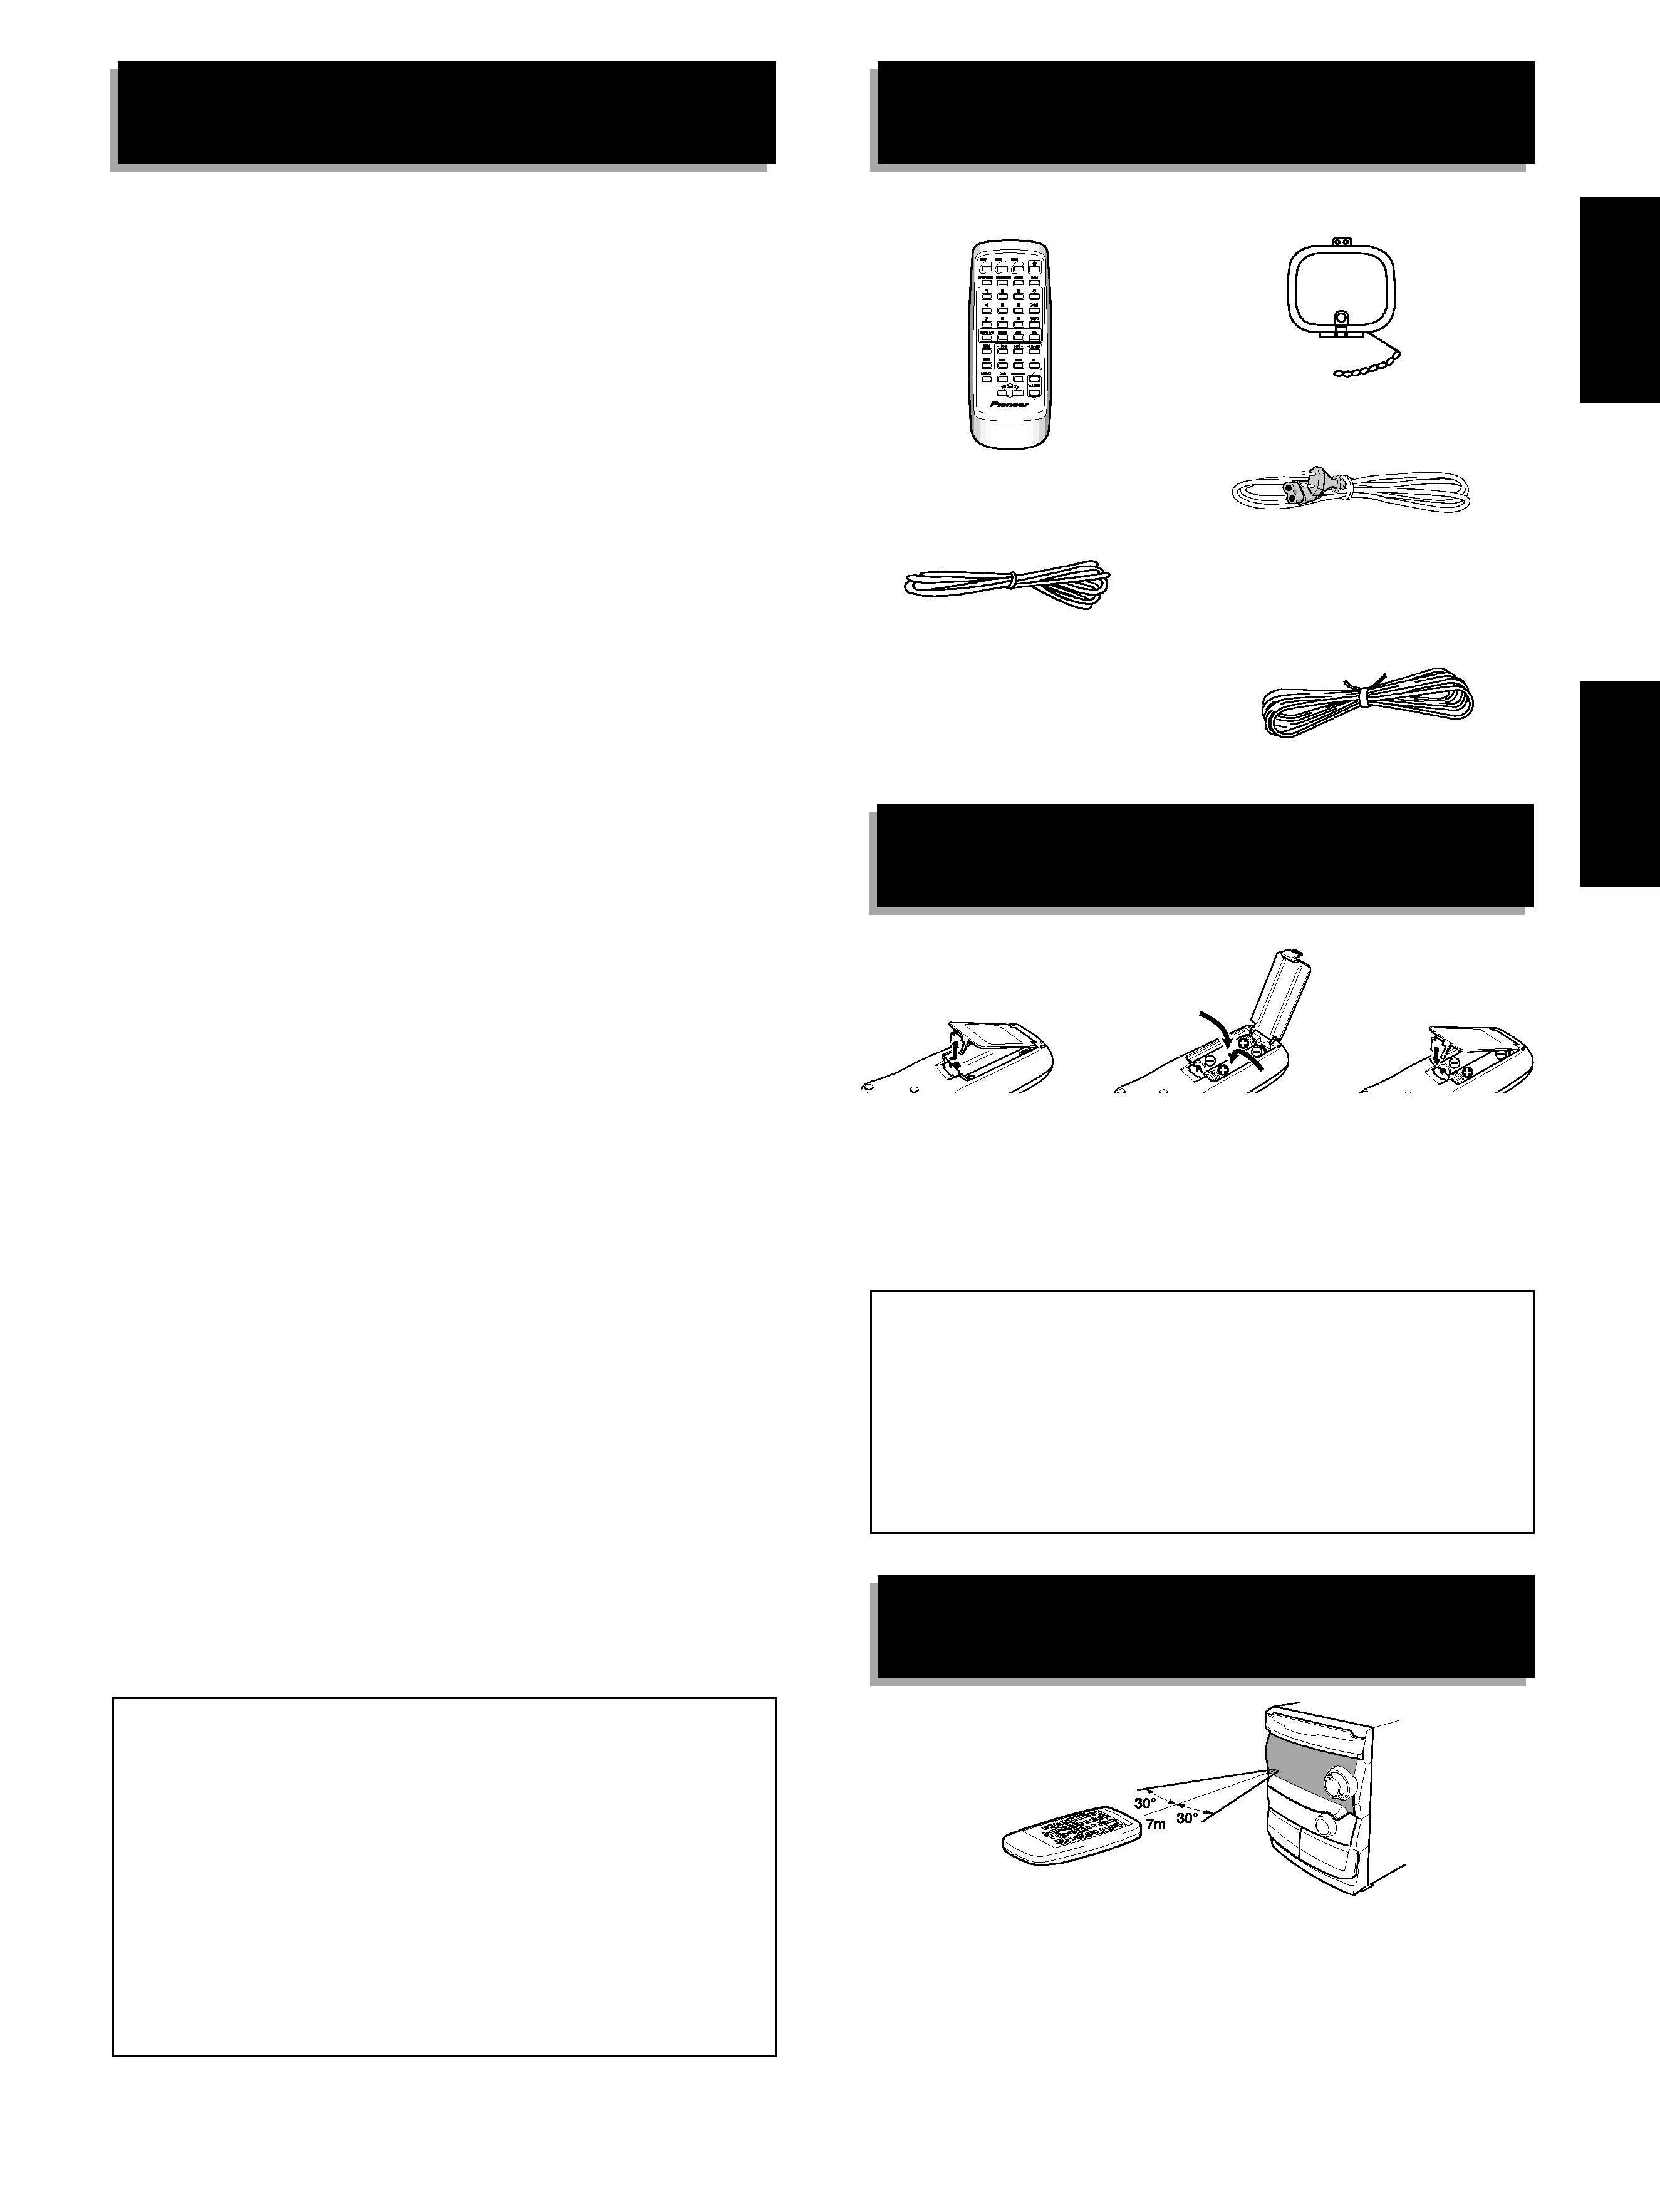
Demo Function
The Demo mode starts automatically when the power cord is
plugged into the power outlet.
Also, when the P.BASS (DEMO) button is pressed for more than
3 seconds in the STANDBY mode, the Demo mode is activated.
In the demo mode, various patterns appear on the display.
÷ The Demo mode can be cancelled by pressing the STANDBY/
ON switch or function button.
÷ When the P.BASS (DEMO) button is pressed for more than
3 seconds in the demonstrate mode, the demonstration stops
and the demonstration function is cancelled. When the
demonstration function is cancelled, the demonstration is not
carried out even when the power cord is connected again. To
resume demonstration function, press the P.BASS (DEMO)
button for more than 3 seconds in the standby mode.
LINE VOLTAGE SELECTOR SWITCH
Only multi-voltage models are provided with this switch.
Be sure this is set correctly.
Mains voltages in Saudi Arabia are 127V and 220V only.
Always check that this selector is set properly before plugging the
power cord into the wall outlet.
1. Disconnect the power cord.
2. Use a small-sized screwdriver.
3. Insert the screwdriver into the groove on the voltage selector,
and adjust the VOLTAGE SELECTOR.
CAUTION 240 V
Power source voltage is factory adjusted
at 240 volts. If AC voltage in your area is
different, refer to operating instructions
and change voltage selector setting.
110-
127V
220-
230V
VOLTAGE
SELECTOR
240V
THE STANDBY/ON SWITCH IS SECONDARY CONNECTED
AND THEREFORE DOES NOT SEPARATE THE UNIT FROM
MAINS POWER IN THE STANDBY POSITION.
background image
3
Ru/Ar
Z
d
Ð
w
English
Ru
:
.
Pioneer
.
,
,
,
,
.
,
,
.
.
,
.
DEMO
.
STANDBY
,
3
P.BASS
(DEMO).
.
÷
,
STANDBY/ON
.
÷
,
,
-
P.BASS
(DEMO)
3
,
,
.
,
.
,
,
,
-
P.BASS
(DEMO)
3
.
,
.
,
.
-
127
220.
,
.
1.
.
2.
.
3.
VOLTAGE SELECTOR
.
÷
,
(OFF) (
)
.
÷
.
"
"
. 62.
,
.
,
,
.
.
.
(
..,
,
.)
(
30
, 15
15
).
,
,
,
.
.
-
.
.
.
.
.
,
,
-
.
,
,
.
,
.
WER
STANDBY/ON
.
: 240
240
.
,
,
,
.
110-
127V
220-
230V
VOLTAGE
SELECTOR
240V
background image
4
En
Ar
%
c
¹
d
Ã
²
H
U
oe
Í
«
(
d
¹
o
Ë
«
Ã
B
b
Ä
U
«
Ã
J
N
d
Ð
U
z
O
W
¨
ô
ð
F
d
÷
¼
c
«
«
'
N
U
"
Ã
K
L
D
d
«
Ë
«
Ã
d
Þ
u
Ð
W
Æ
ý
J
d
«
Ã
p
Z
K
v
ý
d
«
z
p
l
N
U
"
Ð
U
¹
u
½
O
d
¼
c
«
Æ
¹
d
l
v
Á
d
«
¡
...
l
L
O
l
¼
c
Á
«
Ã
²
F
K
O
L
U
Ð
F
M
U
¹
W
ô
Ê
­
Ã
p
¹
U
Z
b
,,
Z
K
v
Ä
F
d
W
ð
A
G
O
q
l
N
U
"
,,
Ð
B
u
--
...
×
O
×
W
Æ
Ð
F
b
«
ô
½
²
N
U
¡
Ä
s
Á
d
«
¡
...
¼
c
«
¨
«
S
²
H
k
Ð
N
U
w
Ä
J
U
Ê
Ä
M
U
Ý
V
Ã
²
J
u
Ê
Ä
d
l
F
U
Ã
p
w
«
*
²
I
³
q
Æ
w
Ð
F
i
«
Ã
³
K
b
«
Ê
«
Ë
«
*
M
U
Þ
o
Ä
I
³
f
«
Ã
²
O
U
--
Ë
Ä
Q
s
c
«
Ã
D
U
Á
W
w
«
'
b
«
--
Á
b
¹
²
K
H
U
Ê
Ð
F
i
«
ô
S
O
U
Ê
Z
s
«
ô
ý
J
U
«
*
³
O
M
W
w
¼
c
Á
«
Ã
²
F
K
O
L
U
Æ
Ä
l
­
Ã
p
U
Ê
Þ
d
¹
I
W
ð
u
O
q
Ë
ð
A
G
O
q
¼
c
«
«
'
N
U
"
¼
w
½
H
N
U
Â
L
U
w
¼
c
«
«
Ã
b
Ã
O
q
Æ
Ë
þ
O
H
W
«
Ý
²
F
d
«
÷
«
Ã
²
A
G
O
q
Ë
{
l
«
Ý
²
F
d
«
÷
«
Ã
²
A
G
O
q
¹
³
b
«
Ã
F
L
q
«
Ë
ð
u
Ä
U
ð
O
J
O
U
Z
M
b
ð
u
O
q
Ý
K
p
«
Ã
D
U
Á
W
«
Ã
v
Ä
Q
s
c
«
Ã
D
U
Á
W
w
«
'
b
«
--
Æ
Â
c
Ã
p
Z
M
b
{
G
j
"
--
«
Ý
²
F
d
«
÷
«
Ã
²
A
G
O
q
P. BASS (DEMO)
*
b
...
Â
¦
d
Ä
s
L
u?
«
Ê
w?
Ë
{
l?
«
ô
Ý
²?
F?
b?
«
oe
Ã
K?
²?
A?
G?
O?
q?
STANDBY
Ý
O?
²?
r?
ð
A?
G?
O?
q?
Ë
þ
O?
H?
W?
«
Ý
²
F
d
«
÷
«
Ã
²
A
G
O
q
Æ
w
W?H?K?²??Ä Ã­U?/ d?NEð ¨wSUC¹ù« ÷dFë l{Ë
Æ÷d?F?ë W?Suà w
1
J
s
Ã
G
U
¡
Ë
{
l
«
Ý
²
F
d
«
÷
«
Ã
²
A
G
O
q
Ð
C
G
j
"
--
«
ô
Ý
²
F
b
«
oe
Ã
K
²
A
G
O
q
Ø
«
Ã
²
A
G
O
q
STANDBY/ON
Ë
"
--
«
Ã
u
þ
O
H
W
Æ
Z
M
b
{
G
j
"
--
«
Ý
²
F
d
«
÷
«
Ã
²
A
G
O
q
P. BASS (DEMO)
*
b
...
Â
¦
d
Ä
s
L
u?
«
Ê
w?
Ë
{
l?
«
Ý
²?
F?
d?
«
÷
«
Ã
²?
A?
G?
O?
q?
¨
Ý
O?
²?
u?
Á
n?
ð
A?
G?
O?
q?
«
Ý
²?
F?
d?
«
÷
«
Ã
²
A
G
O
q
Ë
Ý
²
K
G
v
Ë
þ
O
H
W
«
Ý
²
F
d
«
÷
«
Ã
²
A
G
O
q
¨
Z
M
b
«
Ã
G
U
¡
Ë
þ
O
H
W
«
Ý
²
F
d
«
÷
«
Ã
²
A
G
O
q
¨
Ã
s
¹
F
L
q
Ë
{
l
«
Ý
²
F
d
«
÷
«
Ã
²
A
G
O
q
S
²
v
Z
M
b
Ä
U
¹
²?
r?
ð
u?
O?
q?
Ý
K?
p?
«
Ã
D?
U?
Á
W?
Ä
d?
...
«
s
d?
È
Æ
ô
Ý
²?
¾?
M?
U?
·
ð
A?
G?
O?
q?
Ë
þ
O?
H?
W?
«
Ý
²
F
d
«
÷
«
Ã
²
A
G
O
q
¨
«
{
G
j
"
--
«
Ý
²
F
d
«
÷
«
Ã
²
A
G
O
q
P. BASS (DEMO)
*
b
...
Â
¦
d
Ä
s
L
u
«
Ê
w
Ë
{
l
«
ô
Ý
²
F
b
«
oe
Ã
K
²
A
G
O
q
Æ
Ä
H
²
U
Õ
Ä
M
²
I
w
u
Ã
D
O
W
«
)
j
l
N
e
«
*
u
oe
¹
ö
­
«
«
Ã
H
u
Ã
D
O
W
«
*
²
F
b
oe
...
I
j
Ð
N
c
Á
«
*
H
U
ð
O
`
Æ
ð
Q
Â
b
Ä
s
×
W
{
³
j
Â
ö
«
*
H
²
U
S
5
Æ
u
Ã
D
O
U
«
Ã
²
O
U
--
w
«
Ã
F
u
oe
¹
W
¼
w
±
u
Ã
X
Ë
u
Ã
X
Æ
ð
Q
Â
b
oe
«
z
L
U
Ä
s
«
½
t
Á
b
-
{
³
j
«
*
H
²
U
Õ
Ð
B
u
--
...
×
O
×
W
Á
³
q
ð
u
O
q
Ý
K
p
«
Ã
D
U
Á
W
«
Ã
v
«
*
Q
s
c
w
«
'
b
«
--
Æ
±
Æ
«
B
q
Ý
K
p
«
Ã
D
U
Á
W
Æ
«
Ý
²
b
Â
Ä
H
p
Ð
d
«
z
w
G
O
d
Æ
Æ
«
oe
s
q
Ä
H
p
«
Ã
³
d
«
z
w
w
«
s
b
Ë
oe
Ä
M
²
I
w
«
Ã
H
u
Ã
D
O
W
L
r
«
{
³
j
Ä
M
²
I
w
«
Ã
H
u
Ã
D
O
W
Æ
ð
B
L
O
r
Ä
u
d
w
«
Ý
²
N
ö
,,
«
Ã
D
U
Á
W
L
r
¼
c
«
«
'
N
U
"
ô
Ý
²
N
ö
,,
«
oe
½
v
S
b
2
J
s
Ä
s
«
Ã
D
U
Á
W
«
Ã
J
N
d
Ð
U
z
O
W
Z
M
b
«
¹
I
U
·
ð
A
G
O
q
OFF
«
Ã
D
U
Á
W
®
L
M
U
¡
Ë
{
l
«
ô
Ý
²
F
b
«
oe
Ã
K
²
A
G
O
q
©
Æ
O
L
U
¹
h
Ä
I
b
«
--
«
Ã
D
U
Á
W
«
*
²
N
K
J
W
w
Ë
{
l
«
ô
Ý
²
F
b
«
oe
Ã
K
²
A
G
O
q
¨
--
l
l
«
Ã
v
Á
r
"
«
*
u
«
H
U
"
Z
K
v
H
×
W
Æ
ð
M
³
O
N
U
S
u
«
ô
Ý
²
b
«
Â
«
*
u
Á
l
{
l
«
'
N
U
"
w
Ä
u
Á
l
l
O
b
«
Ã
²
N
u
¹
W
Ð
×
O
Y
ô
¹
²
F
d
÷
«
Ã
v
oe
--
l
U
S
d
«
--
...
«
Ë
--
Þ
u
Ð
W
Z
U
Ã
O
W
Æ
ô
ð
C
l
«
'
N
U
"
w
Ä
u
Á
l
¹
²
F
d
÷
«
Ã
v
«
ý
F
W
«
Ã
A
L
f
«
*
³
U
ý
d
...
«
Ë
Á
d
»
«
ô
l
N
e
...
«
(
d
«
--
¹
W
«
Ë
«
*
A
F
U
«
(
d
«
--
¹
W
Æ
«
(
d
«
--
...
«
Ã
e
«
z
b
...
1
J
s
«
Ê
ð
R
oe
Í
«
Ã
v
ð
K
n
«
Ã
J
U
Ð
O
M
W
Ë
«
ô
l
e
«
¡
«
Ã
b
«
s
K
O
W
Æ
ð
d
Â
O
V
«
'
N
U
"
w
Ä
u
Á
l
­
Ë
z
³
U
--
Ë
«
ð
d
Ð
W
Â
¦
O
d
...
1
J
s
«
Ê
¹
R
oe
Í
«
Ã
v
«
Z
D
U
w
«
Ã
²
A
G
O
q
«
Ë
S
u
«
oe
À
Æ
®
&
M
V
Â
c
Ã
p
ð
d
Â
O
V
«
'
N
U
"
Á
d
»
«
l
N
e
...
«
Ã
D
³
a
¨
«
Ã
a
S
O
Y
1
J
s
«
Ê
¹
²
F
d
÷
«
'
N
U
"
«
Ã
v
«
Ã
b
s
U
Ê
Ä
s
«
Ã
e
¹
X
«
Ë
«
Ã
³
U
--
«
Ë
«
(
d
«
--
...
Æ
©
«
Ã
²
N
u
¹
W
Z
M
b
ð
d
Â
O
V
¼
c
«
«
'
N
U
"
ð
Q
Â
b
Ä
s
ð
d
,,
Ä
U
W
Â
U
O
W
S
u
«
'
N
U
"
Ã
K
²
N
u
¹
W
Ë
%
5
«
ý
F
U
Y
«
(
d
«
--
...
®
Ý
r
Ä
s
«
ô
Z
K
v
¨
µ
±
Ý
r
w
«
)
K
n
Ë
µ
±
Ý
r
Ä
s
Â
q
l
U
½
V
©
Æ
«
­
«
Ã
r
¹
²
r
ð
d
,,
Ä
U
W
Â
U
O
W
Ð
5
«
'
N
U
"
Ë
«
'
b
--
«
Ê
Ë
«
ô
l
N
e
...
«
ô
s
d
È
¨
Ý
u
·
ð
d
ð
H
l
«
(
d
«
--
...
w
oe
«
s
q
«
'
N
U
"
2
U
¹
R
oe
Í
«
Ã
v
«
Ã
²
Q
L
O
d
Z
K
v
«
ô
oe
«
¡
«
Ë
S
b
Ë
À
«
ô
Z
D
U
Æ
«
S
²
O
U
Þ
U
S
u
«
Ã
²
d
Â
O
V
Ë
{
l
Ë
«
Ý
²
b
«
Â
«
'
N
U
"
u
,
Ä
B
U
oe
--
Ä
M
²
-
W
Ã
K
×
d
«
--
...
Ã
H
²
d
...
Þ
u
¹
K
W
Ä
s
«
Ã
e
Ä
s
Ý
O
R
L
d
Z
K
v
l
u
oe
...
«
ô
oe
«
¡
Æ
&
M
V
Ë
{
l
«
'
N
U
"
u
,
Ä
B
U
oe
--
Ä
M
²
-
W
Ã
K
×
d
«
--
...
Æ
{
l
«
'
N
U
"
«
Ð
F
b
Ä
U
1
J
s
Z
s
l
N
U
"
ð
K
H
e
¹
u
½
p
Æ
S
O
Y
«
Ê
«
Ã
²
d
Â
O
V
w
Ä
u
Á
l
Á
d
¹
V
Ä
s
Ä
¦
q
¼
c
Á
«
ô
l
N
e
...
Á
b
¹
R
oe
Í
«
Ã
v
S
b
Ë
À
ð
A
u
¹
g
Ë
ð
A
u
¹
W
Ã
K
B
u
--
...
Æ
¹
J?
u?
Ê
Ä
¦?
q?
¼
c?
«
«
Ã
²?
A?
u?
¹
g?
Ä
K?
×?
u?
þ
U?
Ð
B?
u?
--
...
Â
³?
O?
d?
Z
M?
b?
«
Ý
²?
?
b?
«
Â
¼
u
«
z
w
oe
«
s
K
w
Æ
w
Ä
¦
q
¼
c
Á
«
(
U
Ã
W
¨
ð
Q
Â
b
Ä
s
«
Ý
²
b
«
Â
¼
u
«
z
w
s
U
--
l
w
Ë
Ë
Á
n
ð
A
G
O
q
Þ
U
Á
W
«
'
N
U
"
Æ
¹
d
l
v
Ë
{
l
«
'
N
U
"
Z
K
v
Ý
D
`
Ä
²
u
È
Æ
«
Ã
²
J
U
L
n
Z
M
b
½
I
q
«
'
N
U
"
«
Ã
v
z
d
W
oe
«
¾
W
Ä
s
Ä
J
U
Ê
Ð
U
--
oe
«
Ë
Z
M
b
«
--
ð
H
U
Y
oe
--
l
W
S
d
«
--
...
«
Ã
G
d
W
Ð
B
u
--
...
Z
U
Ã
O
W
1
J
s
«
Ê
¹
×
B
q
ð
J
U
L
n
w
«
Ã
b
«
s
q
Ë
Á
b
ô
%
B
q
Z
K
v
«
oe
«
¡
Â
U
Ä
q
Ä
s
«
'
N
U
"
Æ
Ã
²
ö
w
­
Ã
p
¨
«
ð
d
,,
«
'
N
U
"
*
b
...
Ý
U
Z
W
Ë
«
S
b
...
ð
I
d
¹
³
U
Á
³
q
ð
A
G
O
K
t
«
Ë
«
--
l
oe
--
l
W
S
d
«
--
...
«
Ã
G
d
W
ð
b
--
¹
-
O
U
Æ
110-
127V
220-
230V
VOLTAGE
SELECTOR
240V
ð
M
³
O
t
¥
u
Ã
j
Ã
I
b
-
{
³
j
Ä
B
b
--
«
Ã
H
u
Ã
D
O
W
w
«
*
B
M
l
Z
K
v
¥
u
Ã
j
Æ
«
­
«
Â
U
½
X
u
Ã
D
O
W
«
Ã
²
O
U
--
«
¹
t
Ý
w
ð
²
K
n
w
Ä
M
D
I
²
p
¨
--
«
l
l
ð
F
K
O
L
U
«
Ã
²
A
G
O
q
Ë
Á
r
Ð
²
G
O
O
d
{
³
j
Ä
M
²
I
w
«
Ã
H
u
Ã
D
O
W
Æ
q?O?G?A?²?ëØq?O?G?A?²?K?à oe«b?F?²?Ýô« ÕU?²?HÄ qË
STANDBY/ON
...--u?B?Ð
w?
W?O?Ozdë ...--bIë sÄ ...bSuë qB
vKZ qLF¹ ô t½U
«cà W¹u½UL
ÆqOGA²Kà oe«bF²Ýô« l{Ë
background image
5
Ru/Ar
Z
d
Ð
w
English
The remote control unit can be used within a range of approx.
7 meters from the remote sensor, and within angles of up to
approx. 30 degrees.
NOTE:
If the remote control sensor window is in a position where it
receives strong light such as sunlight or fluorescent light, control
may not be possible.
En
CONTENTS
CONFIRM SUPPLIED
ACCESSORIES
REMOTE CONTROL OPERATIONS
CAUTIONS REGARDING HANDLING .......................................... 2
CONFIRM SUPPLIED ACCESSORIES .......................................... 5
LOADING BATTERIES INTO THE REMOTE CONTROL UNIT .... 5
REMOTE CONTROL OPERATIONS ............................................. 5
CONNECTIONS ............................................................................ 8
NAMES AND FUNCTIONS OF PARTS ...................................... 14
SETTING THE CLOCK ................................................................. 20
TUNING INTO STATIONS .......................................................... 22
MEMORIZING STATIONS .......................................................... 24
Manual presetting .................................................................. 24
Station call ............................................................................. 24
LISTENING TO COMPACT DISCS ............................................. 26
To play a compact disc .......................................................... 26
To remove a disc ................................................................... 26
To stop playback .................................................................... 28
To search for a particular track ............................................. 28
VARIOUS OPERATIONS OF THE CD PLAYER .......................... 30
A Selecting a different disc during play ............................. 30
B To repeat playback (Repeat playback) ............................ 30
C To play all discs and all tracks in random order
(Random playback) ........................................................... 30
TO PLAY ONLY DESIRED TRACKS ........................................... 32
Programmed playback
-- To program tracks in desired order ................................ 32
To clear all of the programmed commands ....................... 32
PLAYING TAPES ........................................................................ 34
Basic operation ...................................................................... 34
RECORDING ............................................................................... 38
Recording on a tape .............................................................. 38
Recording on a tape from CD
A.S.E.S. (Auto Synchro Editing System) ............................. 38
Tape copy (COPY) .................................................................. 40
CHANGING THE SOUND PRESENCE/TONE
(SOUND MORPHING) ................................................................ 42
Switching the sound morphing ............................................ 42
Memorizing desired settings ................................................ 44
OPERATIONS OF THE DISPLAY ................................................ 44
CAUTIONS REGARDING COMPACT DISC HANDLING ........... 47
MAINTENANCE .......................................................................... 47
Cleaning the head .................................................................. 47
Demagnetizing the cassette deck heads ............................. 47
Maintenance of external surfaces ........................................ 47
HOW TO HANDLE CASSETTE TAPES ...................................... 50
TIMER PLAYBACK/TIMER RECORDING .................................... 52
Setting the WAKE-UP timer .................................................. 52
Timer recording setting ......................................................... 54
To change timer settings ...................................................... 56
If you make a mistake when setting the timer .................... 56
SLEEP TIMER .............................................................................. 56
Sleep timer -- Automatically turns off the power .............. 56
TROUBLESHOOTING ................................................................. 58
SPECIFICATIONS ....................................................................... 61
1
2
3
1 Remote control unit x 1
4 Power Cord x 1
1 Open the battery compartment cover on the back of the
remote control unit.
2 Insert two AA/R6P dry cell batteries into the battery
compartment in accordance with the indications (
ª, ·)
inside the compartment.
3 Close the cover of the battery case.
Incorrect use of batteries may cause leakage or rupture.
Always be sure to follow these guidelines:
A. Always insert batteries into the battery compartment
correctly matching the positive
ª and negative ·
polarities, as shown by the display inside the compartment.
B. Never mix new and used batteries.
C. Batteries of the same size may have different voltages,
depending on brand. Do not mix different brands of
batteries.
1
2
3
LOADING BATTERIES INTO THE
REMOTE CONTROL UNIT
POWER-CORD CAUTION
Handle the power cord by the plug. Do not pull out the plug
by tugging the cord and never touch the power cord when
your hands are wet as this could cause a short circuit or
electric shock. Do not place the unit, a piece of furniture, etc.,
on the power cord, or pinch the cord. Never make a knot in
the cord or tie it with other cords. The power cords should be
routed such that they are not likely to be stepped on. A
damaged power cord can cause a fire or give you an electrical
shock. Check the power cord once in a while. When you find
it damaged, ask your nearest PIONEER authorized service
center or your dealer for a replacement.
5 AM wire antenna x 1 (5 m)
(For short wave)
3 AM loop antenna x 1
2 FM antenna x 1

Reviews

There are no reviews of this manual yet.