Mode d'emploi du récepteur audio à voies multiples SX-218-K
UP
DOWN
MULTI JOG
MASTER
VOLUME
ENTER
AUDIO MULTI-CHANNEL RECEIVER
VSX-218
STANDBY/ON
PHONES
FRONT
AUDIO INPUT
DVD/LD
TV / SAT
DVR
CD
CD-R / TAPE / MD
FRONT AUDIO
FM
AM
STANDARD
MIDNIGHT/
LOUDNESS
ADVANCED
SURR
ST/DIRECT/
AUTO SURR
LISTENING MODE
QUICK
SETUP
SETUP
RETURN
MUTE
TONE
ANALOG
ATT
SLEEP
TUNER
EDIT
DIMMER
MULTI JOG
TUNING
STATION
MPX
VSB
MODE
DIALOGUE
ENHANCEMENT
MIDNIGHT/
LOUDNESS
QUICK
SETUP
SETUP
RETURN
MUTE
TONE
ANALOG
ATT
SLEEP
TUNER
EDIT
DIMMER
MULTI JOG
ENTER
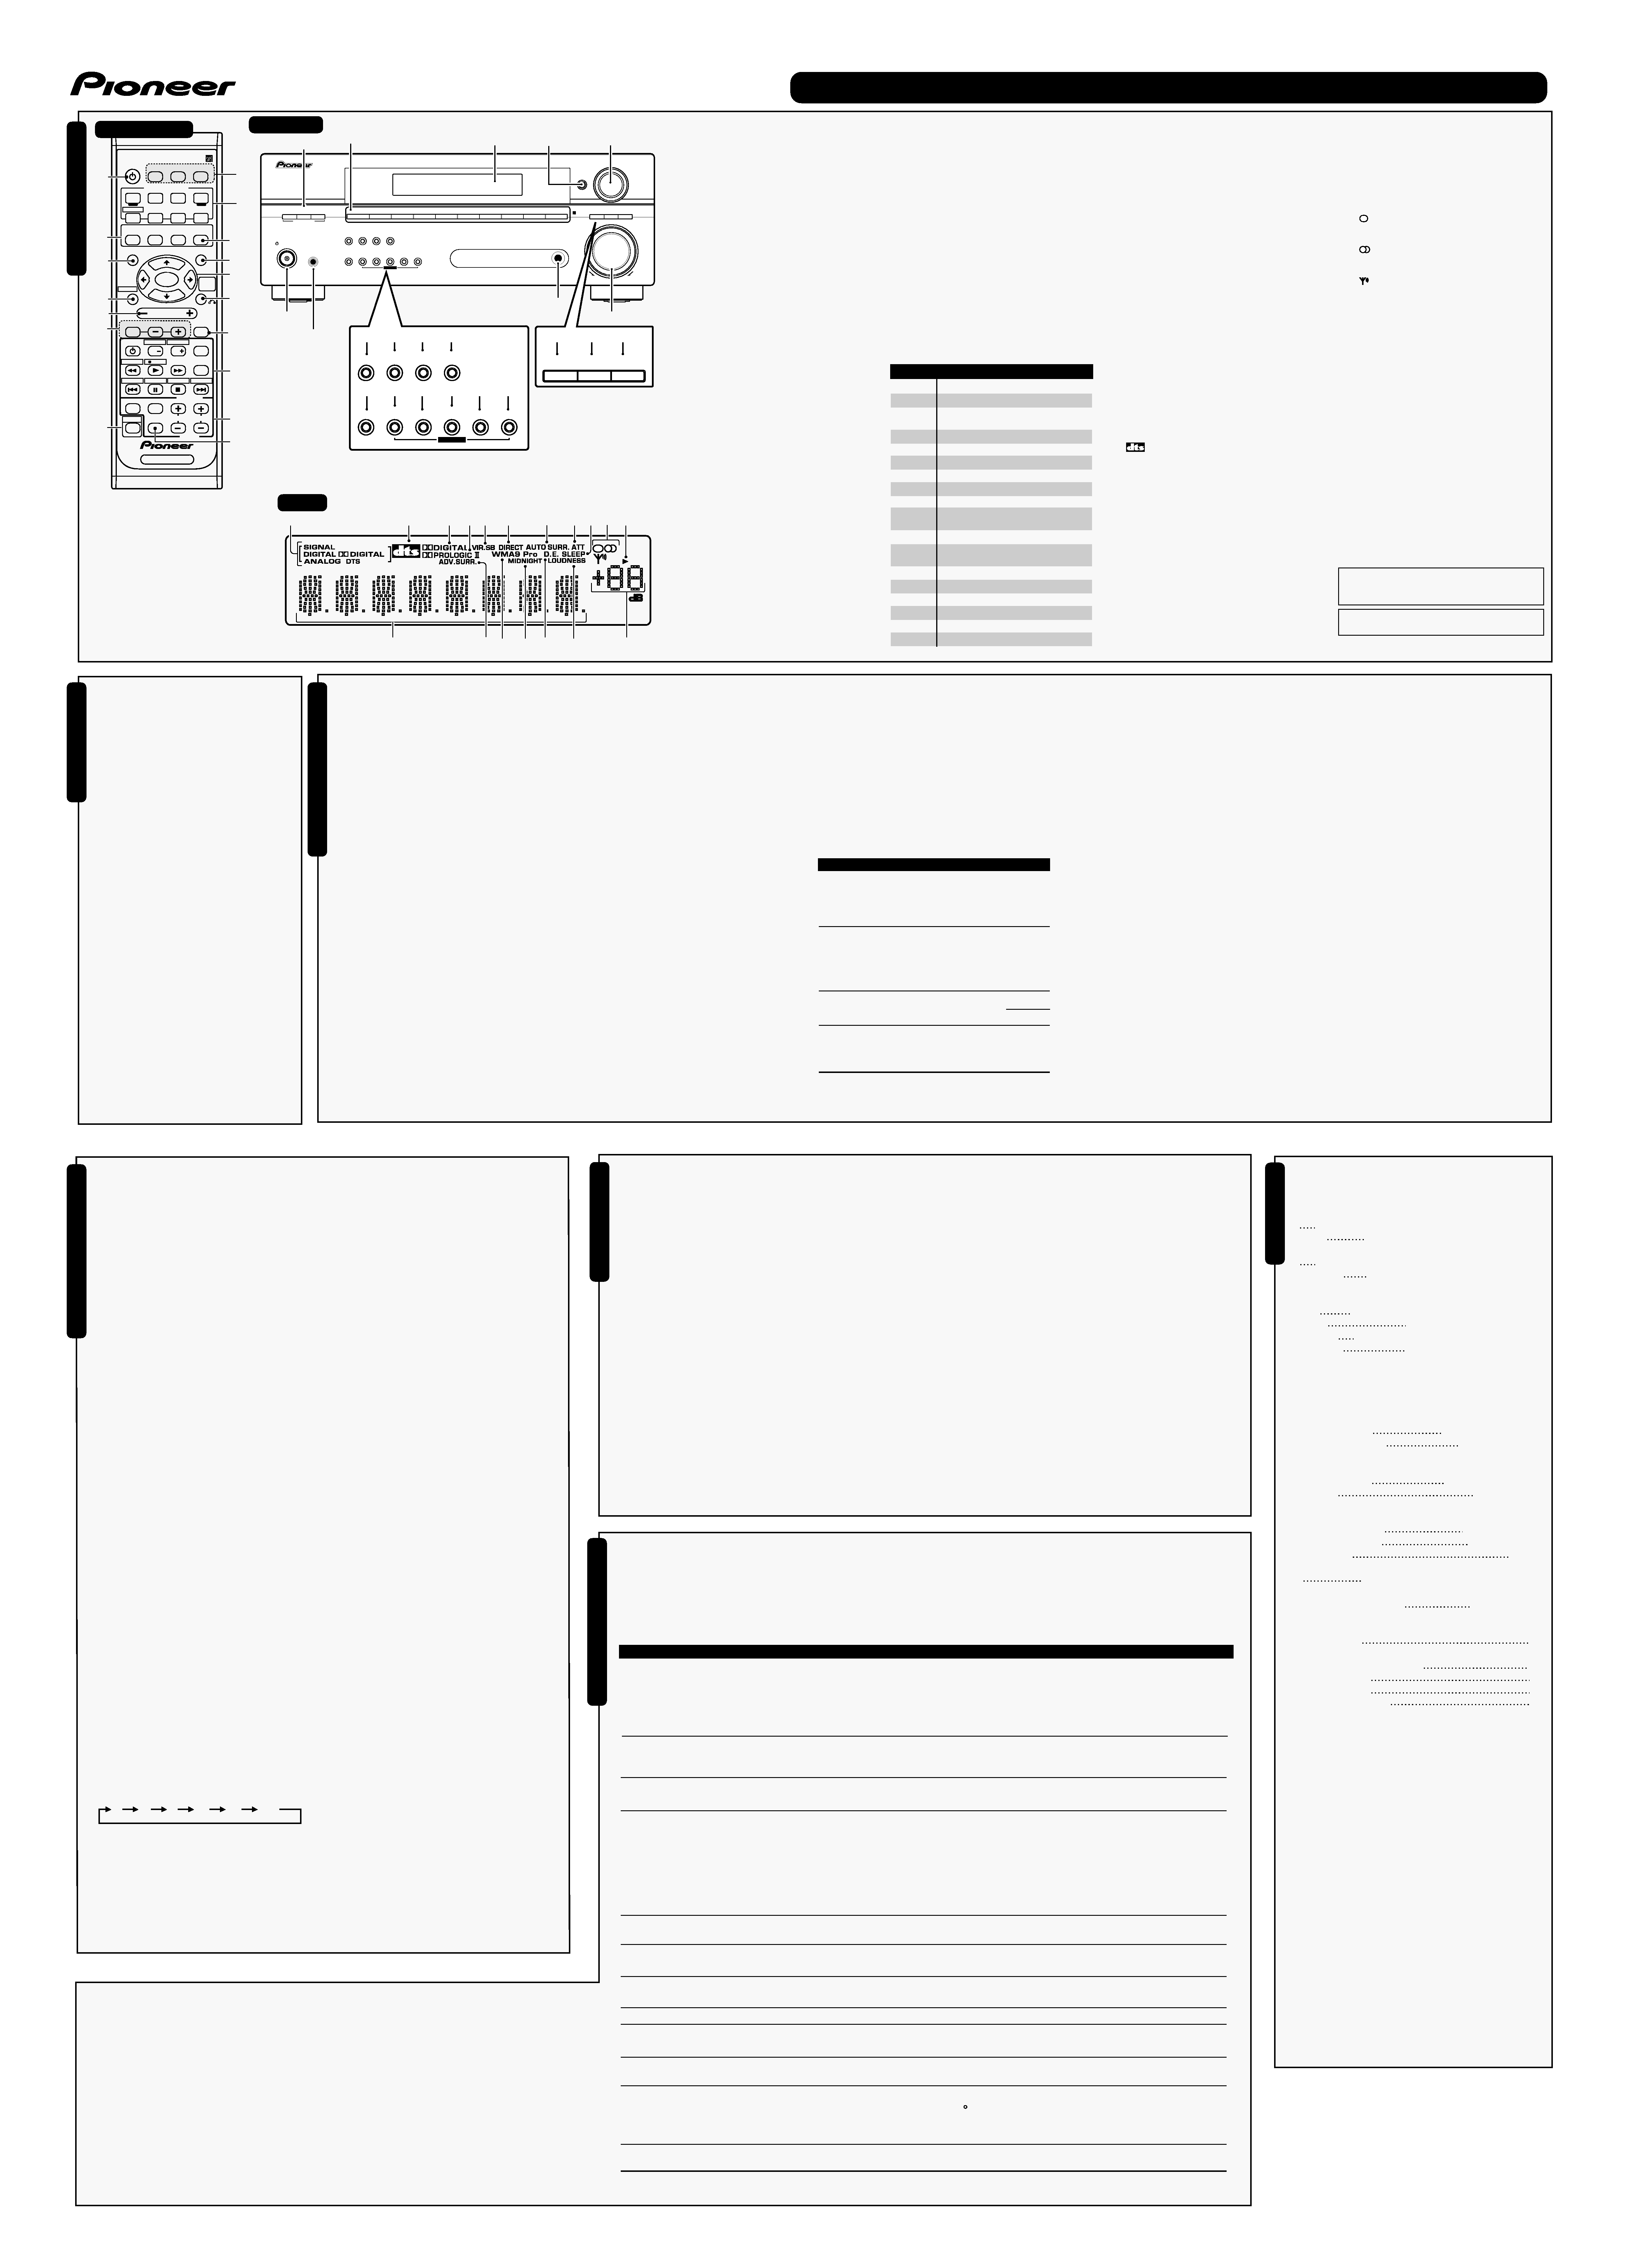
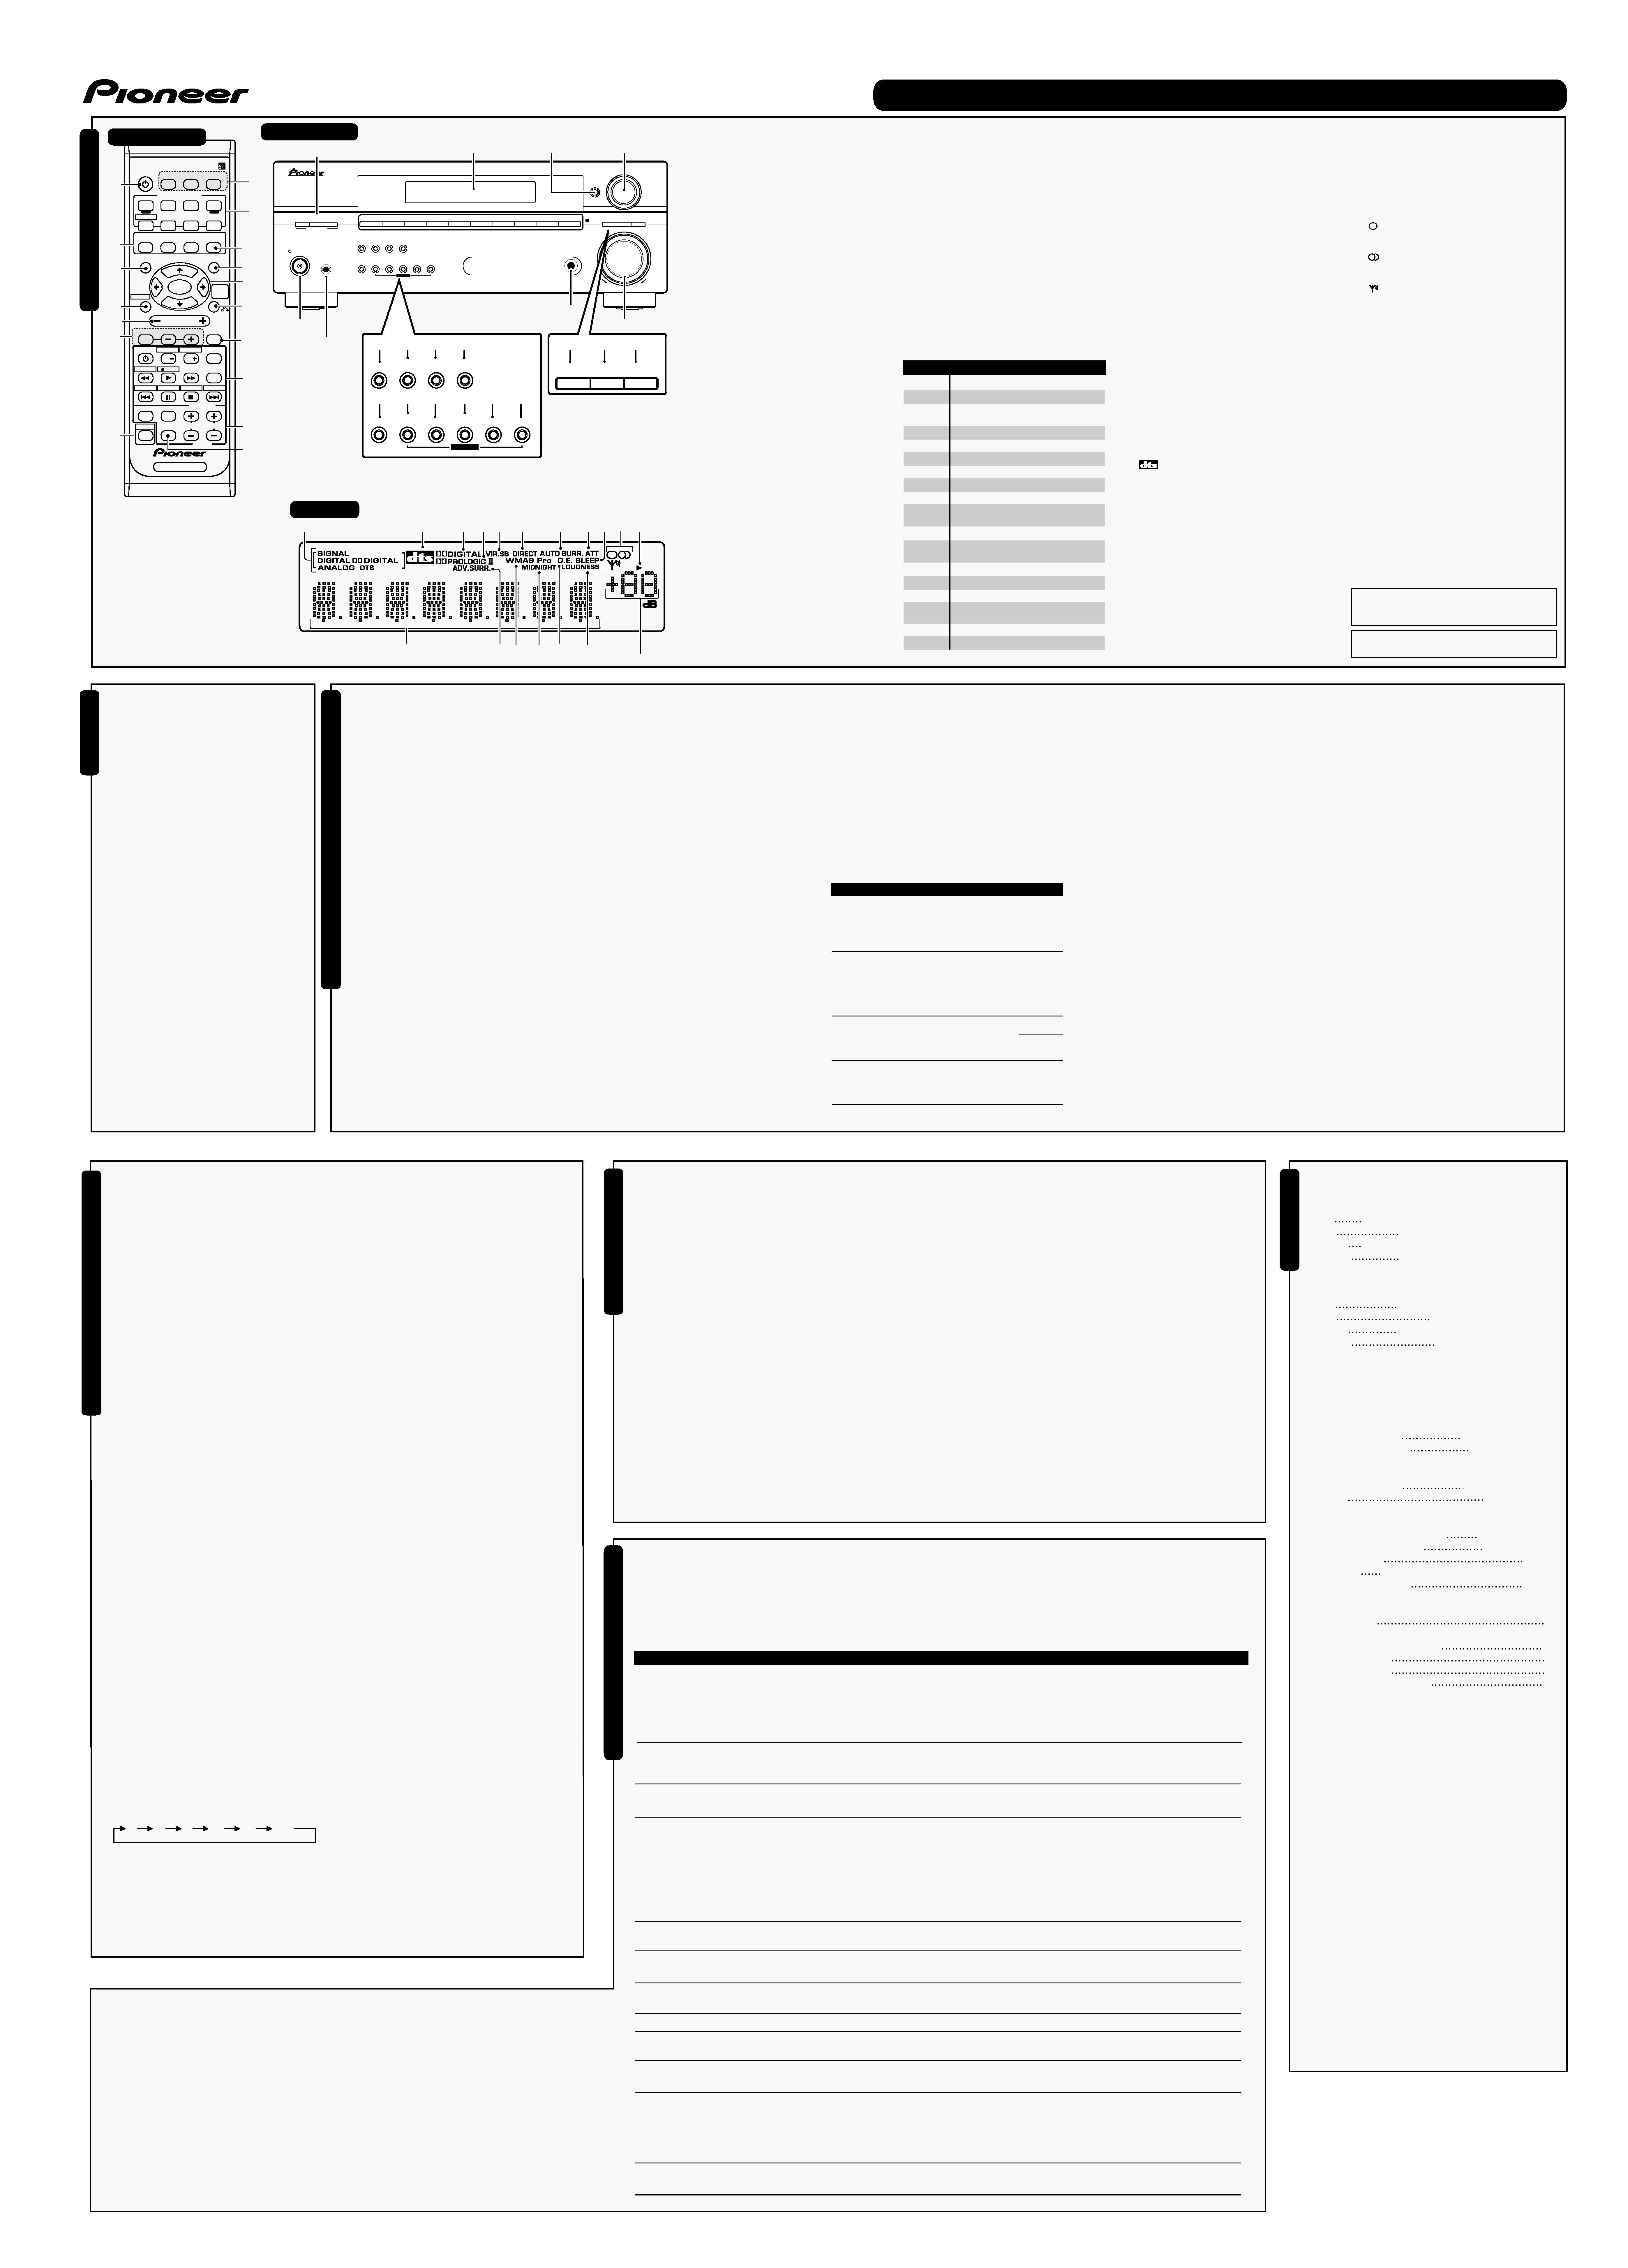
Cadran MULTI JOG
Affichage
5
FRONT AUDIO INPUT
8
8
Prise PHONES
10
8
14
19
3
13
4
20
INPUT SELECTOR
RECEIVER
STANDARD ADV.SURR STEREO
MIDNIGHT/
LOUDNESS
TOP MENU
SETUP
RETURN
S.RETRIEVER
TUNER EDIT
ONE
TOUCH
COPY
HDD
DVD
DVD/DVR
TUNING
DISPLAY
CLASS
MPX
STATION
DVD/DVR
TUNER
AUDIO
SUBTITLE
MUTE
EFFECT/CHSEL
LEVEL
ENTER
RECEIVER
VOLUME
SLEEP
F.AUDIO
DVR
DVD
CD-R
AM
FM
CD
RECEIVER
TV
DIMMER ANALOG ATT
MENU
DIALOG E
GUIDE
REC
TIMERREC
INFO
RECSTOP
JUKEBOX
CH
CH
SHIFT
1
1
2
3
4
2
6
5
7
8
9
11
10
12
13
14
15
16
17
MPX
VSB
MODE
DIALOGUE
ENHANCEMENT
17
18
11
SP
A
21
22
23 24 25
26
27
31
28 29 30
34 35
33
36
32
Panneau avant
Télécommande
Affichage
Pr
é
paratifs
Commandes
et
af
fichages
Utilisation de la touche Quick Setup
La touche Quick Setup vous permet de mettre en
marche votre système en appuyant sur un minimum
de touches. Le récepteur définit automatiquement
les réglages nécessaires lorsque vous avez
sélectionné la taille de la pièce et la position
d'écoute.
Si vous désirez procéder à des réglages plus
spécifiques, reportez-vous à la section Menu de
configuration du système.
Utilisez les touches de commande du panneau avant
pour exécuter les opérations suivantes.
1 Appuyez sur la touche
STANDBY/ON
pour allumer le récepteur.
2 Appuyez sur la touche QUICK SETUP.
3 Utilisez le bouton MULTI JOG pour
choisir la taille de la pièce.
En fonction de la distance entre vos
enceintes et la position d'écoute,
sélectionnez Small, Medium ou Large (
S,
M
ou
L),
M correspondant à une pièce de taille
moyenne.
4 Appuyez sur la touche ENTER.
5 Utilisez le bouton MULTI JOG pour
définir votre position d'écoute.
Vous avez le choix entre les options suivantes:
· FWD -- Si votre position d'écoute est plus proche
des enceintes avant que des enceintes surround
· MID -- Si votre position d'écoute est à égale
distance des enceintes avant et des enceintes surround
· BACK -- Si votre position d'écoute est plus proche
des enceintes surround que des enceintes avant
6 Appuyez sur la touche ENTER pour
confirmer votre configuration.
La fenêtre affiche la taille de la pièce et la position
d'écoute que vous avez sélectionnées.
Important
· Certaines options décrites dans cette section
ne seront pas accessibles selon la source
(par exemple, PCM 88,2 kHz/96 kHz, DTS 96 kHz
(24 bits) ou WMA9 Pro).
Lecture en mode Auto
La fonction Auto Surround correspond à l'option d'écoute
en mode direct la plus simple. Grâce à cette fonction, le
récepteur détecte automatiquement le type de source que
vous écoutez et sélectionne un mode de lecture
multicanaux ou stéréo selon les besoins.
· Au moment d'écouter une source, appuyez
sur la touche STEREO pour lancer la lecture de
la source en mode Auto.
Appuyez plusieurs fois sur cette touche jusqu'à ce
que
AUTO SURR. s'affiche brièvement (le format de
décodage ou de lecture apparaîtra ensuite). Vérifiez
les indicateurs de format numérique sur l'affichage
pour suivre le traitement de la source.
Remarque
· Les formats (matrices) surround stéréo sont décodés
en conséquence via
2 Pro Logic II MOVIE.
· La fonction Auto Surround est annulée si vous
raccordez un casque d'écoute ou si vous sélectionnez
les entrées analogiques multicanaux.
Ecoute d'une source en son surround
Ce récepteur permet d'écouter n'importe quelle
source en son surround. Toutefois, les options
disponibles dépendront du type de source que
vous écoutez.
· Lors de l'écoute d'une source, appuyez sur
la touche STANDARD.
1 RECEIVER
(STANDBY/ON )
Ces touches permettent de mettre en veille le
récepteur et de l'allumer.
2 Touches Listening Mode
STANDARD
Appuyez sur ces touches pour accéder au décodage
standard et naviguer entre les options Pro Logic II.
ADV.SURR.
Permet de naviguer entre les divers modes surround.
STEREO
Permet de naviguer entre la lecture en mode direct et stéréo. La
lecture en mode direct contourne les commandes de tonalité
afin d'obtenir une reproduction extrêmement fidèle de la source.
Permet également de sélectionner le mode Auto Surround.
3 TOP MENU
Affiche le menu `supérieur' d'un DVD.
SETUP
Appuyez pour accéder au menu de configuration du système.
4 TUNER EDIT*
Appuyez pour mémoriser et nommer une station de radio à rappeler.
Joue également le rôle du bouton SETUP pour les lecteurs de DVD/DVR.
S.RETRIEVER
Appuyez sur cette touche pour restaurer un son de
qualité CD aux sources audio compressées.
5 (MASTER) VOLUME +/
Permet de régler le volume d'écoute.
6 EFFECT/CH SEL
Appuyez sur cette touche plusieurs fois pour
sélectionner un canal, puis sur
LEVEL +/ pour régler
le niveau. Cette commande sélectionne également le
niveau des effets Advanced Surround (utilisez cette
touche
LEVEL +/ pour régler le niveau).
LEVEL +/
Appuyez sur ces touches pour régler l'effet et le niveau des canaux.
7 SHIFT
Appuyez sur cette touche pour accéder aux commandes
figurant dans un rectangle (situées au-dessus des
touches) de la télécommande. Ces touches sont
indiquées par un astérisque (* ) dans cette section.
8 SLEEP
Appuyez sur cette touche pour modifier le délai qui
s'écoule avant que le récepteur ne passe en mode
veille (
30 min - 60 min - 90 min - Off).
DIMMER
Permet d'obscurcir ou d'éclaircir l'affichage.
ANALOG ATT
Permet d'atténuer (de réduire) le niveau d'un signal
d'entrée analogique pour éviter toute distorsion.
9 Touches INPUT SELECTOR
Appuyez pour sélectionner une source d'entrée
(appuyez sur
DVD/DVR pour utiliser les commandes
du lecteur/graveur de DVD de la télécommande).
RECEIVER
Appuyez sur cette touche pour utiliser les commandes
du récepteur de la télécommande. Utilisez également
ces touches pour régler le son surround du récepteur.
10 MIDNIGHT/LOUDNESS
Ces modes vous offrent un son de qualité à des niveaux sonores
bas lorsque vous écoutez des sources cinématographiques
(Midnight) ou musicales (Loudness). Appuyez sur cette touche
pour passer de
MIDNIGHT, LOUDNESS à OFF.
11 MENU
Permet d'afficher le menu du DVD/des disques vidéo.
DIALOG E (DIALOGUE ENHANCEMENT)
Ce mode permet de concentrer les dialogues d'un programme
télévisé ou d'un film dans le canal central et ainsi de les mettre
en relief par rapport aux autres sons d'arrière-plan.
12
/ENTER
13 RETURN
Confirmez et quittez l'écran du menu affiché.
ONE TOUCH COPY*
Permet de copier le titre en cours de lecture du DVD sur
le disque dur et inversement.
14 MUTE
Permet de couper/restaurer le son.
15 Touches de commande DVD/DVR
Ces touches vous permettent de commander un lecteur ou
un enregistreur de DVD Pioneer raccordé à votre système.
16 Commandes du TUNER
Les touches
TUNING +/ sont utilisées pour trouver les
fréquences radio et les touches
STATION +/ pour
sélectionner les stations de radio préréglées.
DISPLAY
Permet de naviguer entre l'affichage du nom des
stations préréglées et la fréquence correspondante.
CLASS
Permet de naviguer entre les trois rangées (classes) de
stations de radio préréglées.
17 MPX
Cette touche permet de naviguer entre les modes de réception
mono et auto stéréo de la bande FM. Si le signal est faible, le
passage au mode mono améliorera la qualité du son.
18 VSB MODE
Permet de sélectionner le mode d'effet surround arrière virtuel (VSB).
19 TONE
Appuyez sur cette touche pour accéder aux
commandes des graves et des aigus que vous pourrez
ensuite régler à l'aide du bouton
MULTI JOG.
20 QUICK SETUP
21 Indicateurs SIGNAL
Ils s'allument pour indiquer le type de signal d'entrée
affecté à l'appareil concerné:
DIGITAL
S'allume lorsqu'un signal audio numérique est détecté.
2 DIGITAL
S'allume lorsqu'un signal Dolby Digital encodé est détecté.
DTS
S'allume lorsqu'un signal audio DTS encodé est détecté.
ANALOG
S'allume lorsqu'un signal analogique est détecté.
22
Lorsque le récepteur est en mode
STANDARD, cet
affichage s'allume pour indiquer le décodage d'un
signal DTS multicanaux.
23
2 DIGITAL
Lorsque le récepteur est en mode
STANDARD, cet
affichage s'allume pour indiquer le décodage d'un
signal Dolby Digital multicanaux.
24
2 PRO LOGIC II
Lorsque le récepteur est en mode Pro Logic II
(
STANDARD),
2 PRO LOGIC II s'allume pour indiquer
le décodage de signaux Pro Logic II.
25 VIR.SB
S'allume pendant le traitement de l'effet surround arrière virtuel.
26 DIRECT
S'allume lors de la lecture de la source en mode direct. La
lecture en mode direct contourne les commandes de tonalité
afin d'obtenir une reproduction extrêmement fidèle de la source.
Si la source présente un encodage Dolby Digital, DTS ou
Dolby Surround, le format de décodage adéquat sera
automatiquement sélectionné et apparaîtra sur l'affichage.
Pour les sources à deux canaux, appuyez plusieurs
fois sur la touche
STANDARD pour sélectionner:
·
2 Pro Logic II MOVIE -- Les sons jusqu'à 5.1 canaux,
particulièrement adaptés aux sources cinématographiques
·
2 Pro Logic II MUSIC -- Les sons jusqu'à 5.1
canaux, particulièrement adaptés aux sources musicales
·
2 Pro Logic II GAME -- Les sons jusqu'à 5.1
canaux, particulièrement adaptés aux jeux vidéo
·
2 PRO LOGIC -- Son surround à 5.1 canaux
Utilisation des effets surround avancé
Essayez différents réglages et différentes bandes
sonores pour savoir quel mode vous préférez.
· Appuyez plusieurs fois sur la touche ADV.SURR
(ADVANCED SURROUND) pour sélectionner un
mode d'écoute.
· ADV. MOVIE -- Convient aux sources
cinématographiques.
· ADV. MUSIC -- Convient aux sources musicales.
· TV SURR. -- Produit un son surround pour les
sources télévisées en mode mono et stéréo.
· SPORTS -- Convient aux programmes sportifs.
· ADV. GAME -- Convient aux jeux vidéo.
· EXPANDED -- Permet d'obtenir un son surround
multicanaux pour les sources à deux canaux.
· EX. POWER (Extra Power) -- Permet de recréer
un son multicanaux à partir d'une source stéréo, en
utilisant toutes vos enceintes.
· VIR. SURR -- Permet de créer un effet surround virtuel
en utilisant seulement le subwoofer et les enceintes avant.
· PHONESUR. (Phones Surround) -- Permet de
créer l'effet surround d'ensemble avec le casque d'écoute.
Remarque
· Utilisez ce mode avec Dolby Pro Logic pour obtenir un effet
stéréo surround (le champ stéréophonique est plus large que
les modes standard avec des sources Dolby Digital).
Réglage des options d'effet
Lorsque vous utilisez des effets surround, vous
pouvez paramétrer plusieurs réglages.
1 Appuyez plusieurs fois sur la touche EFFECT/CH SEL pour
sélectionner le réglage que vous souhaitez paramétrer.
Certaines options peuvent ne pas apparaître selon
l'état/le mode utilisé du récepteur. Consultez le
tableau ci-dessous pour en savoir plus à ce sujet.
2 Utilisez les touches LEVEL+/ pour paramétrer
le réglage selon les besoins.
Consultez le tableau ci-dessous pour connaître les options disponibles
pour chaque réglage. Si elles ne sont pas expressément marquées
comme telles, les options par défaut sont présentées en gras.
3 Appuyez à nouveau sur la touche EFFECT/CH
SEL pour paramétrer d'autres réglages.
Utilisation du mode d'effet surround arrière virtuel
La sélection de ce mode permet à vos enceintes surround
d'émettre un son de canal arrière surround virtuel. Vous
pouvez par exemple choisir d'écouter des sources ne
contenant aucune information de canal surround arrière
(support encodé 5.1, par exemple) avec un encodage 6.1
reproduit (
VSB ON). Parfois, la source peut avoir une
meilleure qualité sonore au format 5.1 pour lequel elle a été
initialement encodée. Dans ce cas, désactivez simplement le
mode VSB (
VSB OFF).
· Appuyez sur la touche VSB MODE (panneau avant) pour
sélectionner une option de canal surround arrière virtuel.
Chaque pression sur la touche fait défiler les options suivantes:
· VSB ON -- Le mode Virtual Surround Back est
toujours utilisé (supports encodés 5.1, par exemple)
· VSB OFF -- Le mode Virtual Surround Back est
inactif
Remarque
· Il n'est pas possible d'utiliser le mode Virtual Surround Back
avec un casque d'écoute ou avec le mode
STEREO / DIRECT.
Ecoute en mode stéréo
Lorsque vous sélectionnez le mode
STEREO ou DIRECT, la
source sera émise uniquement par les enceintes avant droite
et gauche (et le subwoofer). Les sources multicanaux Dolby
Digital et DTS sont remixées en stéréo.
· Lors de l'écoute d'une source, appuyez sur la
touche STEREO pour une lecture en mode stéréo.
Appuyez plusieurs fois pour naviguer entre:
· STEREO -- La source audio est lue selon vos
réglages surround, mais vous pouvez toujours utiliser
les fonctions Midnight, Loudness et Tone.
· DIRECT -- Contourne tous les effets et réglages
surround afin que le son demeure le plus près
possible du signal audio de la source.
· AUTO SURR. -- Reportez-vous à la section
Lecture en mode Auto ci-dessus.
Remarque
·
DIRECT permute en STEREO en cas d'utilisation des
fonctions Midnight, Loudness et Dialog Enhancement ou
les commandes de tonalité.
Utilisation de la fonction Sound Retriever
Lorsque des données audio sont supprimées lors de la
compression, la qualité du son est souvent amoindrie du
fait de l'inégalité de l'image sonore. La fonction Sound
Retriever a recours à une nouvelle technologie DSP pour
restaurer un son de qualité CD vers des sources audio
compressées à 2 canaux en rétablissant la pression
sonore et en lissant les artéfacts dentelés restants après
la compression.
· Lors de l'écoute d'une source, appuyez sur la
touche S.RETRIEVER.
Appuyez plusieurs fois pour naviguer entre:
· RTRV1 ON -- Cette option a été conçue tout
particulièrement pour les lecteurs audio
numériques portables.
· RTRV2 ON -- Cette option a été conçue tout
particulièrement pour les appareils radio numériques
portables (disponible uniquement en cas d'utilisation de
la touche
FRONT AUDIO INPUT).
· OFF -- Désactive la fonction Sound Retriever.
27 AUTO SURR.
S'allume lorsque l'option Auto Surround est
sélectionnée.
28 ATT
S'allume lorsque l'option
ANALOG ATT est utilisée pour
atténuer (réduire) le niveau du signal d'entrée analogique.
29 SLEEP
S'allume lorsque le récepteur est mode veille.
30 Indicateurs du Tuner
/ MONO
S'allume lorsque le mode mono est sélectionné à
l'aide de la touche
MPX.
/ STEREO
S'allume lorsque la bande FM stéréo est captée en
mode stéréo auto.
/ TUNED
S'allume lorsqu'une bande est captée.
31 Indicateur d'enceinte
Indique si le système d'enceintes fonctionne ou non.
SP A signifie que les enceintes sont en marche.
SP
signifie que le casque d'écoute est raccordé.
32 ADV.SURR. (Advanced Surround)
S'allume lorsque l'un des modes Advanced Surround
a été sélectionné.
33 WMA9 Pro
S'allume pour indiquer le décodage d'un signal
WMA9 Pro.
34 MIDNIGHT
S'allume pendant l'écoute Midnight.
35 D.E.
S'allume lorsque l'option Dialog Enhancement
(
DIALOG E) est sélectionnée.
36 LOUDNESS
S'allume pendant l'écoute Loudness.
Niveau du volume principal
Fabriqué sous licence de Dolby Laboratories. Les termes
« Dolby » et « Pro Logic », ainsi que le sigle double D sont
des marques commerciales de Dolby Laboratoies.
"DTS" est une marque déposée de DTS, Inc. et "DTS
96/24" est une marque commerciale de DTS, Inc.
Remarque
Gardez à l'esprit ce qui suit lorsque vous utilisez la
télécommande:
· Assurez-vous de l'absence d'obstacles entre la
télécommande et le capteur de l'appareil.
· La télécommande a une portée d'environ 7 mètres.
· La télécommande risque de ne pas
fonctionner correctement si la lumière du soleil
ou une lampe fluorescente puissante éclaire le
capteur de l'appareil.
· Les télécommandes de différents appareils
peuvent interférer entre elles. Evitez d'utiliser
des télécommandes commandant d'autres
équipements situés à proximité de cet appareil.
· Remplacez les piles lorsque vous constatez
une diminution de la portée de fonctionnement
de la télécommande.
Ecoute
de
sour
ces
à
l
'aide
de
votr
e
syst
è
me
Affichage alphanumérique
Son rôle
Permet d'allumer/d'éteindre le lecteur ou l'enregistreur de DVD.
Permet de modifier la langue ou le canal.
Permet d'afficher/de modifier les sous-titres
des DVD/disques vidéo multilingues.
Permet de changer de canal.
Permet de lancer/reprendre la lecture en mode normal.
Permet de mettre un disque sur pause/de reprendre la lecture.
Permet d'arrêter la lecture.
Permet de lancer la recherche rapide arrière.
Permet de lancer la recherche rapide avant.
Permet de passer directement au début de la piste ou chapitre
en cours d'écoute, puis aux pistes/chapitres précédents.
Permet de passer directement à la piste ou au chapitre suivant.
Permettent de permuter les commandes entre disque
dur et DVD pour les enregistreurs de DVD/disque dur.
Permet d'afficher les guides sur un enregistreur DVD.
Permet de lancer l'enregistrement.
Permet d'accéder au menu d'enregistrement sur minuterie.
Permet d'afficher des informations
supplémentaires sur l'EPG.
Permet d'arrêter l'enregistrement.
Permet de permuter vers la fonction Juke-box.
Touche
DVD/DVR
AUDIO
SUBTITLE
CH +/
HDD/DVD*
GUIDE*
ìREC*
TIMER REC*
INFO*
REC STOP*
JUKEBOX*
Réglage
Center Width*
Dimension*
Panorama*
Effect
Son rôle
Répartit le canal central entre les
enceintes avant droite et gauche; le
son émis semble être plus large
(réglages plus hauts) ou au contraire
plus étroit (réglages plus bas).
Règle la balance du son
surround de l'avant vers
l'arrière; le son émis semble
être plus éloigné (réglages
négatifs) ou au contraire plus
proche (réglages positifs).
Permet d'étendre la configuration
stéréophonique à l'avant de façon à
inclure les enceintes surround pour créer
un effet sonore « enveloppant ».
Permet de régler le niveau d'effet
pour le mode surround avancé
sélectionné (chaque mode peut
être réglé séparément).
Options
0 à 7
Réglage par
défaut:
3
3 à +3
Réglage par
défaut:
0
OFF
ON
10 à 90
* Disponible uniquement avec les sources à 2 canaux en
mode Dolby Pro Logic II Music.
L
C
R
RS
LS
SW
Guide de dépannage
Une utilisation incorrecte de l'appareil est souvent interprétée comme un problème ou un dysfonctionnement. Si vous êtes convaincu que cet
appareil ne fonctionne pas correctement, contrôlez les points ci-dessous. Inspectez les autres appareils électriques raccordés au récepteur car
quelquefois, le problème provient d'un autre appareil. Si le problème ne peut pas être résolu grâce à la liste de contrôle ci-dessous, consultez
le service après-vente Pioneer indépendant agréé le plus proche pour effectuer la réparation.
Remarque
Si l'appareil ne fonctionne pas normalement en raison d'un problème externe aux appareils, comme la présence d'électricité statique par
exemple, débranchez la prise secteur puis rebranchez-la immédiatement pour retourner à des conditions de fonctionnement normales.
Sp
é
cifications
Problème
Solution
Effectuez les réglages du
récepteur à partir du menu de
configuration du système
La section suivante décrit de façon détaillée comment
effectuer les réglages adaptés à votre propre
utilisation du récepteur et comment régler chaque
système d'enceintes séparément selon vos exigences.
1 Appuyez sur la touche RECEIVER de la
télécommande, puis sur la touche SETUP.
2 Utilisez
/
pour sélectionner le réglage que vous
désirez paramétrer, puis appuyez sur la touche ENTER.
· SP SETUP vous permet de définir la distance et la
balance des enceintes que vous avez raccordées:
CH LEVEL -- Règle la balance générale de
votre système d'enceintes.
SP DISTN. -- Définit la distance entre la
position d'écoute et vos enceintes.
· OTHER vous permet d'effectuer des réglages
personnalisés adaptés à votre propre utilisation du récepteur.
DRC -- Ce réglage indique le nombre de mises au point
de la plage dynamique des bandes son
cinématographiques Dolby Digital et DTS (utilisez ce
réglage lors de l'écoute de sons surround à faible volume).
DUAL MONO -- Vous pouvez définir la façon dont les
bandes son en mode mono double Dolby Digital doivent être
lues (le mode mono double est parfois utilisé lorsque deux
langues doivent être envoyées vers des canaux différents).
LFE ATT -- Certaines sources audio Dolby Digital et DTS
incluent des tonalités extrêmement graves. Réglez l'atténuateur
LFE de façon à éviter que les tonalités extrêmement graves
produisent une distorsion du son émis par les enceintes.
Niveau des canaux
1 Sélectionnez CH LEVEL à partir du menu SP SETUP.
2 Utilisez
/
pour sélectionner une option
de configuration.
· T. TONE M. -- Déplacez la tonalité d'essai
manuellement d'une enceinte à l'autre et réglez
chaque niveau de canal individuellement.
· T. TONE A. -- Réglez les niveaux des canaux en
suivant automatiquement la tonalité d'essai d'une
enceinte à l'autre.
3 Confirmez l'option de configuration que vous
avez sélectionnée.
Les tonalités d'essai seront lancées lorsque vous aurez
appuyé sur
ENTER. Lorsque le volume aura atteint le
niveau de référence, des tonalités de test seront émises.
4 Réglez le niveau de chaque canal à l'aide des touches
/
.
Si vous avez sélectionné
T. TONE M., utilisez
/
pour passer d'une enceinte à l'autre.
La configuration
T. TONE A. lancera l'émission de
tonalités d'essai dans l'ordre suivant :
Réglez le niveau de chaque enceinte pendant
l'émission de la tonalité d'essai.
5 Lorsque vous avez terminé, appuyez sur la
touche RETURN.
Astuce
· Vous pouvez modifier les niveaux des canaux à
tout moment à l'aide des touches
EFFECT/CH SEL
et
+/ de la télécommande.
Remarque
· Si vous utilisez un compteur de niveau de pression
acoustique (SPL), effectuez les relevés de la position
d'écoute principale et réglez le niveau de chaque
enceinte sur 75 dB SPL (pondération C/lecture lente).
· La tonalité d'essai du subwoofer est émise à faible
volume. Il se peut que vous deviez effectuer un nouveau
réglage si l'essai a été réalisé avec une véritable bande son.
Distance des enceintes
1 Sélectionnez SP DISTN. à partir du menu SP SETUP.
2 Utilisez
/
pour sélectionner l'enceinte pour
laquelle vous désirez alors régler la distance.
Utilisez
/
pour régler la distance de chaque
enceinte (par incrémentations de 10 cm).
3 Lorsque vous avez terminé, appuyez sur
la touche RETURN.
Astuce
· Pour obtenir un son surround optimal, assurez-
vous que les enceintes surround arrière sont à la
même distance de la position d'écoute.
Configuration du contrôle de la
plage dynamique
· Réglage par défaut: OFF
1 Sélectionnez DRC à partir du menu de
configuration OTHER.
2 Utilisez
/
pour définir le réglage que
vous désirez.
· OFF -- Aucune mise au point de la plage
dynamique (écoute à volume élevé).
· MID -- Réglage moyen.
· MAX -- Plage dynamique réduite (le volume
des sons forts est réduit alors que celui des
sons faibles est augmenté).
3 Lorsque vous avez terminé, appuyez sur la
touche RETURN.
Réglage mono double
· Réglage par défaut: CH1
1 Sélectionnez DUAL MONO à partir du
menu de configuration OTHER.
2 Utilisez
/
pour définir le réglage que
vous désirez.
· CH1 -- Seul le canal 1 est lu
· CH2 -- Seul le canal 2 est lu
· CH1 CH2 -- Les deux canaux sont lus par les
enceintes avant
3 Lorsque vous avez terminé, appuyez sur la
touche RETURN.
Remarque
· Ce réglage fonctionne uniquement pour des bandes
son en mode mono double Dolby Digital et DTS.
Réglage de l'atténuateur LFE
· Réglage par défaut: ATT 0 dB
1 Sélectionnez LFE ATT à partir du menu de
configuration OTHER.
2 Utilisez
/
pour définir le réglage que
vous désirez.
· LFEATT 0 -- Aucune limite (réglage
recommandé)
· LFEATT 10 -- 10 dB de limite
· LFEATT ** -- Aucun son en provenance du canal LFE
3 Lorsque vous avez terminé, appuyez sur la
touche RETURN.
Impossible de mettre l'appareil sous
tension.
Aucun son n'est émis lorsqu'une fonction
est sélectionnée.
Aucune image n'est émise lorsqu'une
fonction est sélectionnée.
Bruit considérable lors de la radiodiffusion.
Les stations de radio émettrices ne peuvent
pas être sélectionnées automatiquement.
Aucun son n'est émis des enceintes
surround ou centrale.
Aucun son n'est émis par le subwoofer.
Emission de bruit pendant la lecture d'une platine à cassettes.
Lors de la lecture d'un logiciel avec le système DTS,
aucun son n'est émis ou seul du bruit est émis.
Lors d'une recherche pendant la lecture, du bruit est émis
par un lecteur de CD compatible avec le système DTS.
Impossible de faire fonctionner la
télécommande.
L'affichage est noir ou éteint.
· Raccordez la fiche d'alimentation à la prise murale.
· Débranchez la fiche d'alimentation de la prise murale, et rebranchez-la.
· Veillez à ce qu'aucun brin de fil d'enceinte lâche ne touche le panneau arrière. Ceci pourrait
provoquer la coupure automatique du récepteur.
· Si l'alimentation de l'appareil se coupe automatiquement, veuillez amener l'appareil au service après-
vente Pioneer agréé le plus proche de chez vous ou à votre revendeur pour effectuer les réparations.
· Assurez-vous que l'appareil est raccordé correctement.
· Appuyez sur la touche
MUTE de la télécommande pour désactiver la sourdine.
· Réglez le
MASTER VOLUME.
· Assurez-vous que l'appareil est raccordé correctement.
· Sélectionnez l'appareil approprié (utilisez les touches
INPUT SELECTOR).
· Réglez la bonne fréquence.
· Raccordez l'antenne et réglez son orientation et sa position de façon à obtenir une bonne réception.
· Eloignez tous les câbles détachés des bornes d'antenne et des fils électriques.
· Dréoulez le fil de l'antenne filaire FM, placez-le de façon à obtenir une bonne réception et fixez-le à un mur.
· Raccordez une antenne FM extérieure.
· Raccordez une antenne AM intérieure ou extérieure supplémentaire.
· Eteignez les appareils qui provoquent du bruit ou éloignez-les du récepteur.
· Placez les antennes le plus loin possible des appareils qui provoquent du bruit.
· Raccordez une antenne extérieure.
· Raccordez les enceintes correctement.
· Reportez-vous à la section Niveau des canaux pour vérifier les niveaux d'enceintes.
· La source Dolby Digital ou DTS que vous écoutez peut ne pas avoir de canal LFE.
· Réglez le réglage de l'atténuateur LFE sur
LFEATT 0 ou sur LFEATT 10.
· Eloignez la platine à cassettes de votre récepteur jusqu'à disparition du bruit.
· Réglez le niveau du volume numérique du lecteur à fond ou en position neutre.
· Il ne s'agit pas d'un dysfonctionnement, mais veillez à baisser le volume pour éviter que le
son émis par les enceintes ne soit trop fort.
· Remplacez les piles.
· Faites fonctionner la télécommande jusqu'à une distance de 7 mètres dans un angle de 30°
du capteur de la télécommande du panneau avant.
· Eliminez tout obstacle ou faites-la fonctionner d'une autre position.
· Evitez d'exposer le capteur de la télécommande du panneau avant à la lumière directe.
· Appuyez plusieurs fois sur la touche
DIMMER de la télécommande pour retourner aux
réglages par défaut.
Spécifications
Section amplificateur
· Puissance de la production électrique continue
Avant
100 W par canal* (200 Hz à 20 kHz, 0,7 %**, 8
)
Centre
100 W* (200 Hz à 20 kHz, 0,7 %**, 8
)
Surround
100 W par canal* (200 Hz à 20 kHz, 0,7 %**, 8
)
Subwoofer
100 W* (45 Hz à 200 kHz, 0,7 %**, 8
)
· Puissance de la production électrique RMS
Avant
144 W par canal (1 kHz, THD, 10 %, 8
)
Centre
144 W (1 kHz, THD, 10 %, 8
)
Surround
144 W par canal (1 kHz, THD, 10 %, 8
)
Subwoofer
144 W (1 kHz, THD, 10 %, 8
)
* Mesures conformes à la réglementation commerciale de la
Commission fédérale du Commerce sur la production électrique des
amplificateurs.
** Mesures prises à l'aide d'un analyseur de spectre audio.
Secteur tuner FM
Plage de frequencies
87,5 MHz à 108 MHz
Entrée d'antenne (DIN)
75
déséquilibrée
Section tuner AM
Plage de frequencies
530 kHz à 1700 kHz
Antenne
Antenne cadre
Divers
Caractéristiques d'alimentation
AC 120 V / 60 Hz
Consommation électrique
320 W / 420 VA
En mode veille
0,5 W
Dimensions
420 mm (L) x 158 mm (H) x 348 mm (P)
Poids (sans emballage)
8,6 kg
Pièces fournies
Télécommande
1
Piles à anode sèche AA /R6 (pour confirmer le bon
fonctionnement du système)
2
Antenne cadre AM
1
Antenne filaire FM
1
Câble audio avec mini-fiche
1
Le présent mode d'emploi
Remarque
Les spécifications et la conception sont soumises à de
possibles modifications sans préavis en raisons
d'améliorations apportées à l'appareil.
Réinitialisation de l'appareil principal
Respectez cette procédure pour rétablir les réglages d'usine du récepteur. Utilisez les commandes du panneau
avant pour ce faire.
1 Mettez le récepteur en mode veille.
2 En maintenant la touche TONE enfoncée, appuyez sur la touche
STANDBY/ON pendant trois
secondes environ et maintenez-la enfoncée.
3 Lorsque `RESET?' apparaît sur l'affichage, appuyez sur la touche ENTER.
OK? apparaît sur l'affichage.
4 Appuyez sur SETUP pour confirmer.
OK s'affiche pour indiquer que les réglages d'usine du récepteur ont été rétablis.
Publication de Pioneer Corporation.
©2008 Pioneer Corporation.
Tous droits de reproduction et de traduction réservés.
Menu
de
configuration
du
syst
è
me
Informations
compl
é
mentair
es
Enregistrez votre produit sur le site Web:
http://www.pioneerelectronics.com (US)
http://www.pioneerelectronics.ca (Canada)
Pour écouter la radio
Les étapes suivantes décrivent la façon de régler les bandes FM et
AM et d'en mémoriser la fréquence pour y accéder ultérieurement.
1 Appuyez sur les touches AM ou FM pour sélectionner la bande.
2 Pour régler une station de radio.
Une station de radio peut être réglée de trois façons différentes:
· Réglage automatique -- Appuyez sur les touches TUNING +/
et maintenez-les enfoncées pendant une seconde environ. La
recherche s'arrête automatiquement à la station de radio suivante.
· Réglage manuel -- Pour modifier la fréquence un pas à la fois,
appuyez sur les touches
TUNING +/.
· Réglage rapide -- Appuyez sur les touches TUNING +/ et
maintenez-les enfoncées.
Si le signal est faible, appuyez sur la touche
MPX pour permuter le
récepteur en mode de réception mono.
Mémorisation de stations de radio préréglées
Ce récepteur peut mémoriser jusqu'à 30 stations de radio
enregistrées dans trois rangées de 10 stations de radio chacune.
1 Pour régler une station de radio que vous désirez mémoriser.
2 Appuyez sur la touche TUNER EDIT pour sélectionner `ST. MEMORY'.
3 Appuyez sur CLASS pour sélectionner une classe sur les trois, puis sur
STATION (+/) pour sélectionner la station de radio préréglée que vous désirez.
Vous pouvez également utiliser le bouton
MULTI JOG après avoir
appuyé sur la touche
STATION (panneau avant) pour sélectionner
des stations de radio préréglées.
4 Appuyez sur la touche ENTER pour mémoriser la station de radio.
Remarque
· Lors de la mémorisation d'une fréquence FM, le réglage
MPX est également mémorisé.
Pour nommer les stations de radio préréglées
Vous pouvez nommer vos stations de radio préréglées pour y accéder facilement.
1 Choisissez la station de radio préréglée que vous désirez nommer.
Reportez-vous à la section Pour écouter les stations de radio préréglées ci-dessous.
2 Appuyez sur la touche TUNER EDIT pour sélectionner `ST. NAME'.
Un curseur apparaît à la position du premier caractère.
3 Saisissez le nom que vous désirez donner à la station de
radio, puis appuyez sur la touche ENTER.
Utilisez le bouton
MULTI JOG (panneau avant) ou les touches STATION +/-
(télécommande) pour sélectionner des caractères, et appuyez sur la touche
ENTER pour confirmer. Si aucun caractère n'est saisi, il y aura un espace.
Astuce
· Lorsqu'une station de radio préréglée a été nommée, vous pouvez
appuyer sur la touche
DISPLAY au moment de l'écoute de cette station de
radio pour afficher son nom ou sa fréquence.
Pour écouter les stations de radio préréglées
Vous devez mémoriser des stations de radio préréglées pour avoir accès à cette
fonction. Reportez-vous à la section Mémorisation de stations de radio préréglées si
vous n'avez pas encore mémorisé de stations de radio préréglées.
1 Appuyez sur les touches AM ou FM pour sélectionner le tuner.
2 Appuyez sur CLASS pour sélectionner la classe dans
laquelle la station de radio sera mémorisée.
Appuyez plusieurs fois sur cette touche pour passer de la classe
A à la classe B à la classe C.
3 Appuyez sur la touche STATION +/ pour sélectionner la
station de radio préréglée que vous désirez.
Utilisation
du
tuner
SX-218_EnFr_XRE3196A.p65
08.1.21, 1:20 PM
2