PIONEER S-HTD340/XTW/UC Service Manual

Cover page of PIONEER S-HTD340/XTW/UC Service Manual

Service Manual for PIONEER S-HTD340/XTW/UC, downloadable as a PDF file.

Manual details

  • Immediate download after payment.
  • Delivered as a PDF file.
  • The manual has 6 pages
  • File size: 0.16 MB
  • Available language versions: English
  • Different language versions may vary sligthly in file size and page count.

We guarantee that...

  • our manuals are complete,
  • the manual includes circuit diagrams,
  • our manuals are checked with antivirus,
  • We'll issue refund if the manual is damaged, incomplete or unreadable (our refund policy)

Sample pages

Thumbnail of page 1Thumbnail of page 2Thumbnail of page 3Thumbnail of page 4
Thumbnail of page 5Thumbnail of page 6Thumbnail of page 7Thumbnail of page 8
Thumbnail of page 9
background image
ORDER NO.
PIONEER CORPORATION 4-1, Meguro 1-chome, Meguro-ku, Tokyo 153-8654, Japan
PIONEER ELECTRONICS (USA) INC. P.O. Box 1760, Long Beach, CA 90801-1760, U.S.A.
PIONEER EUROPE NV Haven 1087, Keetberglaan 1, 9120 Melsele, Belgium
PIONEER ELECTRONICS ASIACENTRE PTE. LTD. 253 Alexandra Road, #04-01, Singapore 159936
PIONEER CORPORATION 2004
RRV2915
T ­ ZZP MAR. 2004 Printed in Japan
S-HTD340
XTW/UC
SPEAKER SYSTEM
65S
This service manual is intended for qualified service technicians; it is not meant
for the casual do-it-yourselfer. Qualified technicians have the necessary test
equipment and tools, and have been trained to properly and safely repair complex
products such as those covered by this manual.
Improperly performed repairs can adversely affect the safety and reliability
of the product and may void the warranty. If you are not qualified to perform the
repair of this product properly and safely, you should not risk trying to do so and
refer the repair to a qualified service technician.
WARNING
This product contains lead in solder and certain electrical parts contain chemicals
which are known to the state of California to cause cancer, birth defects or other
reproductive harm.
Health & Safety Code Section 25249.6 ­ Proposition 65
(Surround Speaker)
FOR PRECAUTION OF
REASSEMBLY AND DISASSEMBLY
The grille assy is attached to the cabinet by its bosses applied
with adhesive. To detach it, pry it open by inserting a flat blade
screwdriver into lower slot. To attach it, apply adhesive to the
holes on the baffle. Then press it to the baffle.
The woofer is attatched to the baffle by 4 external screws. To
detach it ,unfasten those screws. When attaching it, face its ter-
minal downward.
The tweeter is attached to the baffle by 2 external screws. To
detach it ,unfasten those screws. When attaching it, face its ter-
minal downward.
(Front SP)
The woofer is attached to the rear baffle by 4 external screws.
To detach it ,unfasten those screws. When attaching it, face its
terminal rightward.
(Sub Woofer)
The grille assy is attached to the cabinet by its bosses applied
with adhesive. To detach it, pry it open by inserting a flat blade
screwdriver into lower slot. To attach it, apply adhesive to the
holes on the baffle. Then press it to the bafle.
The speaker is attached to the baffle by 4 external screws. To
detach it ,unfasten those screws. When attaching it, face its ter-
minal downward.
(Center SP)
The grille assy is attached to the cabinet by its bosses applied
with adhesive. To detach it, pry it open by inserting a flat blade
screwdriver into lower slot. To attach it, apply adhesive to the
holes on the baffle. Then press it to the bafle.
The speaker is attached to the baffle by 4 external screws. To
detach it ,unfasten those screws. When attaching it, face its ter-
minal upward.
background image
2
1
23
4
12
3
4
C
D
F
A
B
E
S-HTD340
Parts marked by "NSP" are generally unavailable because they are not in our Master Spare Parts List.
The
mark found on some component parts indicates the importance of the safety factor of the part.
Therefore, when replacing, be sure to use parts of identical designation.
NOTES:
PARTS LIST
NSP
CS Assy (Front SP x 2)
SMW6100
NSP
CS Assy (Sub WF)
SMW6101
NSP
CS Assy (Center SP)
SMW6102
NSP
CS Assy (Surround SP x 2)
SMW6103
For Packing
Speaker Wire (White)
SDS1108
Speaker Wire (Red)
SDS1109
Speaker Wire (Blue)
SDS1110
Speaker Wire (Gray)
SDS1111
Speaker Wire (Green)
SDS1112
Speaker Wire (Purple)
SDS1113
Non Skid Pads
SEP1240
Middle Protector
SHA6062
Bottom Protector
SHA6063
Top Protector
SHA6067
Spacer
SHB6005
Protection Sheet (for Center SP)
SHC6024
Protection Sheet (for Surround SP) SHC6025
Protection Sheet (for Front SP)
SHC6026
Protection Sheet (for Sub WF)
SHC6027
Packing Case
SHG6069
Mark No.
Description
Part No.
Grille Assy
SMG6047
Input Terminal Assy
SKX6015
Speaker (for WF)
W10DC60-51D
Speaker (for TW)
B32ZB
Screw
BYC40P140FZK
Speaker
A14LU83-58D
CS Cord
SDD1301
Input Terminal
SKX1060
Cosmetic Baffle
SNK6062
Packing
SEC6023
Screw
BYC40P200FZK
Grille Assy
SMG6045
Input Terminal Assy
SKX6013
Speaker
D87DU60-51D
Screw
BPZ40P100FZK
Grille Assy
SMG6046
Input Terminal Assy
SKX6014
Speaker
D87DU60-51D
Metal Fixture
SNA1400
Screw
BPZ40P100FZK
Front SP
Mark No.
Description
Part No.
Sub WF
Mark No.
Description
Part No.
Center SP
Mark No.
Description
Part No.
Surround SP
Mark No.
Description
Part No.
background image
3
1
23
4
1
2
3
4
C
D
F
A
B
E
S-HTD340
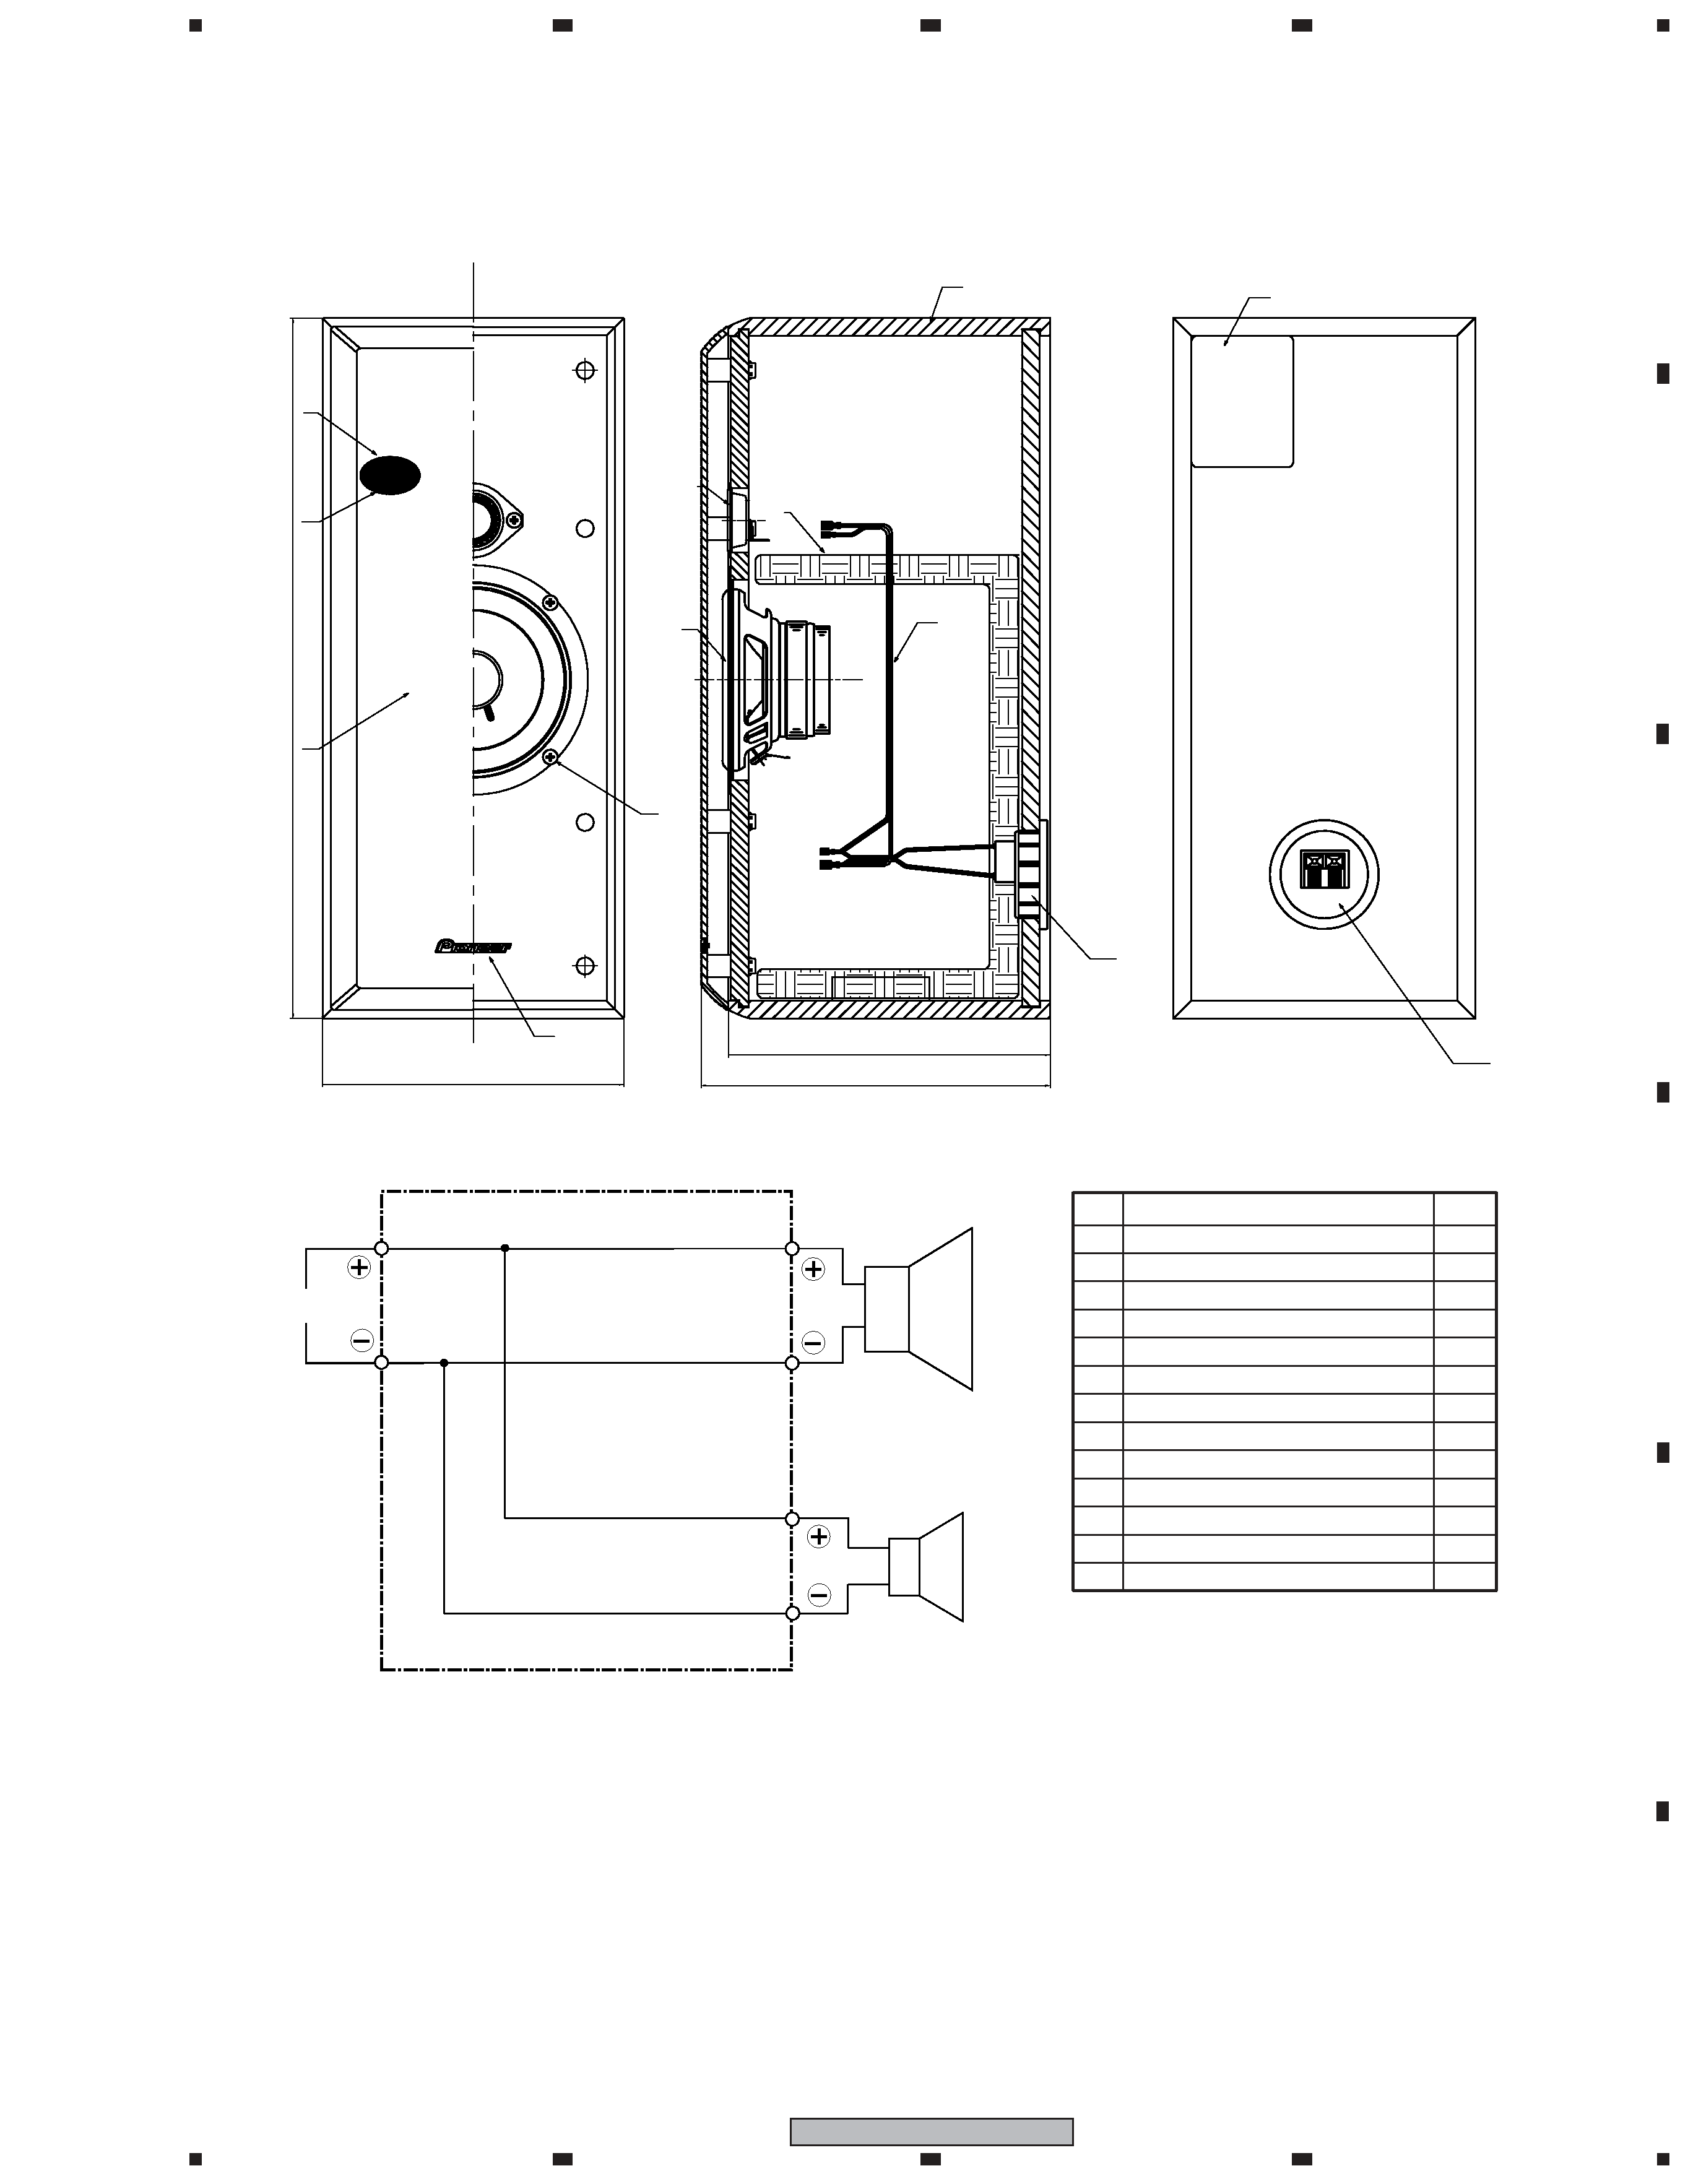
PRODUCT APPEARANCE (FRONT)
155
179
165
360
5
4
6
9
3
1
10
2
7
12
13
11
8
I N
Blue
Red
White
White
Woofer
Tweeter
NO.
NUM.
PART NAME
1
1
1
1
1
1
1
6
1
1
1
1
1
1
2
3
4
5
6
7
8
9
10
11
12
13
CABINET
WF SPEAKER
TW SPEAKER
INPUT TERMINAL ASSY
INPUT TERMINAL
NETWORK ASSY
LOGO BADGE
SCREW
ACOUSTIC ABSORBENT
MODEL LABEL
GRILLE ASSY
GRILLE FRAME
GRILLE CLOTH
Input Terminal Assy (SKX6015)
background image
4
1
23
4
12
3
4
C
D
F
A
B
E
S-HTD340
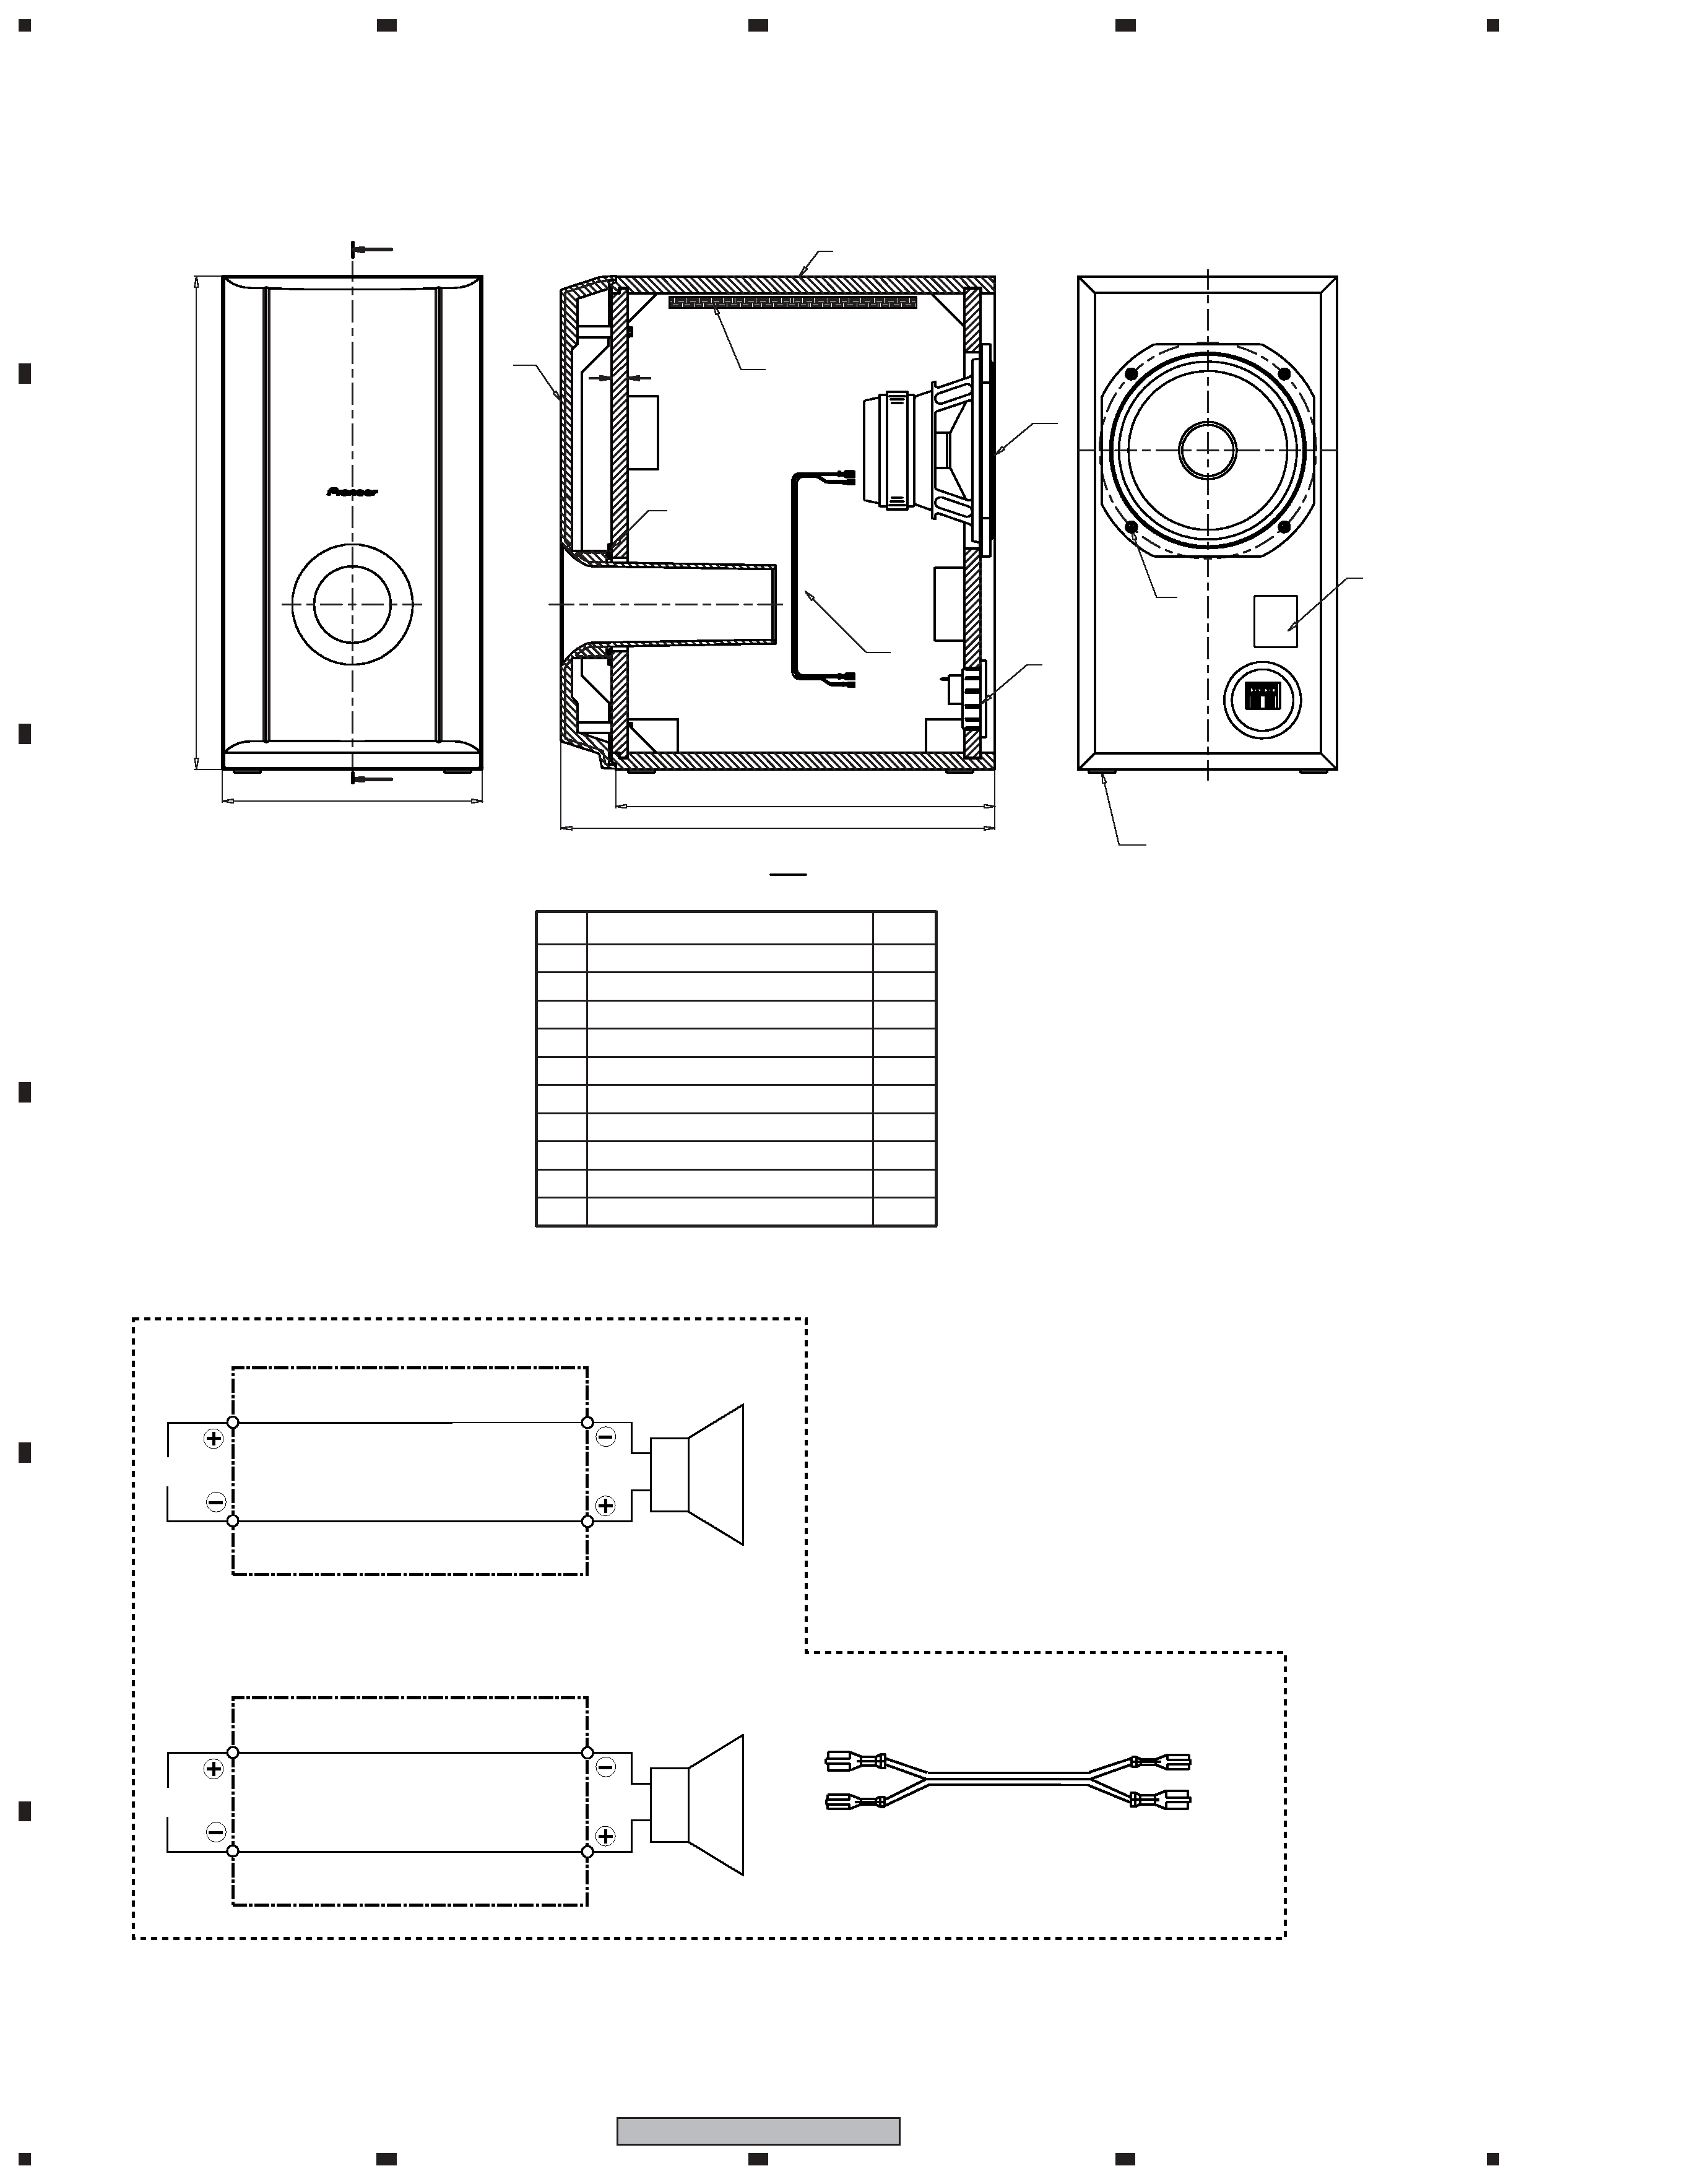
PRODUCT APPEARANCE (SubWF)
287
327
12
190
360.5
5
6
4
2
3
8
7
1
9
10
A
A
A-A
INPUT
Blue
Or
White
Full-Range
Speaker Wire
INPUT
White
Blue
Full-Range
Speaker Wire
SDD1301 Product Appearance
The CS cord terminal of SDD1301 is reversed.
Then, the color of the CS cord is alternative.
In
(Out)
Out
(In)
Blue
White
CS Cord (SDD1301)
NO.
NUM.
PART NAME
1
1
1
1
4
4
1
1
1
1
1
2
3
4
5
6
7
8
9
10
CABINET
SPEAKER UNIT
INPUT TERMINAL
MODEL LABEL
NON SKID PADS
SCREW
ACOUSTIC ABSORBENT
CORD
PACKING
COSMETIC BAFFLE
background image
5
1
23
4
1
2
3
4
C
D
F
A
B
E
S-HTD340
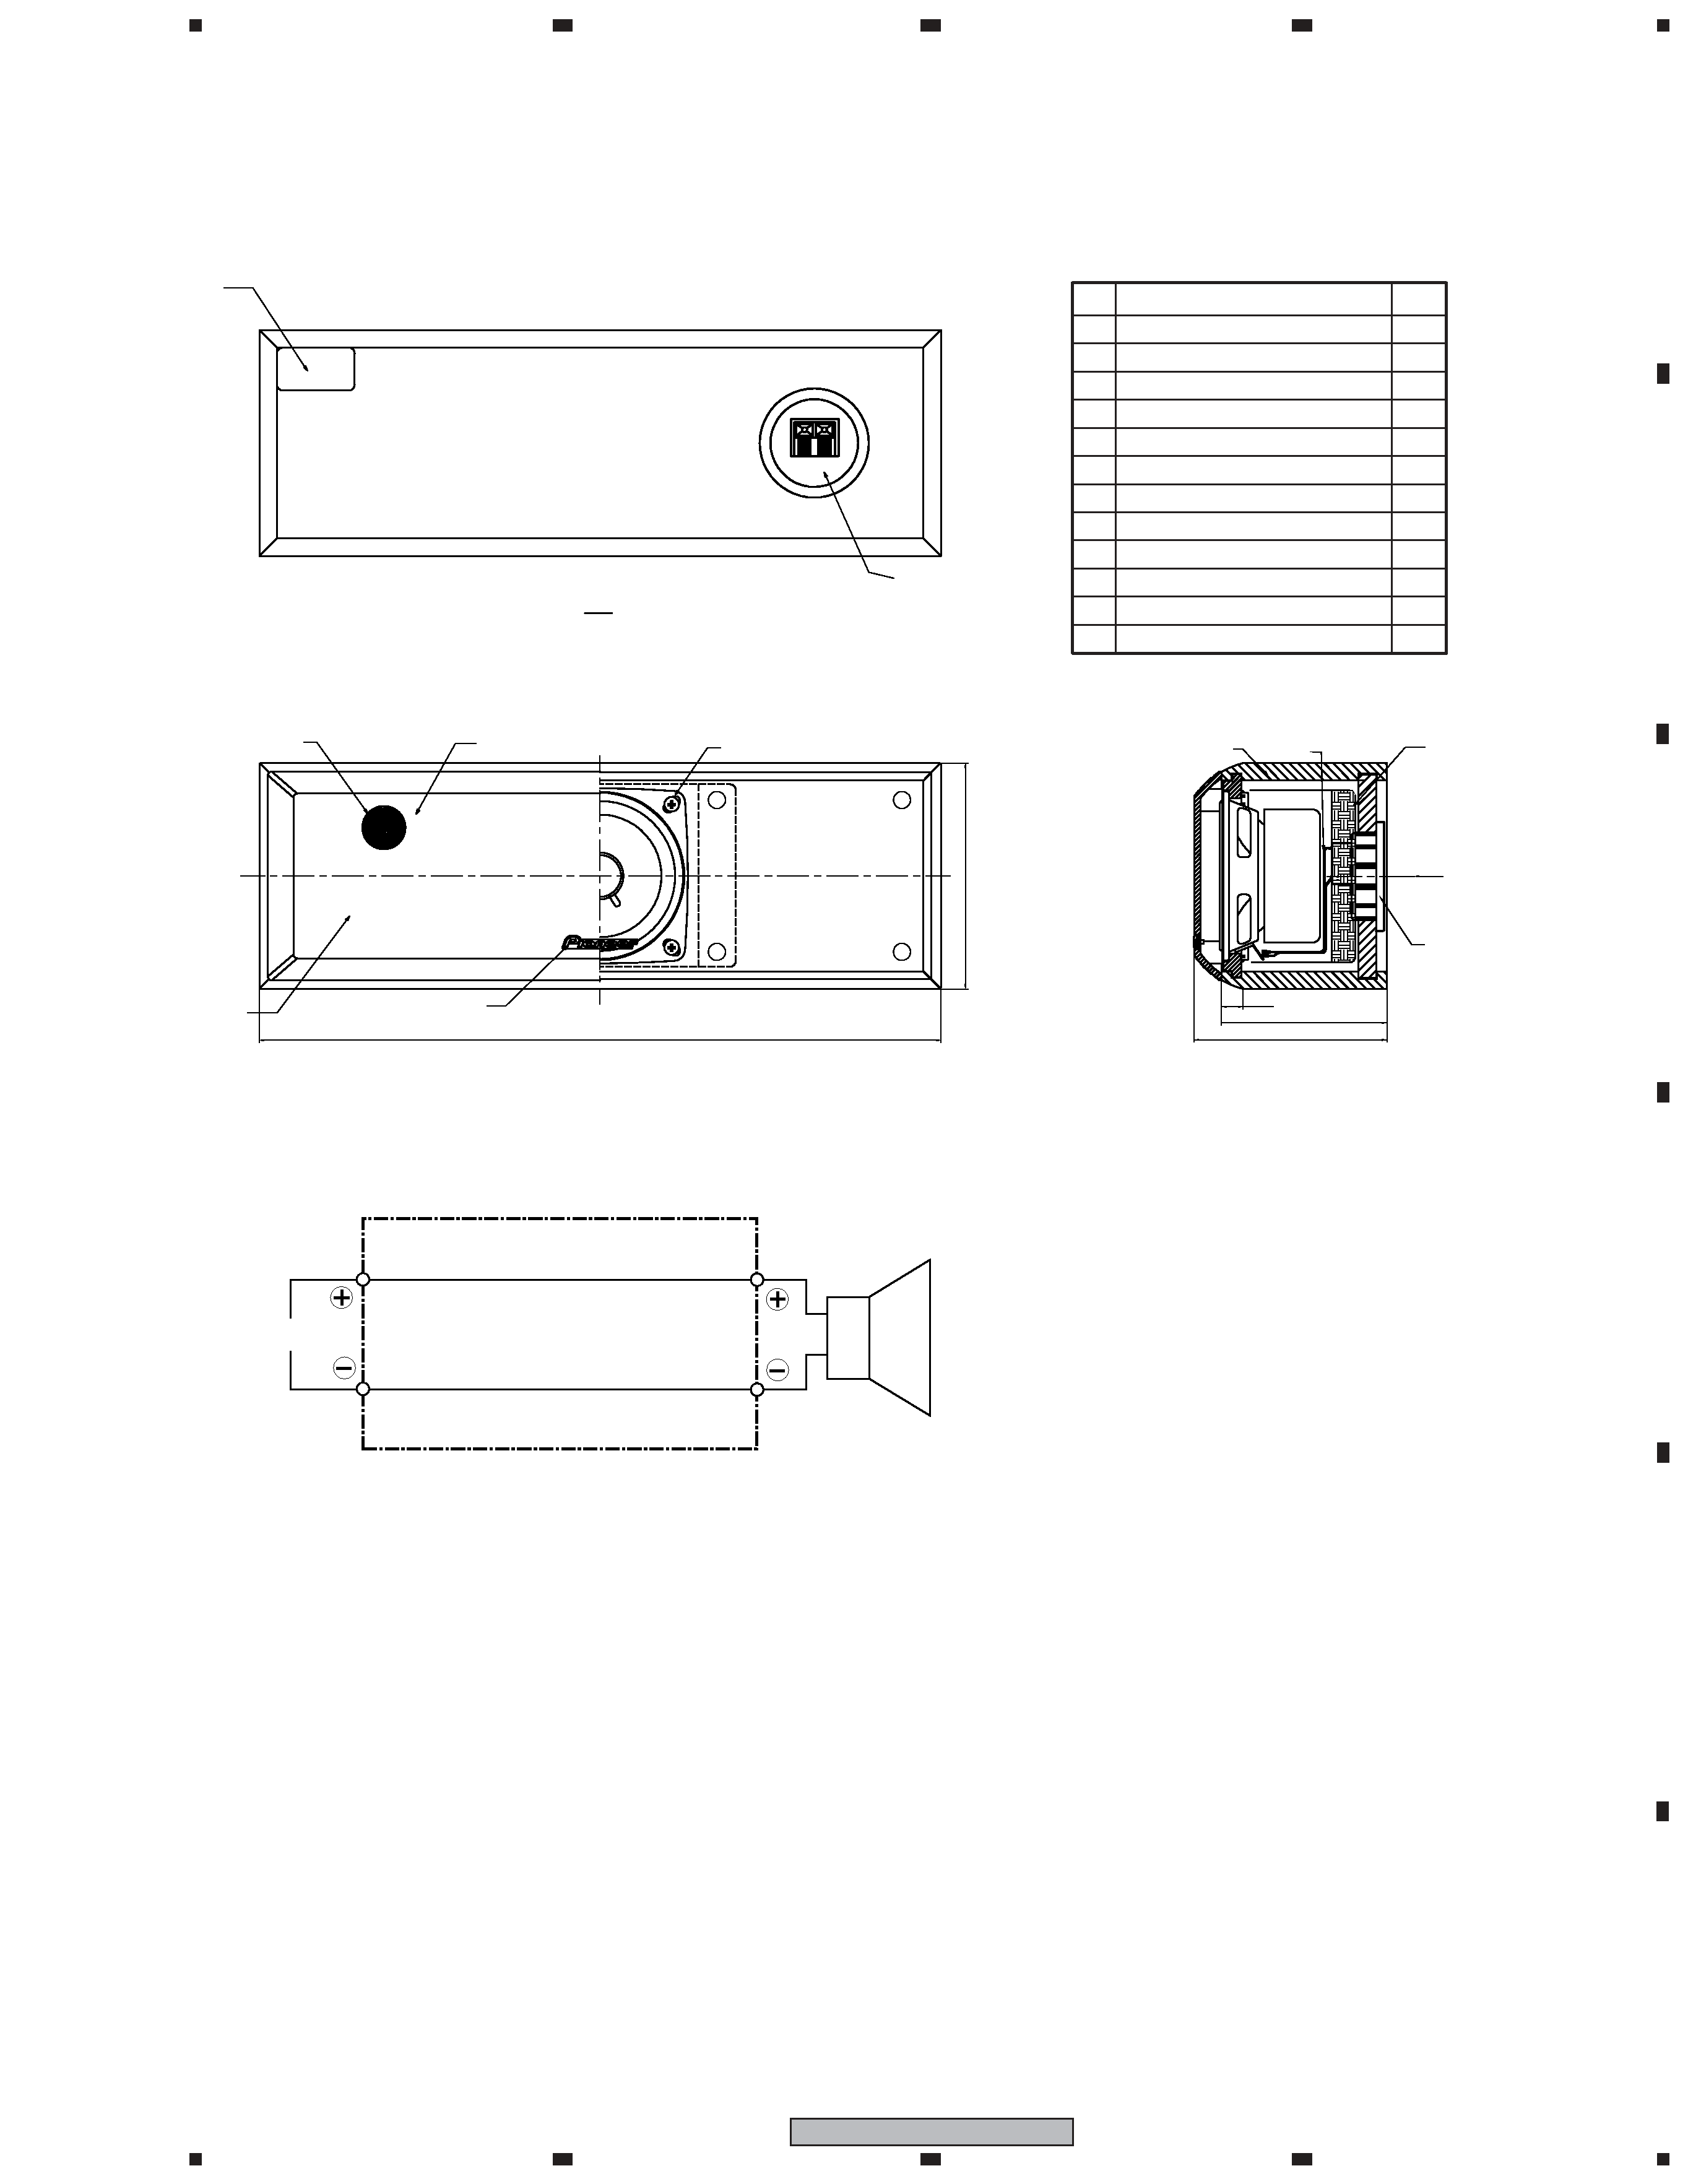
PRODUCT APPEARANCE (Center SP)
4
1
5
8
3
10
12
7
6
11
9
A
A
116
350
85
99
11.2
INPUT
Red
White
Full-Range
NO.
NUM.
PART NAME
1
1
1
1
1
1
4
1
1
1
1
1
1
2
3
4
5
6
7
8
9
10
11
12
CABINET
SPEAKER
INPUT TERMINAL ASSY
INPUT TERMINAL
CORD
LOGO BADGE
SCREW
ACOUSTIC ABSORBENT
MODEL LABEL
GRILLE ASSY
GRILLE FRAME
GRILLE CLOTH
Input Terminal Assy (SKX6013)

Reviews

There are no reviews of this manual yet.