PIONEER S-FL1/XTW/E5 Owner's Manual

Cover page of PIONEER S-FL1/XTW/E5 Owner's Manual

Owner's Manual for PIONEER S-FL1/XTW/E5, downloadable as a PDF file.

We also have service manual to this model.

Manual details

  • Immediate download after payment.
  • Delivered as a PDF file.
  • The manual has 58 pages
  • File size: 1.75 MB
  • Available language versions: French, English, Spanish, Dutch, German, Chinese Traditional, Italian
  • Different language versions may vary sligthly in file size and page count.

We guarantee that...

  • our manuals are complete,
  • our manuals are checked with antivirus,
  • We'll issue refund if the manual is damaged, incomplete or unreadable (our refund policy)

Sample pages

Thumbnail of page 1Thumbnail of page 2Thumbnail of page 3Thumbnail of page 4
Thumbnail of page 5Thumbnail of page 6Thumbnail of page 7Thumbnail of page 8
Thumbnail of page 9
background image
Flat Panel Speaker
Haut-parleur à panneau plat
Flachpaneel-Lautsprecher
Diffusore a pannello piatto
Platte luidspreker
Altavoz de panel plano
S-FL1
Operating Instructions
Mode d'emploi
Bedienungsanleitung
Istruzioni per l'uso
Gebruiksaanwijzing
Manual de instrucciones
®
01 speaker system.fm 1
background image
2
En
Features
· The flat-panel speaker system allows sound to radiate
from the whole of the front and rear surface of the
speaker. This produces a uniform sound across the
whole listening area.
· The speaker can be used with a third-party speaker
stand in a variety of configurations - vertically,
horizontally and so on.
· The speaker is magnetically shielded.
The S-FL1 speaker is a flat-panel type unit that uses NXT®
speaker technology. This slim style speaker allows for easy
installation anywhere.
NXT and the
logo are registered trademarks of New
Transducers Limited.
Supplied accessories
There are no supplied accessories with this speaker.
Caution
About installation
· This equipment should only be installed by a suitably
experienced and qualified person. Please have
installation and setting up carried out by factory or
sales staff.
· Pioneer is in no way responsible for accidents, injury
or damage caused by incorrect installation/setting
up, misuse, modification or natural disasters.
· Before wall- or ceiling-mounting this speaker, please
make sure that the wall or ceiling is strong enough to
support the speaker's weight (9.9 kg). If you are in
doubt, please consult a specialist. Serious injury
could result if the speaker were to fall.
· Please do not attempt to detach the grille; the
diaphragm may be damaged as a result.
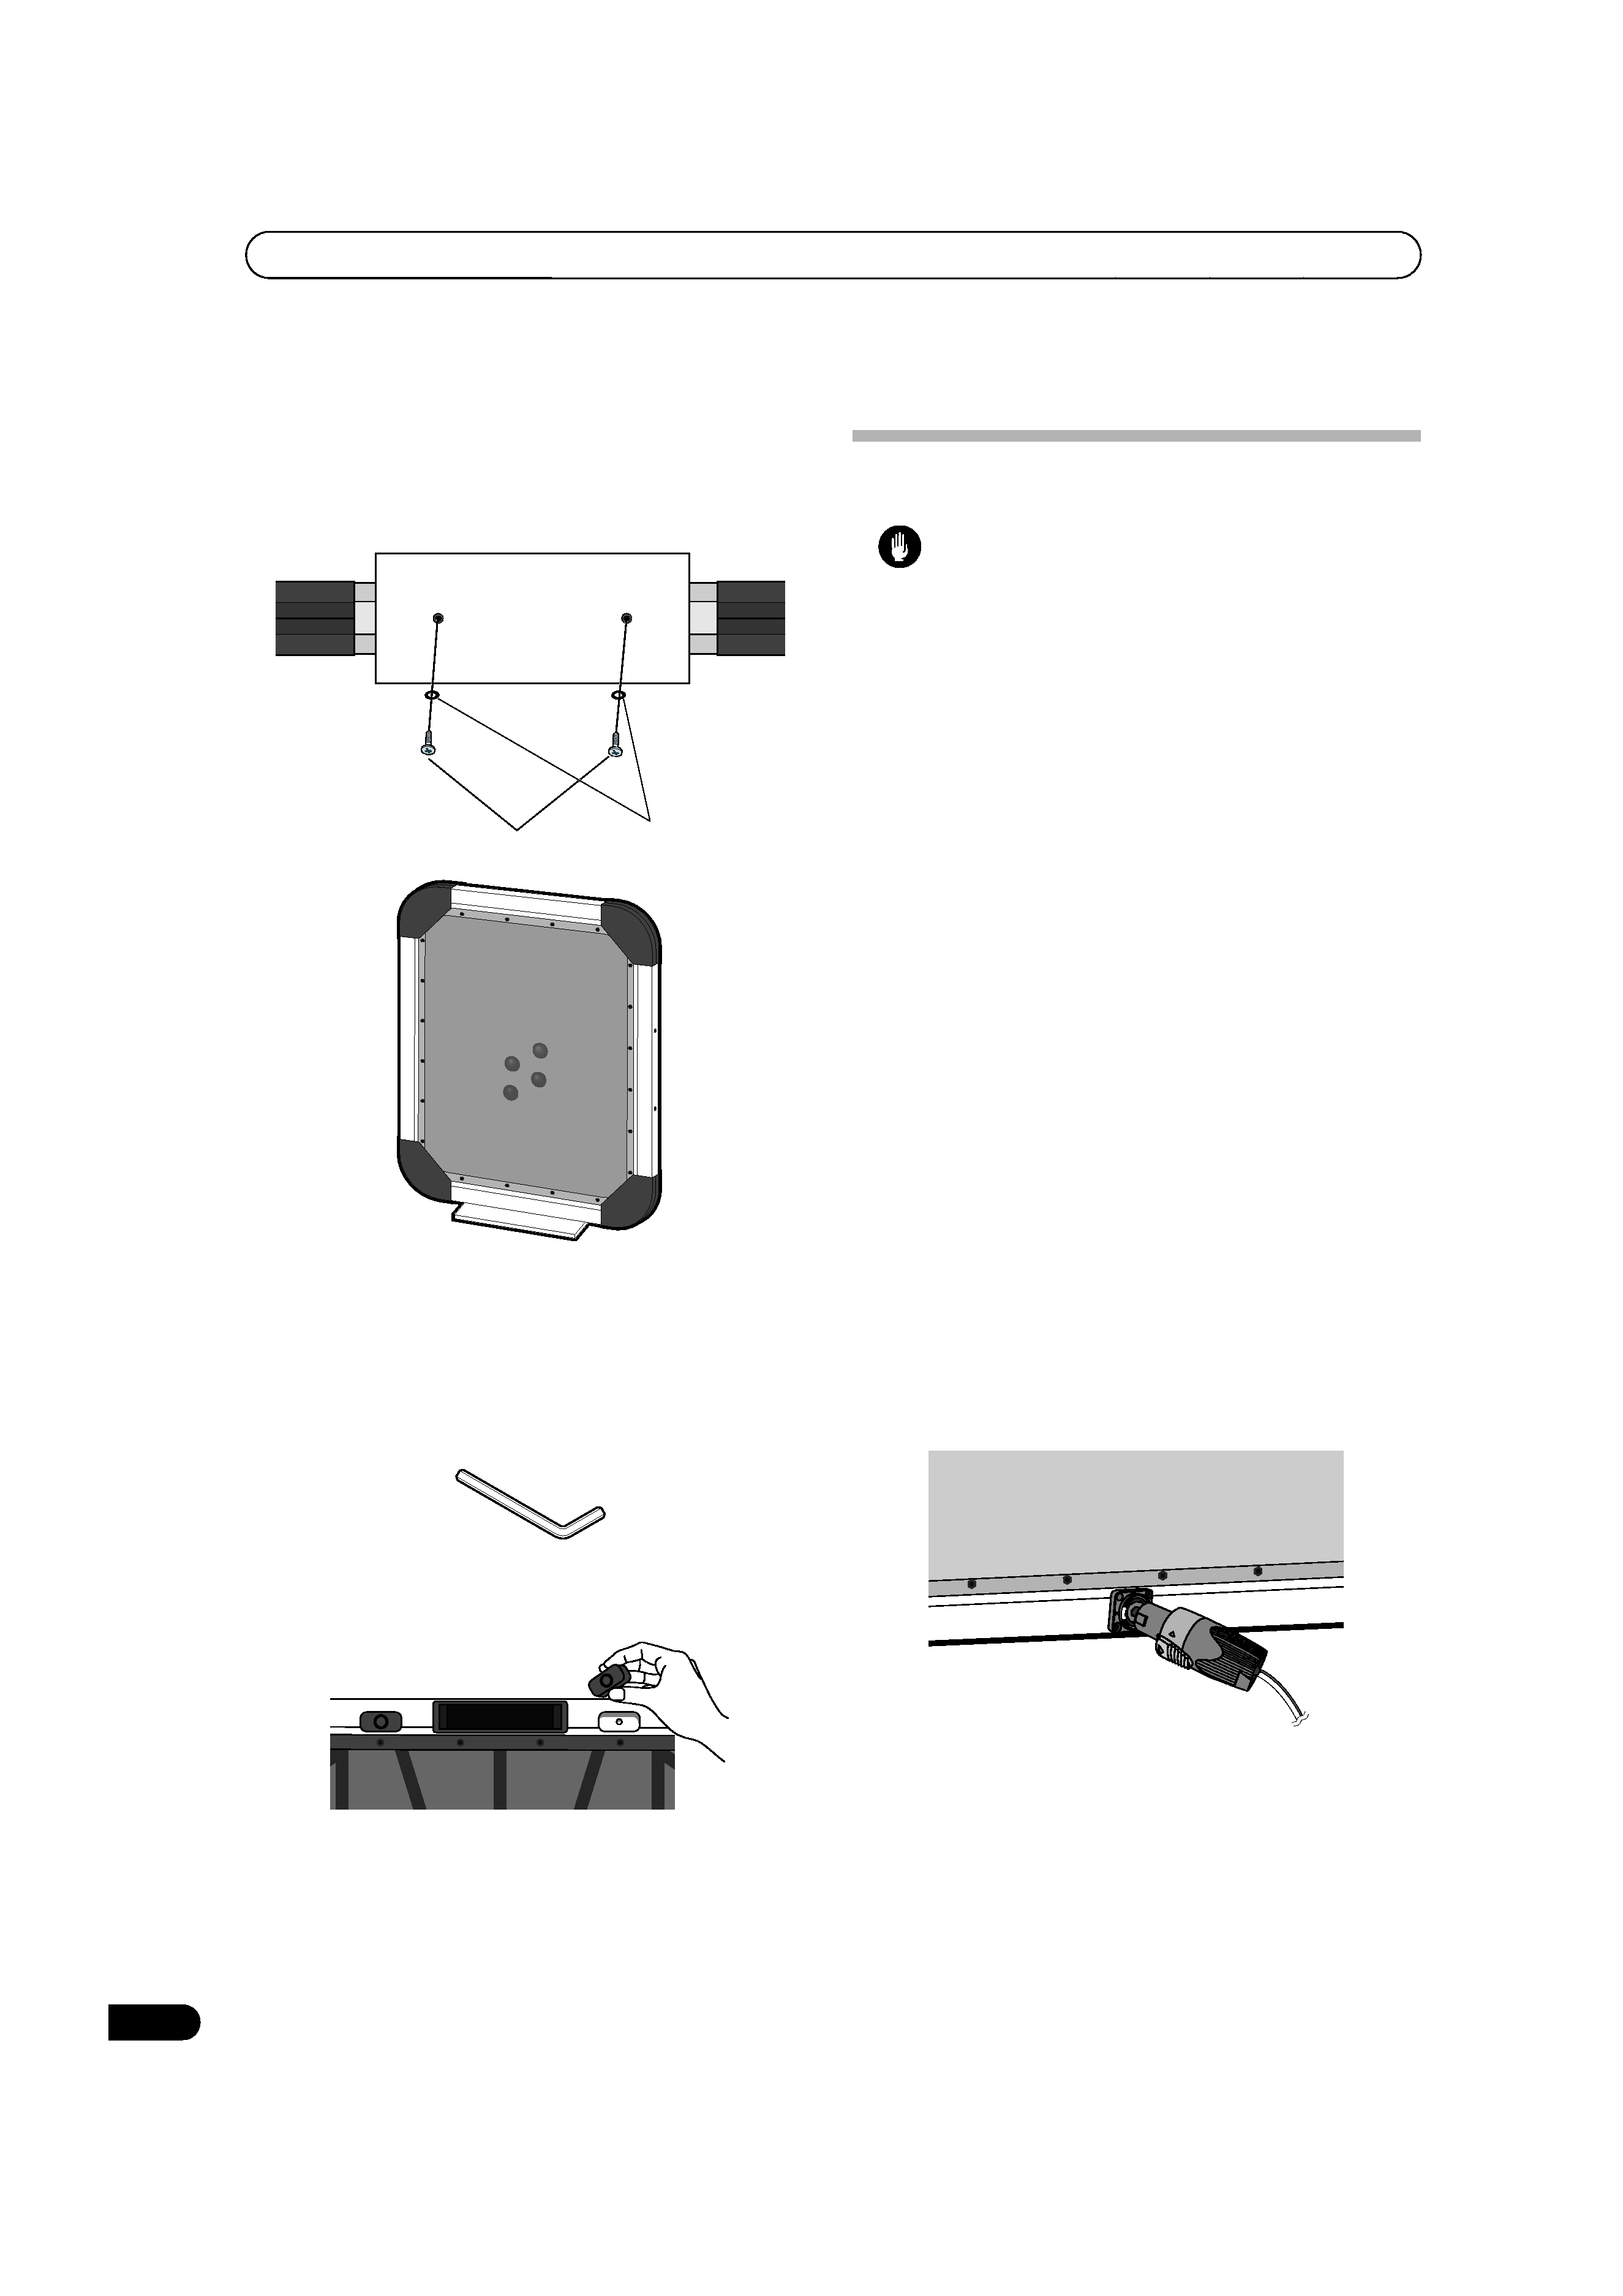
· This speaker's nominal impedance is 8 ohms. Please
use a power amplifier rated between 4 and 16 ohms.
· If you are using a stand, metal fittings, etc. with the
speaker, please make sure that they are of sufficient
strength to carry the load.
· Do not install the speaker near a heater or in direct
sunlight.
Before you install
· The sound of the speaker may be subtlely affected by
the listening room conditions. Please take this into
account when installing the speaker in order to get
the best performance from it.
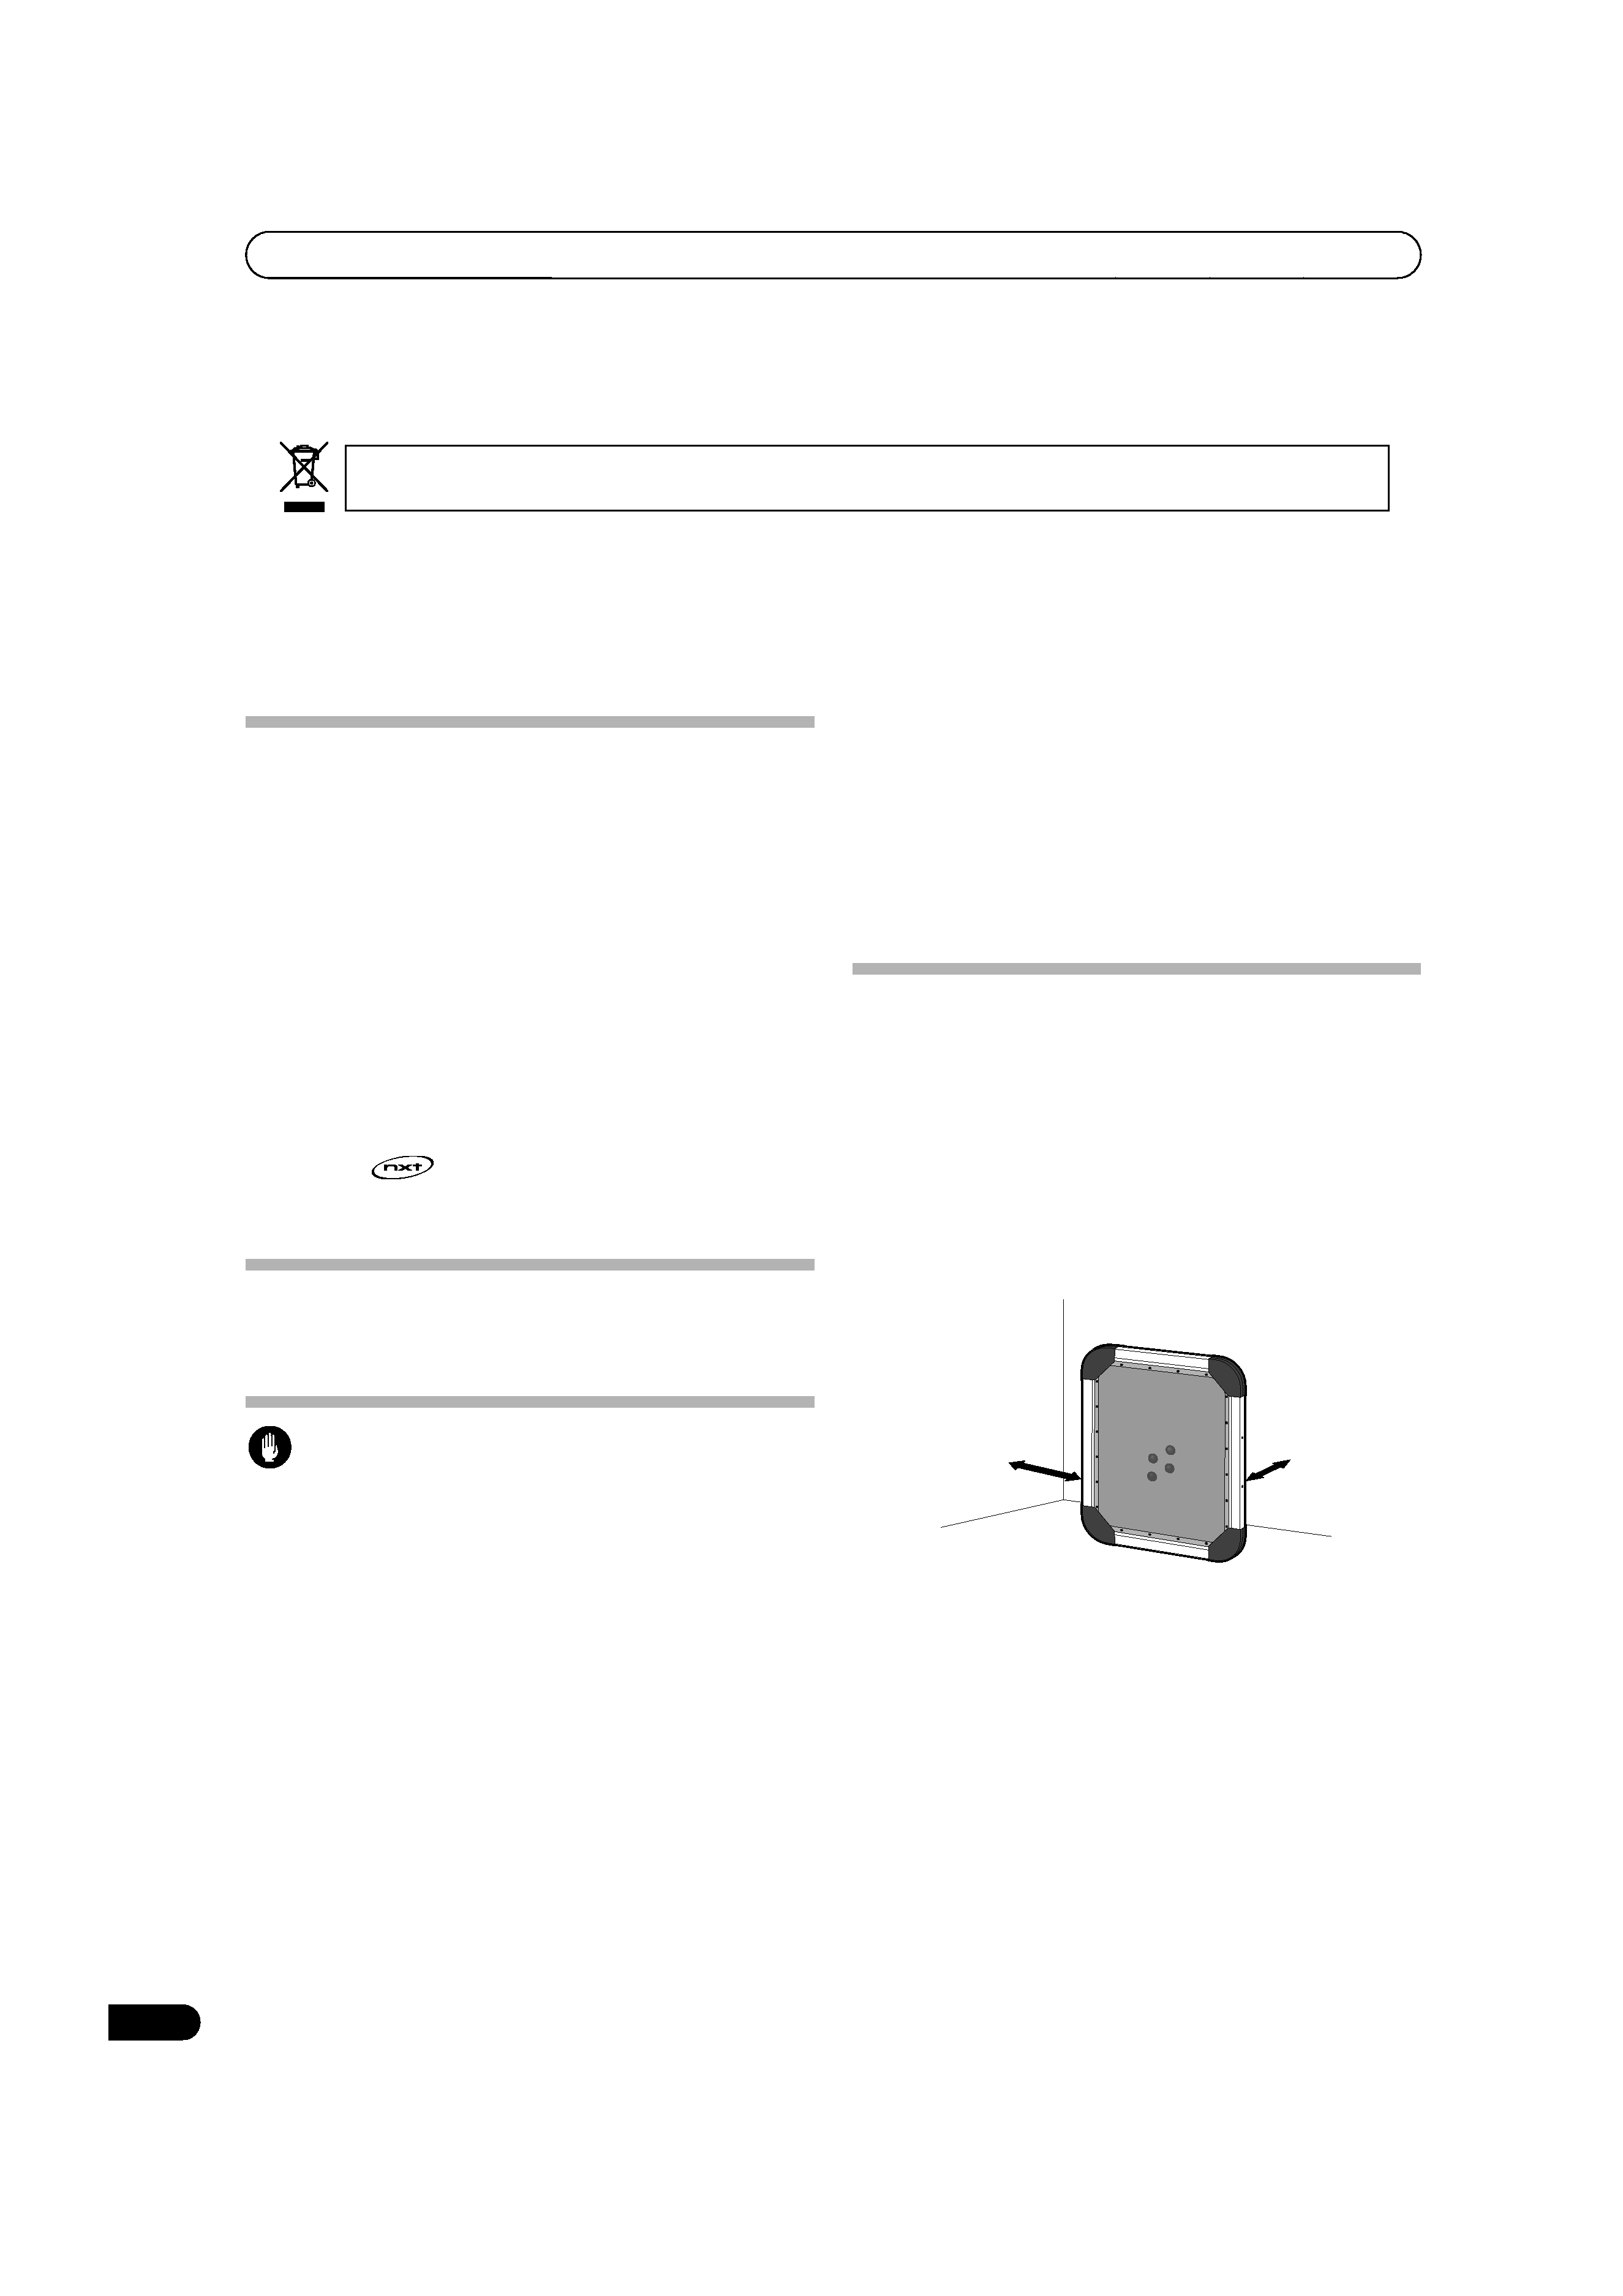
· The speaker weighs 9.9 kg. Please make sure that you
choose a stable surface that is far enough from rear
and side walls (see the diagram below). Adjust the
position so that the left and right walls do not
adversely affect the sound.
· The minimum distances in the above diagram are
just a guide; the acoustic properties of the wall will
affect the best placement.
· In general, the more acoustically absorbant the wall,
the less bass frequencies will be affected, even when
the speaker is placed close to a wall.
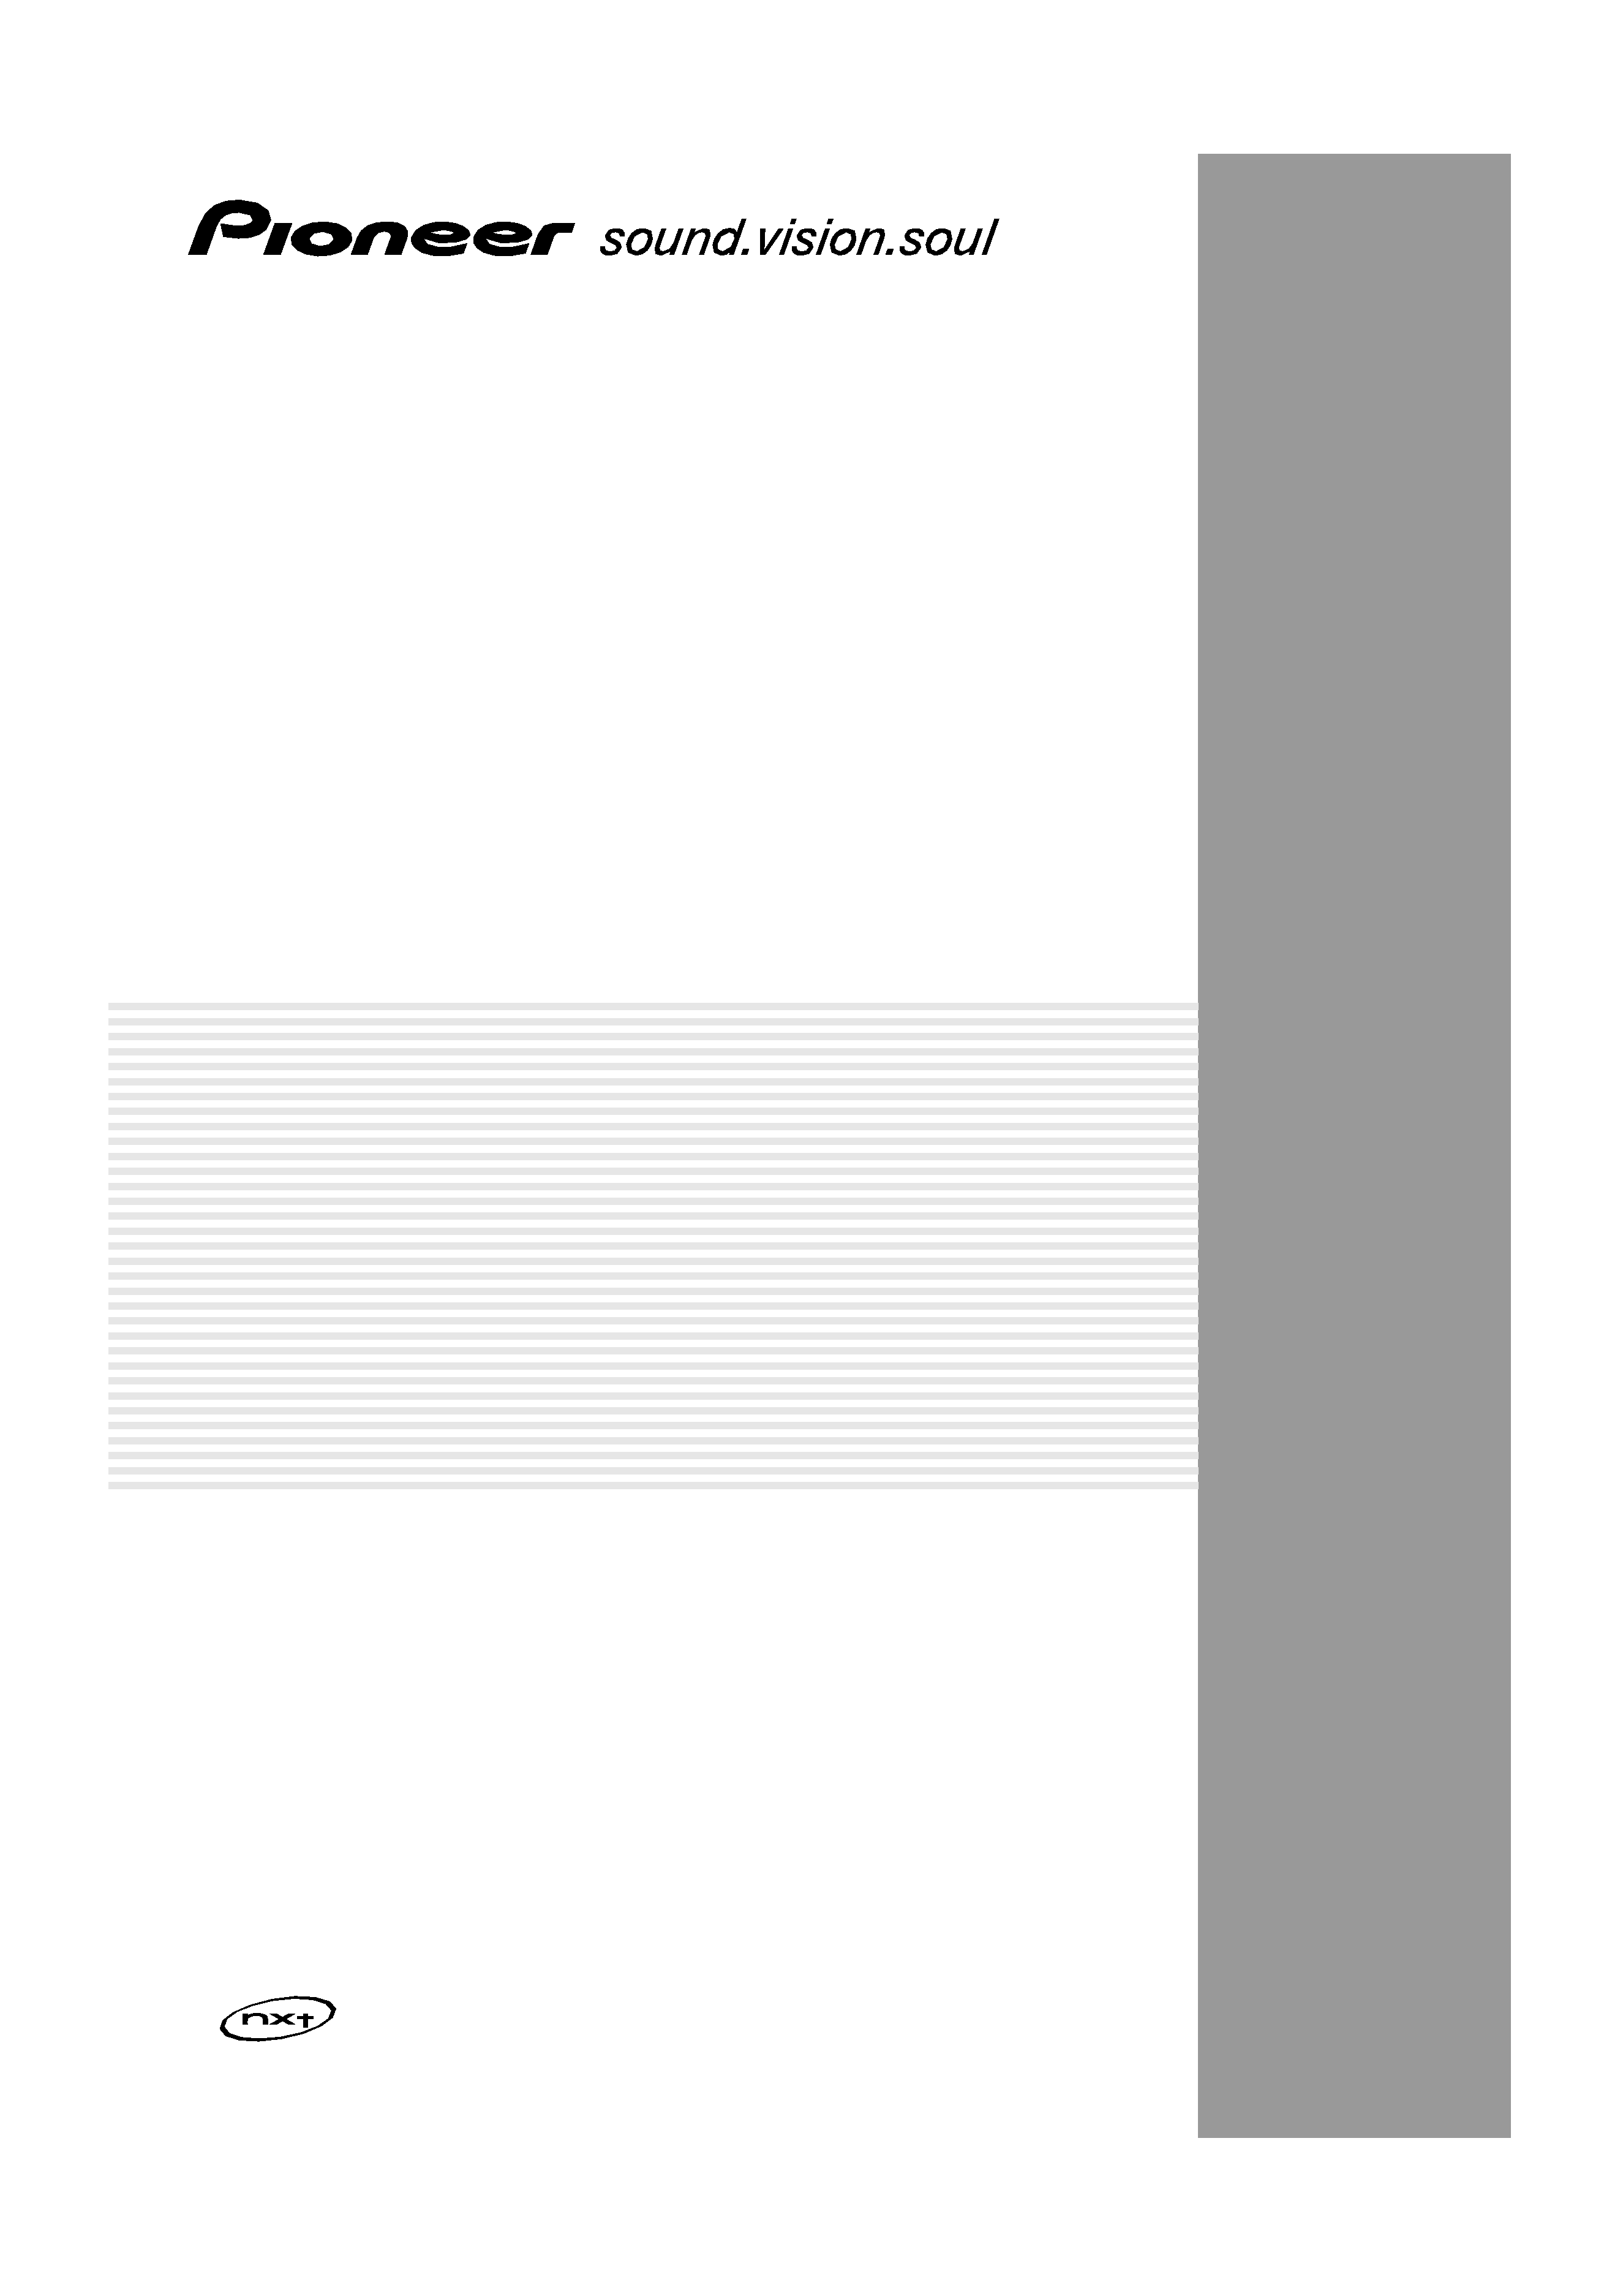
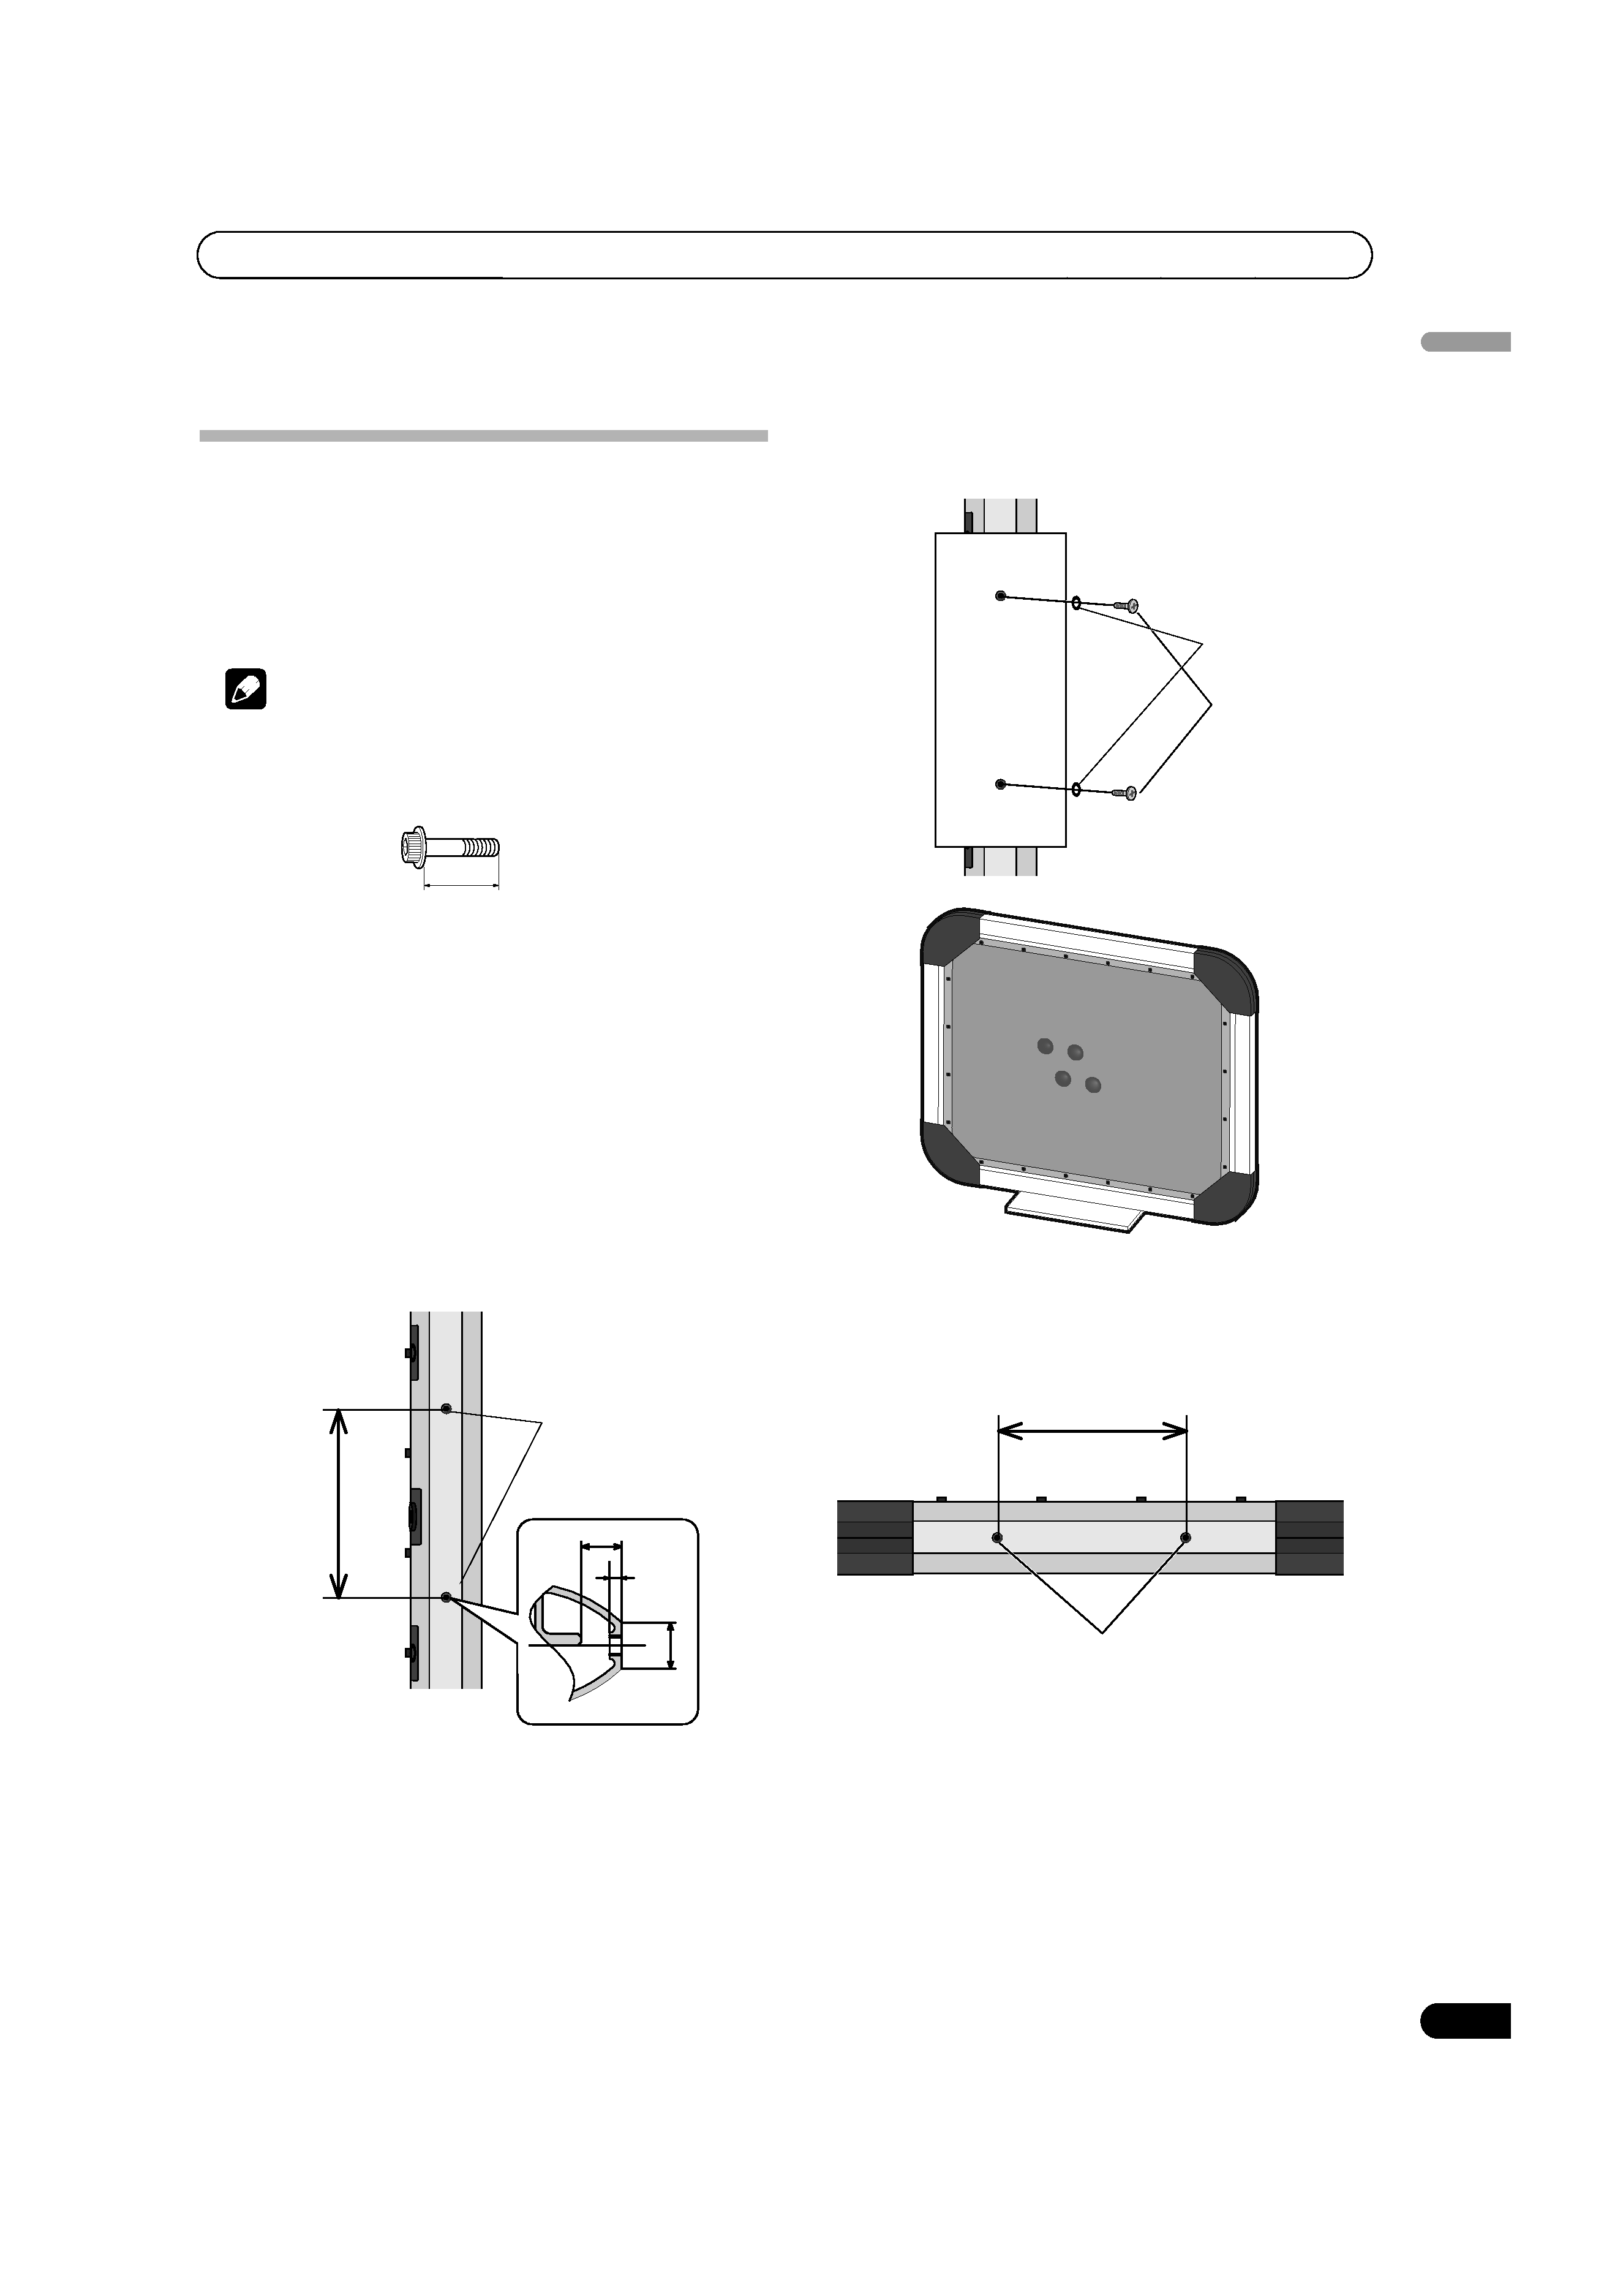
· Two M8 diameter screw holes for mounting the
speaker can be found on the top, bottom and both
sides of the speaker. There are also four M6 diameter
screw holes on the rear panel; please remove the
caps before use.
If you want to dispose this product, do not mix it with general household waste. There is a separate collection system for used
electronic products in accordance with legislation that requires proper treatment, recovery and recycling.
Private households in the 25 member states of the EU, in Switzerland and Norway may return their used electronic products free of charge to
designated collection facilities or to a retailer (if you purchase a similar new one).
For countries not mentioned above, please contact your local authorities for the correct method of disposal.
By doing so you will ensure that your disposed product undergoes the necessary treatment, recovery and recycling and thus prevent potential
negative effects on the environment and human health.
at least
50cm
at least
50 cm
01 speaker system.fm 2
background image
3
En
English
Installation
No stand or other fittings for mounting the speaker are
supplied. Please use appropriate fittings, screws, etc. in
order to install the speaker properly.
You will need a cross-head screwdriver or hexagonal
wrench for installation.
Note
· Please use screws suitable for the wall material and
strength. The following is a guide to the length of
screws you should use for the speaker and fittings:
· Do not overtighten the screws as this can cause
damage.
· To reduce the risk of the speaker falling or toppling
over should there be an accident, please reinforce
the mounting fittings for added safety.
Installation example 1 (horizontal
mounting)
1
Use the two screw holes on the longer side of the
speaker.
2
Use two screws with washers to attach the stand
or other fitting to the speaker.
Installation example 2 (vertical mounting)
1
Use the two screw holes on the shorter side of
the speaker.
Depth of mounting material +
washer + 7~15 mm
150 mm
16.5
19
5
Unit : mm
Screw holes
(M8 x P1.25)
Screw
Washer
150 mm
Screw holes
(M8 x P1.25)
01 speaker system.fm 3
background image
4
En
2
Use two screws with washers to attach the stand
or other fitting to the speaker.
Please take extra care in selecting a location for upright
installation as the speaker is less stable.
Intallation example 3 (other)
1
You can also use the screw holes on the rear of
the speaker for installation. Remove the caps to use.
You'll need a 5 mm hexagonal wrench for the screws that
keep the caps in place.
Please keep the caps in a safe place in case you need to
use them again.
Connecting to your amplifier
Caution
· Be careful not to short the two pins (1+ and 1­) of the
free speaker terminal. Doing so could damage the
speaker and/or your amplifier.
· Switch off the amplifier before connecting any
speakers.
There are two connection terminals on the rear side of
the speaker. To connect the speaker to your amplifier you
will need a suitable speaker cord terminated in a Neutrik
Speakon® speaker connector [NL4MP]. Only the 1+ and
1­ pins should be connected. These connect to the
positive (+) and negative (­) speaker terminals
respectively on the amplifier.
Neutrik [NL4FX] and [NL4FC] Speakon speaker cord can
be used for the connection. Please refer to Neutrik for
more information.
1
Use a suitable speaker cord (not supplied) to
connect the speaker terminal on your amplifier to
one of the input terminals on the rear of the
speaker.
The speaker's terminals are exactly the same; use
whichever is convenient.
· See the manual that came with your amplifier for
more details.
a
Plug the speaker cord connector into the
speaker's input terminal. Check the alignment for
the connector with the jack before plugging in.
Screws
Washers
01 speaker system.fm 4
background image
5
En
English
b
After inserting the connector fully, turn
clockwise to lock it in place.
· After connecting, gently pull the connector to make
sure that it is securely connected. Improper
connection can be a cause of noise or other
problems.
Disconnecting
Squeeze the lever on the speaker connector with your
thumb, then twist the whole connector counter-
clockwise and pull out.
Moving the speaker
A carrying handle is provided on the top side of the
speaker (when horizontal). Use this if you need to move
the speaker short distances.
Connecting another speaker
On the rear of the speaker are two terminals; you can use
these to connect another speaker of the same type to this
speaker.
· The number of speakers you may connect will vary
according to the impedance rating of the amplifier.
See the manual that came with your amplifier for
more details.
· The diagram below shows the wiring of two
connected speakers.
1
2
Amplifier
S-FL1
S-FL1
+
­
1+
8
1+
Amplifier
1+
1+
8
S-FL1
S-FL1
01 speaker system.fm 5

Reviews

There are no reviews of this manual yet.