PIONEER S-F60/SXTW/EW5 Owner's Manual

Cover page of PIONEER S-F60/SXTW/EW5 Owner's Manual

Owner's Manual for PIONEER S-F60/SXTW/EW5, downloadable as a PDF file.

We also have service manual to this model.

Manual details

  • Immediate download after payment.
  • Delivered as a PDF file.
  • The manual has 8 pages
  • File size: 0.9 MB
  • Available language versions: Portuguese, Swedish, French, English, Russian, Spanish, Dutch, German, Italian
  • Different language versions may vary sligthly in file size and page count.

We guarantee that...

  • our manuals are complete,
  • our manuals are checked with antivirus,
  • We'll issue refund if the manual is damaged, incomplete or unreadable (our refund policy)

Sample pages

Thumbnail of page 1Thumbnail of page 2Thumbnail of page 3Thumbnail of page 4
Thumbnail of page 5Thumbnail of page 6Thumbnail of page 7Thumbnail of page 8
Thumbnail of page 9
background image
English
The speaker units in this speaker system are magnetically shielded.
However, colours may blur if the speakers are positioned too close to a
television screen. If this happens, switch off the television and switch it
back on again after 15 to 30 minutes. If the problem persists, move the
speakers away from the television set.
BEFORE OPERATION
Thank you for buying this PIONEER product.
Read the Instruction Manual carefully before using this speaker system so that
you can operate it properly. After you have finished, put this manual away in a
safe place for future reference.
The rated impedance of this speaker system is 8
. It must be connected to a
amplifier which accepts this type of load (miminum and maximum impedances
accepted by the amplifier are generally indicated near the loudspeaker outlets: for
example "4
to 16 " or "6
to 16 ").
To guard against damage to this speaker system due to an electric power
overload, take the following precautions:
Do not supply more than the maximum permitted power to the speaker
system (see Specifications).
Any connection or switching on or off of part of the audio system (CD
player, tuner etc.) must be carried out after switching off the amplifier or at
least with the loudspeaker outlets disconnected (if the amplifier allows).
Interference caused by these operations will otherwise reach the speaker
and may damage the treble loudspeaker units.
When boosting particular frequencies using a graphic equaliser or bass
and treble correctors, make sure that you do not increase the amplifier
volume excessively, as the speaker will be overloaded more quickly.
Do not force a low-power amplifier to produce a high level of sound as
harmonic distortion increases rapidly in this situation and may pose a
danger to the treble speaker units.
Avoid touching the diaphragms and suspensions of speakers units as they are
fragile.
CONNECTIONS
Switch off the amplifier power supply (OFF).
Connect the cables to the input terminals on the rear of the speaker: Connect
the neutral cable to the
terminal and the live cable to the
terminal. Do not
forget that the red input terminal has positive polarity and that the black input
terminal has negative polarity.
+
Accessory parts
Instruction Manual ................................................................................................. 1
Warranty ................................................................................................................ 1
Mounting panels......................................................................................................2
Safety wires.............................................................................................................2
Foam cushions ...................................................................................................... 8
REMARK : The specifications and design of this product are subject to change
without notice, in the interests of improvements.
ADVICES AND PRECAUTIONS :
For optimum sound reproduction of high frequencies, the treble speaker units
must be at the same height as the listener's ears.
For low frequencies, it is possible to increase the level of bass sounds by
positioning the speakers close to a wall (the maximum increase being obtained
for a position in a corner of the listening room).
REMARKS :
Check that the cables are securely connected to the terminals. A loose
connection may cause not just intermittent or distorted sound but short-circuiting
and breakdown of the amplifier.
If the cables of one of the speakers have been connected with the wrong
polarities, you will find when listening to a stereo recording that bass sounds are
weakened and the stereo effect normally obtained between the two speakers
does not exist.
Connect the cables to the loudspeaker outlet terminals of the amplifier. Connect
the live cable to the
terminal and the neutral cable to the
terminal.
+
SPECIFICATIONS
Speaker .......................................................................... Satellite type, enclosed
System ............................................................................. 2 ways, 2 speaker units
Woofer.......................................................... Cone type, 77 mm
Tweeter ........................................................ Dome type, 20 mm
Nominal Impedance ....................................................................................... 8
Frequency range .................................................................. 80 Hz to 20 000 Hz
Sensitivity ..................................................................... 85 dB/W at 1 m distance
Maximum power ........................................................................................ 100 W
Dimensions.........................................144 mm (W) x 190 mm (H) x 110 mm (D)
Weight ........................................................................................................ 2.1 kg
Speaker units :
MAINTENANCE OF THE ENCLOSURE
Use a cloth to wipe away dust and dirt.
If the enclosure is very dirty, wipe with a soft cloth dipped in a neutral detergent
diluted five to six times with water, then wipe again with the dry cloth. Do not use
thinner, benzene, cleaning sprays or other chemical products on or near the
enclosures as the surfaces could be adversely affected.
Do not install the speakers close to an oven or heating appliance. Avoid
exposing them to direct sunlight. High temperatures can distort the structure of
the enclosure and adversely affect the sound.
This speaker system is heavy and fragile, and it is therefore dangerous to install
it in an unstable position.
SPEAKER SYSTEM
ENCEINTE ACOUSTIQUE
LAUTSPRECHERSYSTEM
SISTEMA ALTOPARLANTE
LUIDSPREKERSYSTEEM
HÖGTALARSYSTEM
SISTEMA DE ALTAVOCES
SISTEMA DE ALTIFALANTES
INSTRUCTION MANUAL
MODE D'EMPLOI
BEDIENUNGSANLEITUNG
GUIDA PER L'USO
GEBRUIKSAANWIJZING
BRUKSANVISNING
GUIA DE OPERACIÓN
GUIA DE OPERAÇÃO
Published by Pioneer Corporation.
© 2007 Pioneer Corporation.
All reproduction and translation rights reserved.
Printed in China <FRRD-186-B>
Strip the insulation at the tip of
the cord and twist the strands.
Depress the input terminal and insert the
tip of the cord into the hole and then
realease the input terminal so that it
springs back into position.
Connect the common-side speaker cord
to the
terminal.
Connect the hot-side speaker cord to the
terminal.
1
2
+
B
4 foam cushions to be stuck on the underside of the speaker.
S-F60
A
This Mounting panel
will enable you to set the speaker system on your
interior's walls. Before screwing the mounting panel, make sure that cables are
properly connected to the input terminal. The 2 screws that hold the speaker
system must be fixed into the dedicated structure of the speaker system.
For a better security, please use Pioneer's safety wires
. The screw that hold
the speaker system must be fixed into the dedicated structure of the speaker. Wall
screws must be purchased separately. Be sure to use screws that are appropriate
for the wall and that are long enough to provide sufficient strength.
2 Safety wires + 1 polybag including 2 screws.
2 Mounting panels + 1 Polybag including 4 screws.
2
INSTALLATION
1
2
1
3
4
S-F60_FRRD-186-B_8L.fm
Page 1
Tuesday, September 11, 2007
1:44 PM
background image
Pour votre sécurité, utilisez le cable
prévu à cet effet. La vis de maintient
doit être vissée dans l'insert prévu dans le coffre arrière de l'enceinte. La vis à
insérer dans le mur doit être achetée séparément. Assurez vous d'utiliser une vis
qui soit suffisamment solide.
Français
AVANT UTILISATION
Merci d'avoir acheté ce produit PIONEER.
Lire attentivement le mode d'emploi avant d'utiliser ces enceintes acoustiques
afin de savoir comment optimiser leurs performances. Après l'avoir lu, conserver
ce mode d'emploi dans un endroit facilement accessible en cas de besoin.
L'impédance nominale de ces enceintes est de 8
. Elles doivent donc être
connectées à un amplificateur acceptant ce type de charge (les impédances
minimale et maximale acceptées par l'amplificateur sont généralement indiquées
près des sorties haut-parleurs : "4
à 16 " ou "6
à 16 " par exemple).
Pour éviter d'endommager ces enceintes acoustiques suite à une surcharge de
puissance électrique, prendre les précautions suivantes :
Ne pas fournir aux enceintes acoustiques une puissance supérieure à
celle maximale autorisée (voir Fiche Technique).
Toute connexion, mise sous ou hors tension d'un appareil de la chaîne
audio (lecteur CD, tuner...) doit être effectuée après avoir mis l'amplificateur
hors tension ou au moins avec les sorties haut-parleurs coupées (si
l'amplificateur le permet). Dans le cas contraire, les bruits parasites
provoqués par ces manipulations parviennent aux enceintes acoustiques et
peuvent endommager les haut-parleurs d'aigus.
Lors du renforcement de certaines fréquences à l'aide d'un égaliseur
graphique ou de correcteurs de graves et d'aigus, veiller à ne pas pousser
excessivement le volume de l'amplificateur car la surcharge des enceintes
acoustiques sera atteinte plus rapidement.
Ne pas forcer un amplificateur de faible puissance à produire un niveau
sonore élevé car dans ce cas la distorsion harmonique augmente
rapidement, ce qui peut-être dangereux pour les haut-parleurs d'aigus.
Eviter de toucher les membranes et les suspensions des haut-parleurs car
celles-ci sont fragiles.
Les haut-parleurs de ces enceintes acoustiques sont magnétiquement
blindés. Cependant, un flou des couleurs peut se produire si les
enceintes sont trop proches d'un écran de télévision. Dans ce cas,
couper l'alimentation du téléviseur puis remettre celui-ci sous tension
après 15 à 30 minutes. Si le problème persiste, écarter les enceintes
acoustiques du téléviseur.
CONNECTIONS
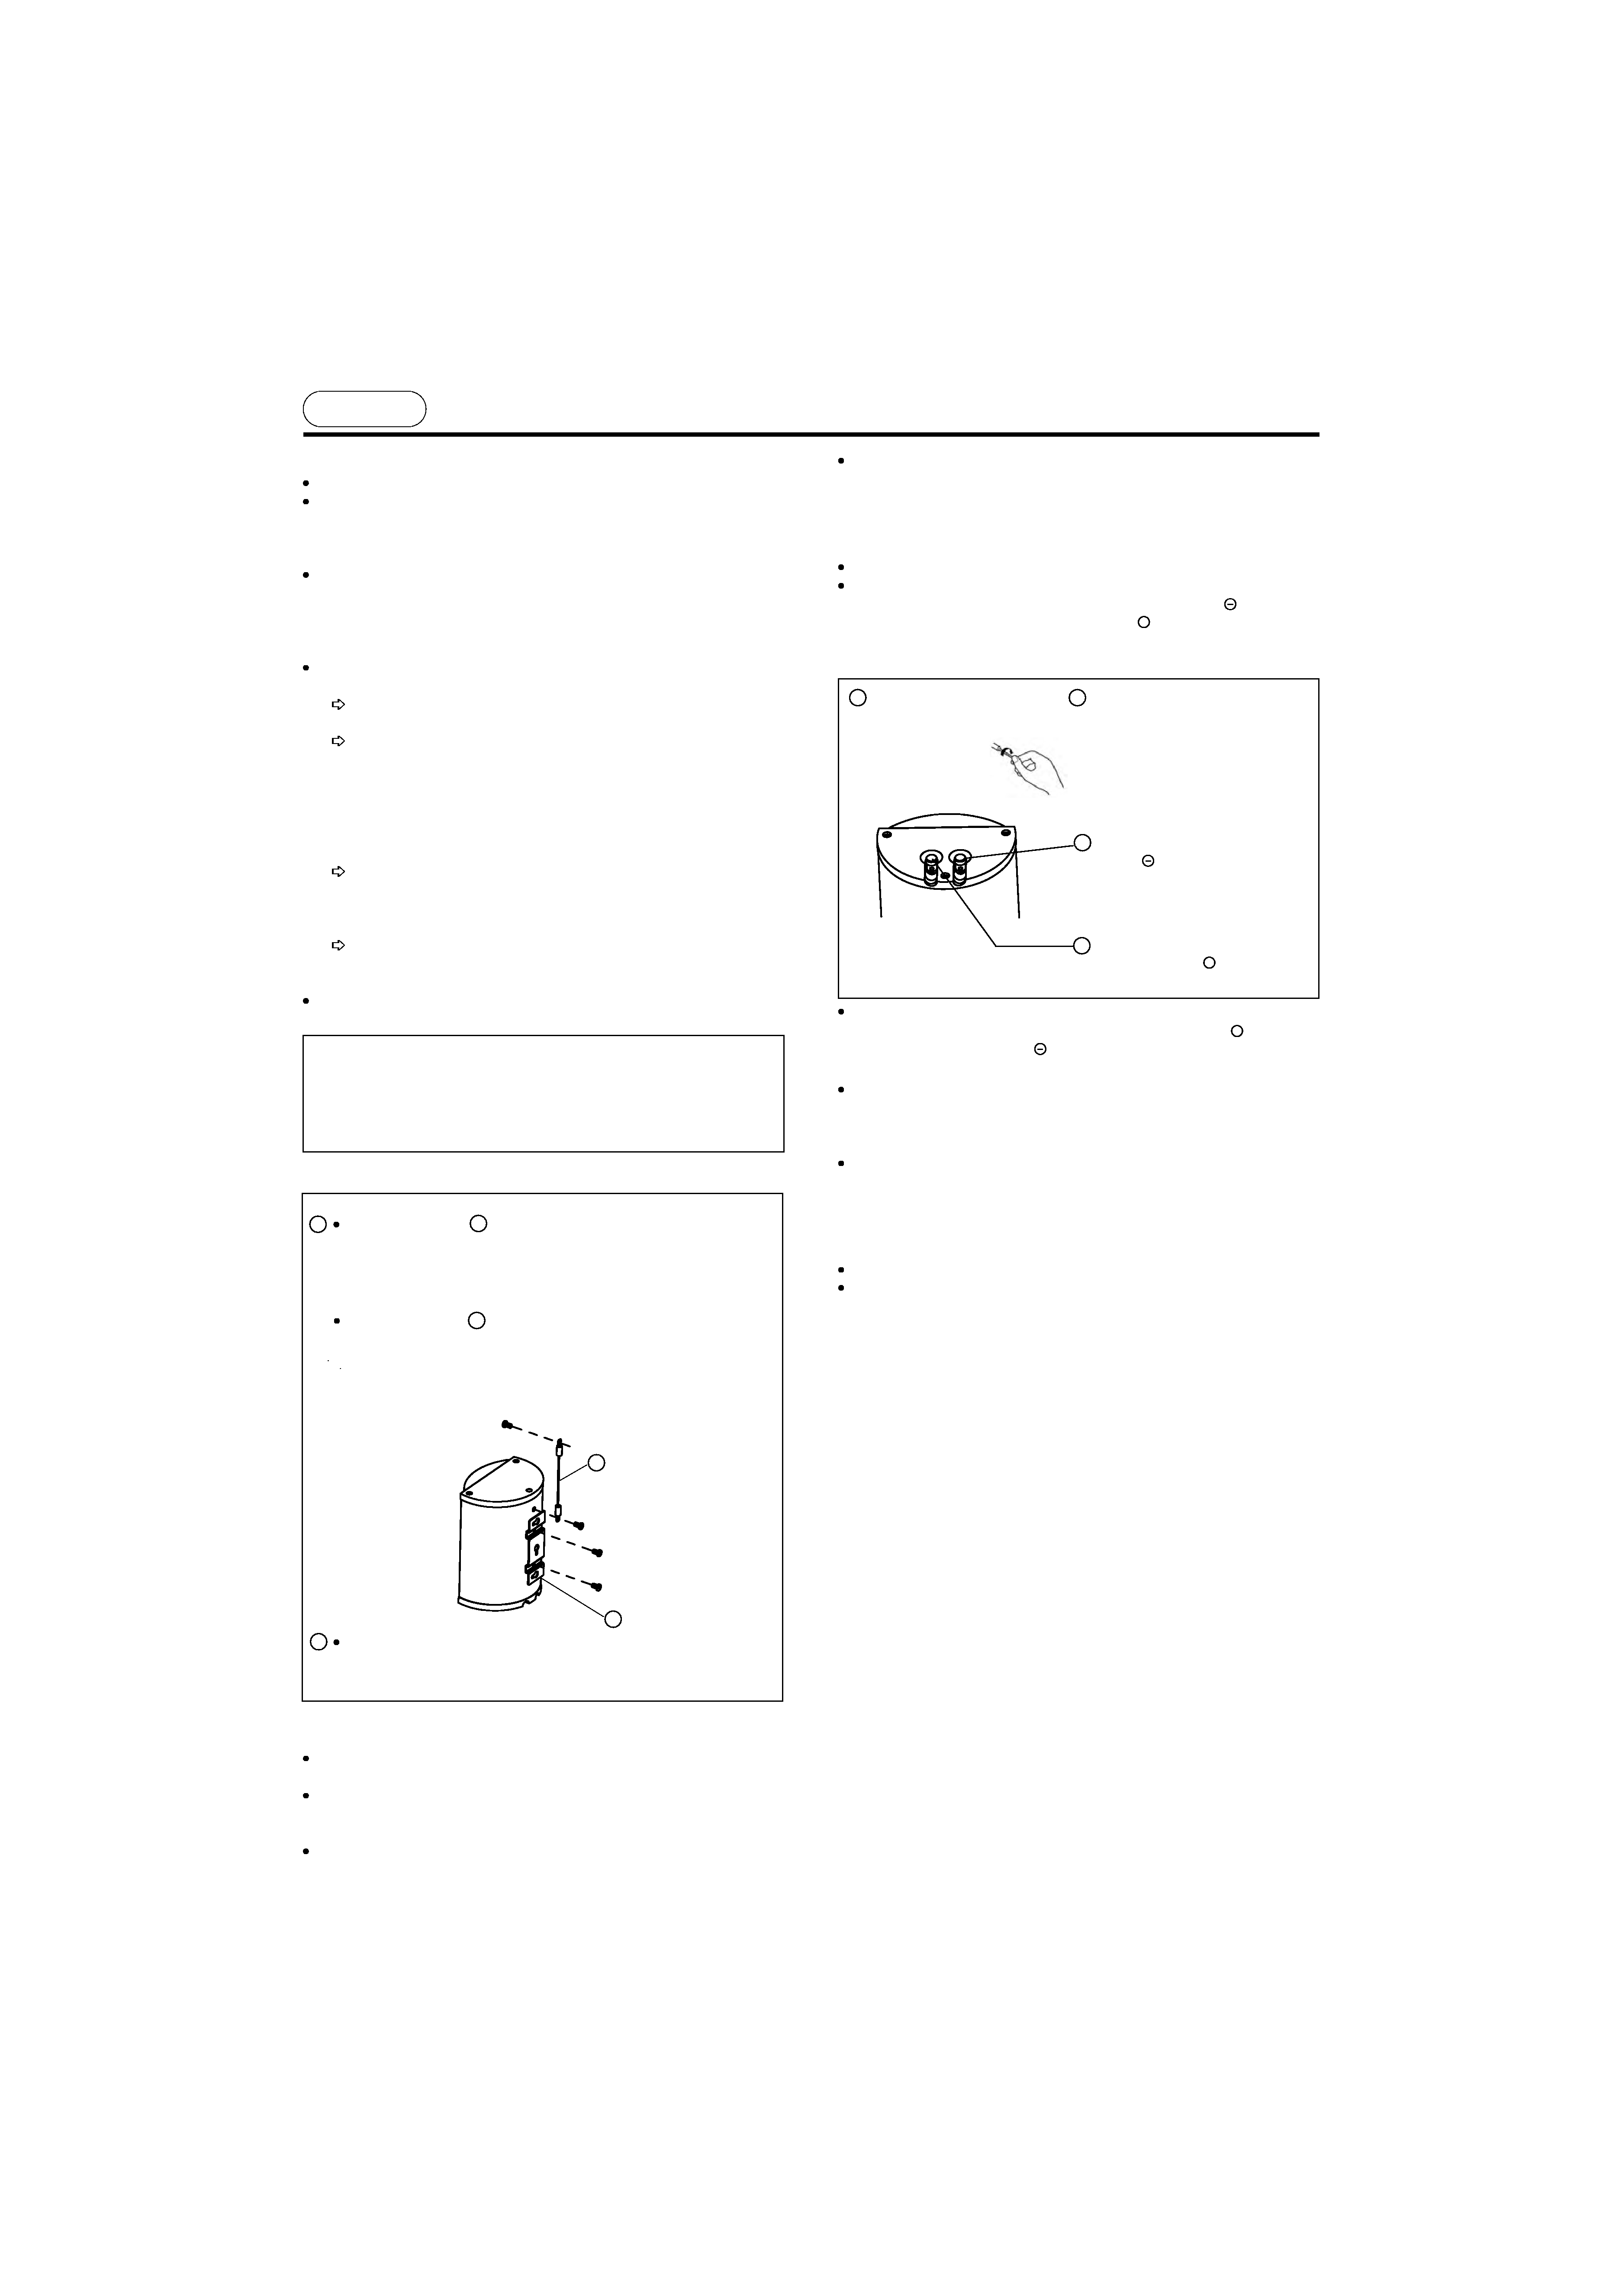
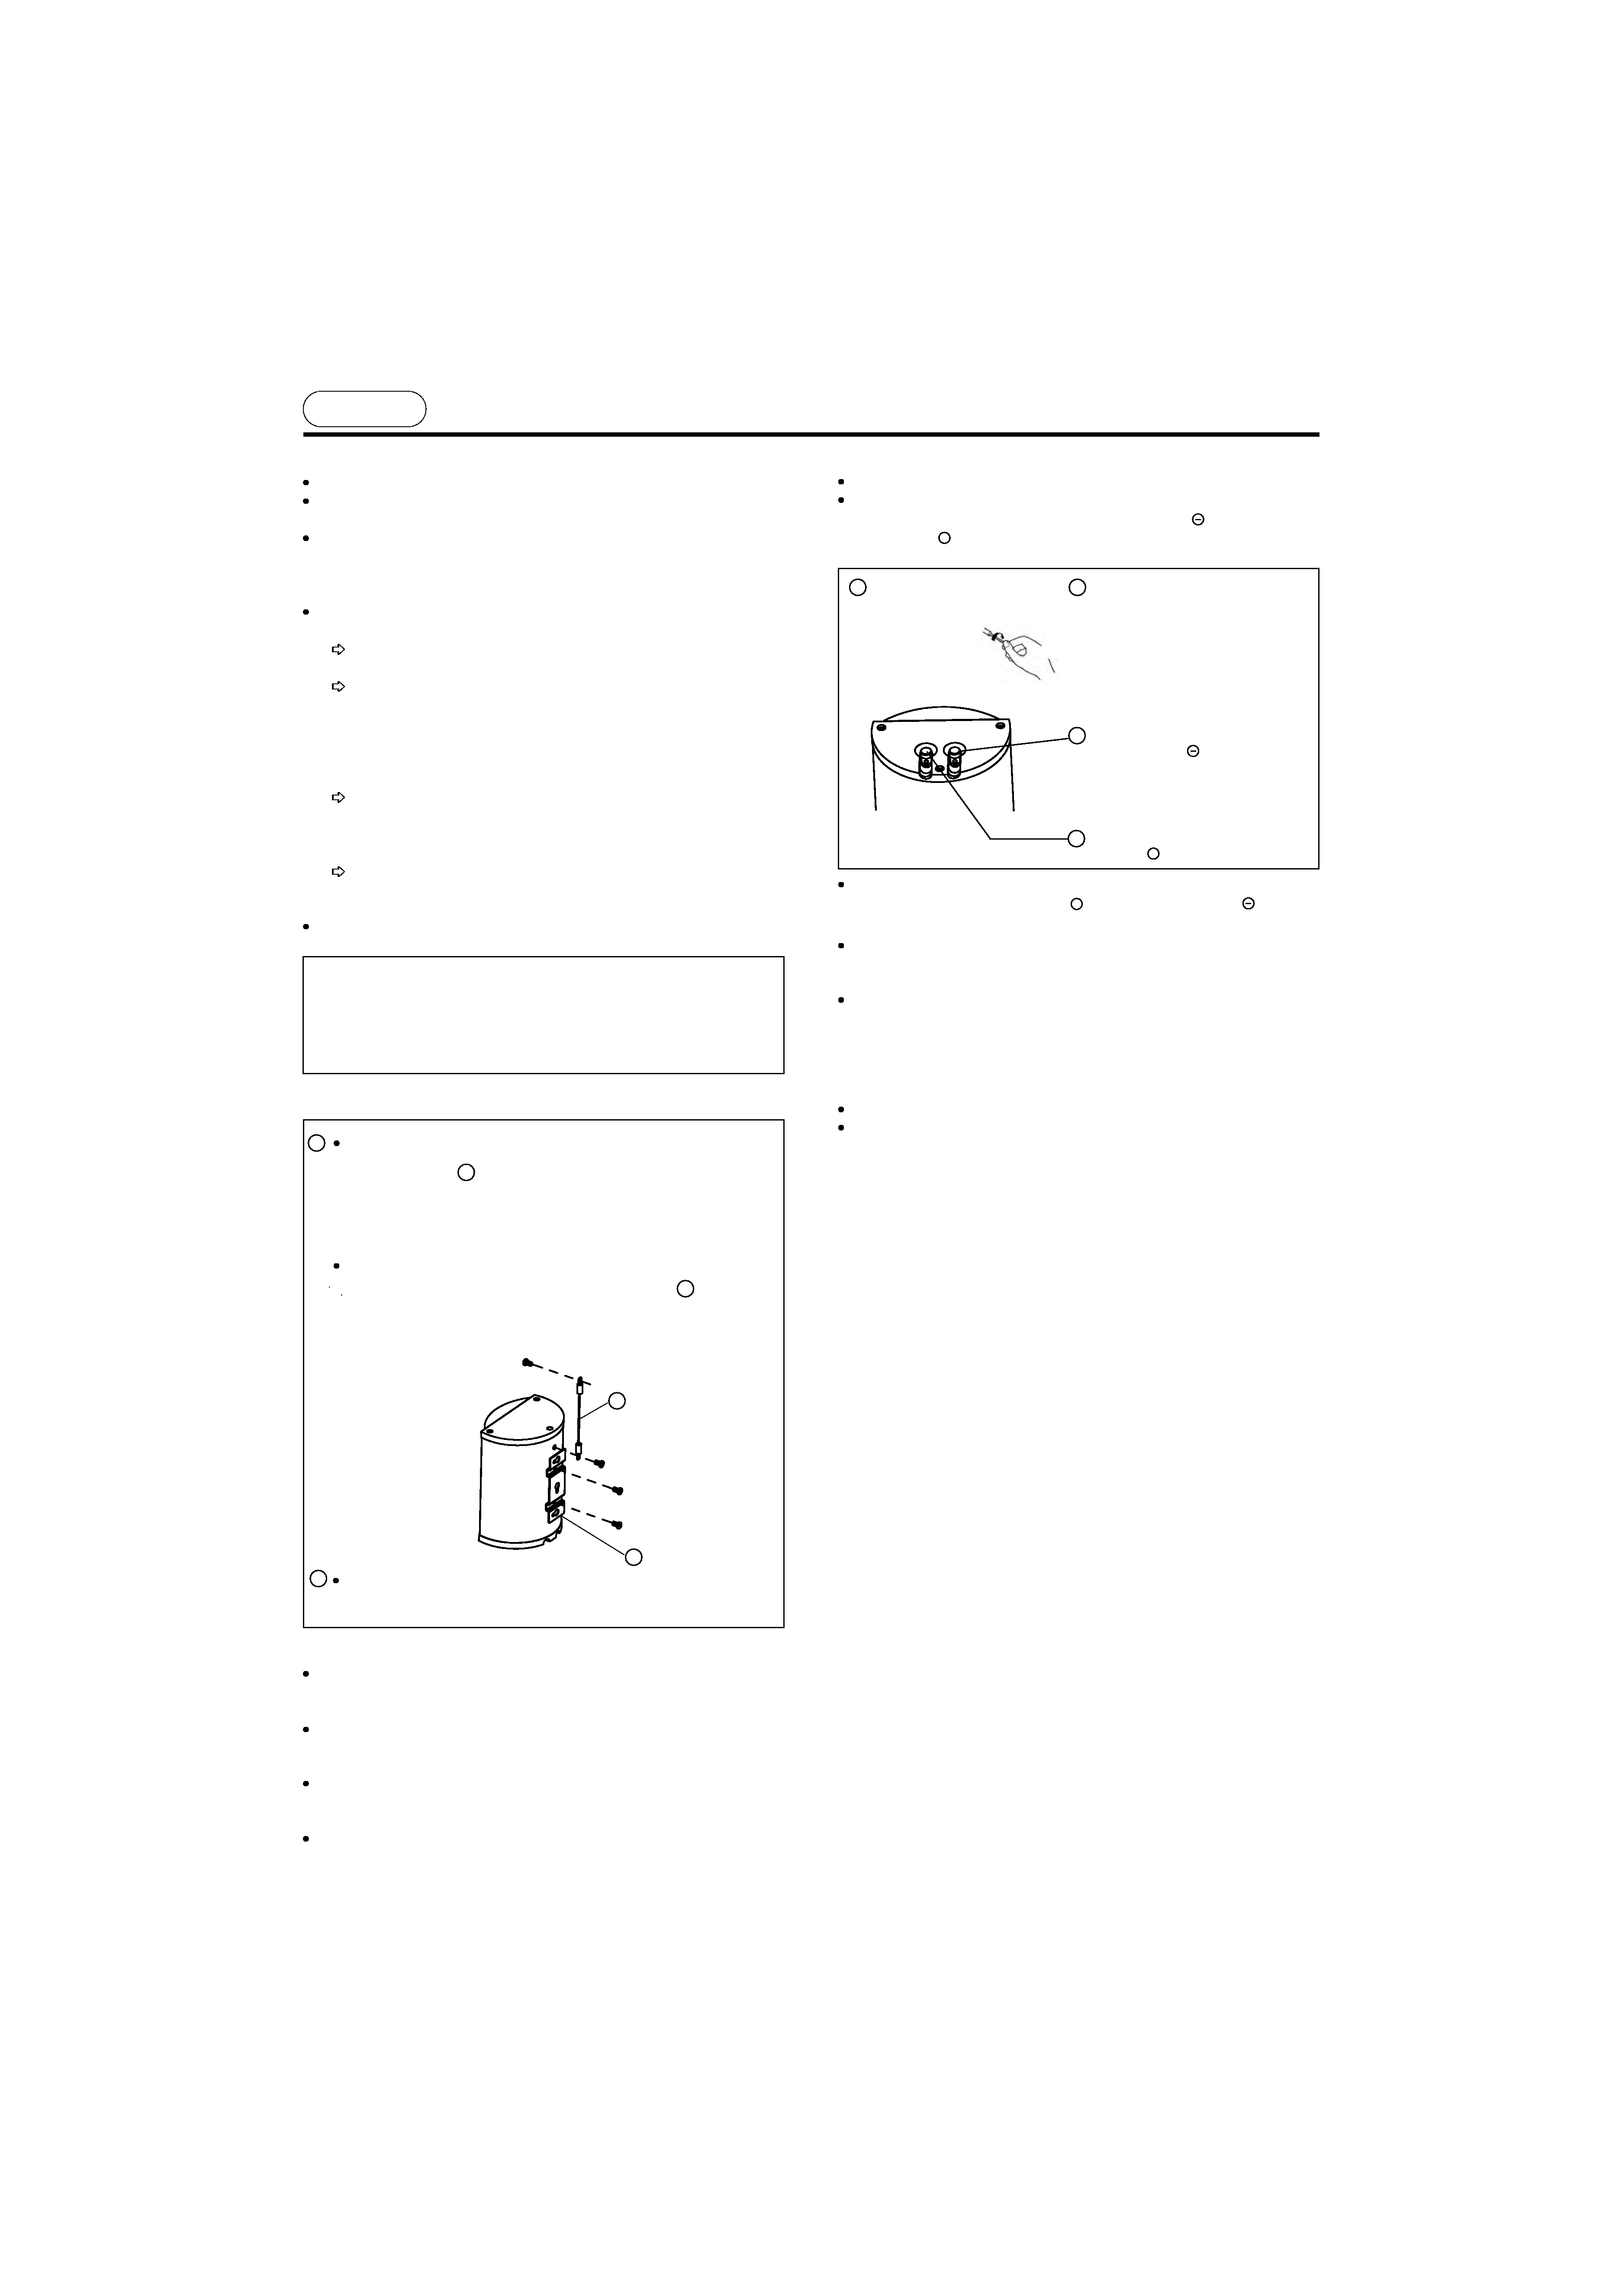
Couper l'alimentation de l'amplificateur (OFF).
Connecter les câbles aux bornes d'entrée à l'arrière des enceintes acoustiques:
Connecter le câble côté neutre à la borne
et celui côté sous tension à la borne
. Ne pas oublier que la borne d'entrée rouge a une polarité positive et que la
borne d'entrée noire a une polarité négative.
+
1 Retirer l'isolant à l'extrémité du
câble et vriller les brins.
2 Appuyer sur la borne d'entrée et insérer
l'extrémité du câble dans le trou, puis
relacher pour qu'elle revienne en position
initiale.
Connecter le câble de haut-parleur côté
neutre à la borne
.
Connecter le câble de haut-parleur côté
sous tension à la borne
.
Pièces et accessoires
Mode d'emploi ....................................................................................................... 1
Garantie ................................................................................................................ 1
Pièces de fixation murale....................................................................................... 2
Cables de sécurité .................................................................................................2
Coussins en mousse ............................................................................................ 8
REMARQUE : Caractéristiques et conception sont sujettes à modifications sans
préavis en vue d'amélioration.
CONSEILS ET PRECAUTIONS :
Pour une restitution sonore optimale des hautes fréquences, les haut-parleurs
d'aigus doivent se situer à hauteur des oreilles de l'auditeur.
Pour les basses fréquences, il est possible d'augmenter le niveau des graves
en positionnant les enceintes acoustiques près d'une paroi (l'augmentation
maximale étant obtenue pour une position dans un coin du local d'écoute).
Connecter les câbles aux bornes de sortie Haut-parleurs de l'amplificateur.
Connecter le câble côté sous-tension à la borne
et le câble côté neutre à la
borne
.
REMARQUES :
Vérifier que les câbles sont bien connectés aux bornes. Une connexion
incomplète peut non seulement entraîner une interruption ou une distorsion du
son, mais également un court-circuit et une panne de l'amplificateur.
Si les câbles d'une des enceintes acoustiques ont été branchés sans respecter
les polarités, vous constaterez à l'écoute d'un enregistrement stéréo que les
graves sont atténués et que l'image stéréo normalement située entre les deux
enceintes est inexistante.
+
+
FICHE TECHNIQUE
Enceinte ........................................................................ type satellite, close
Système ........................................................................... 2 voies, 2 haut-parleurs
Woofer .............................................................. Cône de 77 mm
Tweeter ............................................................ Dôme de 20 mm
Impédance nominale ...................................................................................... 8
Bande passante ..................................................................... 80 Hz à 20 000 Hz
Sensibilité .................................................................. 85 dB/W à 1 m de distance
Puissance maximale ................................................................................. 100 W
Dimensions............................................144 mm (L) x 190 mm (H) x 110 mm (P)
Poids .......................................................................................................... 2,1 kg
Haut-parleurs :
ENTRETIEN DU COFFRET
Utiliser un chiffon de polissage pour essuyer la poussière et la saleté.
Lorsque le coffret est très sale, essuyer avec un chiffon doux trempé dans un
détergent neutre dilué cinq à six fois avec de l'eau, puis essuyer de nouveau
avec un chiffon sec. Ne pas utiliser de diluant, benzine, bombe aérosol et autres
produits chimiques sur ou à proximité des coffrets car ils pourraient détériorer
leurs surfaces.
Ne pas installer ces enceintes acoustiques à proximité d'un four ou d'un
appareil de chauffage. Eviter également l'exposition à de forts rayons du soleil.
Ces températures élevées peuvent provoquer une déformation de la structure du
coffret et nuire au son.
Ces enceintes acoustiques sont lourdes et fragiles, il est donc dangereux de
les installer dans une position instable.
Publication de Pioneer Corporation.
© 2007 Pioneer Corporation.
Tous droits de reproduction et de traduction réservés.
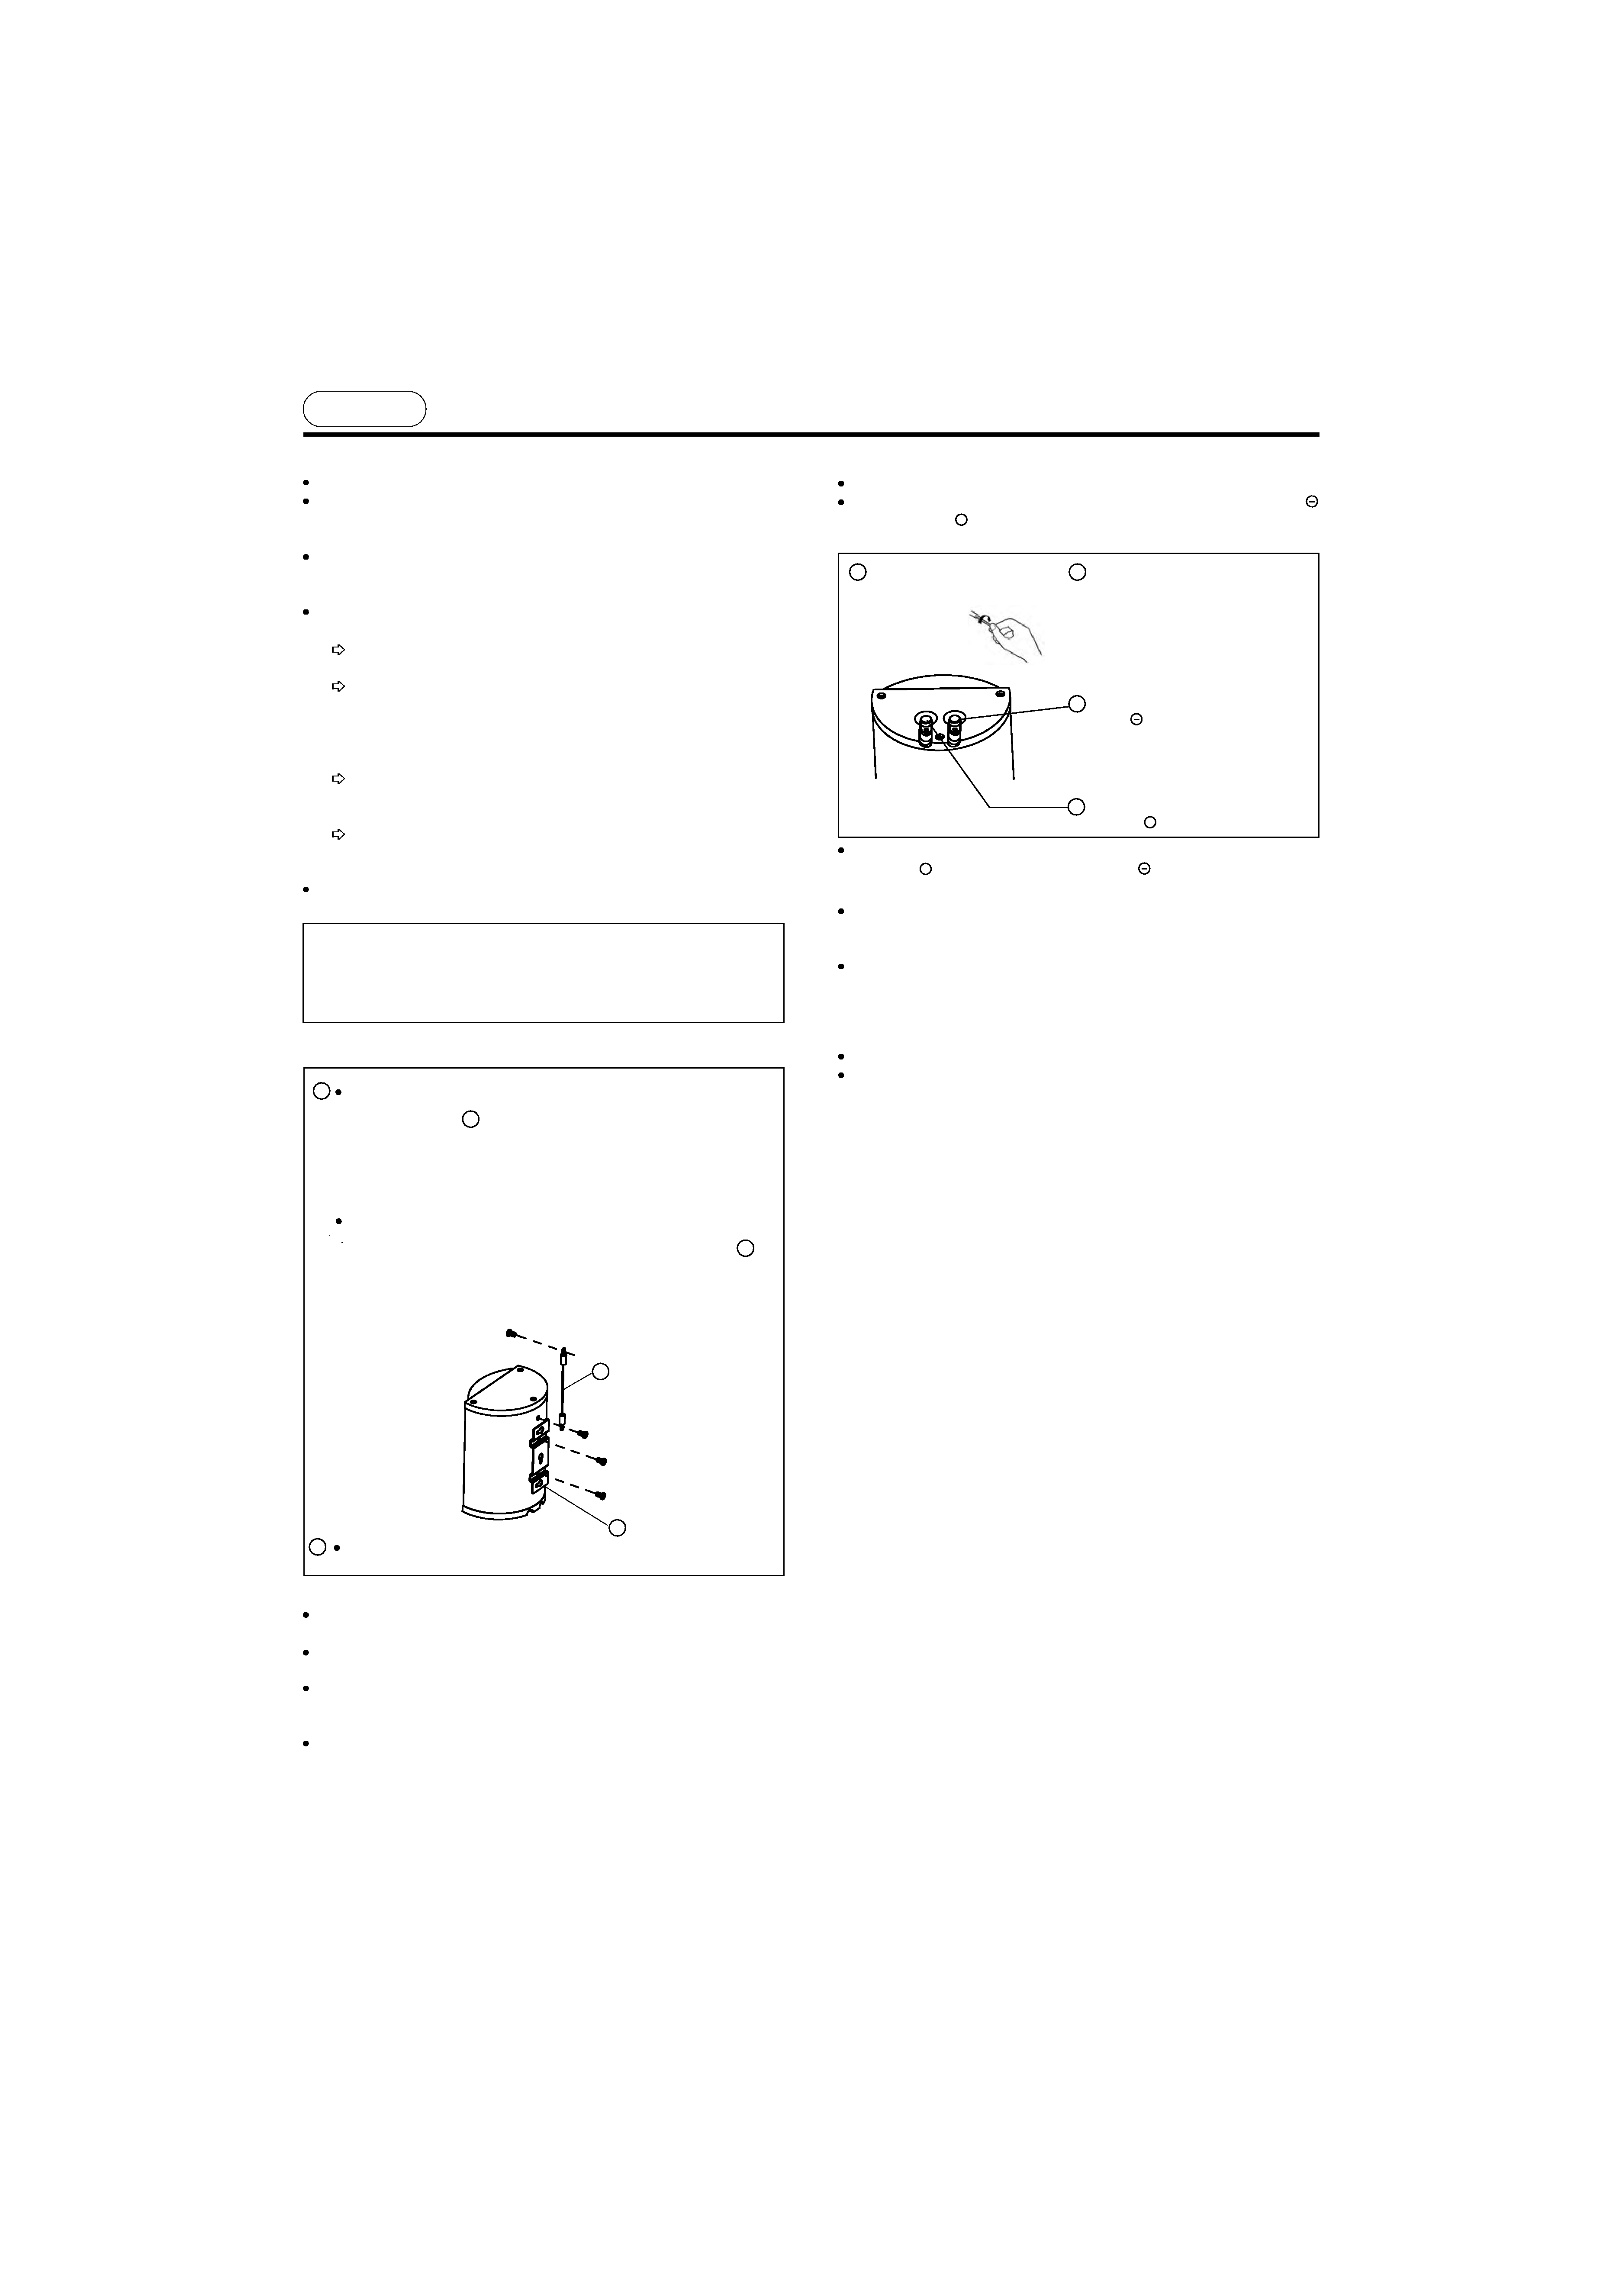
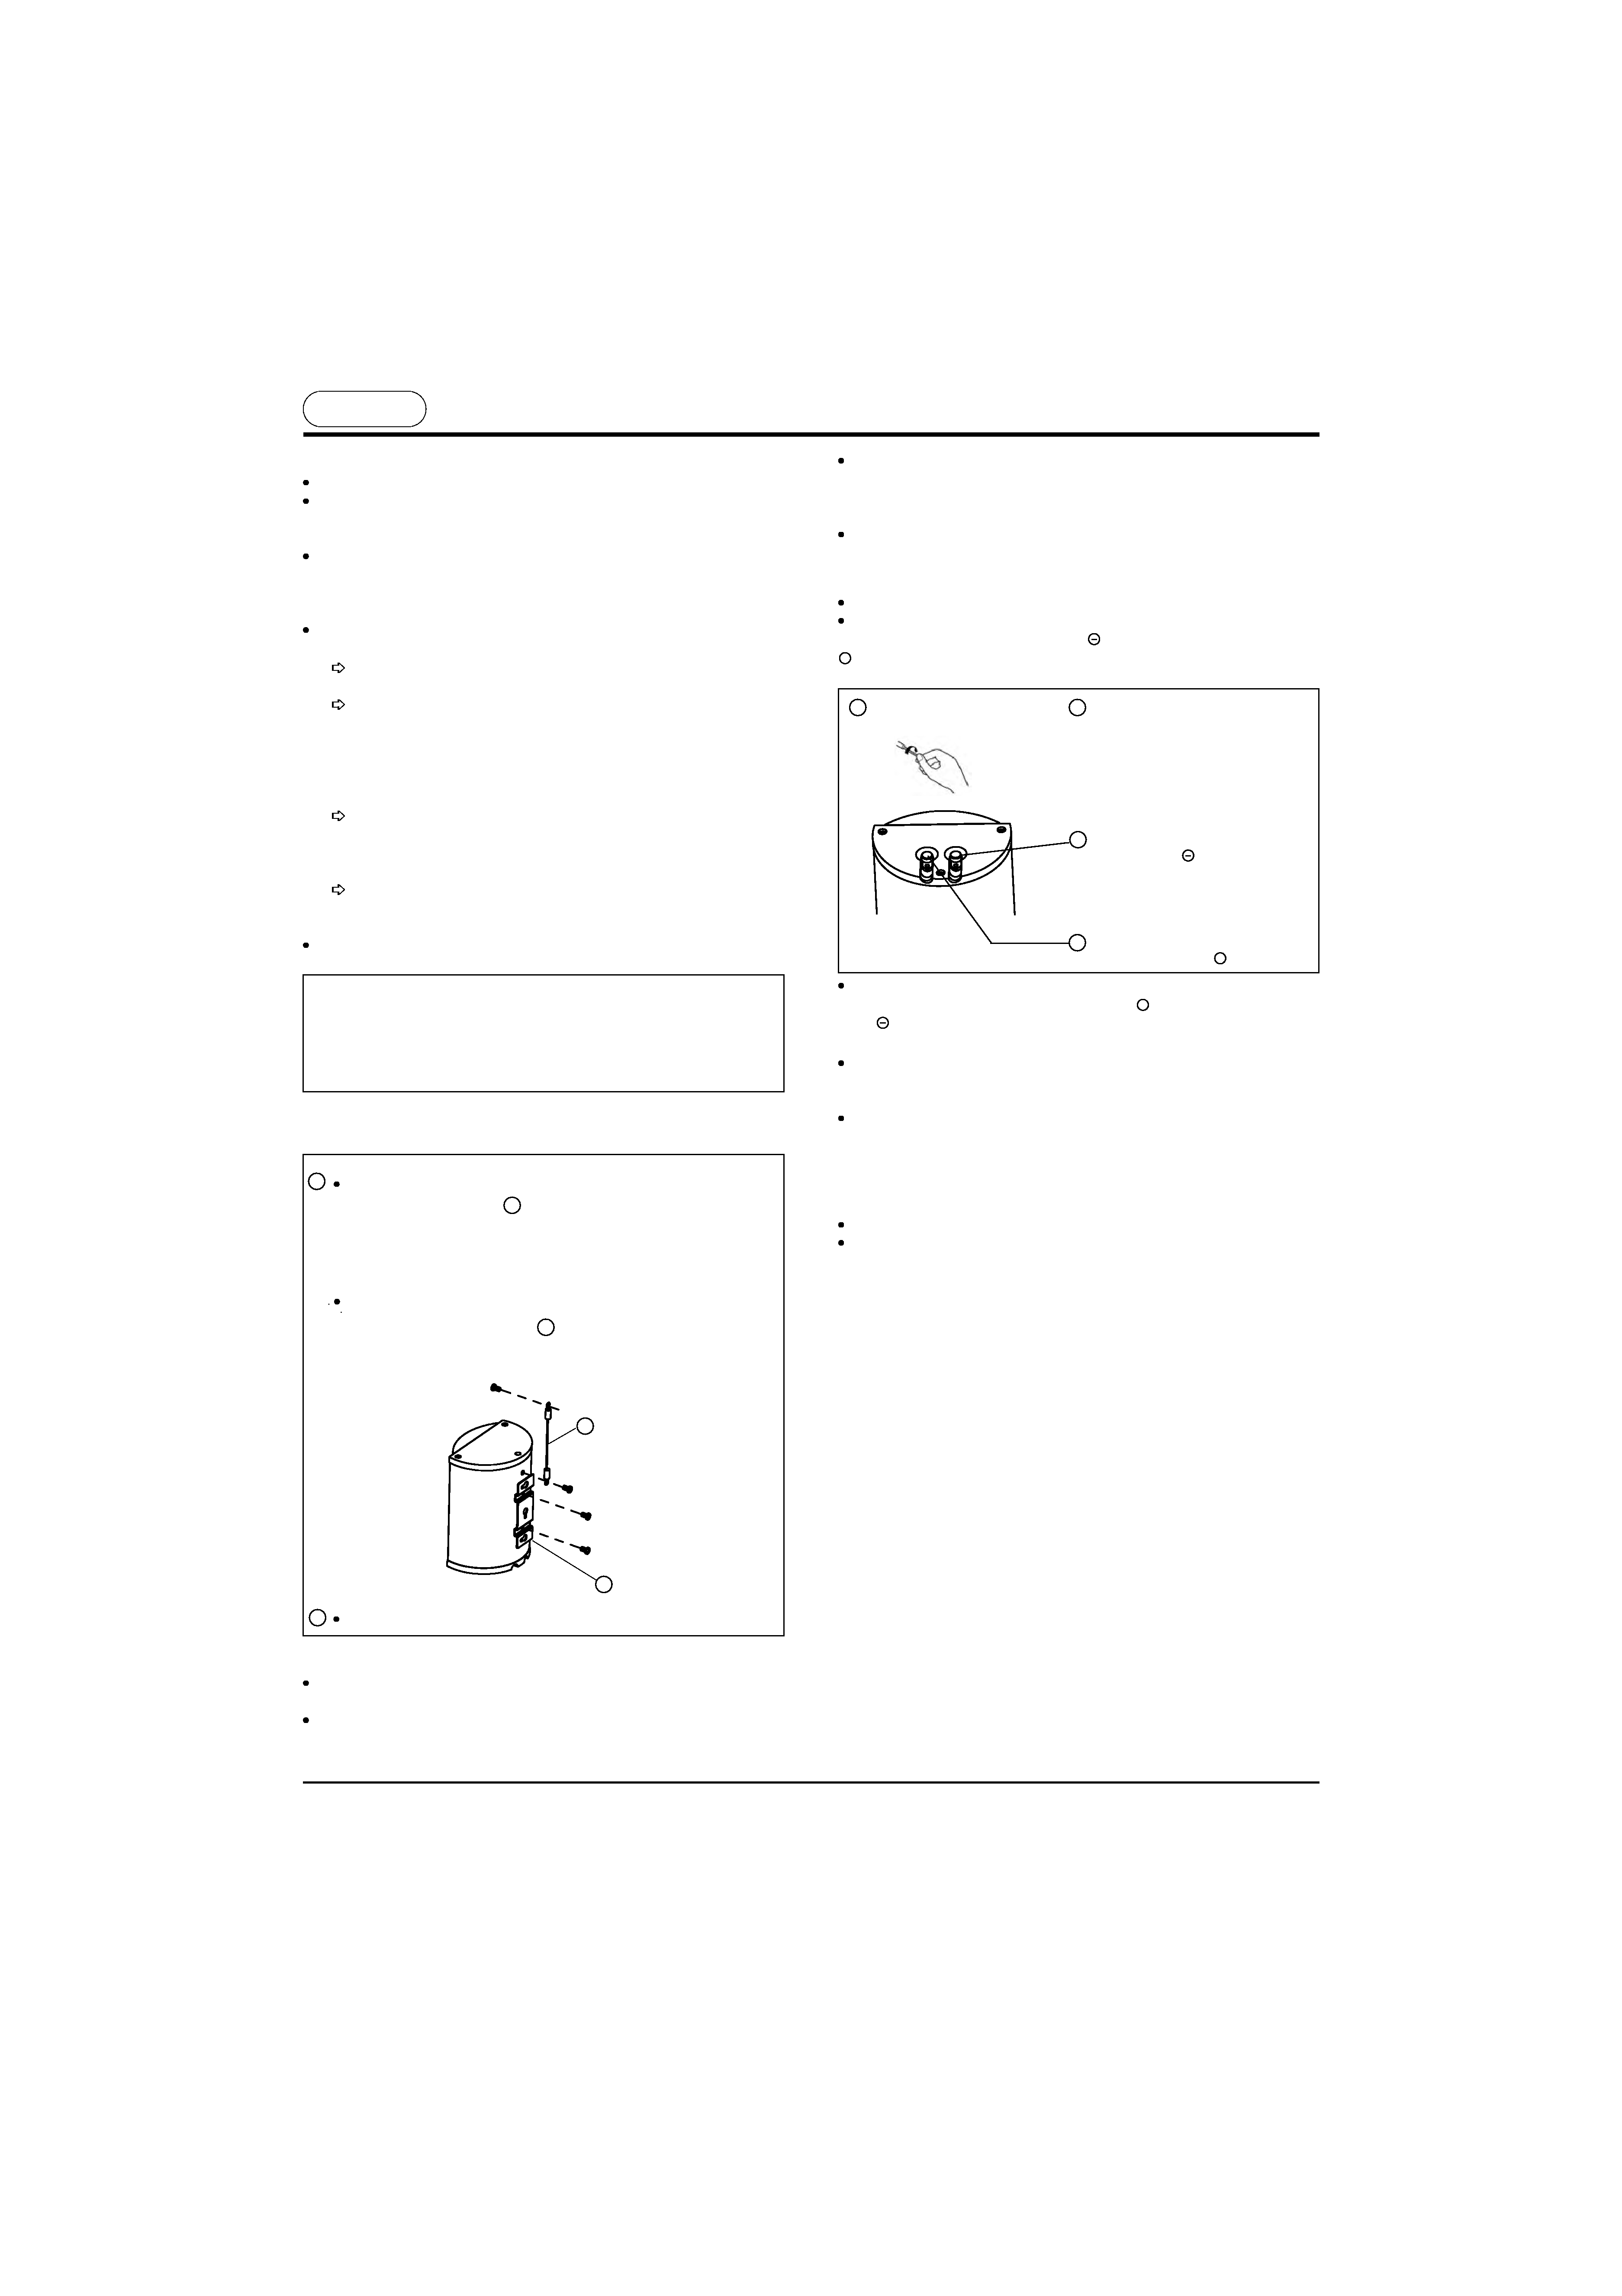
INSTALLATION
4 coussins en mousse (fournis) peuvent être collés sous l'enceinte acoustique.
A
Cette pièce de fixation murale
vous permettra d'installer vos enceintes sur
les murs de votre intérieur. Avant de visser cette pièce à l'arrière de votre
enceinte, assurez vous que les cables soient correctement connectés au bornier.
Les deux vis de maintient doivent être vissées dans les inserts prévus à cet effet
dans le coffre arrière de l'enceinte.
2 cables de sécurité + 1 sachet comprenant 2 vis.
2 pièces de fixation murale + 1 sachet comprenant 4 vis.
B
3
4
1
2
2
1
PIONEER CORPORATION 4-1, Meguro 1-Chome, Meguro-ku, Tokyo 153-8654, Japan / Japon
PIONEER ELECTRONICS (USA) INC. P.O. BOX 1540, Long Beach, California 90801-1540, U.S.A. / Etats-Unis. TEL: (800) 421-1404
PIONEER ELECTRONICS OF CANADA, INC. 300 Allstate Parkway, Markham, Ontario L3R 0P2, Canada TEL: 1-877-283-5901, 905-479-4411
PIONEER EUROPE NV Haven 1087, Keetberglaan 1, B-9120 Melsele, Belgium / Belgique TEL: 03/570.05.11
PIONEER ELECTRONICS AUSTRALIA PTY. LTD. 178-184 Boundary Road, Braeside, Victoria 3195, Australia / Australie, TEL: (03) 9586-6300
PIONEER ELECTRONICS DE MEXICO S.A. DE C.V. Blvd.Manuel Avila Camacho 138 10 piso Col.Lomas de Chapultepec, Mexico / Mexique, D.F. 11000 TEL: 55-9178-4270
S-F60_FRRD-186-B_8L.fm
Page 2
Tuesday, September 11, 2007
1:44 PM
background image
Deutsch
VOR GEBRAUCH
Vielen Dank, dass Sie dieses Produkt von PIONEER gekauft haben.
Lesen Sie bitte aufmerksam die Gebrauchsanweisung, bevor Sie diese
Akustikanlage benutzen, damit Sie wissen, wie sie ihre Leistungen optimieren
können. Bewahren Sie diese Gebrauchsanleitung nach der Lektüre sorgfältig an
einer Stelle auf, an der Sie sie im Bedarfsfall schnell wiederfinden.
Die Nenn-Impedanz (der nominale Scheinwiderstand) der Lautsprecher beträgt
8
. Sie müssen also an einen Verstärker angeschlossen werden, der diese
Belastung
veträgt
(die
vom Verstärker
akzeptierten
Mindest-
und
Höchstimpedanzen sind normalerweise an den Lautsprecherausgängen
angegeben: z.B. "4
bis 16 " oder "6
bis 16 ").
Um eine Beschädigung dieser Akustikgehäuse durch eine elektrische
Überbelastung zu verhindern, treffen Sie bitte folgende Vorsichtsmassnahmen :
Die Akustikgehäuse nicht mit einer höheren als der zulässigen
Eingangsleistung belasten (siehe Technische Angaben).
Jeder Anschluss, jeder Unter- oder Ausserspannungsetzung eines
Geräts der Audio-Anlage (CD-Laufwerk, Tuner usw.) darf nur erfolgen,
nachdem der Verstärker ausser Spannung gesetzt wurde oder nachdem
zumindest mit unterbrochenen Lautsprecherausgängen (wenn der
Verstärker dies ermöglicht). Andernfalls gelangen die durch diese
Manipulationen erzeugten Parasitengeräusche in die Akustikgehäuse und
können die Höhenlautsprecher beschädigen.
Bei
der Verstärkung
bestimmter
Frequenzen
mit
Hilfe
eines
Grafikentzerrers oder von Tiefen- und Höhenentzerrern darauf achten, die
Verstärkerlautstärke nicht zu hoch einzustellen, da die Überbelastung der
Akustikgehäuse schneller erreicht wird.
Einen Verstärker mit geringer Leistung nicht zur Erzeugung eines hohen
Klangniveaus zwingen, weil in diesem Fall die Harmonikverzerrung schnell
zunimmt, was gefährlich für die Höhenlautsprecher sein kann.
Vermeiden Sie das Berühren der Membranen und der Aufhängungen der
Lautsprecher, da diese zerbrechlich sind.
Die Lautsprecher dieser Akustikgehäuse sind magnetisch gepanzert. Es
kann jedoch eine Farbenunschärfe auftreten, wenn sich die Gehäuse zu
nah an einem Fernsehbildschirm befinden. In diesem Fall schalten Sie
die Stromzufuhr des Fernsehers ab und schalten sie nach 15 bis 30
Minuten wieder ein. Wenn das Problem weiterhin besteht, stellen Sie die
Akustikgehäuse weiter von dem Fernsehgerät entfernt auf.
ANSCHLÜSSE
Stromversorgung des Verstärkers abschalten (OFF).
Die Kabel an die Eingangsklemmen auf der Rückseite der Akustikgehäuse
anschliessen: Das Kabel auf der Nulleiterseite an die Klemme
anschliessen
und das auf der Spannungsseite an die Klemme
. Nicht vergessen, dass die
rote Eingangsklemme eine positive und die schwarze Eingangsklemme eine
negative Polarität hat.
+
1 Entfernen Sie die Isolierung von
den Enden der Adern und
verdrehen
Sie
die
Drähte
miteinander.
2 Drücken Sie den Eingangsklemme und
setcken Sie die Spitze der Ader in die
Öffnen. Geben Sie den Eingagsklemme
anschließend frei, so daß er in seine
ursprüngliche Position Zurückspringt.
Schließen Sie den Nulleiter an die
Klemme
an.
Schließen Sie die spannungsführende
Ader an die Klemme
an.
Zubehör
Bedienungsanleitung ............................................................................................. 1
Garantie ................................................................................................................. 1
Befestigungshalter................................................................................................. 2
Befestigungsseiler ................................................................................................ 2
Schaumstoffkissen ................................................................................................ 8
ANMERKUNG: Technische Eigenschaften und Konzeption können zwecks
Verbesserung ohne Vorankündigung verändert werden.
RAT UND VORSICHTSMASSNAHMEN :
Für eine optimale Klangwiedergabe hoher Frequenzen müssen sich die
Höhenlautsprecher in Ohrhöhe des Hörers befinden.
Für die niedrigen Frequenzen ist es möglich, das Tiefenniveau zu erhöhen,
indem man die Akustikgehäuse nahe einer Wand aufstellt (die maximale
Erhöhung erzielt man mit einer Position in einer Ecke des Raums).
Die
Kabel
an
die
Lautsprecher-Ausgangsklemmen
des Verstärkers
anschliessen. Das Kabel auf der Spannungsseite an die Klemme
und das auf
der Nulleiterseite an die Klemme
anschliessen.
ANMERKUNGEN :
Sicherstellen, dass die Kabel gut an die Klemmen angeschlossen sind. Eine
unvollständige Verbindung kann nicht nur zu einer Unterbrechung oder
Verzerrung des Klangs führen, sondern auch zu einem Kurzschluss und einem
Ausfall des Verstärkers.
Wenn die Kabel eines der Akustikgehäuse ohne Beachtung der Polaritäten
angeschlossen wurden, werden Sie beim Hören einer Stereoaufnahme
feststellen, dass die Tiefen verstärkt sind und dass das Stereobild, das
normalerweise zwischen den beiden Gehäusen liegt, nicht vorhanden ist.
+
+
TECHNISCHE ANGABEN
Akustikgehäuse ................................................................ Regaltyp, geschlossen
System .......................................................................... 2 Kanäle, 2 Lautsprecher
Woofer ................................................................... Kegel, 77 mm
Tweeter ................................................................ Kuppel 20 mm
Nennimpedanz ............................................................................................... 8
Durchmassbereich ............................................................... 80 Hz bis 20 000 Hz
Empfindlichkeit ...........................................................85 dB/W in 1 m Entfernung
Max. Leistung ............................................................................................ 100 W
Aussenabmessungen.......................... 144 mm (B) x 190 mm (H) x 110 mm (T)
Gewicht ......................................................................................................... 2,1 kg
Lautsprecher :
PFLEGE DES GEHÄUSES
Entfernen Sie mit einem Staublappen Staub und Schmutz.
Wenn das Gehäuse sehr verschmutzt ist, reinigen Sie es mit einem weichen
Lappen, den Sie in ein neutrales Reinigungsmittel tauchen, das mit fünf bis
sechs Teilen Wasser verdünnt ist. Dann mit einem trockenen Lappen
nachwischen. Kein Verdünnungsmittel, Benzin, Spray oder anderes chemisches
Mittel für die Gehäuse oder in deren Nähe verwenden, da dadurch die
Oberflächen beschädigt werden könnten.
Stellen Sie die Akustikgehäuse nicht in der Nähe eines Ofens oder eines
Heizgeräts auf. Vermeiden Sie auch die Möglichkeit einer zu starken
Sonnenbestrahlung. Hohe Temperaturen können eine Verformung der
Gehäusestruktur verursachen und den Klang beeinträchtigen.
Herausgeber: Pioneer Corporation.
© 2007 Pioneer Corporation.
Alle Rechte der Reproduzierung und Übersetzung vorbehalten.
Diese Akustikgehäuse sind schwer und zerbrechlich, weshalb es gefährlich ist,
sie in einer unstabilen Position aufzustellen.
INSTALLIERUNG
4 Schaumstoffkissen, die auf der Unterseite des Lautsprechersystems zu
befestigen sind.
Dieser Befestigungshalter ermöglich eine Wandmontage. Bevor Sie den Halter
montieren, stellen Sie sicher, dass das Lautsprecherkabel in Terminal
angeschlossen ist. Die beiden Shrauben werden in die dafür vorgesehen
Borhungen gedreht.
Für maximale Sicherheit benutzen Sie bitte die beigelegten Befestigungsseiler.
Mit den Schrauben werden die Lautsprecher mit den vorgesehen Bohrungen am
Halter befestigt. Die Schrauben für die Wandbefestigung müssen separat
bezogen werden. Bitte wählen Sie die Schrauben für die Wandbefestigung mit
einer ausreichenden Länge.
2 Befestigungsseiler
und 2 Schrauben.
2 Befestigungshalter
und 4 Schrauben.
3
4
1
2
A
1
2
B
S-F60_FRRD-186-B_8L.fm
Page 3
Tuesday, September 11, 2007
1:44 PM
background image
För bästa resultat, använd av Pioneer rekommenderade kablar
.
Skruven som håller fast högtalarsysternet skall fästas i den avsedda
monteringsplattan på kabinettet. Väggskruvar köpes separat. Se still att
skruvarna är tillräckligt långa och är väggmaterialet för att ge maximal
hållfasthet.
Svenska
FÖRE ANVÄNDNING
Tack för att du valt en produkt från PIONEER.
Läs bruksanvisningen noggrant innan du använder dessa högtalarlådor, så att
du vet hur du skall optimera prestandan. När du läst bruksanvisningen bör du
förvara den så att du enkelt kan ta fram den vid behov.
Den nominella impedansen för dessa högtalarlådor är 8 . De skall anslutas till
en förstärkare som har denna typ av utgång (impedansområdet anges i normala
fall nära högtalarutgångarna: exempelvis "4
till 16 " eller "6
till 16 ").
För att högtalarlådorna inte skall skadas på grund av elektrisk överbelastning,
skall följande försiktighetsåtgärder vidtas :
Högtalarna får inte drivas med högre effekt än den maximalt tillåtna (se
de tekniska specifikationerna).
Alla inkopplingar eller till-/frånslag av apparater i ljudanläggningen
CD-läsare, radio etc.) skall göras efter att förstärkaren stängts av eller
åtminstone med högtalarutgångarna frånkopplade (om förstärkaren har den
funktionen). I annat fall uppstår störningsljud som förstärks och matas till
högtalarlådorna, vilket kan skada diskanthögtalarna.
Om vissa frekvenser förstärks med hjälp av en grafisk equalizer eller bas-
och diskantinställningen, får förstärkarvolymen inte ökas alltför mycket
eftersom högtalarnas belastningsgräns uppnås snabbare.
Lågeffektsförstärkare får inte användas för att skapa höga ljudnivåer,
eftersom den harmoniska distorsionen ökar snabbt, vilket kan skada
diskanthögtalarna.
Undvik att röra vid högtalarnas membran och upphängningar, eftersom de är
ömtåliga.
Högtalarna i dessa lådor är magnetiskt avskärmade. Missfärgade
fläckar kan ändå uppstå på TV-apparater som står alltför nära
högtalarlådorna. Om detta skulle inträffa kan du stänga av TV:n med
huvudströmbrytaren och sedan starta den igen efter 15 till 30 minuter.
Om problemet kvarstår måste högtalarlådorna flyttas bort från TV : n.
ANSLUTNINGAR
Stäng av förstärkarens strömförsörjning (OFF).
Anslut kablarna till uttagen baktill på högtalarlådorna. Koppla minuskabeln till
och pluskabeln till
. Kom ihåg att det röda uttaget är pluspolen och att det
svarta uttaget är minuspolen.
+
1 Skala av isoleringsremsan i
spetsen och twinna trådarna.
2 Tryck ned kontaktspaken och för in
spetsen på ledningen i hålet. Släpp
sedan spaken så att den återgår till
ursprunglig position.
Anslut
samlingshögtalarledningen
till
uttaget
.
Anslut den strömförande högtalarledningen
till uttaget
.
Tillhörande delar
Bruksanvisning ..................................................................................................... 1
Garanti .................................................................................................................. 1
Monteringspaneler.................................................................................................. 2
Kablar...................................................................................................................... 2
Skumfötter.............................................................................................................. 8
ANMÄRKNING : Specifikationer och konstruktion kan utan föregående
meddelande förändras i syfte att förbättra produkten.
RÅD OCH FÖRSIKTIGHETSÅTGÄRDER :
För optimal återgivning av höga frekvenser skall diskanthögtalarna befinna sig i
höjd med lyssnarens öron.
Basfrekvensernas styrka kan ökas genom att högtalarlådorna placeras nära en
vägg (maximal ökning erhålls i ett hörn av lokalen).
Anslut kablarna till högtalarutgångarna på förstärkaren. Koppla pluskabeln till
uttaget märkt
och minuskabeln till uttaget märkt
.
ANMÄRKNINGAR :
Kontrollera att kablarna är korrekt anslutna till uttagen. En ofullständig
inkoppling kan förutom ljudavbrott och distorsion ge upphov till kortslutning och
fel på förstärkaren.
Om kablarna till en av högtalarlådorna kopplas in med fel polaritet, kan du när
du lyssnar på en stereoinspelning höra att bastonerna är dämpade och att
stereobilden som normalt finns i en punkt mellan högtalarna, i stället är obefintlig.
+
+
TEKNISKA SPECIFIKATIONER
Låda ...............................................................................................av hylltyp, sluten
System .................................................................................... 2 vags, 2 högtalare
Woofer ............................................................... baskoner på 77 mm
Tweeter ......................................................... kupoldiskant på 20 mm
Nominell impedans ........................................................................................ 8
Frekvensområde .................................................................. 80 Hz till 20 000 Hz
Känslighet ..................................................................... 85 dB/W på 1 m avstånd
Maximal ineffekt ........................................................................................ 100 W
Yttermått .............................................. 144 mm (B) x 190 mm (H) x 110 mm (D)
Vikt ............................................................................................................... 2,1 kg
Högtalare :
UNDERHÅLL AV LÅDA
Använd en polertrasa för att torka bort damm och smuts.
Om lådan är mycket smutsig kan du använda en mjuk trasa tillsammans med
ett neutralt rengöringsmedel, som späds ut med fem eller sex delar vatten.
Därefter torkar du på nytt med en torr trasa. Lösningsmedel, bensin,
rengöringsmedel på sprayflaska och andra kemiska produkter får inte användas
på eller nära lådorna eftersom ytorna kan förstöras.
Utgivet av Pioneer Corporation.
© 2007 Pioneer Corporation.
Alla rättigheter till återgivning och översättning förbehålls.
Högtalarlådorna får inte placeras nära en ugn eller ett värmeelement. Undvik
också exponering för starkt solsken. Dessa höga temperaturer kan medföra en
deformation av lådans konstruktion som ger sämre ljudkvalitet.
Eftersom högtalarlådorna är tunga och känsliga är det farligt att placera dem på
ostabila underlag.
2
INSTALLATIONEN
3
4
1
2
2 monteringspaneler + 1 plaspåse med 4 skruvar.
Monteringspaneler
gör att du kan fästa högtalarsysternet på
innerväggarna. Innan monteringspanelen skruvas fast på du se till att
kablarna är riktigt anslutna till ingångskontakten. De två skruvar som
håller högtalarsysternet måste fästas i högtalarsysternets speciella
insatsstruktur.
2 kablar + 1 plaspåse med 2 skruvar.
1
A
B
4 skumfötter som klistras på undersidan av högtalarsystemet.
S-F60_FRRD-186-B_8L.fm
Page 4
Tuesday, September 11, 2007
1:44 PM
background image
Para una mayor seguridad, por favor utilice los cables Pioneer
. El tornillo
que sujeta el altavoz debe de ser fijado en el lugar indicado de la carcasa. Los
tornillos de pared no estàn incluidos. Asegùrese de usar los tornillos apropiados
para pared, siendo estos los suficientemente largos para proporcionar una mayor
resistencia.
Español
Los altavoces de esta caja acústica tienen un blindaje magnético, pero
siempre hay un riesgo de perturbación de los colores de un televisor
cuando se encuentran demasiado cerca. En este caso, desconectar el
televisor y esperar entre 15 y 30 minutos para conectarlo nuevamente.
Si el problema se repite, aumentar la distancia entre la caja de
altavoces y el televisor.
OBSERVACIONES GENERALES
PIONEER aprecia su confianza en este producto.
Lea atentamente las instrucciones para utilizar idealmente las características
de sus altavoces, y consérvelas entre sus documentos de referencia.
Los altavoces tienen una impedancia nominal de 8
. Compruebe si su
amplificador acepta esta carga (los valores mínimo y máximo de impedancia
están indicados generalmente junto a los conectores para altavoces: por
ejemplo, "4
a 16 " o "6
a 16 ").
Precauciones para evitar el riesgo de dañar los altavoces con una potencia
eléctrica excesiva:
Limitarse al valor máximo de potencia autorizado para los altavoces
(véase la ficha de características técnicas).
Antes de enchufar, conectar o desconectar la corriente de uno de los
elementos del equipo (lector de CD, sintonizador...), desconecte la
alimentación del amplificador o corte los conectores de altavoces (posible
en algunos amplificadores). Así evitará la transmisión de ruidos parásitos
producidos por estas manipulaciones a los altavoces, que podrían dañar los
difusores de agudos.
Si utiliza un ecualizador gráfico o correctores de graves y agudos para
reforzar determinadas frecuencias, tenga cuidado de no subir demasiado el
volumen del amplificador. En estos casos alcanzará más pronto el umbral
de carga máxima de los altavoces.
No debe forzar un amplificador de baja potencia a producir altos niveles
sonoros. La distorsión armónica aumentaría rápidamente y podría de dañar
los difusores de agudos.
Las membranas y las suspensiones de los altavoces son delicadas. Evite
tocarlas.
CONEXIONES
Desconectar el amplificador (OFF).
Conectar los cables a los bornes de entrada, en la parte posterior de la caja de
altavoces: Conectar el conductor neutro del cable al borne
y el conductor con
tensión al borne
. Es importante tener en cuenta que el borne de entrada rojo
tiene polaridad positiva, y el borne de entrada negro polaridad negativa.
+
1 Quite la aislación en el extremo
del cable y tuerza los alambres
conductores.
2 Presione la palanca del terminal de
entrada, e inserte la punta del cable en el
orificio, y luego suelte la palanca de
modo que vuelva hacia atrás en posicion.
CARACTERÍSTICAS TÉCNICAS
Caja de altavoces .................................................................. de estanteria, close
Systema .................................................................................. 2 vías, 2 altavoces
Woofer .............................................................. Tipo cono de 77 mm
Tweeter ................................................................. Cúpula de 20 mm
Impedancia nominal .................................................................................... 8
Banda pasante ...................................................................... 80 Hz a 20 000 Hz
Sensibilidad ............................................................... 85 dB/W a 1 m de distancia
Máxima potencia ....................................................................................... 100 W
Dimensiones ..................................144 mm (La) x 190 mm (Al) x 110 mm (An)
Peso ........................................................................................................... 2,1 kg
Altavoces :
Accesorios
Guía de operación ................................................................................................ 1
Garantía ................................................................................................................ 1
Paneles de montaje................................................................................................ 2
Cablos de seguridad.............................................................................................. 2
Almohadillas de espuma........................................................................................ 8
OBSERVACIÓN : Nos reservamos el derecho de modificar las características y
el diseño sin previo aviso para mejorar el producto.
OBSERVACIONES :
Comprobar si los cables están correctamente conectados a los bornes. Un
error de conexión puede provocar la interrupción o la deformación del sonido, o
provocar un cortocircuito que puede dañar el amplificador.
En caso de conexión de los cables de los altavoces con la polaridad
incorrecta, los tonos graves se escuchan atenuados en la reproducción de una
grabación estéreo, y se pierde la imagen estéreo que se sitúa, normalmente,
entre las dos cajas de altavoces.
Conecte el cable de altavoz del lado
común al terminal
.
Conecte el cable de altavoz del lado vivo
al terminal
.
+
Conectar los cables a los bornes de salida "Altavoces" del amplificador.
Conectar el cable con tensión al borne
y el cable neutro al borne
.
+
LIMPIEZA DE LA CAJA DE ALTAVOCES
Eliminar el polvo y la suciedad de la caja de altavoces con un paño suave.
En caso de conexión de los cables de los altavoces con la polaridad
incorrecta, los tonos graves se escuchan atenuados en la reproducción de una
grabación estéreo, y se pierde la imagen estéreo que se sitúa, normalmente,
entre las dos cajas de altavoces.
Publicación de Pioneer Corporation.
© 2007 Pioneer Corporation.
Reservados todos los derechos de reproducción y de traducción.
CONSEJOS Y PRECAUCIONES:
Para obtener la mejor reproducción sonora posible de las altas frecuencias es
importante colocar los altavoces de agudos al nivel de los oídos de la persona
que escucha.
Para las bajas frecuencias, el nivel de graves puede elevarse colocando la caja
de altavoces cerca de una pared (la máxima diferencia se obtiene instalando los
altavoces en una de las esquinas del cuarto donde escucha).
No debe instalar los altavoces cerca de un horno ni de aparatos de calefacción.
Evitar también la exposición a una fuerte radiación solar. Una temperatura
excesiva puede deformar la estructura de la caja y afectar la calidad del sonido.
No es prudente instalar estas cajas de altavoces, que son pesadas y delicadas,
en un posición inestable.
A
2
INSTALACIÓN
3
4
1
2
B
2 paneles de montaje + 1 bolsa con 4 tornillos.
El panel de montaje
servira para instalr la pantalla acùstica en la pared.
Antes de enroscar el panel de montaje en la parte posterior de la pantalla
acùstica,asegùrese de que los cables estàn correctamente conectados sus
terminales. Los 2 tornillos que sujeta la pantalla acùstica deberan fijarse dentro
de la ranura indicada en la misma.
1
2 cablos de seguridad + 1 bolsa con 2 tornillos.
4 almohadillas de espuma que se pegarán en el superficie inferior del altavoz.
S-F60_FRRD-186-B_8L.fm
Page 5
Tuesday, September 11, 2007
1:44 PM

Reviews

There are no reviews of this manual yet.