PIONEER S-DV323/XCN Service Manual

Cover page of PIONEER S-DV323/XCN Service Manual

Service Manual for PIONEER S-DV323/XCN, downloadable as a PDF file.

Manual details

  • Immediate download after payment.
  • Delivered as a PDF file.
  • The manual has 7 pages
  • File size: 0.4 MB
  • Available language versions: English
  • Different language versions may vary sligthly in file size and page count.

We guarantee that...

  • our manuals are complete,
  • the manual includes circuit diagrams,
  • our manuals are checked with antivirus,
  • We'll issue refund if the manual is damaged, incomplete or unreadable (our refund policy)

Sample pages

Thumbnail of page 1Thumbnail of page 2Thumbnail of page 3Thumbnail of page 4
Thumbnail of page 5Thumbnail of page 6Thumbnail of page 7Thumbnail of page 8
Thumbnail of page 9
background image
ORDER NO.
PIONEER CORPORATION 4-1, Meguro 1-chome, Meguro-ku, Tokyo 153-8654, Japan
PIONEER ELECTRONICS (USA) INC. P.O. Box 1760, Long Beach, CA 90801-1760, U.S.A.
PIONEER EUROPE NV Haven 1087, Keetberglaan 1, 9120 Melsele, Belgium
PIONEER ELECTRONICS ASIACENTRE PTE. LTD. 253 Alexandra Road, #04-01, Singapore 159936
PIONEER CORPORATION 2004
RRV3034
T ­ ZZE SEPT. 2004 Printed in Japan
S-DV323
XCN
SPEAKER SYSTEM
FOR PRECAUTION OF
REASSEMBLY AND DISASSEMBLY
CS Assy ( Subwoofer )
The grille assy is attached to the cabinet by press-fitting with
adhesive. To detach it, pry it open by inserting a flat blade
screwdriver into backside of it. To attach it, clean the press-
fitting part and apply a bit of adhesive. Then press it to the
baffle.
The subwoofer is attached to the baffle by 6 external screws.
To detach it, unfasten those screws.
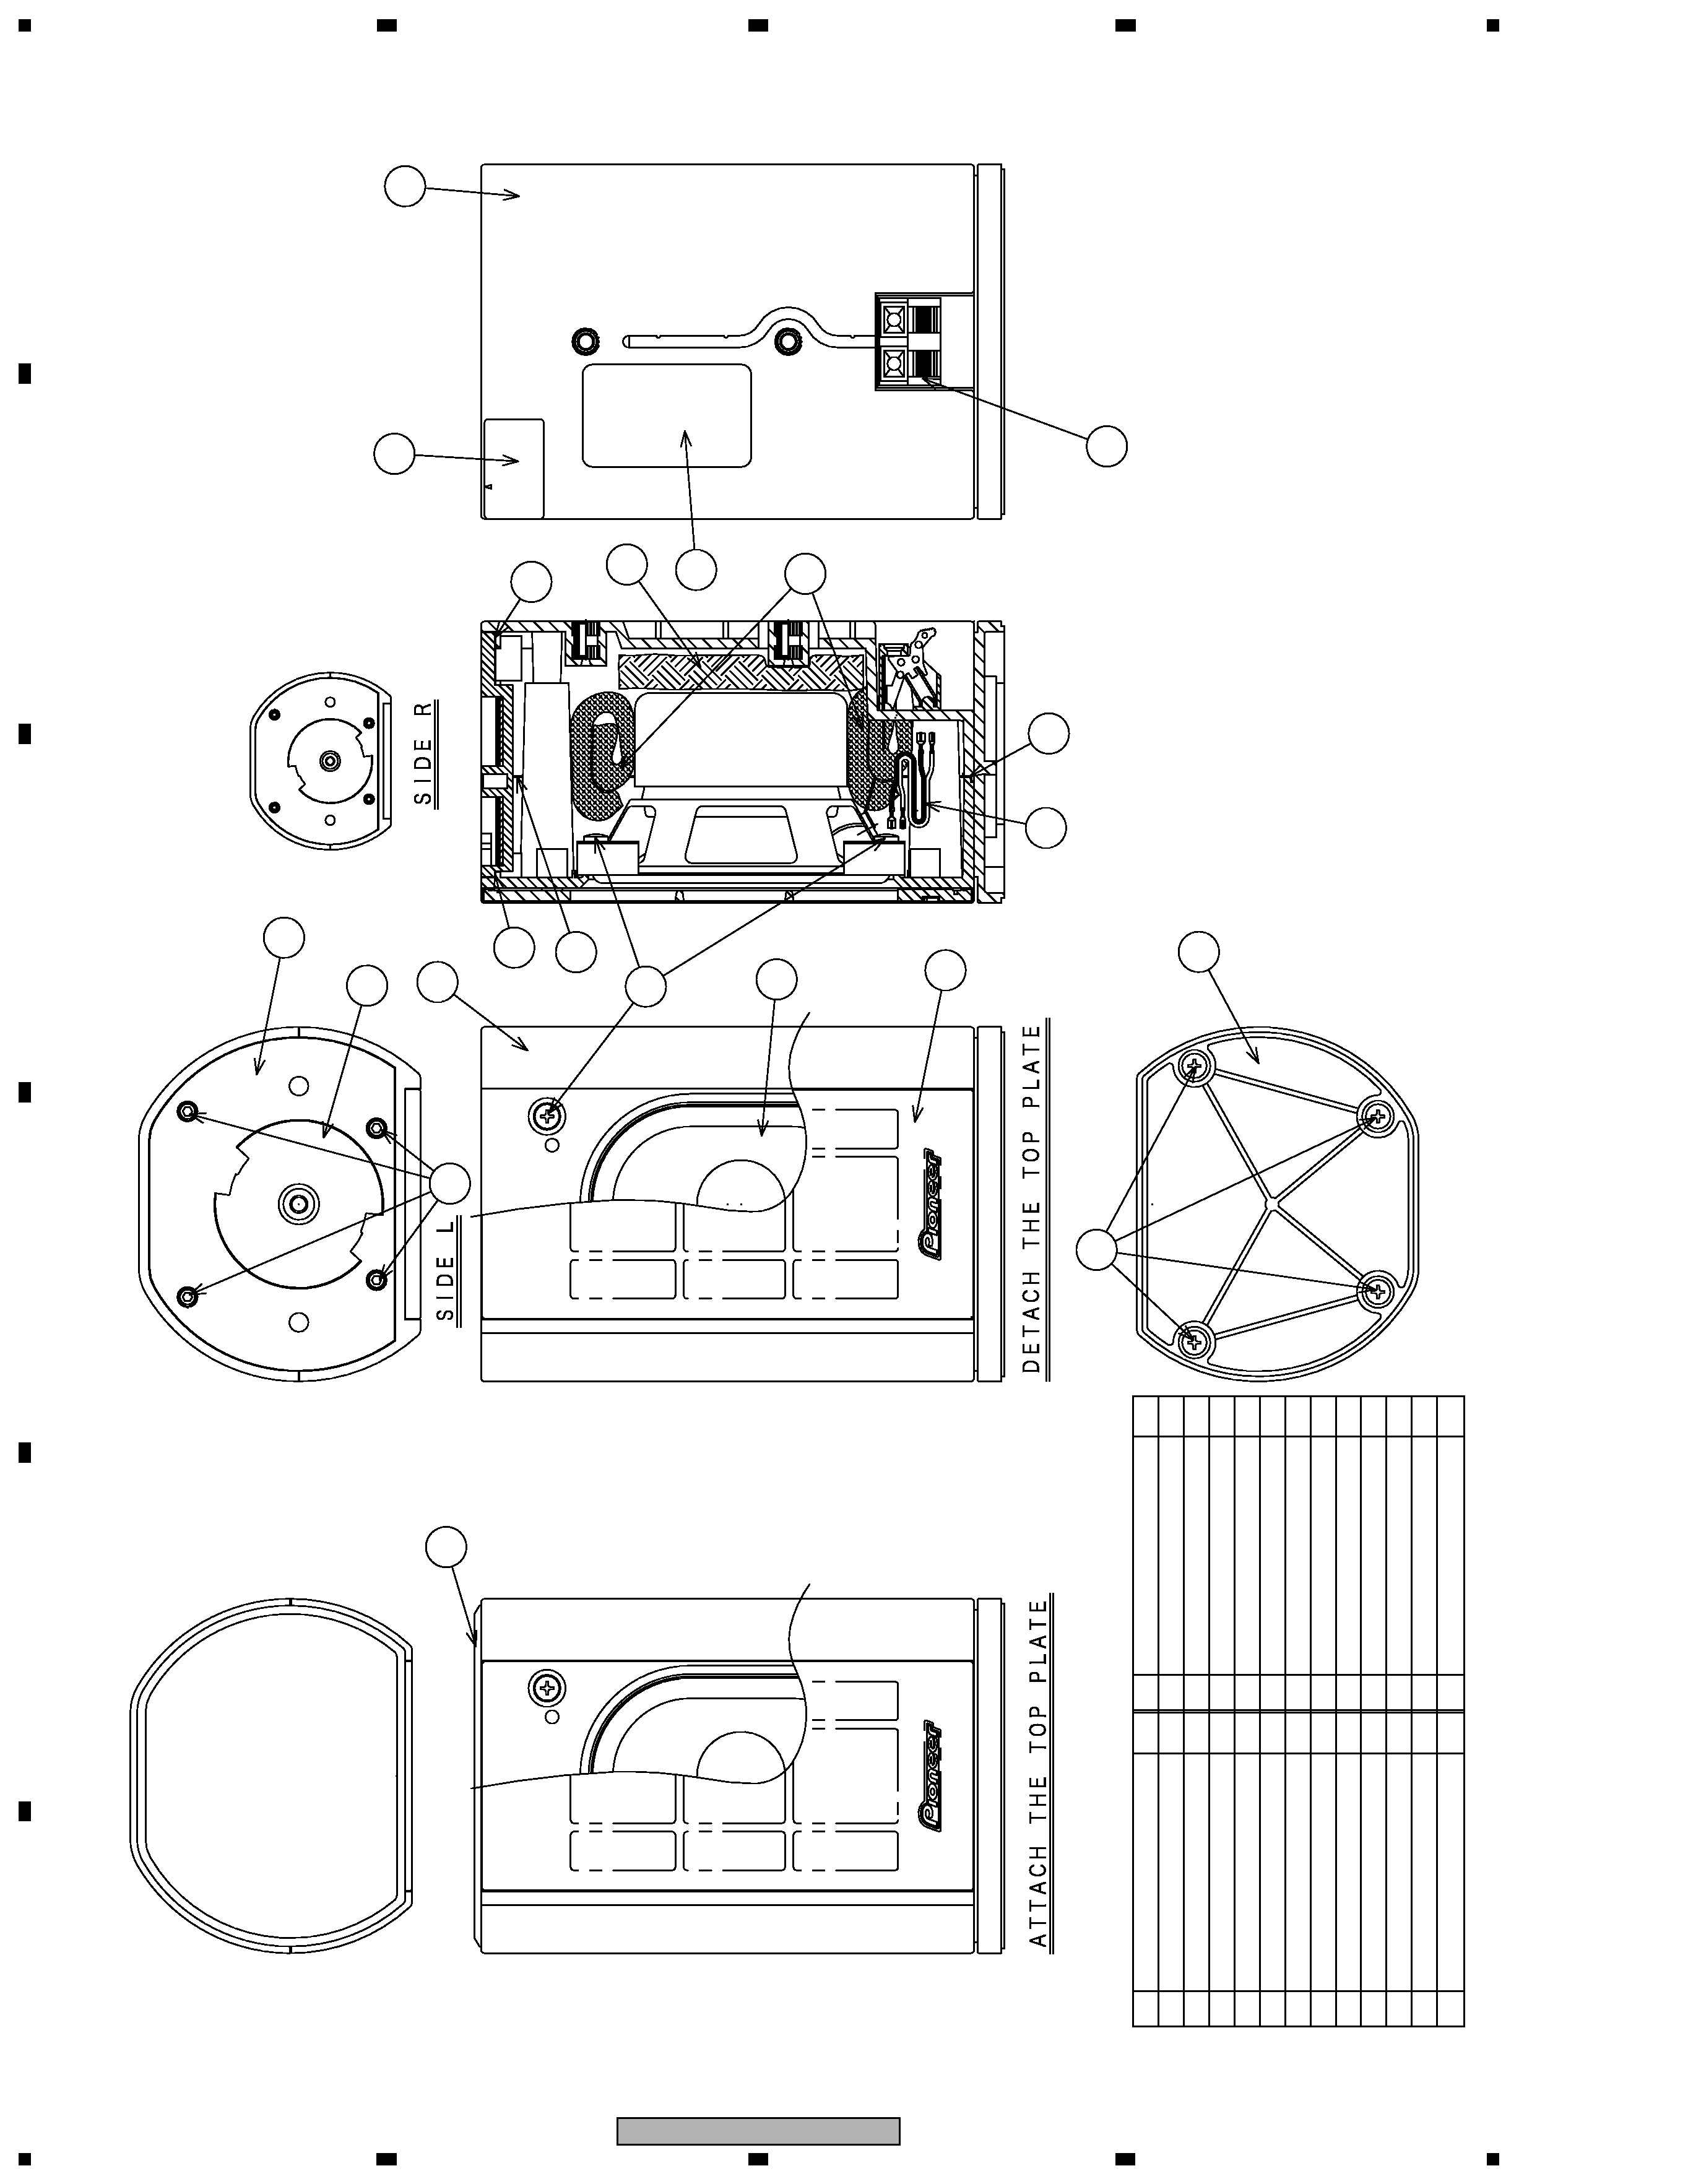
CS Assy ( Front Speaker )
The grille assy is attached to the cabinet by its bosses. To de-
tach it, remove the top board by inserting a flat blade screw-
driver into the cabinet upper side. Then pry it open by inserting
a flat blade screwdriver between the grille and the cabinet.
The speaker unit is atached to the cabinet by 4 internal screws.
To detach it, first the grille assy is removed. Next unfasten
screws of the bottom stand and the hexagon socket screw of a
top plate is removed. Then remove screws for the cabinet and
SP unit, and remove the cable.
When attaching it, face its terminal toward the input terminal.
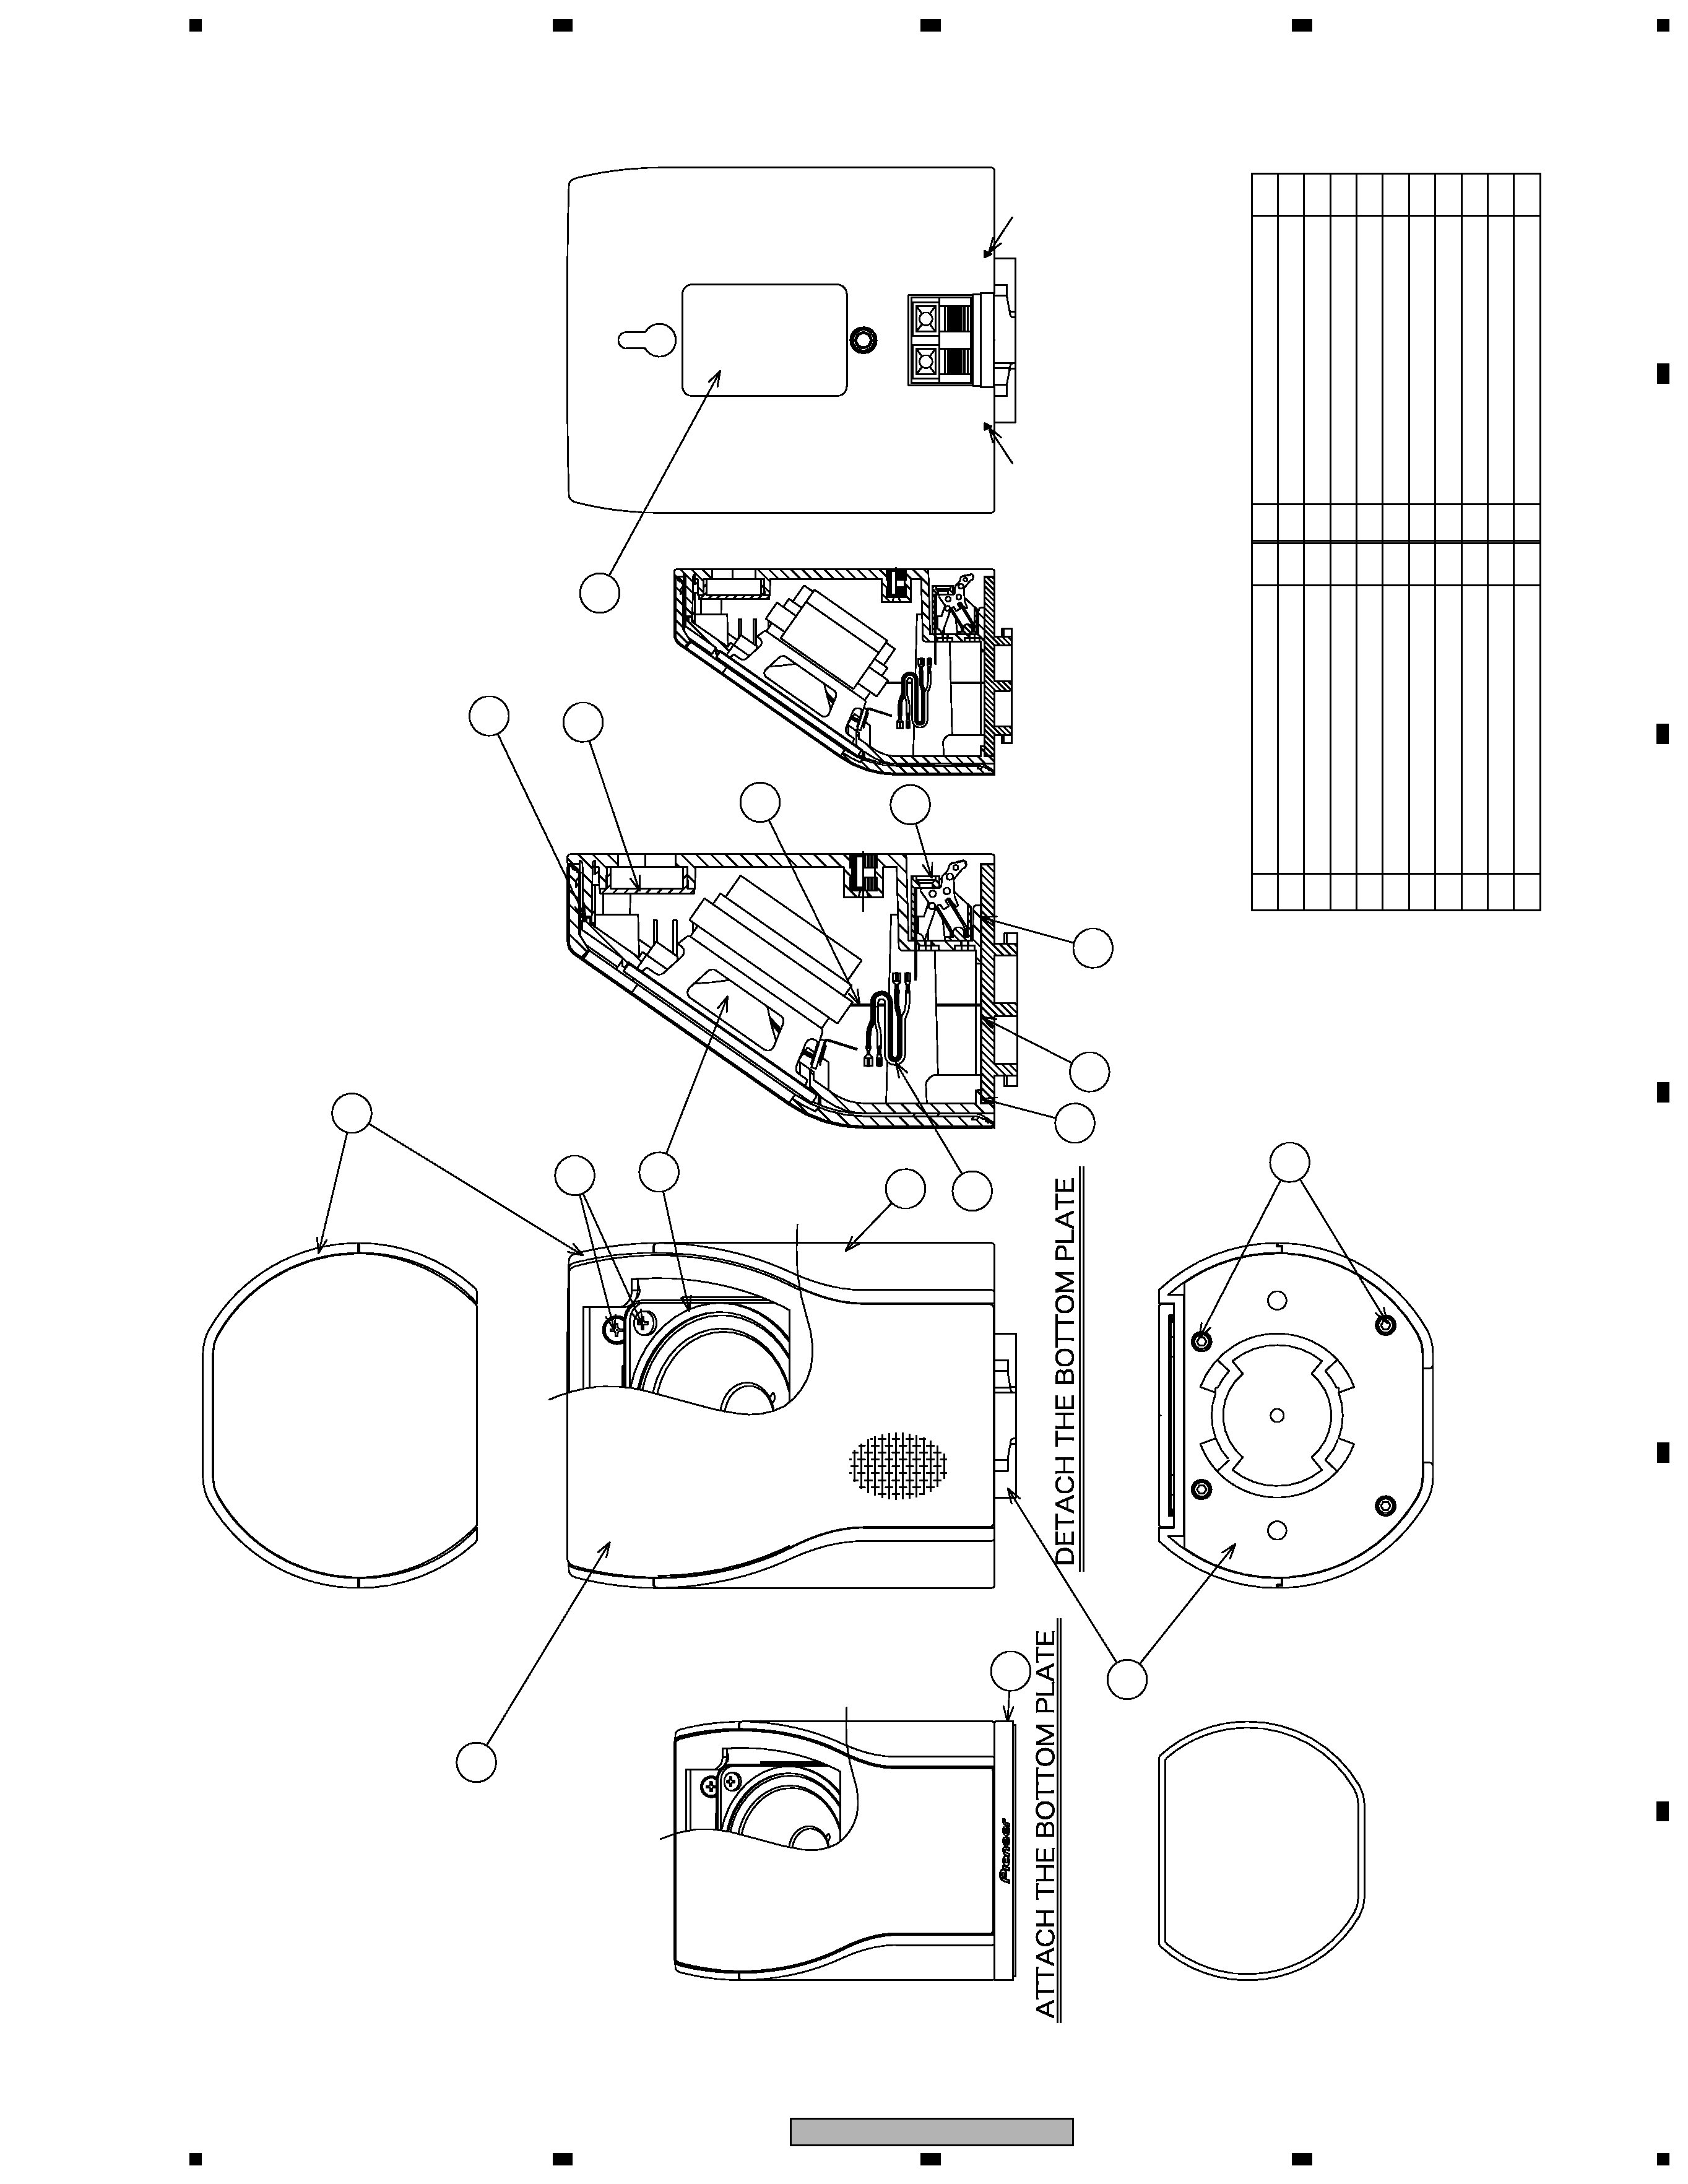
CS Assy ( Surround Speaker )
The grille assy is attached to the cabinet by its bosses. To de-
tach it, remove the stand by inserting a flat blade screwdriver
into the cabinet lower side. Then pry it open by inserting a flat
blade screwdriver into the grille slot.
The speaker unit is attached to the grille by 4 external screws.
To detach it, first remove the rear cabinet Then remove the
cable. When attaching it, face its terminal downward.
CS Assy ( Center Speaker )
The grille assy is attached to the cabinet by its bosses. To de-
tach it, remove the top board by inserting a flat blade screw-
driver into the cabinet upper side. Then pry it open by inserting
a flat blade screwdriver between the grille and the cabinet.
The speaker unit is attached to the cabinet by 4 internal screws.
To detach it, first unfasten screws of the bottom stand. Next
remove screws for the cabinet and SP unit. Then remove the
cable. When attaching it, face its terminal toward the input ter-
minal.
Front
Surround
Center
Sub Woofer
background image
2
1
23
4
12
3
4
C
D
F
A
B
E
S-DV323
For Packing
Parts marked by "NSP" are generally unavailable because they are not in our Master Spare Parts List.
The
mark found on some component parts indicates the importance of the safety factor of the part.
Therefore, when replacing, be sure to use parts of identical designation.
NOTES:
PARTS LIST
Mark No.
Description
Part No.
Mark No.
Description
Part No.
CS ASSY (Surround)
NSP
Front Cabinet
NSP
Rear Cabinet (L)
Bottom Plate
SNK2744
NSP
Rear Cabinet (R)
Grille
SMG1808
NSP
Grille Cloth
SAS1565
NSP
Grille Frame
SMH1077
Speaker Wire
SDD1275
Packing (size 4 x 83 mm)
SEC1806
Packing (size 4 x 134 mm)
SEC1813
Packing (size 4 x 88 mm)
SEC1814
Packing (size 4 x 35 mm)
SEC1815
Packing (size 4 x 20 mm)
SEC1816
NSP
Packing
In-Put Terminal
SKX1062
NSP
Plastic Cap
Speaker
B70DU55-51D
Screw
BPZ35P080FZB
Hexagon Socket Screw
SBA1228
CS ASSY (Front)
Mark No.
Description
Part No.
Bottom Plate
SNK2745
NSP
Front Cabinet
NSP
Rear Cabinet (L)
Top Plate (L)
SNK2748
Top Plate (R)
SNK2749
NSP
Rear Cabinet (R)
Grille
SMG1807
NSP
Badge
SAM6006
NSP
Grille Cloth
SAS1565
NSP
Grille Frame
SMH1078
Speaker Wire
SDD1275
Gasket
SEB1282
Packing (size 1.5 x 75 mm)
SEC1805
Packing (size 4 x 102 mm)
SEC1808
Packing (size 4 x 144 mm)
SEC1811
Packing (size 4 x 210 mm)
SEC1812
In-Put Terminal
SKX1062
NSP
Acoustic Absorbent (White)
NSP
Acoustic Absorbent (Black)
Speaker
K101DC55-51D
Screw
BPZ35P100FZK
Screw
BPZ35P080FZB
Hexagon Socket Screw
SBA1228
CS Assy (Front)
CS Assy (Surround)
CS Assy (Center)
CS Assy (Subwoofer)
NSP
Cosmetic Stand Set
Polyethylene Bag
SHL1372
Cosmetic Stand
SNK2750
NSP
Cosmetic Plate Set
Polyethylene Bag
SHL1372
Cosmetic Plate
SNK2751
NSP
Fastener Set
Screw
BMZ50P080FNC
Polyethylene Bag S0
SHL1314
Polyethylene Bag
SHL1404
Fastener
SNB1070
NSP
Accessory Set
Speaker Wire (White)
SDS6007
Speaker Wire (Red)
SDS6008
Speaker Wire (Green)
SDS6009
Speaker Wire (Purple)
SDS6010
Speaker Wire (Blue)
SDS6011
Speaker Wire (Grey)
SDS6012
Non Skid Pads
SEP1300
Polyethylene Bag
SHL6008
Non Skid Pads (for SW)
SEP1302
NSP
Stand Set
Packing
SEC1810
Polyethylene Bag S0
SHL1349
Stand
SNK2758
Supplement Inst.
SRK6004
Top Protector
SHA2411
Middle Protector
SHA2412
Bottom Protector
SHA2413
Protection Sheet
SHC1813
Polyethylene Bag S5
SHL1345
Packing Case
SHG6095
background image
3
1
23
4
1
2
3
4
C
D
F
A
B
E
S-DV323
Mark No.
Description
Part No.
CS ASSY (Subwoofer)
Mark No.
Description
Part No.
CS ASSY (Center)
NSP
Front Cabinet
NSP
Rear Cabinet
NSP
Cosmetic Top Board
Bottom Plate
SNK2755
Grille
SMG1809
NSP
Badge
SAM6006
NSP
Grille Cloth
SAS1566
NSP
Grille Frame
SMH1079
Speaker Wire
SDD1275
Packing (size 4 x 75 mm)
SEC1807
Packing (size 4 x 237 mm)
SEC1817
Packing (size 60 x 45 mm)
SEC1835
In-Put Terminal
SKX1062
NSP
Acoustic Absorbent (White)
NSP
Acoustic Absorbent (Black)
Speaker
K101DC55-51D
Screw
BPZ35P080FZB
NSP
Cabinet
Grille
SMG1810
NSP
Grille Cloth
SAS1567
NSP
Grille Frame
SMH1081
Cable
SDD1331
Packing
SEC1627
Input Terminal
SKX1060
NSP
Paper Tube 50
NSP
Acoustic Absorbent (White)
NSP
Acoustic Absorbent (Black)
NSP
Cosmetic Buffle
NSP
Cosmetic Port Tube
Speaker
M16LR90-51D
Screw (for Cosmetic Port Tube)
BPZ40P100FMC
Screw (for Speaker unit)
BYC40P160FZB
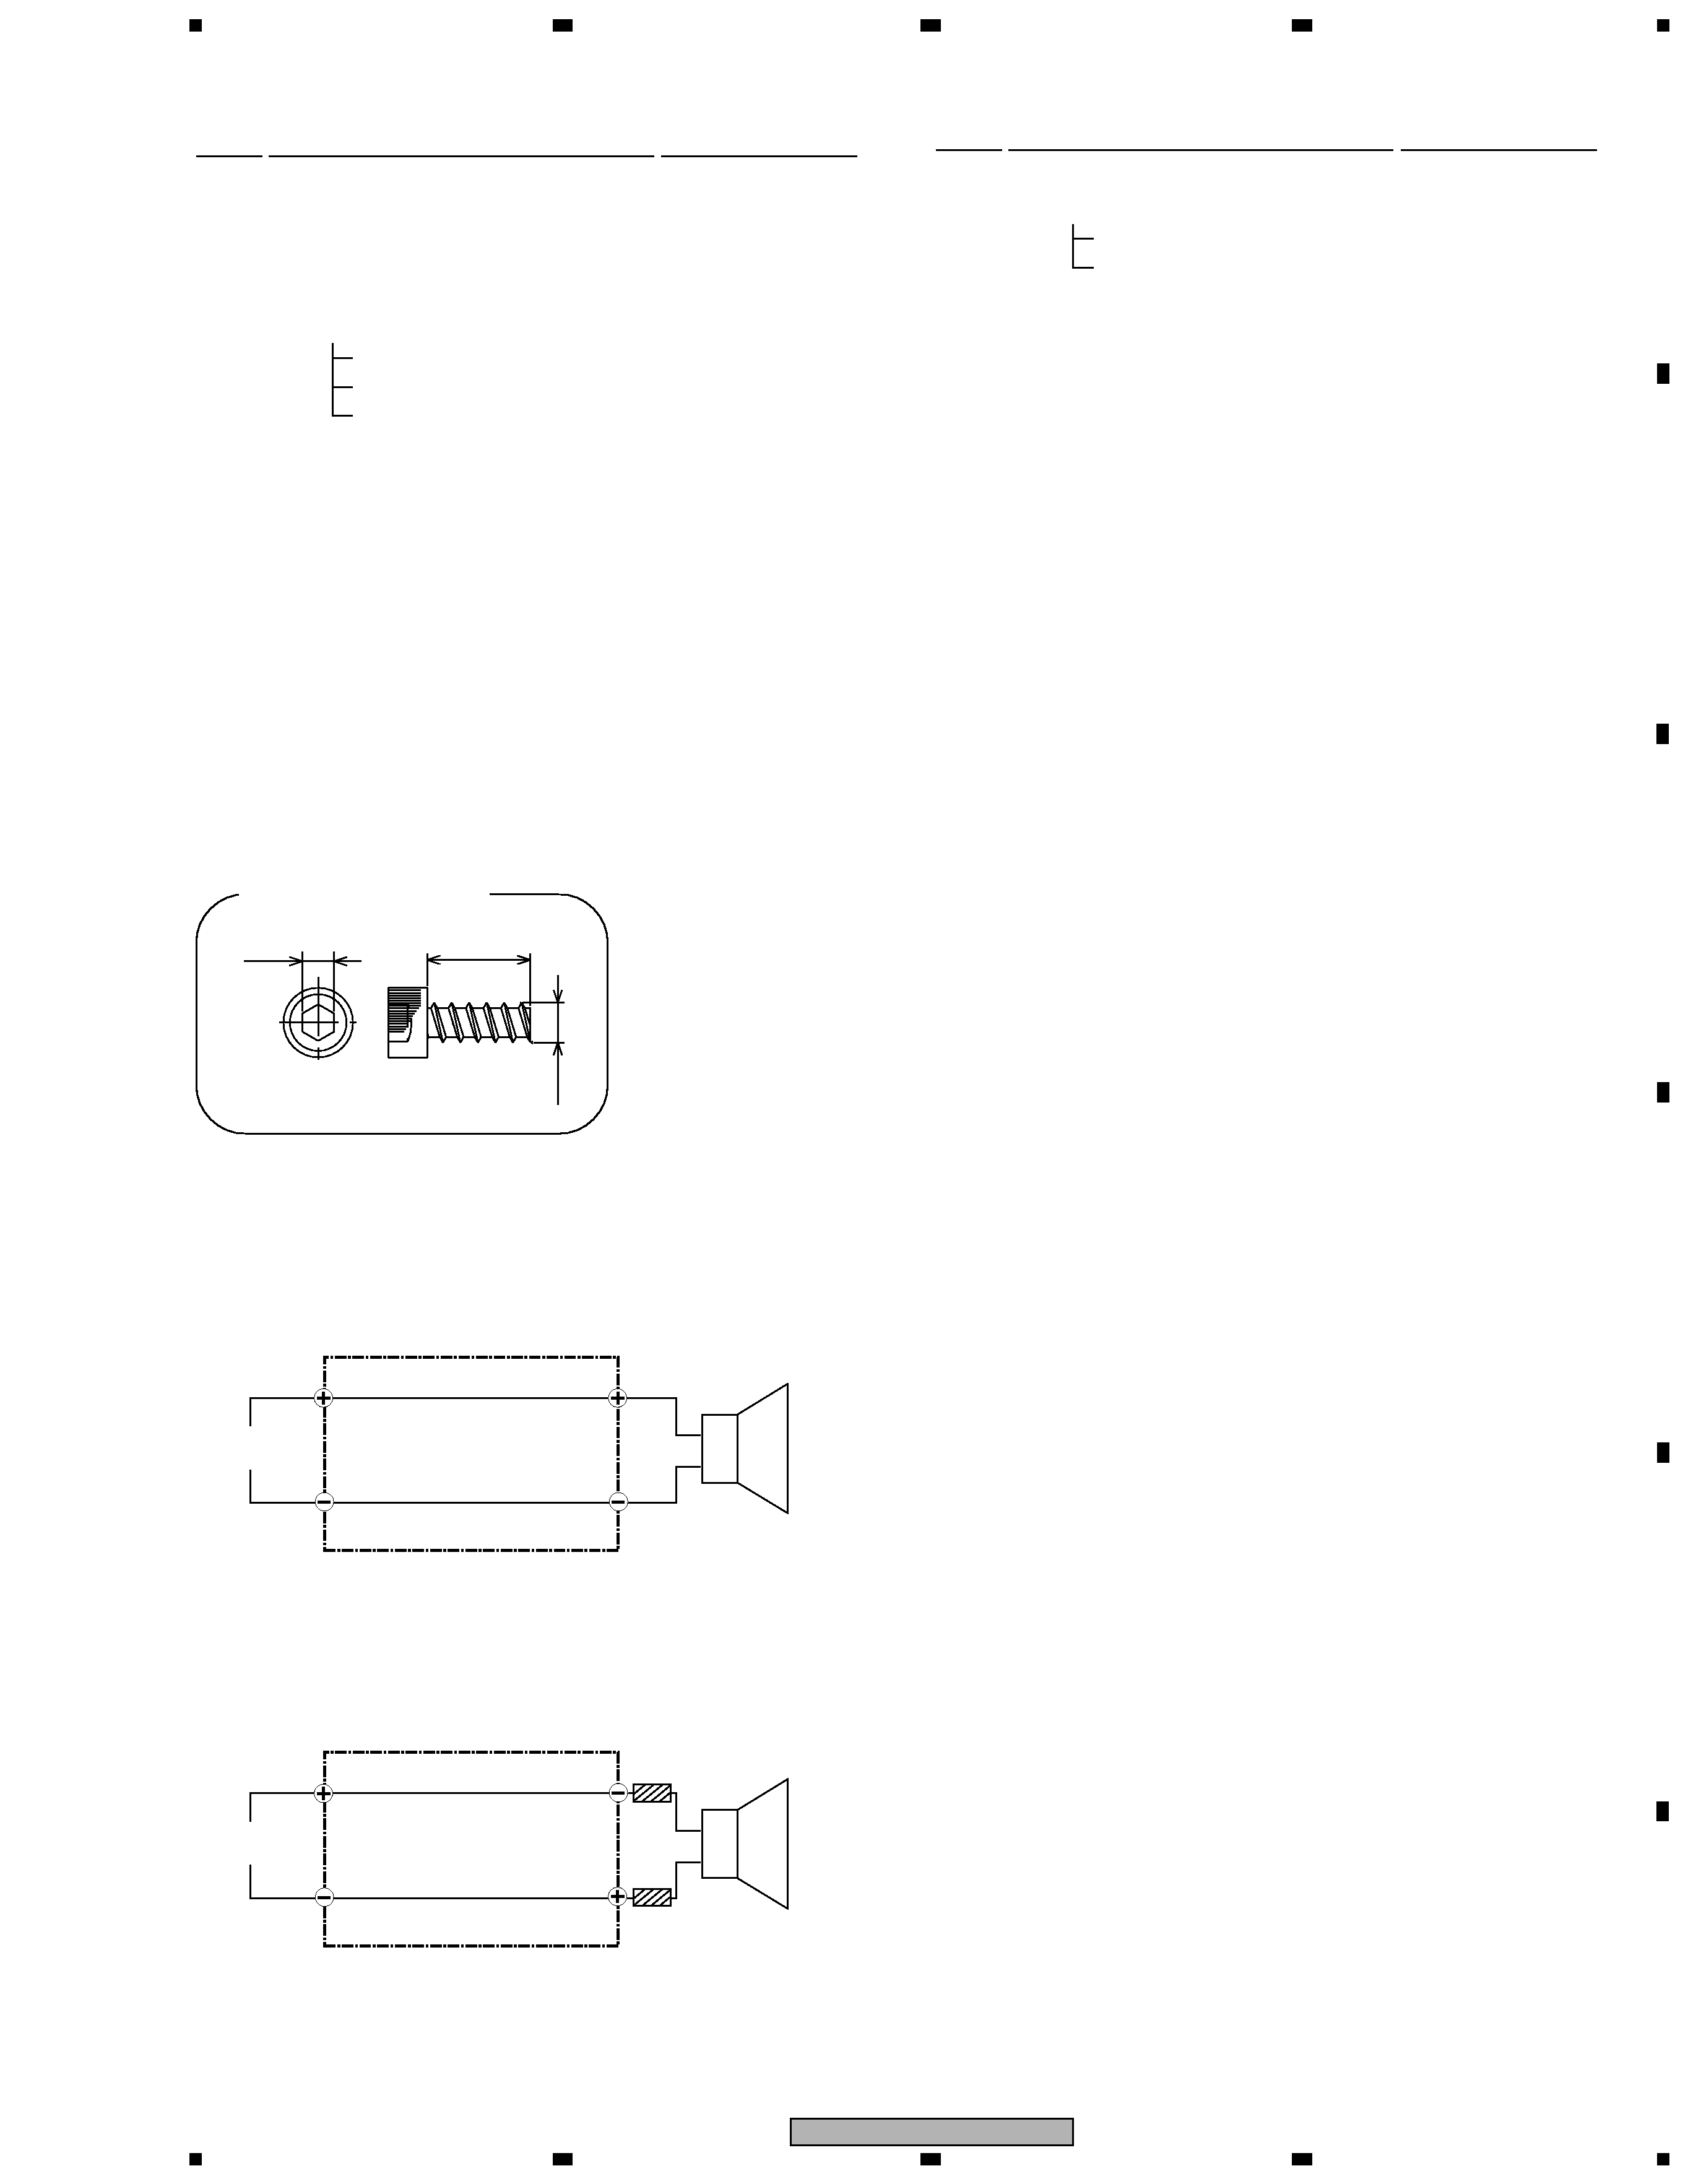
SCHEMATIC DIAGRAM
SDD1275
SDD1331
Woofer
Red
White
INPUT
Packing
Packing
INPUT
Red
Black
Woofer
Ø3.1
2.5
8
SCREW(SBA1228)
background image
4
1
23
4
12
3
4
C
D
F
A
B
E
S-DV323
Num.
No.
PARTS
1
2
3
4
5
6
7
8
9
10
11
12
1
1
1
1
1
1
1
1
2
1
1
1
13
14
15
16
17
18
19
20
21
1
1
1
1
2
1
8
4
4
SPEAKER
WIRE
HEXAGON
SOCKET
SCREW
No.
REAR
CABINET
PARTS
Num.
FRONT
CABINET
COSMETIC
PLATE­
GRILLE
SPEAKER
BOTTOM
PLATE
TOP
PLATE
ACOUSTIC
ABSORBENT(DUFFEL
FELT)
ACOUSTIC
ABSORBENT(POLYESTER
FIBER)
INPUT
TERMINAL
CAUTION
LABEL
MODEL
LABEL(L)
PACKING
PACKING
PACKING
PACKING
PACKING
SCREW(M3.5
×
8)
SCREW(M3.5
×
10)
This
part
is
enclosed
as
a
accessories.
1
2
4
5
8
9
10
11
12
13
20
21
6
19
14
18
3
15
17
16
7
PRODUCT APPEARANCE (Front)
background image
5
1
23
4
1
2
3
4
C
D
F
A
B
E
S-DV323
Only
for
L
side
Only
for
R
side
GRILLE
11
1
1
Num.
No.
No.
PARTS
PARTS
Num.
1
2
3
6
10
1
9
SCREW(M3.5
×
8)
5
4
REAR
CABINET
12
7
4
8
PACKING
PACKING
BOTTOM
PLATE
FRONT
CABINET
8
SPEAKER
WIRE
PACKING
COSMETIC
STAND-
IN-PUT
TERMINAL
PACKING
14
15
16
18
HEXAGON
SOCKET
SCREW
PLASTIC
CAP
1
1
1
1
2
1
2
1
1
1
MODEL
LABEL
1
SPEAKER
13
PACKING
1
This
part
is
enclosed
as
a
accessories.
1
2
4
5
6
8
9
10
12
11
13
14
15
16
18
3
7
PRODUCT APPEARANCE (Surround)

Reviews

There are no reviews of this manual yet.