PIONEER PDK-TS24 Owner's Manual

Cover page of PIONEER PDK-TS24 Owner's Manual

Owner's Manual for PIONEER PDK-TS24, downloadable as a PDF file.

We also have service manual to this model.

Manual details

  • Immediate download after payment.
  • Delivered as a PDF file.
  • The manual has 51 pages
  • File size: 2.29 MB
  • Available language versions: French, English, Spanish, Dutch, German, Chinese Simplified, Italian
  • Different language versions may vary sligthly in file size and page count.

We guarantee that...

  • our manuals are complete,
  • our manuals are checked with antivirus,
  • We'll issue refund if the manual is damaged, incomplete or unreadable (our refund policy)

Sample pages

Thumbnail of page 1Thumbnail of page 2Thumbnail of page 3Thumbnail of page 4
Thumbnail of page 5Thumbnail of page 6Thumbnail of page 7Thumbnail of page 8
Thumbnail of page 9
background image
PDK-TS24
Operating instructions
Mode d'emploi
Bedienungsanleitung
Istruzioni per l'uso
Gebruiksaanwijzing
Manual de instrucciones
Table top stand
Pied de table
Tischständer
Supporto di tavolo
Tafelbladstaander
Soporte de mesa
background image
PDK-TS24
Operating instructions
Mode d'emploi
Bedienungsanleitung
Istruzioni per l'uso
Gebruiksaanwijzing
Manual de instrucciones
Table top stand
Pied de table
Tischständer
Supporto di tavolo
Tafelbladstaander
Soporte de mesa
background image
2
En
Thank you for buying Pioneer's product.
Please read through the Operating Instructions to learn how
to operate your model safely and properly.
Please be advised to keep the Operating Instructions in your
place for future reference.
Contents
Cautions ...................................................................... 2
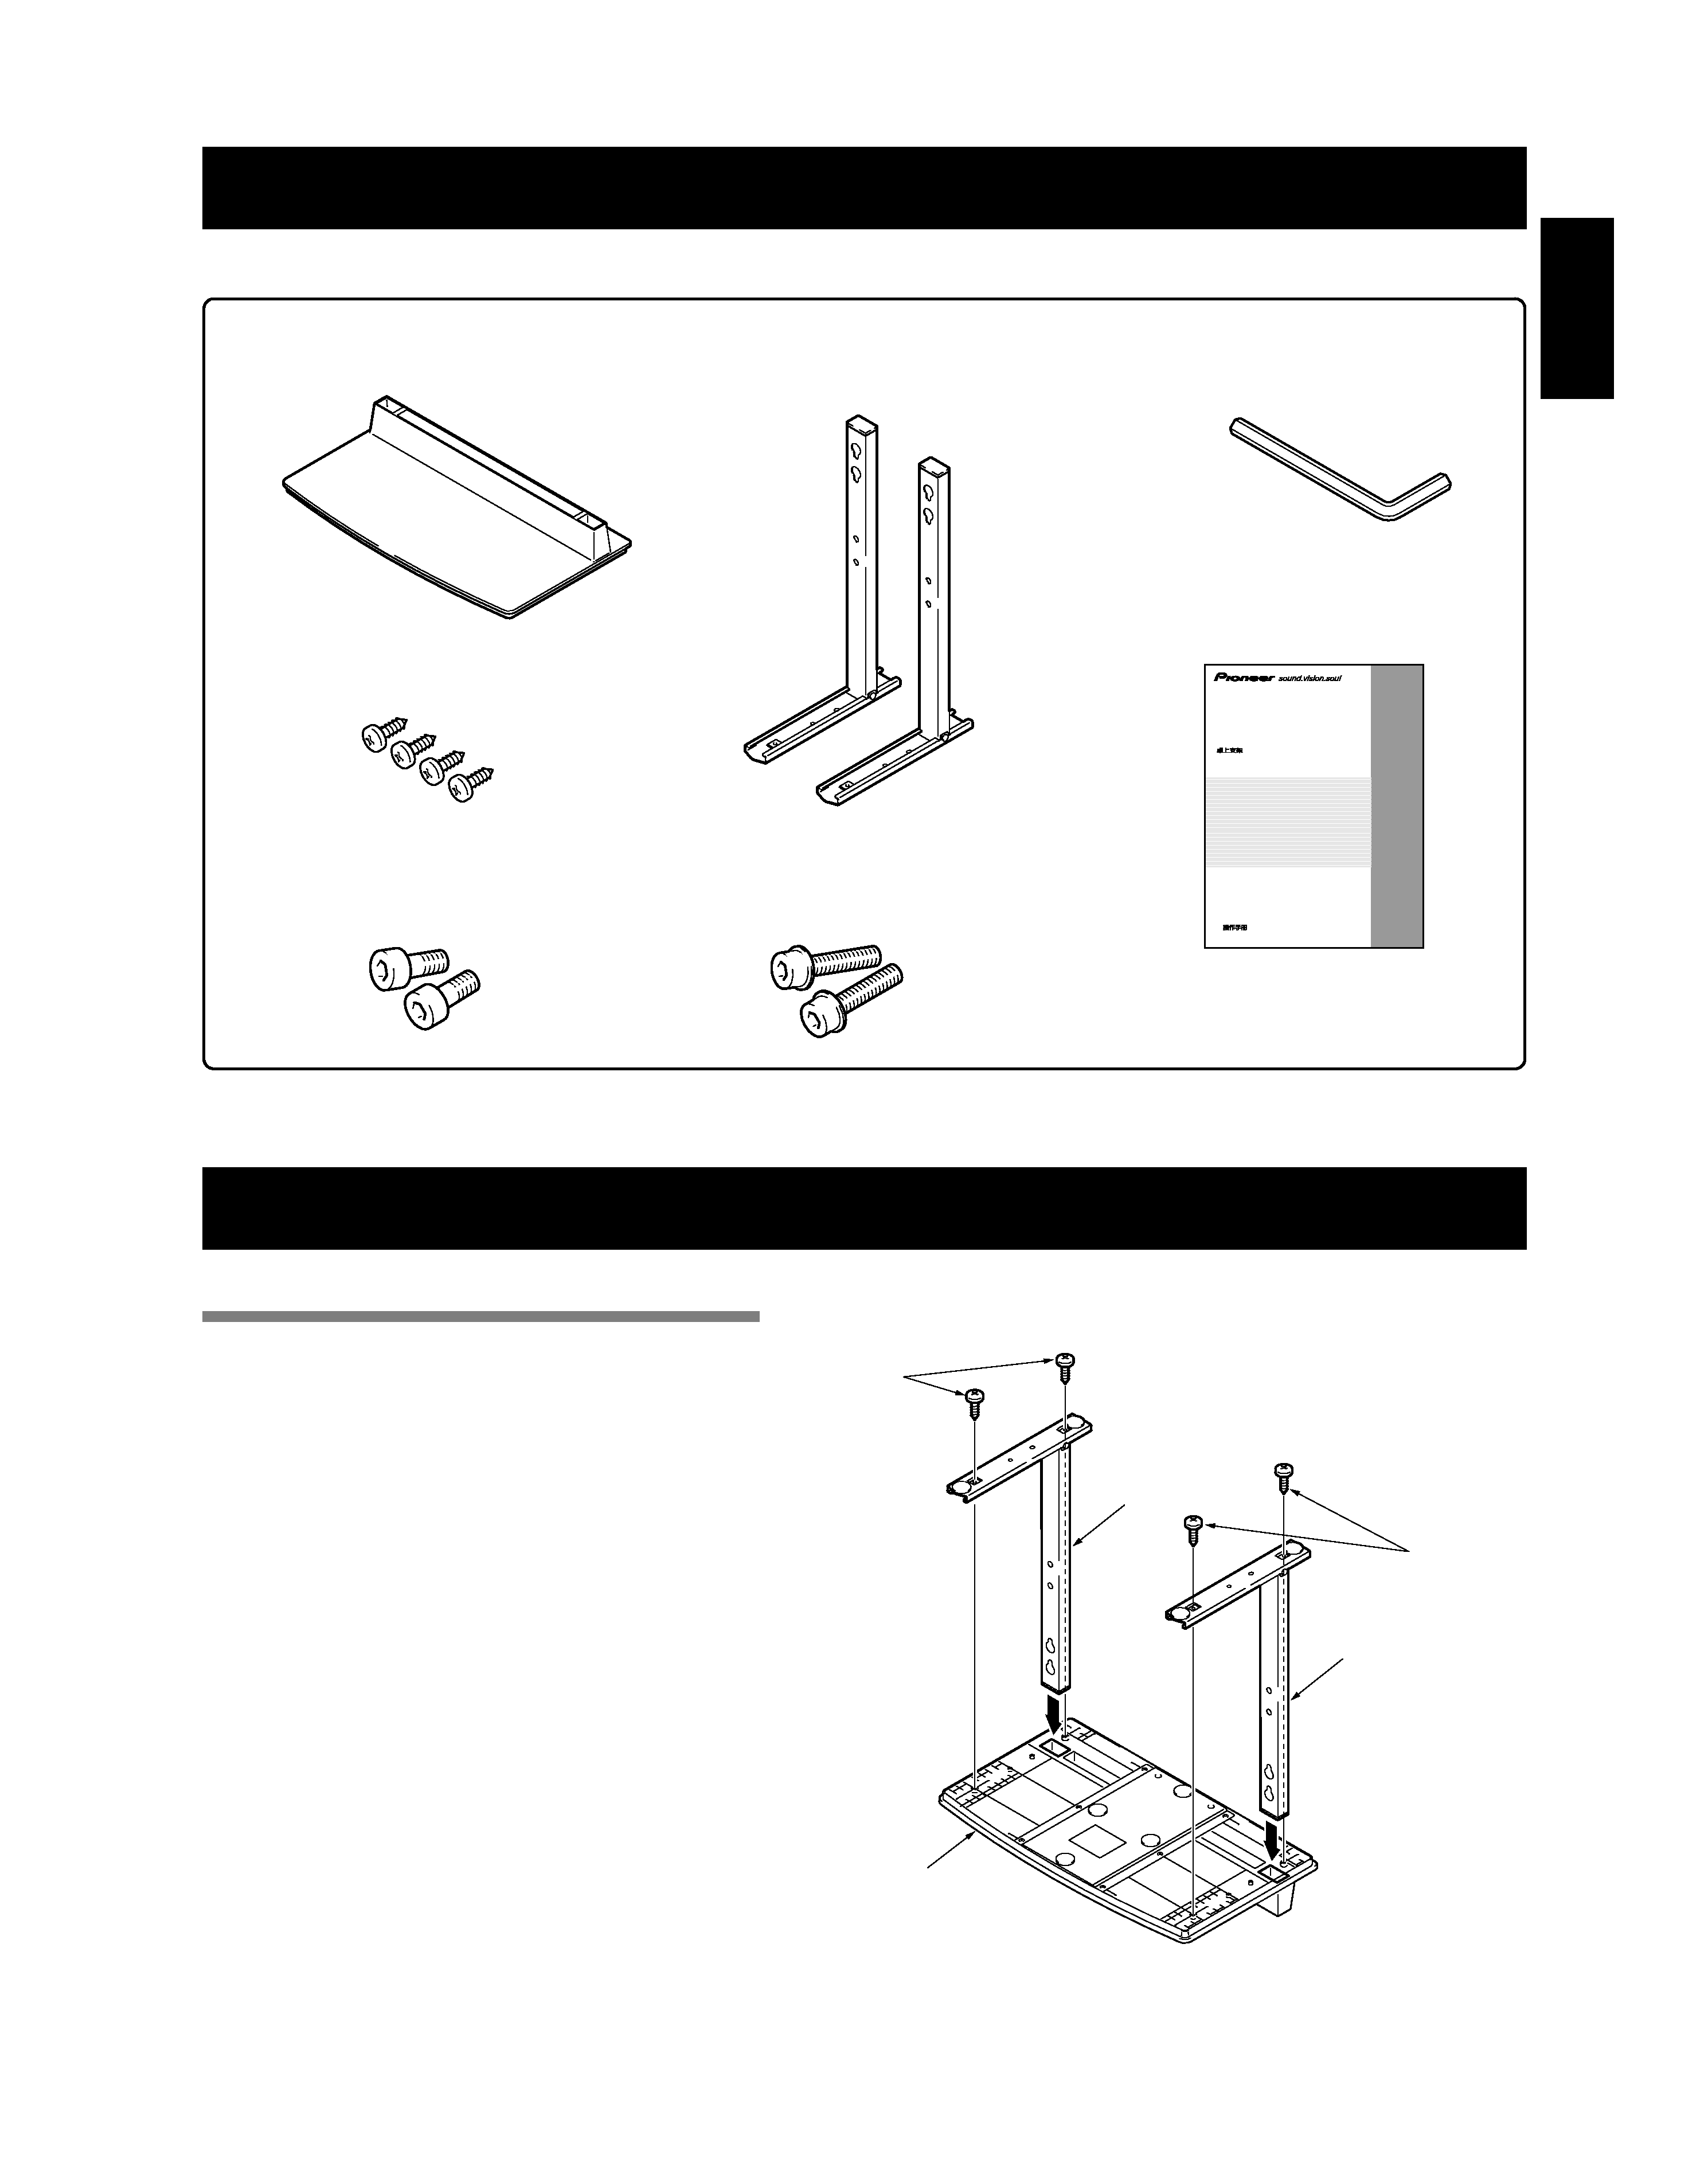
Checking the Standard Accessories ......................... 3
Assembling the Stand ............................................... 3
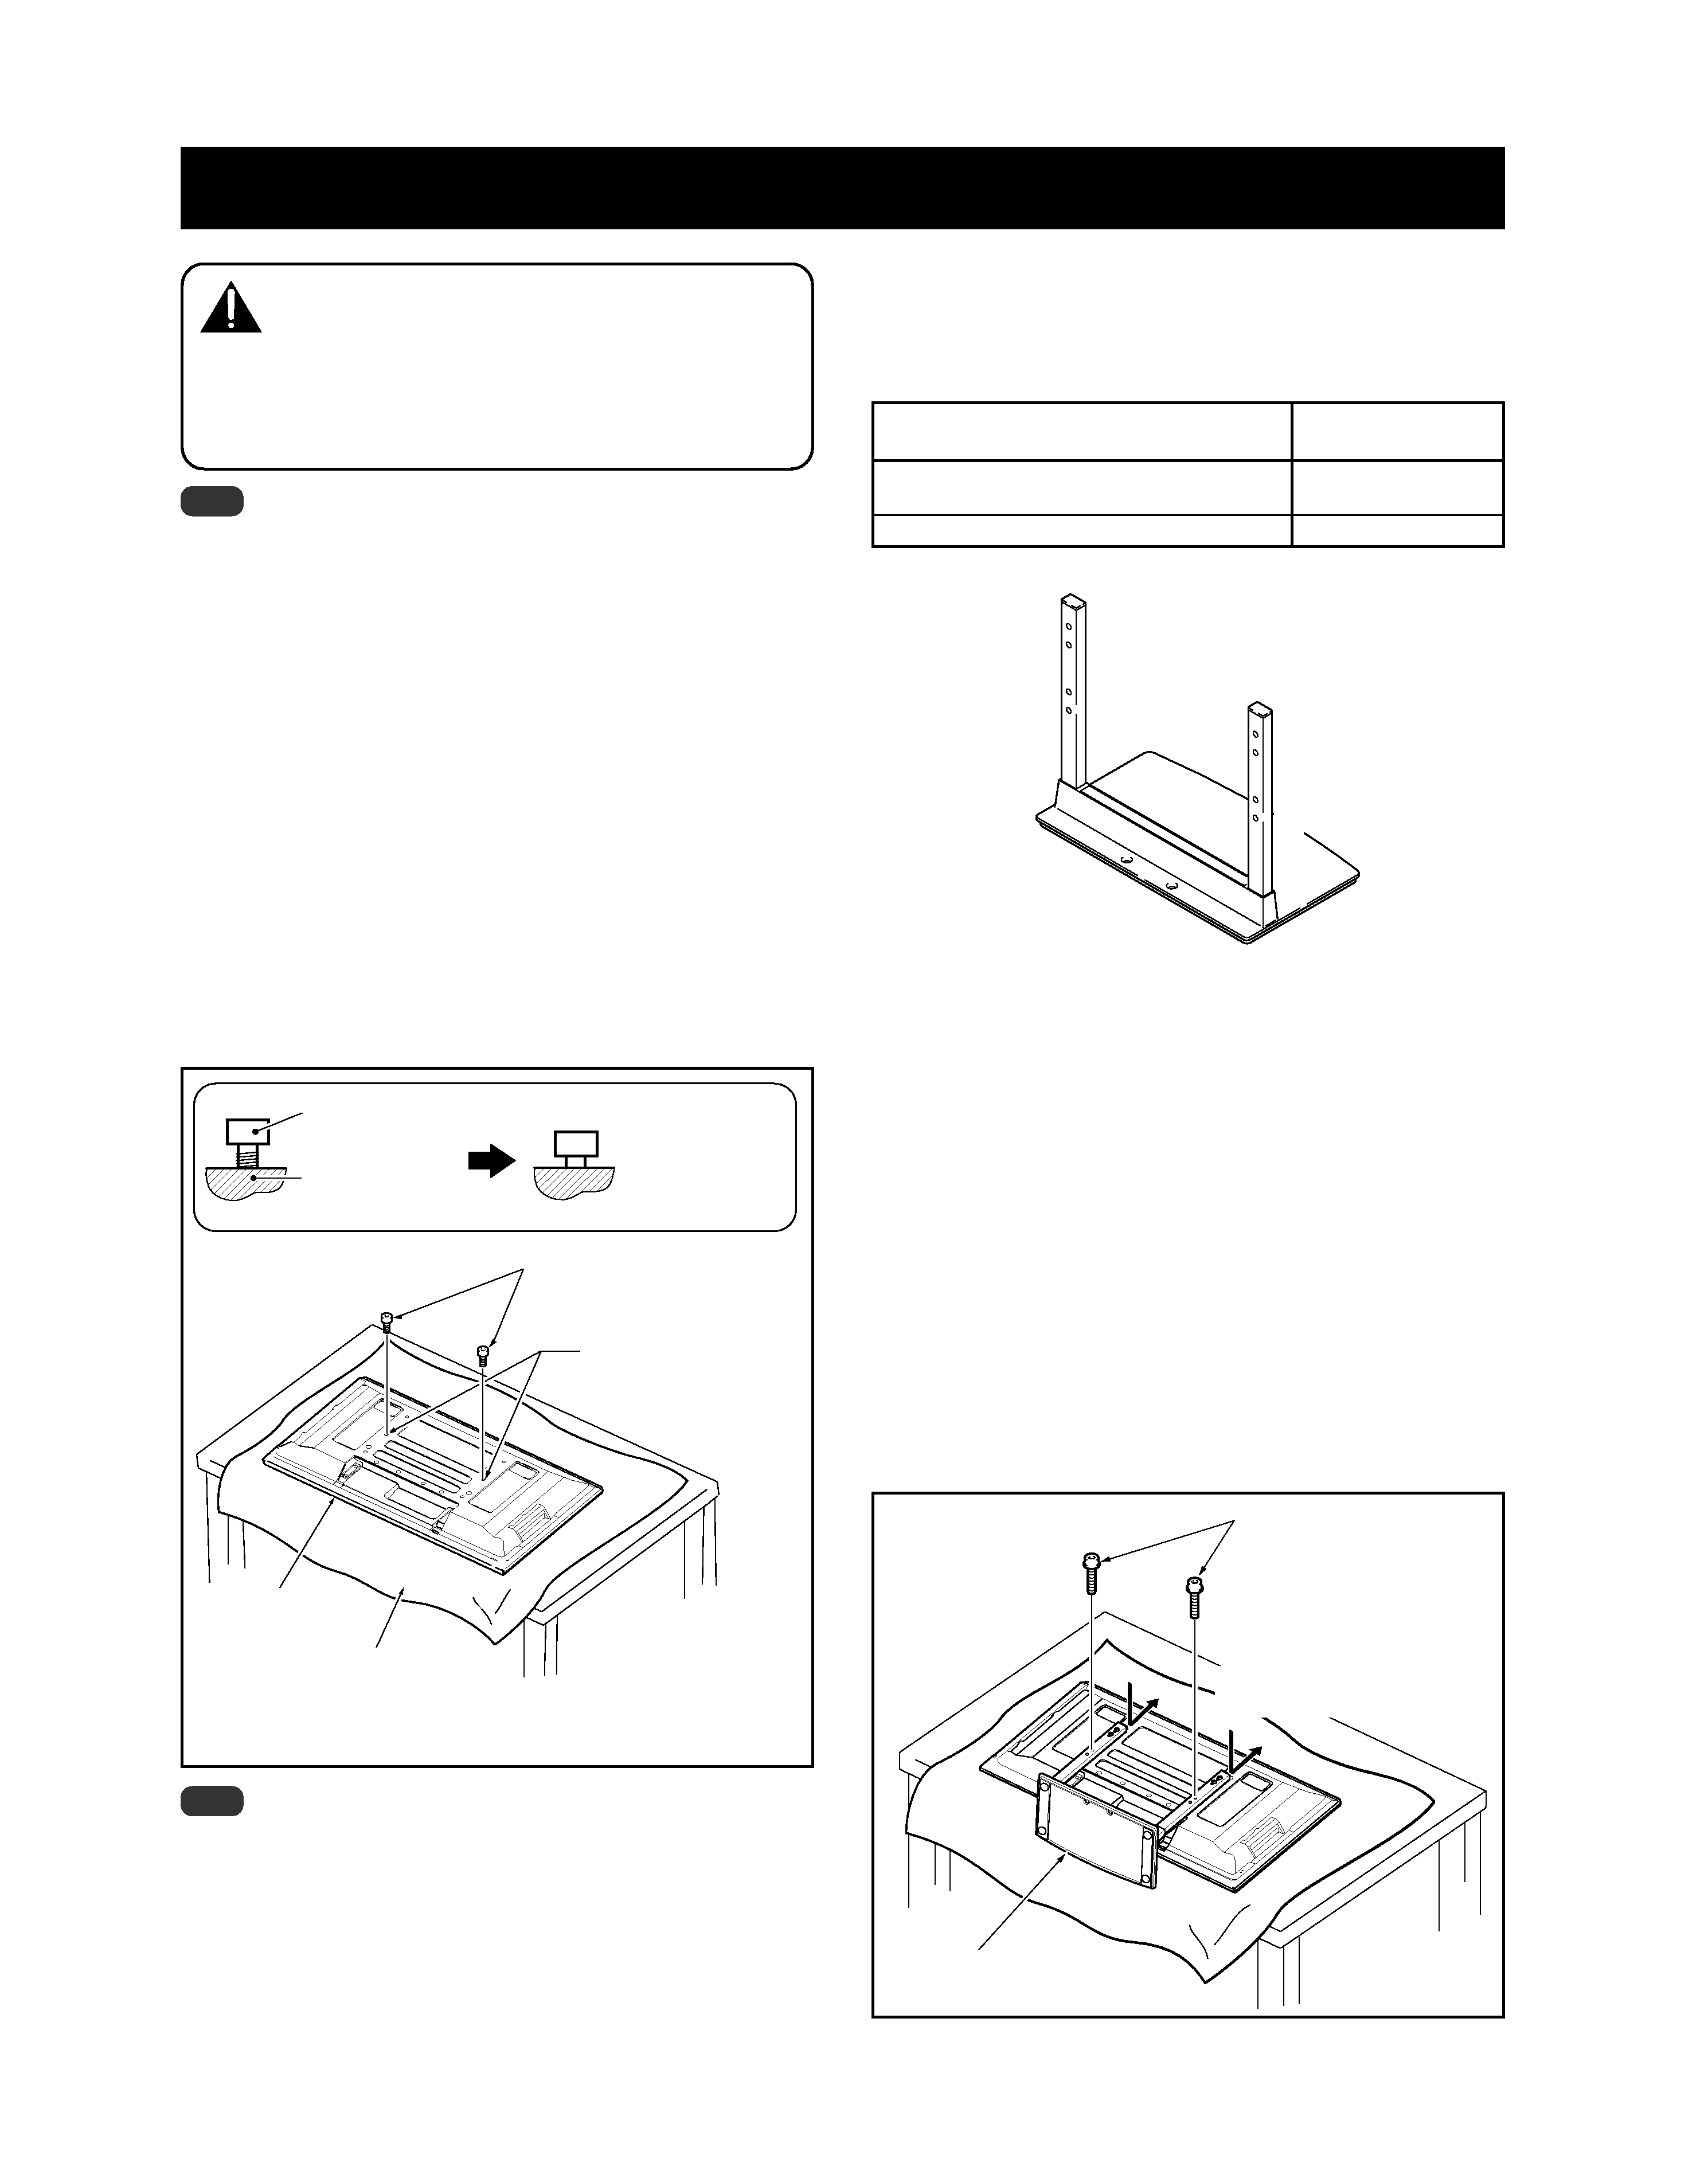
Attaching the Plasma Display ................................... 4
Installing the Product on a TV table etc. ................. 5
Preventing Equipment from Falling Over ................ 6
Specifications ............................................................. 7
Dimensions Diagram ................................................. 7
Installation
· Consult your dealer if you encounter any difficulties with
this installation.
· Pioneer is not liable for any damage resulting from
improper installation, improper use, modification, or
natural disasters.
Cautions
This product is a table top stand exclusively designed for
Plasma Displays (PDP-507XA/PDP-507XD/PDP-507XG/PDP-
4270XA/PDP-4270XD/PDP-427XA/PDP-427XD/PDP-427XG/
PDP-507XDA/PDP-427XDA) from Pioneer. Use with other
model is capable of resulting in instability causing possible
injury. For further information, please contact the store where
you purchased your display.
Do not install or modify the product other than specified. Do
not use this stand for a Plasma Display other than those
designated and do not modify it or use it for other purposes.
Improper installation is extremely dangerous because it may
result in it falling over or other accident.
Installation Location
· Select a location that is strong enough to support the
weight of the stand and the displays.
· Make sure to place it in a level and stable location.
· Do not install it outdoors, at a hot spring, or near a beach.
· Do not install the stand where it may be subjected to
vibration or shock.
Assembling and Installation
· Assemble the stand in accordance with the assembly
instructions and securely attach all screws at the
designated locations.
There have been cases where unforeseen accidents
such as the equipment breaking or falling over oc-
curred after the installation of the display because the
stand was not installed as instructed.
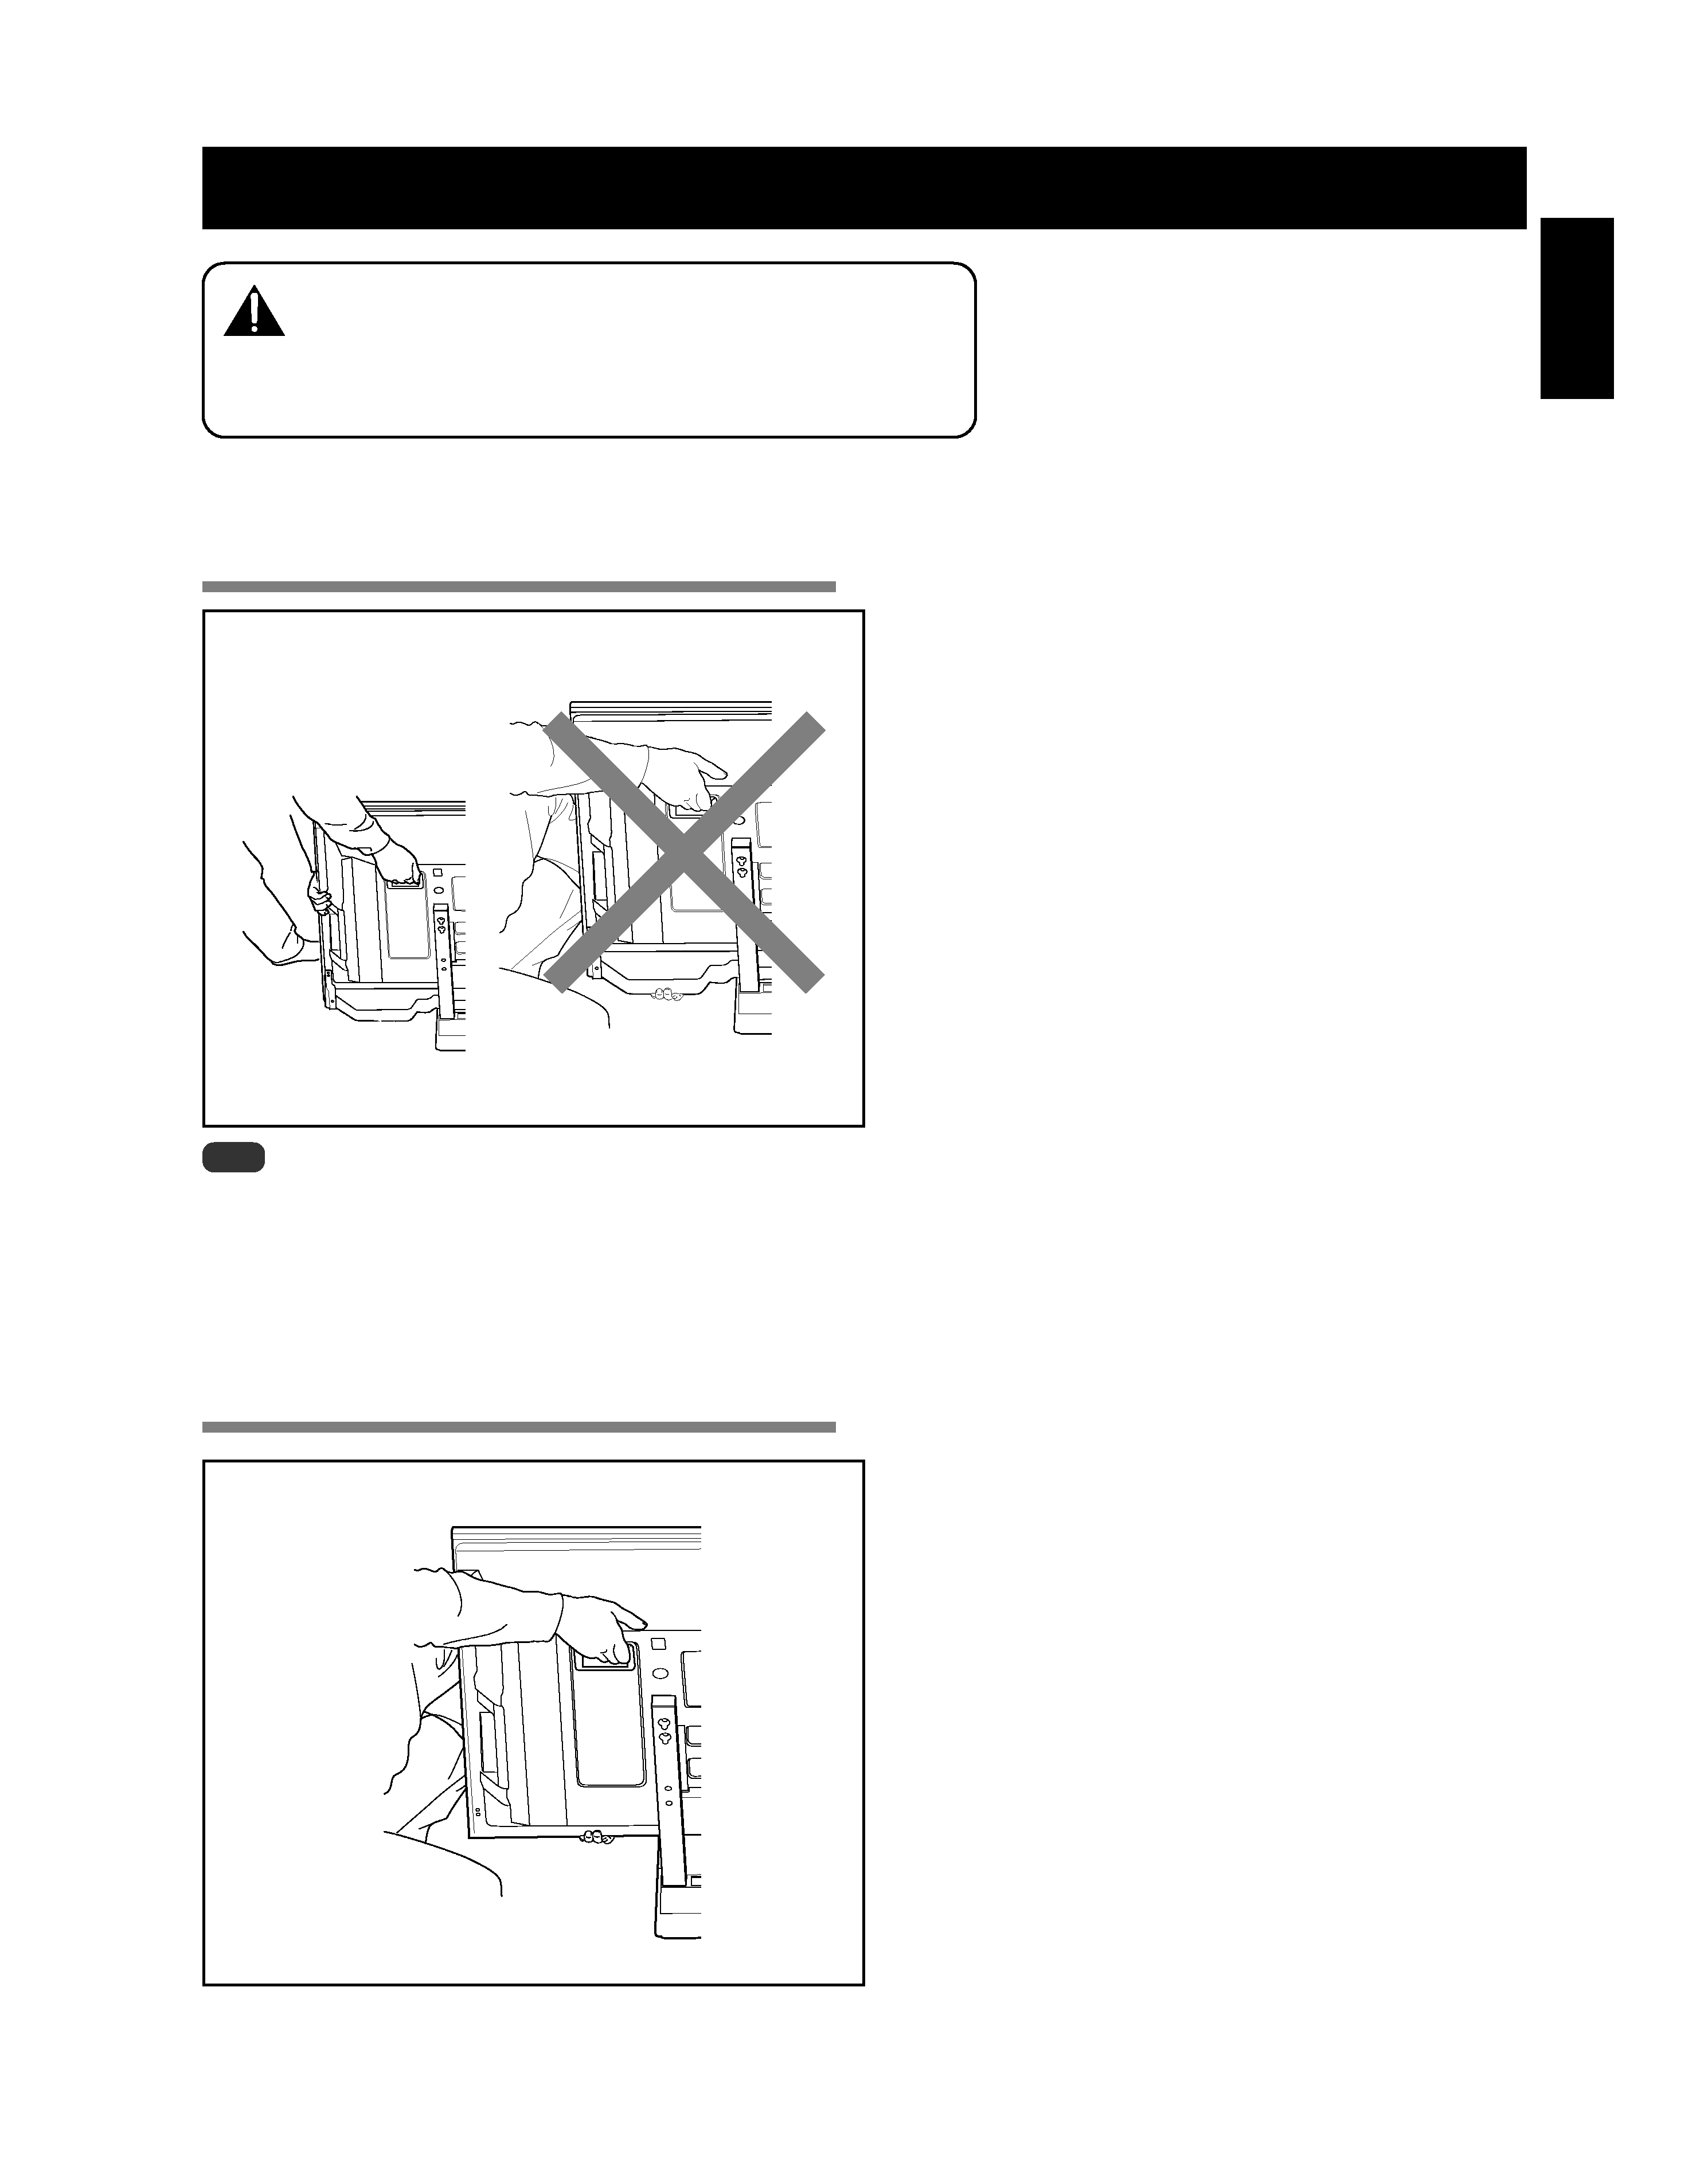
· The display must always be installed by two or more
people to assure it is installed safely.
· Before installation, turn off the power for the display
and peripheral devices then remove the power cord
plug from the power outlet.
Prevent accidents caused by the product falling over by taking
reliable measures to prevent it from falling over (see Page 6).
CAUTION
This symbol refers to a hazard or unsafe practice which
can result in personal injury or property damage.
IMPORTANT NOTICE
Record the model number and serial number of this
equipment below.
Model No. PDK-TS24
Serial No.
Keep these numbers for future use.
background image
3
En
English
Checking the Standard Accessories
Check to make sure that you have all the standard accessories before assembly and installation.
·
Base cover x 1
·
Stand pipes
(left and right, interchangeable) x 2
·
Hexagonal wrench x 1
(Opposite side 6 mm for M8 use)
·
Screws 1 (4 x 10 mm) x 4
·
Installation bolts 2
(M8 x 20 mm: black) x 2
·
Installation bolts 3
(M8 x 40 mm: black) x 2
·
Operating instructions
(this document) x 1
PDK-TS24
Operating instructions
Mode d'emploi
Bedienungsanleitung
Istruzioni per l'uso
Gebruiksaanwijzing
Manual de instrucciones
Table top stand
Pied de table
Tischständer
Supporto di tavolo
Tafelbladstaander
Soporte de mesa
Assembling the Stand
1 Turn the base cover over so the
underside is facing up.
2 Insert the stand pipes into the base
cover.
3 Tighten the screws to stabilize the
stand pipes.
Base cover
Screws 1
(4 x 10 mm)
Stand pipe
Screws 1
(4 x 10 mm)
Stand pipe
Assembly Procedure
background image
4
En
The weight of a 50 inch Plasma Display is about 34.1 kg (75.2
lbs), that of a 42 inch model is about 29.0 kg (64.0 lbs), they
have no depth, and are unstable. Therefore, at least two
people must assemble and install them.
Note
Insert the bolts in the holes vertically and do not tighten
them with more force than necessary.
Place a sheet or protective cover to protect the display from
scratches or damage.
Assemble only with the Plasma Display lying flat on a table
or similar surface.
Move the stand so that the stand screw holes and the nuts
that connect the main display line up correctly.
1 With the Plasma Display lying flat, insert
and secure the two Installation bolts 2 (M8
x 20 mm: black) in the holes "a" located in
center of the Plasma Display housing.
At this point, tighten these bolts 2 only until the threads
are no longer visible when viewed from the side (you will
be unable to attach the display if the bolts are screwed in
completely).
Attaching the Plasma Display
Regarding the stand pipe screw holes when the
stand is used as a desktop stand
Table: Stand pipe screw holes when the stand is used as a
desktop stand
Plasma Display model
42 inch display model
50 inch display model(except under speaker models)
50 inch display model(under speaker models)
Screw holes used with
stand orientation
A, A'
B, B'
2 As shown in the above figure, hook the
stand pipe holes (either pipe A or B) onto
the screw heads of the installation bolts 2,
then slide the stand upwards to the main
Plasma Display until it engages the installa-
tion bolts 2 (once put together with the
display, the stand will slides no more than
19 mm (3/4 inch)).
3 Pass the installation bolts 3 (M8 x 40 mm:
black) through the stand pipes and tighten
the installation bolts firmly with the
accessory hexagonal wrench (The holes
should be used in the proper combinations,
A­A' and B­B').
4 Tighten the installation bolts 2 firmly with
the accessory hexagonal wrench.
Caution
Note
When laying down the Plasma Display, be careful so as to not
scratch or damage it.
B
A
B
´
A
´
B
A
B
´
A
´
Sheet
Plasma Display
Holes "a"
(holes in center of
Plasma Display)
Installation
bolt 2
Plasma Display
housing
Stop screwing
down the bolt
when the threads
are no longer
visible.
Installation bolt 2
(M8 x 20 mm: black)
Table top stand
Installation bolts 3
(M8 x 40 mm: black)
(Step 3)
Slide the stand
(Step 2)
background image
5
En
English
Installing the Product on a TV table etc.
When installing on a TV table etc., hold the Plasma Display.
If you hold the speakers, they may be damaged or twisted.
Caution
How to hold the
PDP-507XA/PDP-507XD/
PDP-507XG/PDP-507XDA(under
speaker models)
Note
Do not hold the under speaker.
How to hold the
PDP-507XA/PDP-507XD/
PDP-507XG/PDP-507XDA(except under
speaker models)/PDP-4270XA/PDP-
4270XD/PDP-427XA/PDP-427XD/PDP-
427XG/PDP-427XDA

Reviews

There are no reviews of this manual yet.