PIONEER MJ-L77/NVXK Owner's Manual

Cover page of PIONEER MJ-L77/NVXK Owner's Manual

Owner's Manual for PIONEER MJ-L77/NVXK, downloadable as a PDF file.

We also have service manual to this model.

Manual details

  • Immediate download after payment.
  • Delivered as a PDF file.
  • The manual has 36 pages
  • File size: 0.8 MB
  • Available language versions: English
  • Different language versions may vary sligthly in file size and page count.

We guarantee that...

  • our manuals are complete,
  • our manuals are checked with antivirus,
  • We'll issue refund if the manual is damaged, incomplete or unreadable (our refund policy)

Sample pages

Thumbnail of page 1Thumbnail of page 2Thumbnail of page 3Thumbnail of page 4
Thumbnail of page 5Thumbnail of page 6Thumbnail of page 7Thumbnail of page 8
Thumbnail of page 9
background image
MJ-L77
MINIDISC RECORDER
Operating Instructions
background image
MJ-L77
MINIDISC RECORDER
Operating Instructions
background image
WARNING: TO PREVENT FIRE OR SHOCK
HAZARD, DO NOT EXPOSE THIS APPLIANCE TO
RAIN OR MOISTURE.
Thank you for buying this Pioneer product.
Please read through these operating instructions
so you will know how to operate your model
properly. After you have finished reading the
instructions, put them away in a safe place for
future reference.
In some countries or regions, the shape of the
power plug and power outlet may some-times
differ from that shown in the explanatory
drawings. However, the method of connecting
and operating the unit is the same.
RISK OF ELECTRIC SHOCK
DO NOT OPEN
CAUTION
IMPORTANT 1
CAUTION:
TO PREVENT THE RISK OF ELECTRIC SHOCK, DO
NOT REMOVE COVER (OR BACK).
NO USER-
SERVICEABLE PARTS INSIDE. REFER SERVICING TO
QUALIFIED SERVICE PERSONNEL.
The exclamation point within an equilateral triangle is
intended to alert the user to the presence of important
operating and maintenance (servicing) instructions in
the literature accompanying the appliance.
The lightning flash with arrowhead symbol, within an
equilateral triangle, is intended to alert the user to the
presence of uninsulated "dangerous voltage" within the
product's enclosure that may be of sufficient magnitude
to constitute a risk of electric shock to persons.
IMPORTANT
FOR USE IN THE UNITED
KINGDOM
The wires in this mains lead are
coloured in accordance with the
following code:
Blue :
Neutral
Brown :
Live
If the plug provided is unsuitable for
your socket outlets, the plug must be
cut off and a suitable plug fitted.
The cut-off plug should be disposed
of and must not be inserted into any
13 amp socket as this can result in
electric shock. The plug or adaptor of
the distribution panel should be
provided with a 5 amp fuse. As the
colours of the wires in the mains lead
of this appliance may not correspond
with coloured markings identifying
the terminals in your plug, proceed as
follows:
The wire which is coloured blue must
be connected to the terminal which is
marked with the letter N or coloured
black.
The wire which is coloured brown
must be connected to the terminal
which is marked with the letter L or
THE POWER SWITCH IS SECONDARY CONNECTED
AND THEREFORE DOES NOT SEPARATE THE UNIT
FROM MAINS POWER IN THE STANDBY POSITION.
This product complies with the Low Voltage
Directive (73/23/EEC), EMC Directives (89/336/EEC,
92/31/EEC) and CE Marking Directive (93/68/EEC).
coloured red.
Do not connect either wire to the earth
terminal of a three-pin plug.
NOTE
After replacing or changing a fuse, the
fuse cover in the plug must be replaced
with a fuse cover which corresponds to
the colour of the insert in the base of
the plug or the word that is embossed
on the base of the plug, and the
appliance must not be used without a
fuse cover. If lost, replacement fuse
covers can be obtained from your dealer.
Only 5 A fuses approved by B.S.I. or
A.S.T.A. to B.S. 1362 should be used.
[For MiniDisc Recorder MJ-L77]
CAUTION
This product contains a laser diode of higher
class than 1. To ensure continued safety, do not
remove any covers or attempt to gain access to
the inside of the product.
Refer all servicing to qualified personnel.
The following caution label appears on your unit.
Location: Bottom of the unit.
CLASS 1
LASER PRODUCT
INFRINGEMENT OF COPYRIGHT
Recording and playback of copyrighted material
may require consent. See the Copyright Design
and Patent Act 1988.
US and foreign patents licensed from Dolby Laboratories Licensing Corporation
background image
Contents
1
Before You Start
Opening the Box ................................................................................................ 4
About Minidiscs ................................................................................................. 5
2
Connecting up
Connecting to the Rest of the System ............................................................... 9
3
What's What
Front Panel Controls and Display ................................................................... 10
4
Switching On
Playing an MD ................................................................................................ 11
Changing the Display ...................................................................................... 12
Introduction to Recording MDs ...................................................................... 13
Automatically Recording from a CD .............................................................. 14
Automatically Recording a Tape ..................................................................... 15
Using the Menu System ................................................................................... 16
5
More Playback Features
Programming the Track Order ....................................................................... 17
Playing Things Again ...................................................................................... 18
Playing Tracks at Random ............................................................................. 19
6
More Recording Features
Recording Options ........................................................................................... 20
Numbering Tracks ........................................................................................... 20
Recording Extra-Long Material ...................................................................... 20
Selecting Analogue Input Recording .............................................................. 21
Recording an Analogue Source ...................................................................... 22
Recording an External Digital Source ............................................................ 23
Recording Over Unwanted Material ............................................................... 24
7
Editing
About MD Editing ............................................................................................ 25
Naming a Disc ................................................................................................. 25
Naming a Track .............................................................................................. 26
Dividing a Track into Two ............................................................................... 27
Combining Two Tracks into One .................................................................... 27
Moving Tracks on a Disc ................................................................................. 28
Reordering Tracks on a Disc ........................................................................... 29
Erasing Tracks on a Disc ................................................................................. 30
Undoing a Mistake .......................................................................................... 31
8
Additional Information
Understanding Error Messages ....................................................................... 32
Troubleshooting .............................................................................................. 33
Specifications .................................................................................................. 34
Se
tUp
In
Use
background image
1 Before You Start
4
Thank you for buying this Pioneer product. Before starting to set up your new
minidisc recorder, please check that you've received the following supplied accessories
in the box:
· Optical digital cable
· Power cable
· Warranty card
· This instruction manual
Using this manual
This manual is for the MJ­L77 Minidisc Recorder. It is split into two sections, the first
covering set up, and the second, operation. Set up, which starts here, covers all aspects
of getting your new minidisc recorder up and running with the rest of your XC­L77
stereo system. If this is the first time you've used minidiscs, we recommend reading the
About Minidiscs section starting on the following page before using the recorder for
the first time.
In the second section of the manual, starting on page 10, you'll learn how to use all
the features of the MJ­L77, from basic playback to disc editing. The final part of the
manual provides reference information on error messages you might encounter
during use, a troubleshooting page, and technical specifications.
Hints on Installation
We want you to enjoy using the MJ­L77 for years to come, so please bear in mind the
following points when choosing a suitable location for it:
DO...
y
Use in a well-ventilated room.
y
Place on a solid, flat, level surface, such as a table, shelf or stereo rack.
DON'T...
y
Use in a place exposed to high temperatures or humidity, including near
radiators and other heat-generating appliances.
y
Place on a window sill or other place where the recorder will be exposed to
direct sunlight.
y
Use in an excessively dusty or damp environment.
y
Place directly on top of an amplifier, or other component in your stereo
system that becomes hot in use.
y
Use near a television or monitor as you may experience interference--
especially if the television uses an indoor antenna.
y
Use in a kitchen or other room where the recorder may be exposed to smoke
or steam.
y
Place on an unstable surface, or one that is not large enough to support all
four of the unit's feet.
Avoiding condensation problems
Condensation may form inside the recorder if it is brought into a warm room from
outside, or if the temperature of the room rises quickly. Although the condensation
won't damage the recorder, it may temporarily impair its performance. For this reason
you should leave it to adjust to the warmer temperature for about an hour before
switching on and using.
more than
+ 15cm =
Tip
Take care when
installing or storing
optical cable.
Do not bend the
cable around sharp
corners and coil
loosly when storing.
Opening the Box
background image
1 Before You Start
5
Se
tUp
Minidisc, or MD as it's usually called, is an extremely flexible and convenient format
on which you can both playback and record high-quality digital audio. Because it's a
disc, MD has many of the advantages of compact disc--you can jump directly to any
track on the disc, program the playing order, instantly skip over tracks you don't want
to play or back to tracks you want to play again, and so on. The really great thing
about MD though is the flexibility it offers when recording. Things that were
impossible using analogue cassette tape, such as reordering tracks, programming
track names, and deleting tracks without leaving any gaps are all easily achieved if
you're using MD. Minidiscs have other advantages over cassette tape; the recorder
automatically finds the next blank space to record on, and can tell you how much
room there is left on a disc before you start recording. When you delete something
from the disc, the time available for recording is automatically updated.
If this is the first time you've used MD, please take a few minutes to read through this
section of the manual. It gives information on how to handle the discs properly, the
different kinds of disc available, and some basic MD characteristics.
Different kinds of MD available
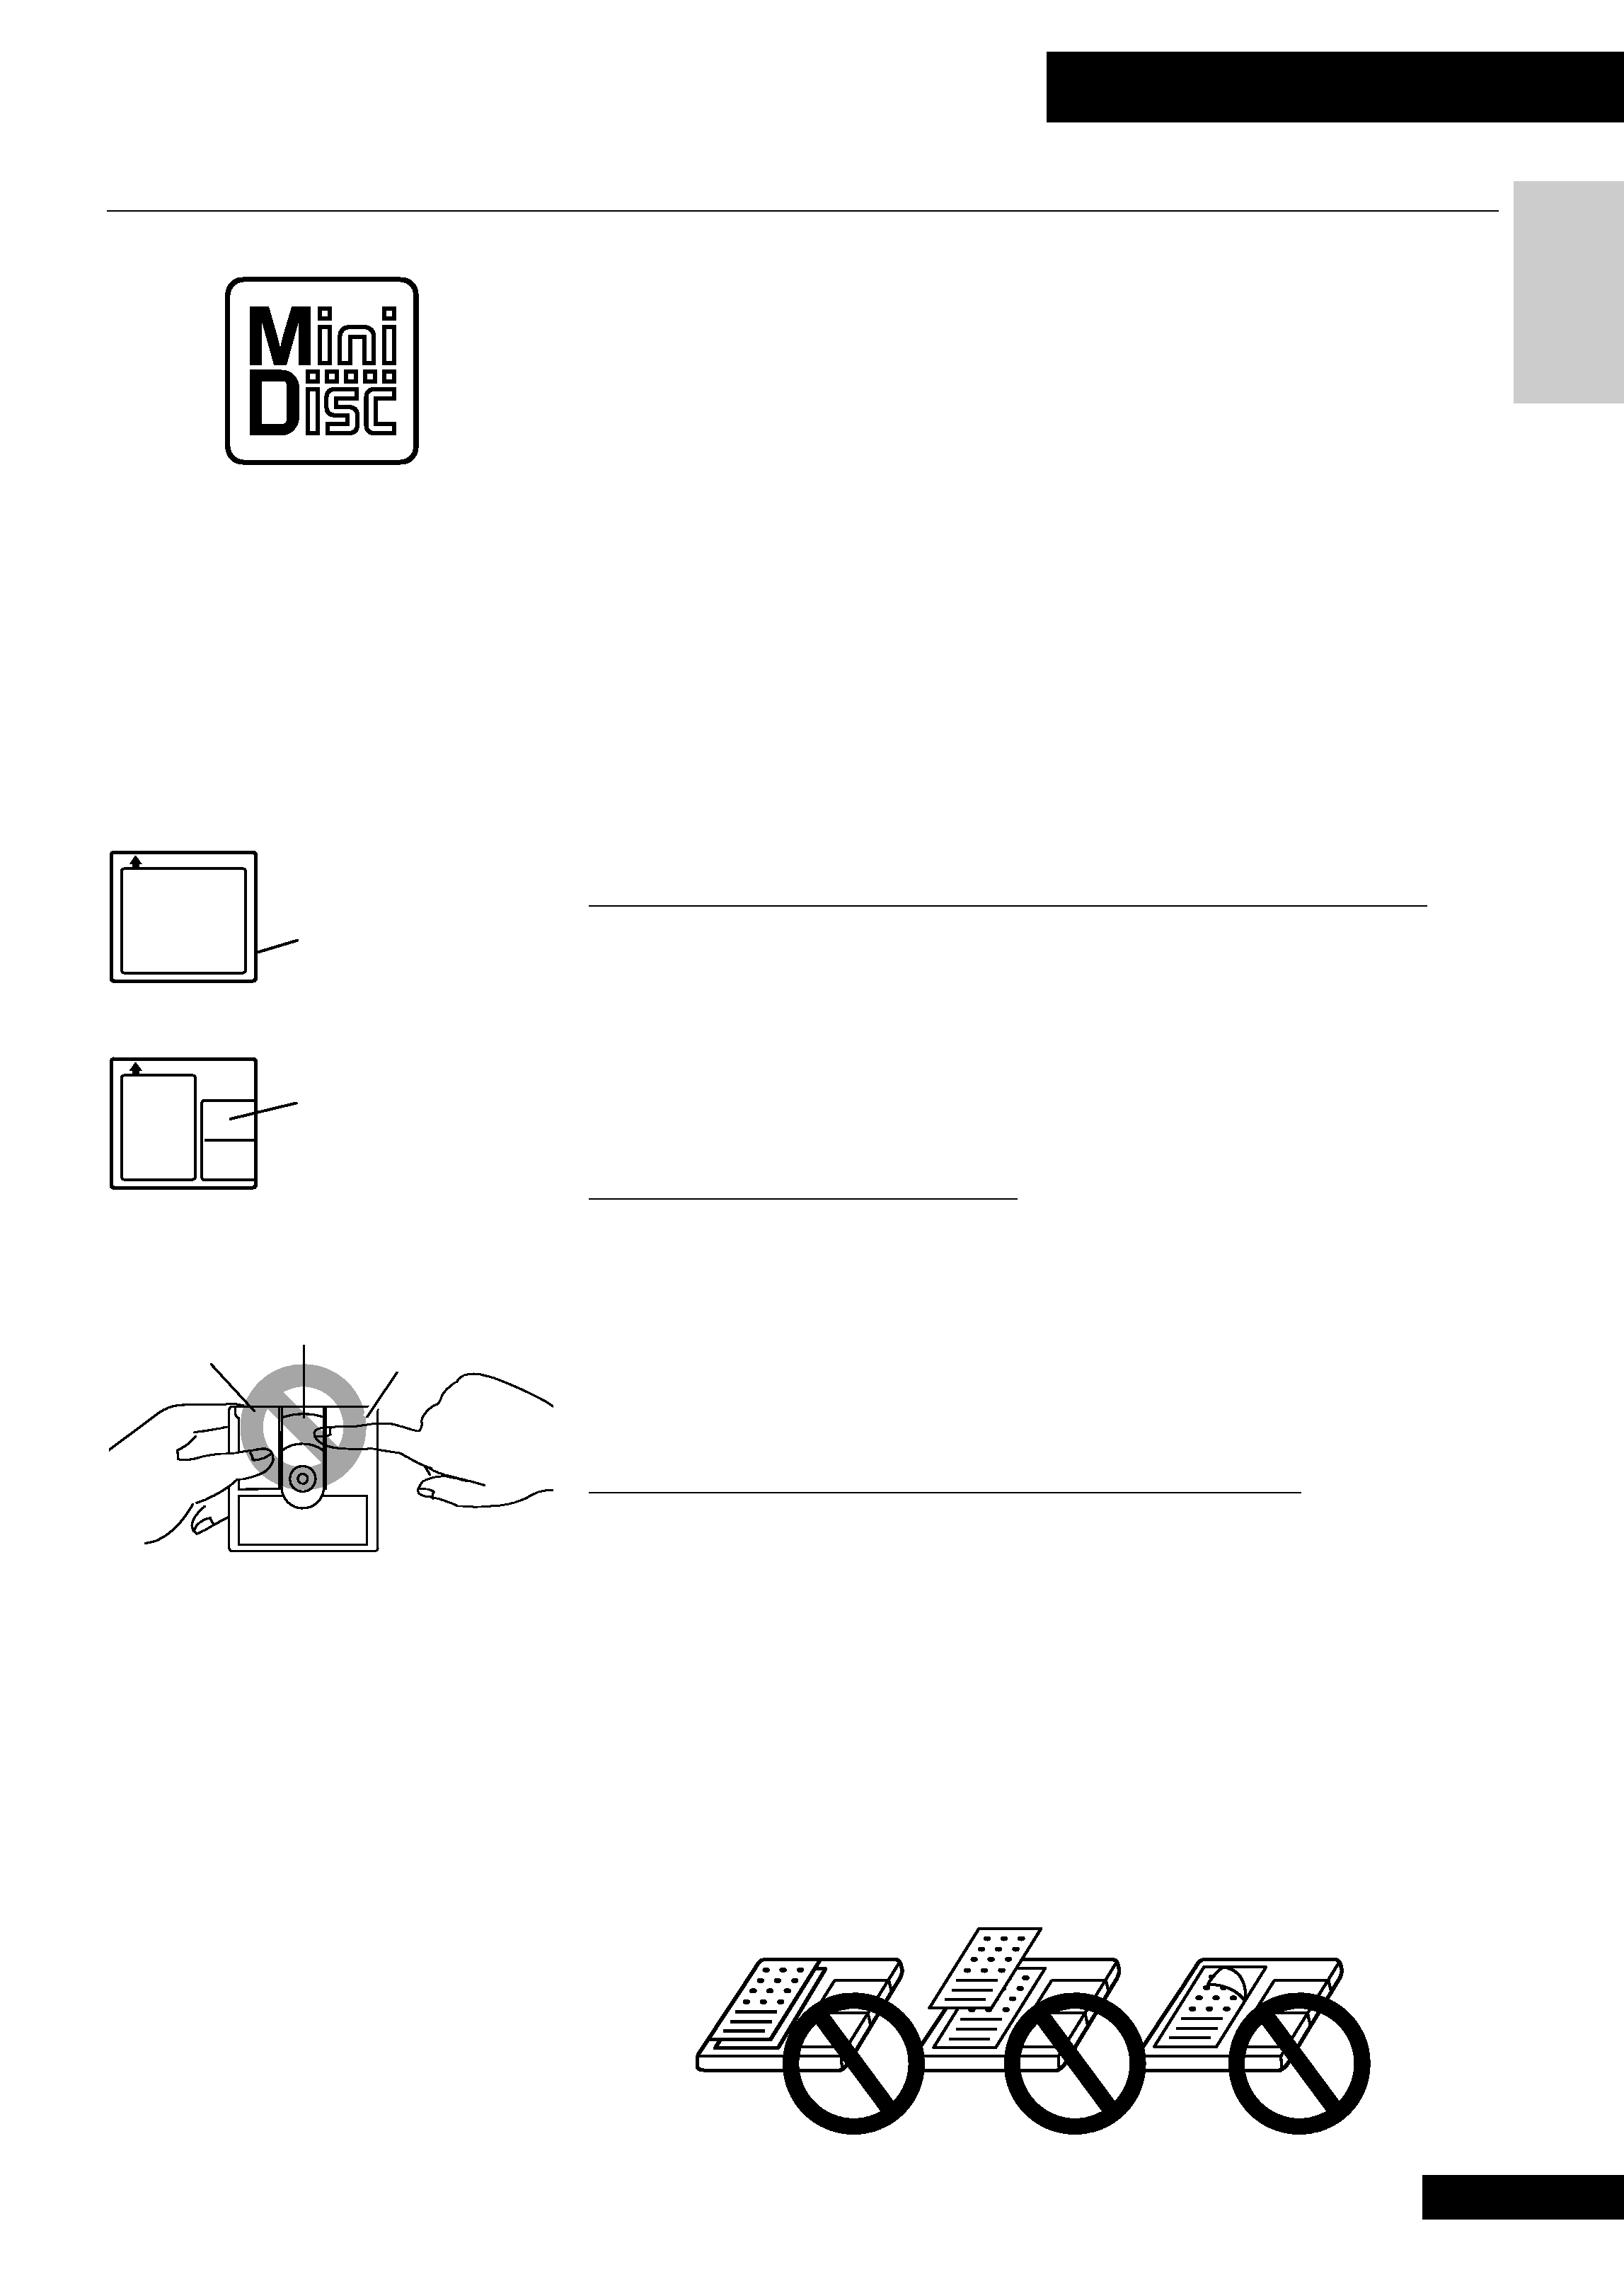
All MDs carry the MD logo shown at the top of the page. Do not use any disc which
does not have this mark.
There are both recordable and non-recordable (playback-only) MDs. Commercially
available music on MD generally comes on discs which are playback only. The
diagrams left show the differences between the two types.
Handling MDs
The actual disc that contains the audio is quite delicate and so is protected against
dust, fingerprints and so on by an outer cartridge. Don't force open the disc shutters to
expose the disc, and never touch the disc itself. Also, do not attempt to disassemble the
disc cartridge.
If the disc cartridge becomes dirty or stained, wipe clean with a soft, dry cloth.
Storing and labelling MDs
When you're not playing a minidisc, put the disc cartridge back in the case for storage.
Avoid storing or leaving discs in very hot or humid areas, such as in a car in summer.
Also avoid leaving discs in direct sunlight, or in places where sand or grit might get
into the disc cartridge.
Recordable MDs come with self-adhesive labels to stick on the disc cartridge to tell you
what's recorded on the disc. Always stick the label in the area provided, avoiding the
disc shutter and the edges of the disc.
If the disc label starts to peel off at the corners, remove the label and replace it with a
fresh one--don't simply stick another label on top of the old one.
About Minidiscs
Minidisc mark--all
MDs carry this logo
Shutter
Disc
Cartridge
Don't touch the disc!
Recordable MD
Disc has shutters
on both sides
Disc
label
Playback-only MD
Disc has shutter
on one side only
Disc
label

Reviews

There are no reviews of this manual yet.