PIONEER DJM-707/KUCXJ Owner's Manual

Cover page of PIONEER DJM-707/KUCXJ Owner's Manual

Owner's Manual for PIONEER DJM-707/KUCXJ, downloadable as a PDF file.

We also have service manual to this model.

Manual details

  • Immediate download after payment.
  • Delivered as a PDF file.
  • The manual has 16 pages
  • File size: 1.65 MB
  • Available language versions: French, English
  • Different language versions may vary sligthly in file size and page count.

We guarantee that...

  • our manuals are complete,
  • our manuals are checked with antivirus,
  • We'll issue refund if the manual is damaged, incomplete or unreadable (our refund policy)

Sample pages

Thumbnail of page 1Thumbnail of page 2Thumbnail of page 3Thumbnail of page 4
Thumbnail of page 5Thumbnail of page 6Thumbnail of page 7Thumbnail of page 8
Thumbnail of page 9
background image
1
<DRB1353>
Operating Instructions
DJ MIXER
DJM-707
background image
1
<DRB1353>
Operating Instructions
DJ MIXER
DJM-707
background image
2
<DRB1353>
Thank you for buying this Pioneer product.
Please read through these operating instructions so you will
know how to operate your model properly. After you have
finished reading the instructions, put them away in a safe place
for future reference.
In some countries or regions, the shape of the power plug and
power outlet may sometimes differ from that shown in the
explanatory drawings. However the method of connecting and
operating the unit is the same.
K015 En
NOTE: THE NO USER-SERVICEABLE PARTS COMPARTMENT WARNING IS LOCATED ON THE APPLIANCE BOTTOM.
background image
3
<DRB1353>
IMPORTANT NOTICE
The serial number for this equipment is located on the bottom
plate. Please write this serial number on your enclosed
warranty card and keep it in a secure area. This is for your
security.
WARNING:
Handling the cord on this product or cords associated with
accessories sold with the product will expose you to lead, a
chemical known to the State of California and other
governmental entities to cause cancer and birth defects or
other reproductive harm.
Wash hands after handling.
background image
4
<DRB1353>
Location
Install the unit in a well-ventilated location where it will
not be exposed to high temperatures or humidity.
÷ Do not install the unit in a location which is exposed to
direct rays of the sun, or near stoves or radiators.
Excessive heat can adversely affect the cabinet and
internal components. Installation of the unit in a damp or
dusty environment may also result in a malfunction or
accident. (Avoid installation near cookers etc., where the
unit may be exposed to oily smoke, steam or heat.)
÷ When the unit is used inside a carrying case or DJ booth,
separate it from the walls or other equipment to improve
heat radiation.
Condensation
When this unit is brought into a warm room from previously
cold surroundings or when the room temperature rises
sharply, condensation may form inside, and the unit may not
be able to attain its full performance. In cases like this, allow
the unit to stand for about an hour or raise the room
temperature gradually.
Cleaning the Unit
÷ Use a polishing cloth to wipe off dust and dirt.
÷ When the surfaces are very dirty, wipe with a soft cloth
dipped in some neutral cleanser diluted five or six times
with water and wrung out well, then wipe again with a dry
cloth. Do not use furniture wax or cleaners.
÷ Never use thinners, benzene, insecticide sprays or other
chemicals on or near this unit, since these will corrode the
surfaces.
CAUTIONS REGARDING
HANDLING
FEATURES
CHECKING ACCESSORIES
÷ Hexagonal Allen driver
(for cross fader operating load adjust screw)
÷ These operating instructions
÷ Warranty
1) Designed for high sound quality
Electronic parts have been carefully selected and internal
circuitry redesigned to provide the shortest-possible signal
paths, thus realizing true club sound with power to spare.
2) Ergonomic, user-customizable cross fader
1 Cross-fader "feeling" adjustment: the specific physical
sensation of cross fader operation is all-important to the
DJ; the "feeling" adjustment provided in this mixer is an
industry first, allowing the user to adjust the physical
sensation of the slider to personal preferences, for the
smoothest possible cross fader operation.
2 Independent cross fader lag cut: the mechanical play
(the lag distance before sound begins) at each end of the
cross fader slider can be adjusted using the fader lag cut
function, thus allowing adjustment of the sound cut when
performing scratch play.
3 Independent cross fader curve: an industry first, the
right-left independently adjustable (33 steps) cross fader
curve control goes beyond the symmetrical type of cross
fader curve on conventional mixers, thus broadening DJ
performance capabilities.
4 "Contactless fader" mechanism: based on Pioneer's
own proprietary technology, this new contactless optical
fader assures durable and stable operation under the
severest of DJ performance conditions.
3) Other features
1 When connected via a control cord to a Pioneer DJ CD
player (sold separately), operation of the fader can be used
for automatic "fader start" play.
2 "Fader reverse" function allows reversing of the
directions of fader operation movement.
3 Delicate 33-step channel fader curve settings.
4 Can be connected in series to other mixers for "session"
output of mixed sounds.
CHECKING ACCESSORIES ....................................... 4
CAUTIONS REGARDING HANDLING ...................... 4
Location ........................................................................... 4
Condensation .................................................................. 4
Cleaning the Unit ............................................................ 4
FEATURES ................................................................. 4
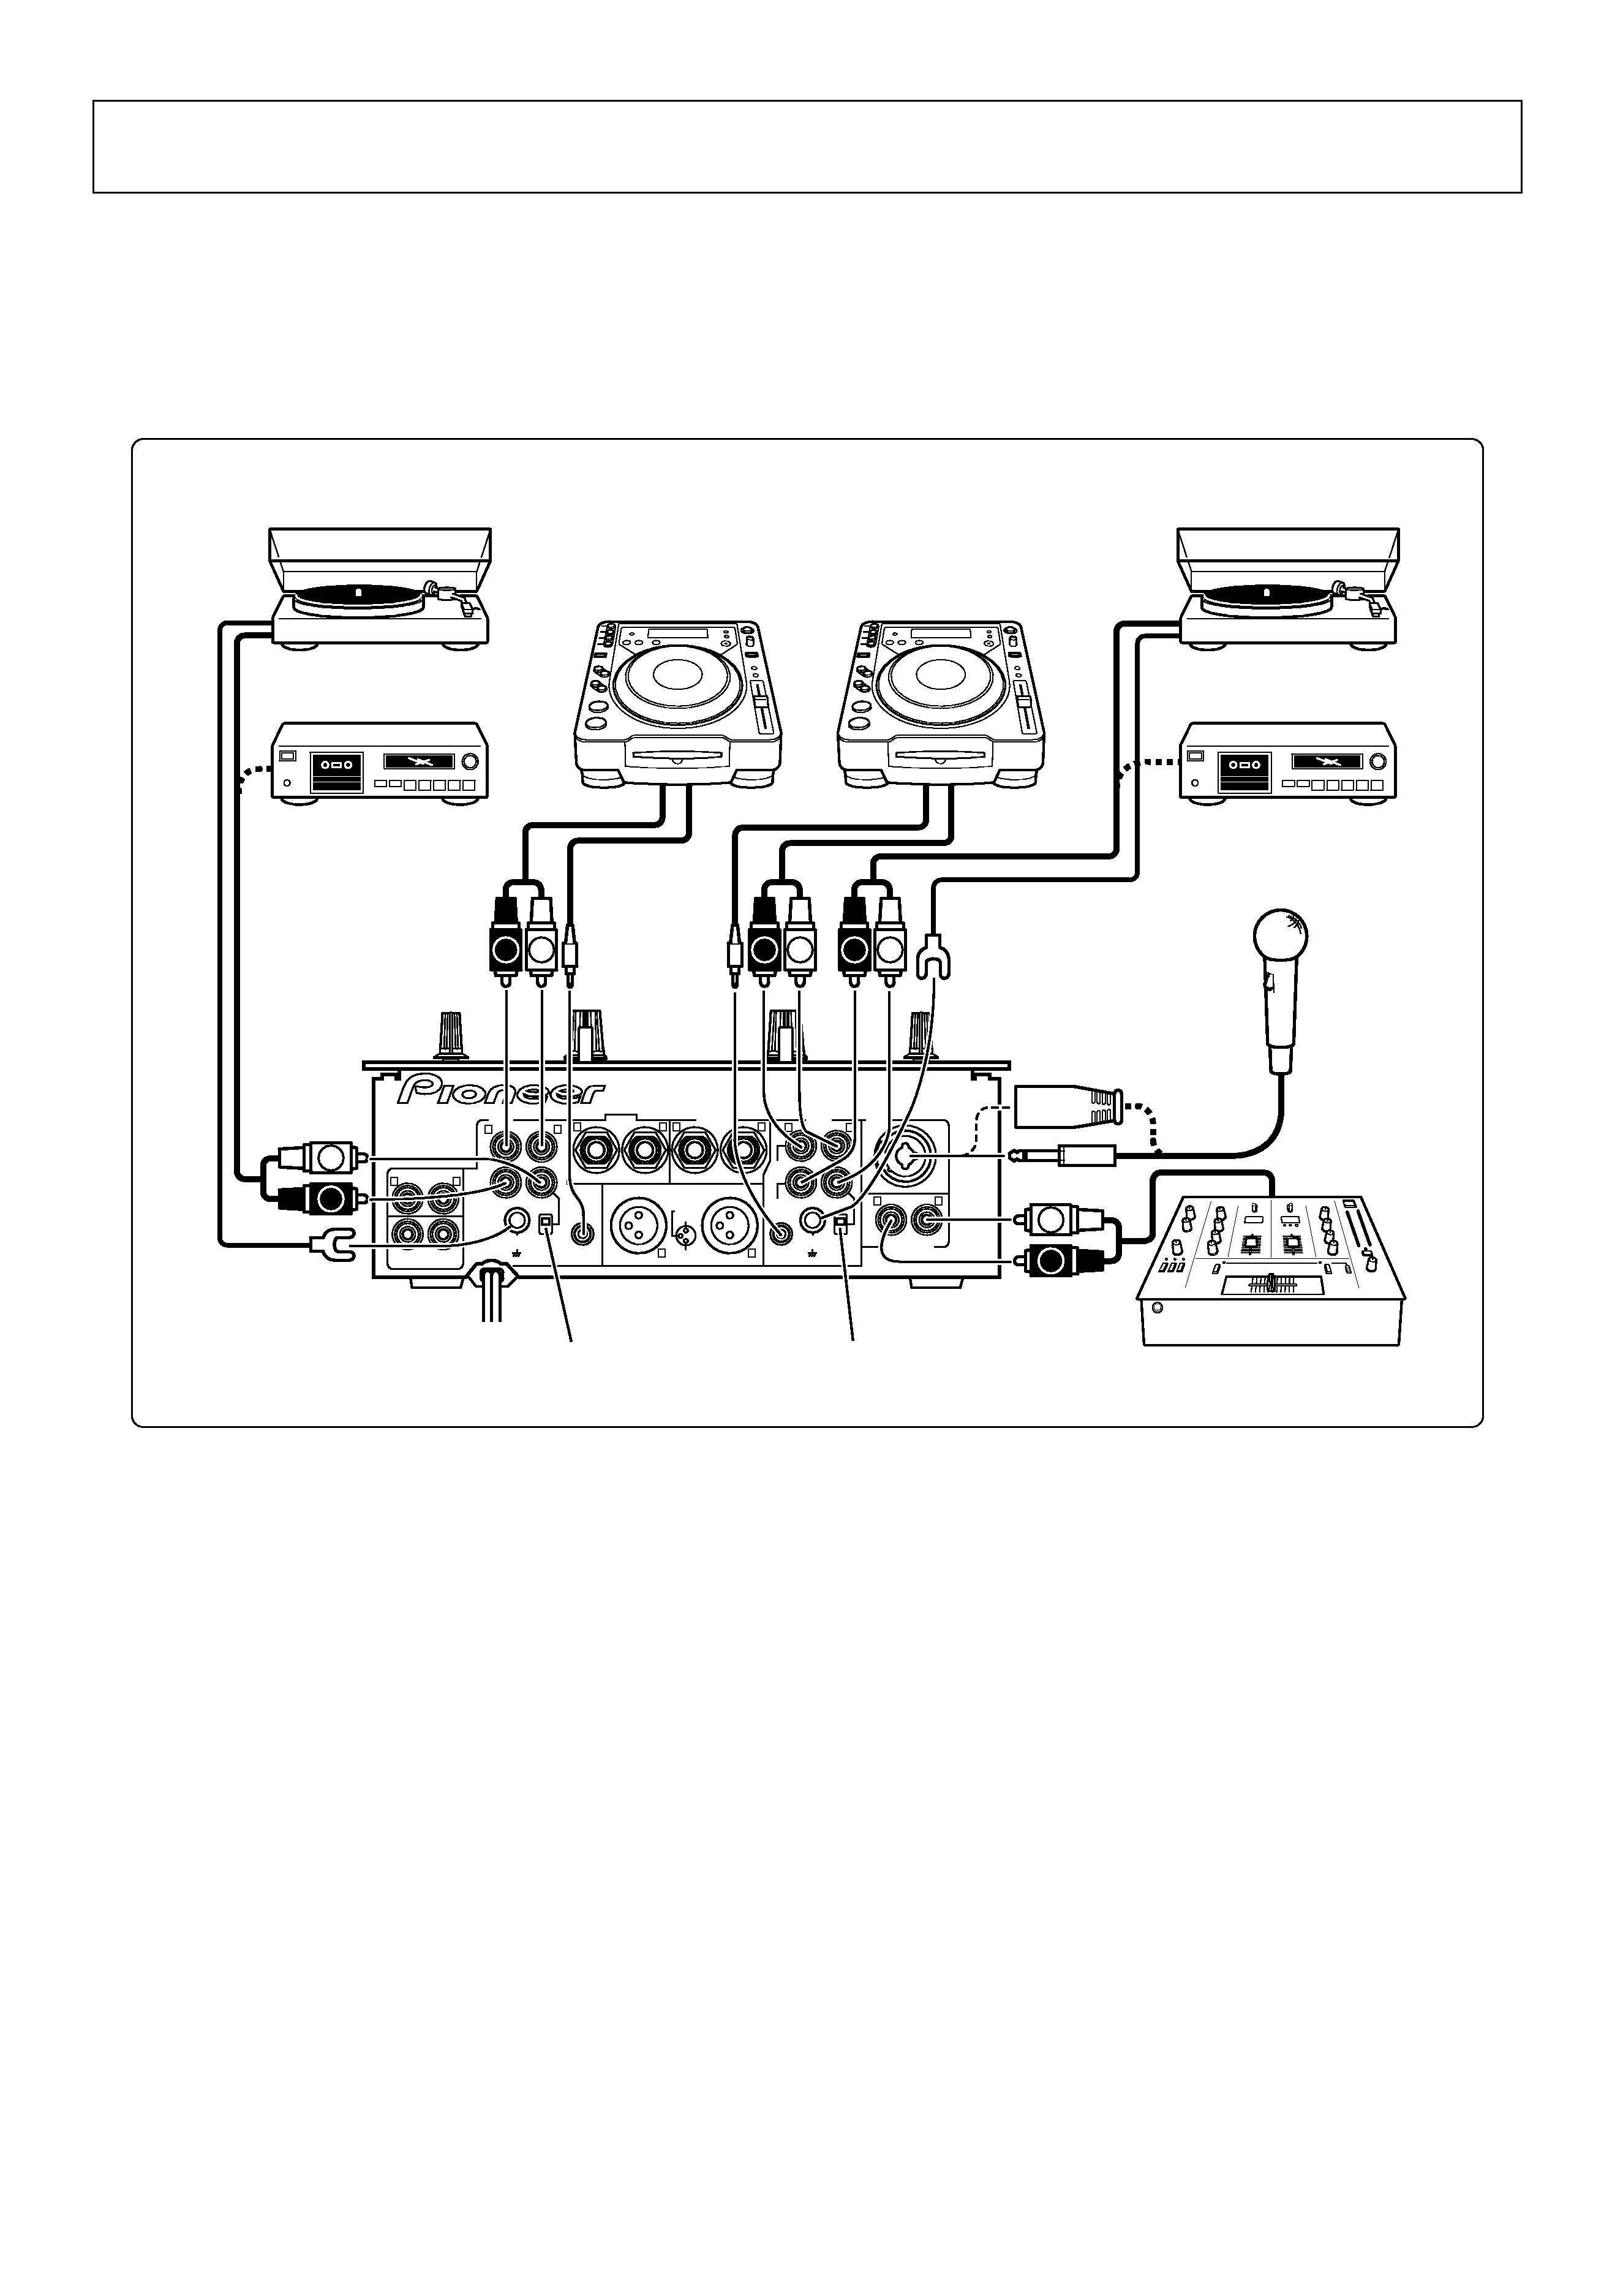
CONNECTIONS ......................................................... 5
PART NAMES AND FUNCTIONS ............................. 7
Top Panel ........................................................................ 7
Front Panel .................................................................... 10
Rear Panel ..................................................................... 11
FADER OPERATIONS .............................................. 12
TROUBLESHOOTING .............................................. 14
SPECIFICATIONS .................................................... 15
CONTENTS
background image
5
<DRB1353>
CONNECTIONS
When connecting or changing the connection of units, make sure to first turn off the power switch and disconnect the power cord
from the outlet.
This mixer is not furnished with any connection cables; when performing connections, use the cables that came provided with your
player and other components, or purchase commercially available audio cables.
1. Connecting Input Components
DJ CD Players 1
Connect the AUDIO OUT connectors from Player A to the
CH-1 CD input jacks of the DJ mixer, and connect the AUDIO
OUT connectors from Player B to the CH-2 CD input jacks.
When using one of the listed DJ CD players, the control cord
furnished with the CD player should be connected between
the player and the DJ mixer. In this way, the DJ mixer's fader
lever can be operated to control operation of the DJ CD
player for fader start play and back cue.
Analog turntable / Cassette deck, etc. 2
Connect the analog turntable 1 output cables to the CH-1
PHONO/LINE jacks of the DJ mixer, and connect the ground
wire to the SIGNAL GND terminal. Set the CH-1 PHONO/
LINE selector switch to [PHONO]. When connecting a
cassette deck or other such component to these jacks, set
the CH-1 PHONO/LINE selector switch to [LINE].
Connect the analog turntable 2 output cables to the CH-2
PHONO/LINE jacks of the DJ mixer, and connect the ground
wire to the SIGNAL GND terminal. Set the CH-2 PHONO/
LINE selector switch to [PHONO]. When connecting a
cassette deck or other such component to these jacks, set
the CH-2 PHONO/LINE selector switch to [LINE].
* The PHONO input for this DJ mixer supports use of a MM
cartridge.
MIC 3
The MIC jack on this unit supports use of either PHONE type
or XLR type plugs.
SESSION IN 4
When using multiple mixers simultaneously, use the
appropriate audio cables to connect the other mixer outputs
to these jacks.
BOOTH/
SESSION OUT
CD
PHONO
/ LINE
PHONO
/ LINE
PHONO
LINE
SIGNAL
GND
RL
(MONO)
(MONO)
MASTER 2
MASTER 1
SEND
RETURN
CH-2
CD
CH-1
MIC
PHONO
LINE
SIGNAL
GND
CH-2 PLAYER
CONTROL
CH-1 PLAYER
CONTROL
3 COLD
1 GND
2 HOT
SESSION IN
R
L
R
R
R
R
L
R
L
L
L
L
R
L
R
L
R
L
R
L
R
L
Analog turntable 2
Cassette deck, etc.
[DJ CD Player]
CDJ-800, CDJ-1000, CDJ-1000MK2,
CDJ-100S, CDJ-700S, CDJ-500II,
CMX-3000, CMX-5000, DMP-555
Player A
Analog turntable 1
Cassette deck, etc.
Microphone
Other mixer output
2
11
2
3
4
CH-1 PHONO/LINE
selector switch
CH-2 PHONO/LINE
selector switch
Player B

Reviews

There are no reviews of this manual yet.