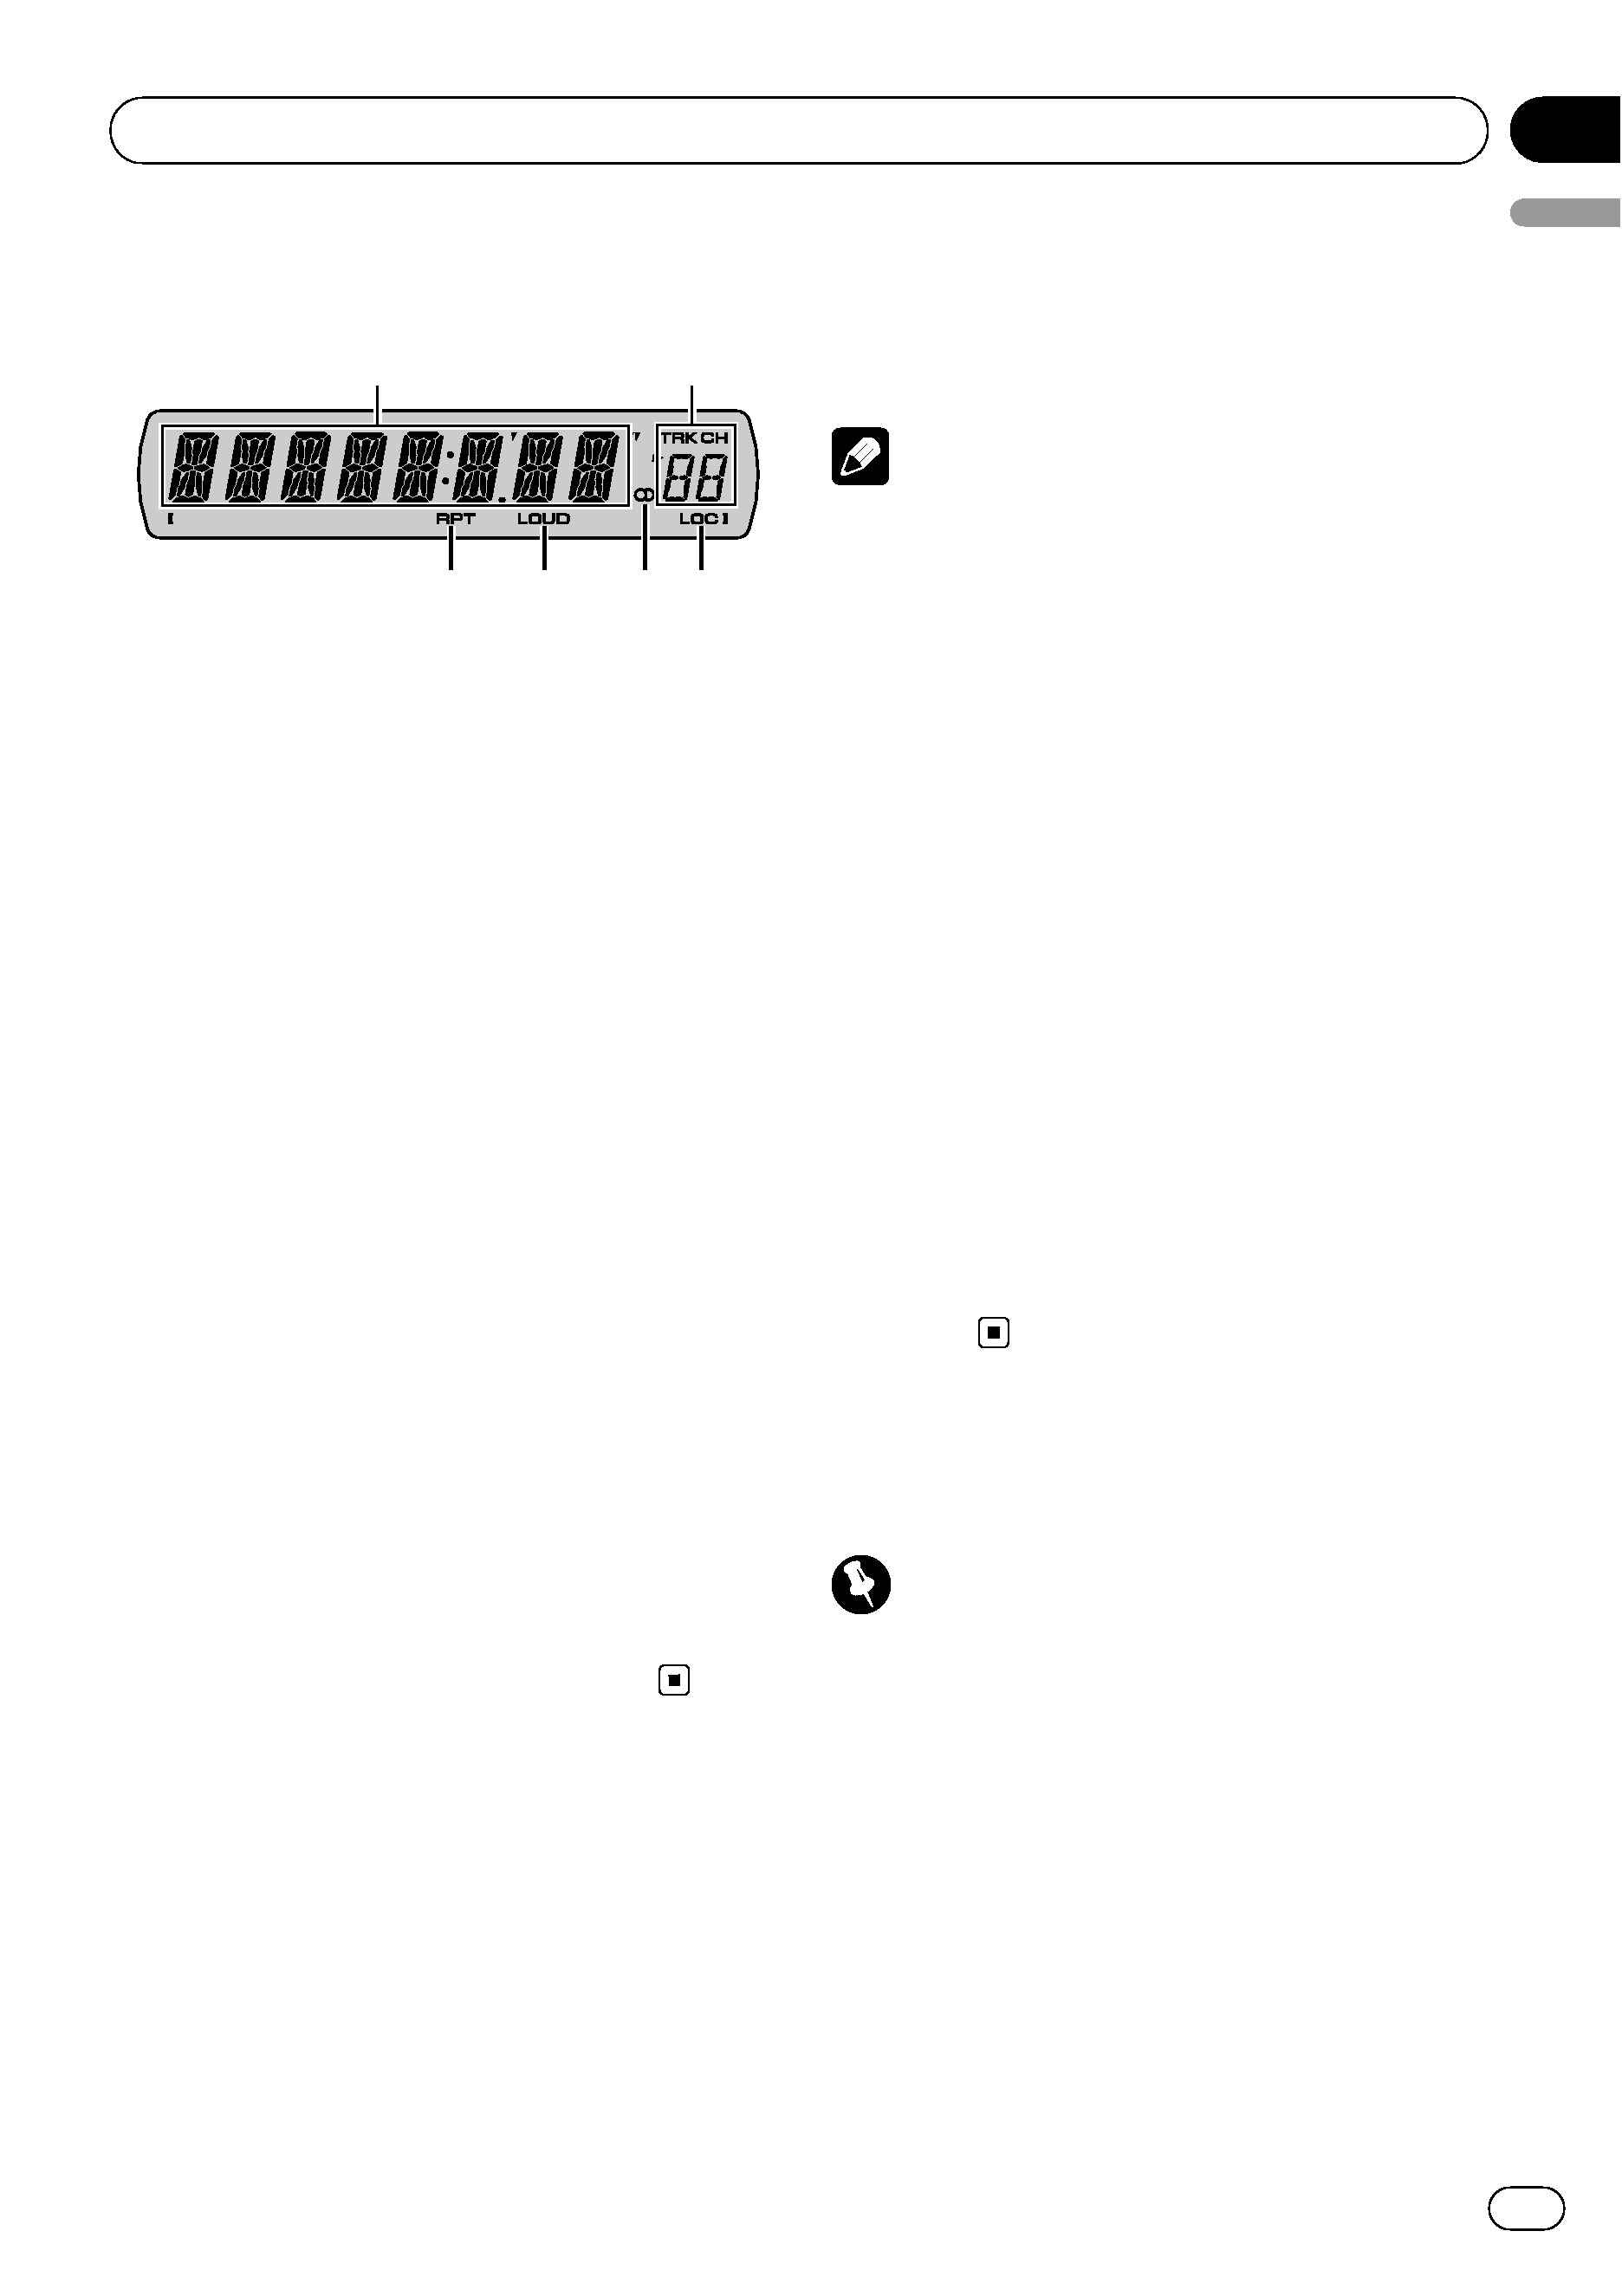
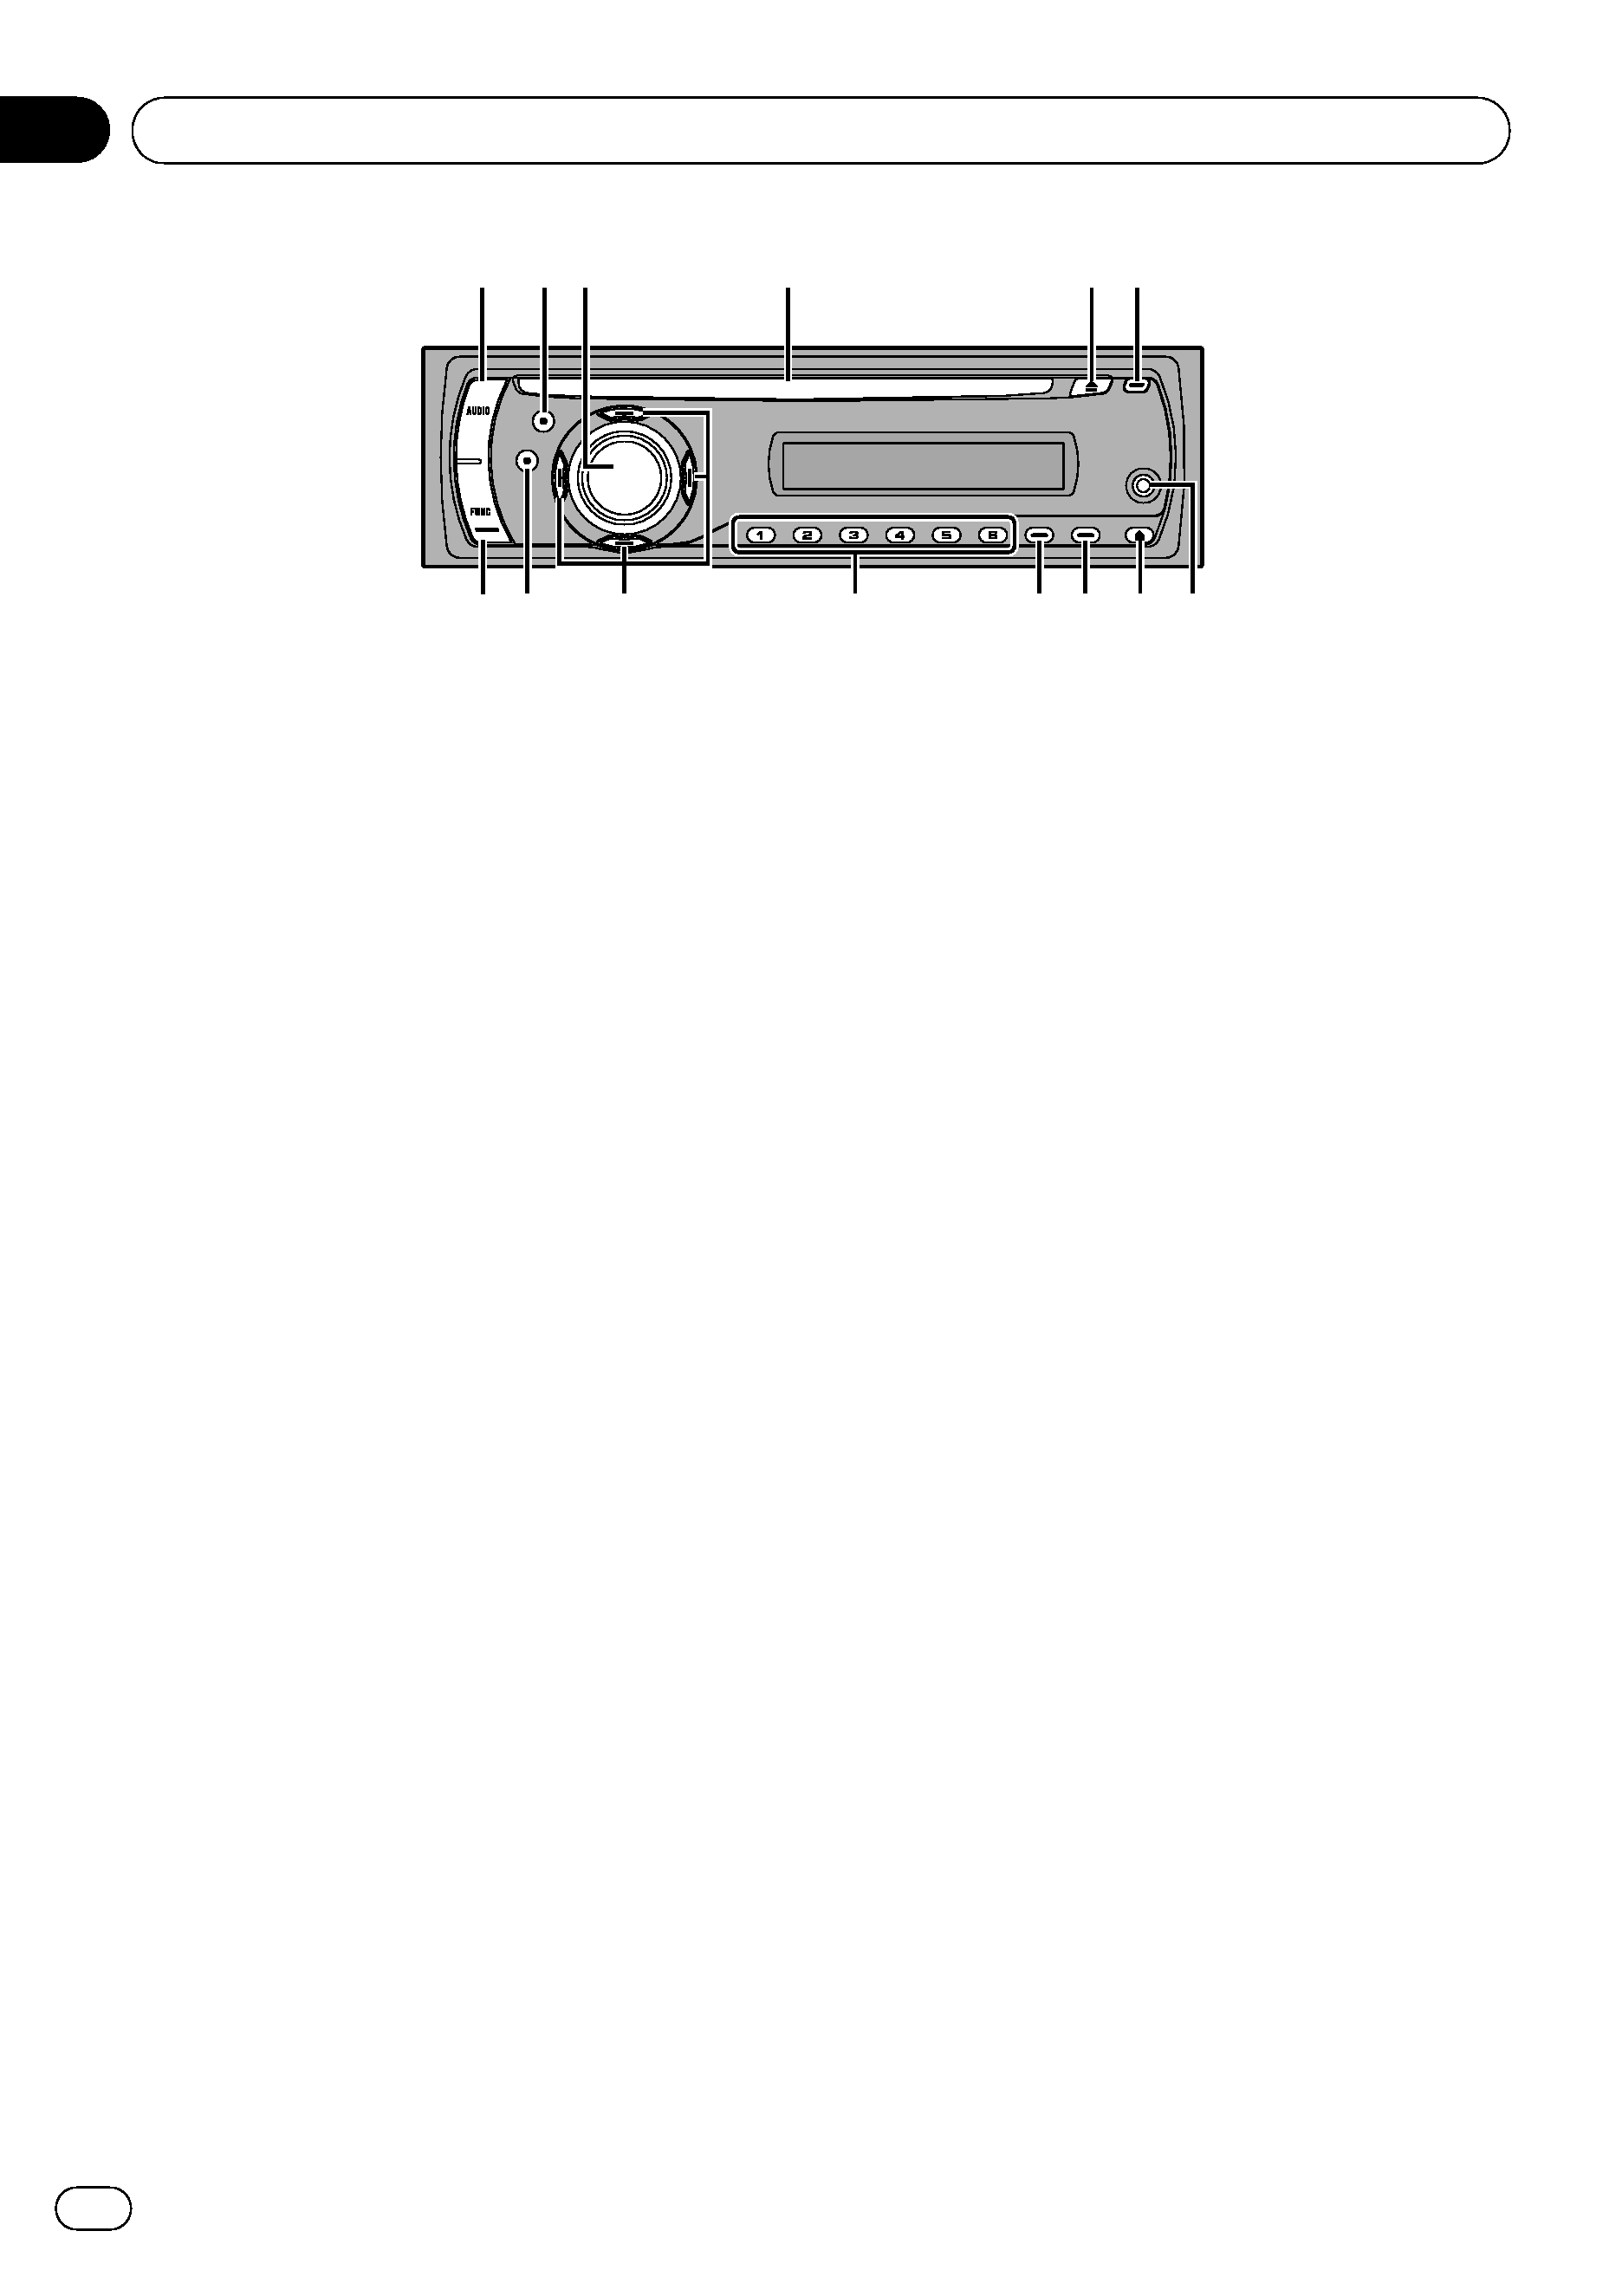
PIONEER DEH-1950G/XN/ES1 Owner's Manual

Cover page of PIONEER DEH-1950G/XN/ES1 Owner's Manual

Owner's Manual for PIONEER DEH-1950G/XN/ES1, downloadable as a PDF file.

We also have service manual to this model.

Manual details

  • Immediate download after payment.
  • Delivered as a PDF file.
  • The manual has 60 pages
  • File size: 1.48 MB
  • Available language versions: Korean, Portuguese, Arabic, English, Spanish, Chinese Traditional, Chinese Simplified
  • Different language versions may vary sligthly in file size and page count.

We guarantee that...

  • our manuals are complete,
  • our manuals are checked with antivirus,
  • We'll issue refund if the manual is damaged, incomplete or unreadable (our refund policy)

Sample pages

Thumbnail of page 1Thumbnail of page 2Thumbnail of page 3Thumbnail of page 4
Thumbnail of page 5Thumbnail of page 6Thumbnail of page 7Thumbnail of page 8
Thumbnail of page 9
background image
Operation Manual
CD Receiver
DEH-1950
DEH-1950G
English
P
o
rtu
guês
(B)
Español
background image
Operation Manual
CD Receiver
DEH-1950
DEH-1950G
English
P
o
rtu
guês
(B)
Español
background image
Thank you for buying this Pioneer product.
Please read through these operating instructions so you will know how to operate
your model properly. After you have finished reading the instructions, keep this man-
ual in a safe place for future reference.
Before You Start
About this unit
3
Visit our website
3
Protecting your unit from theft
3
­ Removing the front panel 3
­ Attaching the front panel 3
Operating this unit
What
's What 4
­ Head unit 4
­ LCD display 5
Basic Operations
5
­ Turning the unit on and selecting a
source
5
­ Adjusting the volume 5
­ Turning the unit off 5
Tuner
5
­ Listening to the radio 5
­ Storing and recalling broadcast
frequencies
6
­ Tuning in strong signals 6
­ Storing the strongest broadcast
frequencies
6
Built-in Player
6
­ Playing a disc 6
­ Repeating play 6
­ Playing tracks in random order 7
­ Scanning tracks of a CD 7
­ Pausing disc playback 7
Audio Adjustments
7
­ Using balance adjustment 7
­ Using the equalizer 7
­ Adjusting equalizer curves 8
­ Adjusting loudness 8
­ Adjusting source levels 8
Other Functions
8
­ Adjusting initial settings 8
­ Setting the clock 8
­ Setting the FM tuning step 9
­ Setting the AM tuning step 9
­ Switching the auxiliary setting 9
Additional Information
Troubleshooting
10
Error messages
10
Handling guideline of discs and player
10
Dual Discs
11
Specifications
12
Contents
En
2
background image
About this unit
CAUTION
! Do not allow this unit to come into contact
with liquids. Electrical shock could result.
Also, this unit damage, smoke, and overheat
could result from contact with liquids.
! Keep this manual handy as a reference for op-
erating procedures and precautions.
! Always keep the volume low enough so that
you can hear sounds from outside the vehicle.
! Protect this unit from moisture.
! If the battery is disconnected or discharged,
the preset memory will be erased and must be
reprogrammed.
! If this unit does not operate properly, contact
your dealer or nearest authorized Pioneer Ser-
vice Station.
Visit our website
Visit us at the following site:
! We offer the latest information about
Pioneer Corporation on our website.
Protecting your unit from
theft
The front panel can be detached to deter theft.
Important
! Handle gently when removing or attaching
the front panel.
! Avoid subjecting the front panel to excessive
shocks.
! Keep the front panel out of direct sunlight and
high temperatures.
Removing the front panel
1
Press DETACH to release the front
panel.
2
Grab the front panel and remove.
3
Put the front panel into provided pro-
tective case for safe keeping.
Attaching the front panel
1
Slide the front panel to the left until it
clicks.
Front panel and the head unit are jointed on
the left side. Make sure that the front panel
has been jointed to the head unit.
2
Press the right side of the front panel
until it is firmly seated.
# If you can't attach the front panel to the head
unit successfully, try again. Front panel may be
damaged if you attach the front panel forcedly.
Before You Start
En
3
English
Section
01
background image
What
's What
Head unit
1 AUDIO button
Press to select various sound quality con-
trols.
2 EQ button
Press to select various equalizer curves.
3 SOURCE button, VOLUME
This unit is turned on by selecting a source.
Press to cycle through all the available
sources.
Press and hold to recall the initial setting
menu when the sources are off.
Rotate it to increase or decrease the vo-
lume.
4 CD loading slot
Insert a disc to play.
5 EJECT button
Press to eject a CD from your built-in CD
player.
6 CLOCK button
Press to change to the clock display.
7 AUX input jack (3.5 mm stereo jack)
Use to connect an auxiliary equipment.
8 DETACH button
Press to remove the front panel from the
head unit.
9 PAUSE button
Press to turn pause on or off.
a LOUD button
Press to turn loudness on or off.
b 1 to 6 buttons
Press for preset tuning.
c a/b/c/d buttons
Press to perform manual seek tuning, fast
forward, reverse and track search controls.
Also used for controlling functions.
d BAND button
Press to select among three FM bands and
one AM band and to cancel the control
mode of functions.
e FUNCTION button
Press to recall the function menu when op-
erating a source.
1
4
4
4
5
5
5 6
6
6
7
7
7
8
8
8
9
a
b
c
c
2 3
d
e
e
Operating this unit
En
4
Section
02
background image
LCD display
1
3
4
6
2
5
1 Main display section
Shows the various information such as
band, play time, and other setting.
! Tuner
Band and frequency are displayed.
! Built-in CD Player
Erapsed play time is displayed.
! Audio and initial setup
Function names and setup status are dis-
played.
2 Preset number/track number indicator
Shows the track number or preset number.
! If a track number 100 or more is selected,
d on the left of the track number indica-
tor will light.
3 RPT indicator
Shows when repeat play is turned on.
4 LOUD indicator
Appears in the display when loudness is
turned on.
5 Stereo (5) indicator
Shows when the selected frequency is
being broadcast in stereo.
6 LOC indicator
Shows when local seek tuning is on.
Basic Operations
Turning the unit on and
selecting a source
You can select a source you want to listen to.
To switch to the built-in CD player, load a disc
in the unit (refer to the next page).
% Press SOURCE to select a source.
Press
SOURCE repeatedly to switch between
the following sources:
Tuner
--Built-in CD player--AUX
Notes
! In the following cases, the sound source will
not change:
-- When there is no disc in the unit.
-- When the AUX (auxiliary input) is set to off
(refer to page 9).
! AUX is set to on by default. Turn off the AUX
when not in use (refer to Switching the auxili-
ary setting on page 9).
! When this unit's blue/white lead is connected
to the vehicle
's auto-antenna relay control
terminal, the vehicle
's antenna extends when
this unit
's source is turned on. To retract the
antenna, turn the source off.
Adjusting the volume
% Use VOLUME to adjust the sound level.
Turning the unit off
% Press SOURCE and hold until the unit
turns off.
Tuner
Listening to the radio
Important
If you are using this unit in North, Central or
South America, reset the AM tuning step (see
Setting the AM tuning step on page 9).
1
Press SOURCE to select the tuner.
2
Press BAND to select a band.
Press
BAND until the desired band (F1, F2, F3
for FM or
AM) is displayed.
3
To perform manual tuning, briefly press
c or d.
Operating this unit
En
5
English
Section
02

Reviews

There are no reviews of this manual yet.