ONKYO SKF-101 Owner's Manual

Cover page of ONKYO SKF-101 Owner's Manual

Owner's Manual for ONKYO SKF-101, downloadable as a PDF file.

Manual details

  • Immediate download after payment.
  • Delivered as a PDF file.
  • The manual has 2 pages
  • File size: 0.07 MB
  • Available language versions: English
  • Different language versions may vary sligthly in file size and page count.

We guarantee that...

  • our manuals are complete,
  • our manuals are checked with antivirus,
  • We'll issue refund if the manual is damaged, incomplete or unreadable (our refund policy)

Sample pages

Thumbnail of page 1Thumbnail of page 2Thumbnail of page 3Thumbnail of page 4
Thumbnail of page 5Thumbnail of page 6
background image
Thank you for your purchase of the Onkyo speaker system.
Please read this manual thoroughly before using it.
Following the instructions in this manual will enable you to
obtain optimum performance and listening enjoyment from
your new speaker system.
Please retain this manual for future reference.
Before using this unit
The speaker cabinet is made of wood and is therefore
sensitive to extreme temperatures and humidity. Avoid
placing the speaker systems in locations subjected to direct
sunlight, or in smokey or in humid places, such as near an
air conditioner, humidifier, bathroom, or kitchen. Doing so
may result in damage to the speaker.
Place the unit on a rigid, level surface. Placing it on a
slanted surface or weak base not only may cause the unit to
fall, but also results in decreased sound quality.
Be sure to turn off your amplifier before connecting the
speaker system. Connecting them with the amplifier's power
on may result in damage to the amplifier or the speaker
system.
Keep water or other liquids away from the unit. If water is
spilled into the unit, not only the unit but also the speakers
themselves may be damaged.
Name and function of each part
Connection
Turn the sound volume to the minimum and disconnect the
power cord to the amplifier before connecting the speaker
cables.
The nominal impedance of this speaker system is 6
. Use
only amplifiers capable of handling this impedance.
Use the supplied speaker cables to connect between
speaker 's binding posts and the amplifier's speaker
terminals as illustrated below.
Connect the speaker cables securely to the terminals, with
the core wires twisted properly. In this case, make sure that
the core wires do not touch each other. Note that a short
circuit in core wires may result in damage to the amplifier.
This speaker system uses banana-plug compatible binding
posts.
Connect the Right and Left speakers (as viewed from the
listening position) to the amplifier's corresponding Right
and Left speaker terminals.
Before turning on the amplifier's power switch:
Make sure that the positive (+) and negative (­) speaker
cables do not contact each other. Otherwise, a short-circuit
may occur, causing damage to the amplifier.
Be sure to connect the speaker cables with correct polarity
(connect the speaker's positive (+) and negative (­) binding
posts with the amplifier's corresponding speaker terminals).
Reversed polarity results in impaired bass-range
reproduction, causing mislocalization of the sound image.
Also, be sure to connect the Right and Left speakers with
the amplifier's corresponding speaker terminals.
Pull lightly on the speaker cables to ensure that they are
connected firmly.
RL
RL
Ordinary connection (single-wiring)
1. Loosen the LOW-FREQUENCY binding post screws, with the
jumper bars attached.
2. Insert the speaker wires to the connection holes. Fasten the
screws securely again.
* To use banana-plug speaker cables, insert the banana plug
into the center hole of each binding post.
Note:
Make sure that the HIGH-FREQUENCY jumper bars are not
loosened.
Bi-wiring connection (Remove the attached jumper bars.)
1. Using two sets of speaker cables, connect the HIGH FRE-
QUENCY and LOW-FREQUENCY binding posts
independently to your amplifier.
2. On the amplifier, connect the speaker cables to the speaker
output terminals paying close attention to maintain consistent
polarity (See below.).
Remove the
jumper bars.
Amplifier's speaker output
terminals
(Or AV amplifier's front
speaker output terminals)
Amplifier's speaker output terminals
(Or AV amplifier's front speaker output
terminals)
Cabinet
Grille
Grille plug holes
Woofer
Tweeter
Bass-reflex port
216 mm
285 mm
921
mm
LOW-FREQUENCY binding post
HIGH-FREQUENCY binding post
SKF-101
SPEAKER SYSTEM
Instruction Manual
background image
http://www.onkyo.co.jp/
HOMEPAGE
SN 29343105
D0103-1
Sales & Product Planning Div. :
2-1, Nisshin-cho, Neyagawa-shi, OSAKA 572-8540, JAPAN
Tel: 072-831-8111 Fax: 072-833-5222
ONKYO U.S.A. CORPORATION
18 Park Way, Upper Saddle River, N.J. 07458, U.S.A.
Tel: 201-785-2600 Fax: 201-785-2650
http://www.onkyousa.com
ONKYO EUROPE ELECTRONICS GmbH
Liegnitzerstrasse 6, 82194 Groebenzell, GERMANY
Tel:
+49-8142-4401-0 Fax: +49-8142-4401-555
http://www.onkyo.net
ONKYO CHINA LIMITED
Units 2102-2107, Metroplaza Tower I,
223 Hing Fong Road, Kwai Chung, N.T., HONG KONG
Tel: 852-2429-3118 Fax: 852-2428-9039
Use with a TV set
In general, Braun tubes used for color television sets, etc. are
extremely sensitive and can be affected even by the magnetism of the
earth. If a speaker system is used near them, therefore, discoloration or
distortion of pictures will occur. To allow use with color television sets,
etc., this speaker system is provided with magnetic shielding.
Even so, discoloration may still result, depending on the installation
environment. If discoloration occurs, turn off the power of the television
set, wait for 15 to 30 minutes and then turn it on again. This activates
the self-demagnetizing function of the television set, improving the
display condition. If discoloration persists even after performing this
remedy, move the speaker apart from the television set. Discoloration
may also be caused when a magnet or other magnetizing object exists
near the television because of the combined effect.
The sound quality a speaker system reproduces varies greatly
depending on the construction and area of the room where it is
installed, as well as the location and size of the furniture. For better-
quality sound, observe the following precautions.
Avoid placing the speaker system on an elevated object such as
on concrete blocks. Instead, place it on a rigid floor surface with
minimal vibration. Also note that high-quality bass cannot be
obtained if the speaker system is unstably positioned. Generally
speaking, placing the speaker system on several small-diameter
supports results in better bass than placing it directly on the
installation surface. Moreover, if you feel the bass reproduced by
the system is too weak, move the speaker system closer to the
wall behind it. You can thus control the strength of the reproduced
bass by the position of the speakers.
In many rooms, the furniture and wall affect the reproduced sound
quality. For stereo sound reproduction, placing the Right and Left
speakers in the same condition produces the best results. If they
are placed in extremely different conditions, the Right- and Left-
channel balance will be adversely affected.
The ideal placement of the speaker system is as follows: Imagine
an equilateral triangle and position the Right and Left speakers on
both ends of the base. The ideal listening position is at or slightly
to the rear of the triangle apex.
Glazed doors or surrounding walls in front of the speaker system
may cause the resonance of specific frequency ranges due to
reflected sound. To eliminate this resonance, place some sound-
absorbing material such as a thick curtain in front of the doors or
walls.
Placement
Speaker care
Your Onkyo speakers are finished with a very high quality polymer
laminate covering that serves to protect the wood speaker cabinet.
Wipe the cabinet periodically with a dry, silicon-embedded or plain soft
cloth.
The covering may be cleaned with a soft cloth moistened with water
and a mild soap. Avoid the use of furniture polishes or harsh cleansers.
Use a soft brush or hand vacuum cleaner to remove dust and lint from
the grille material.
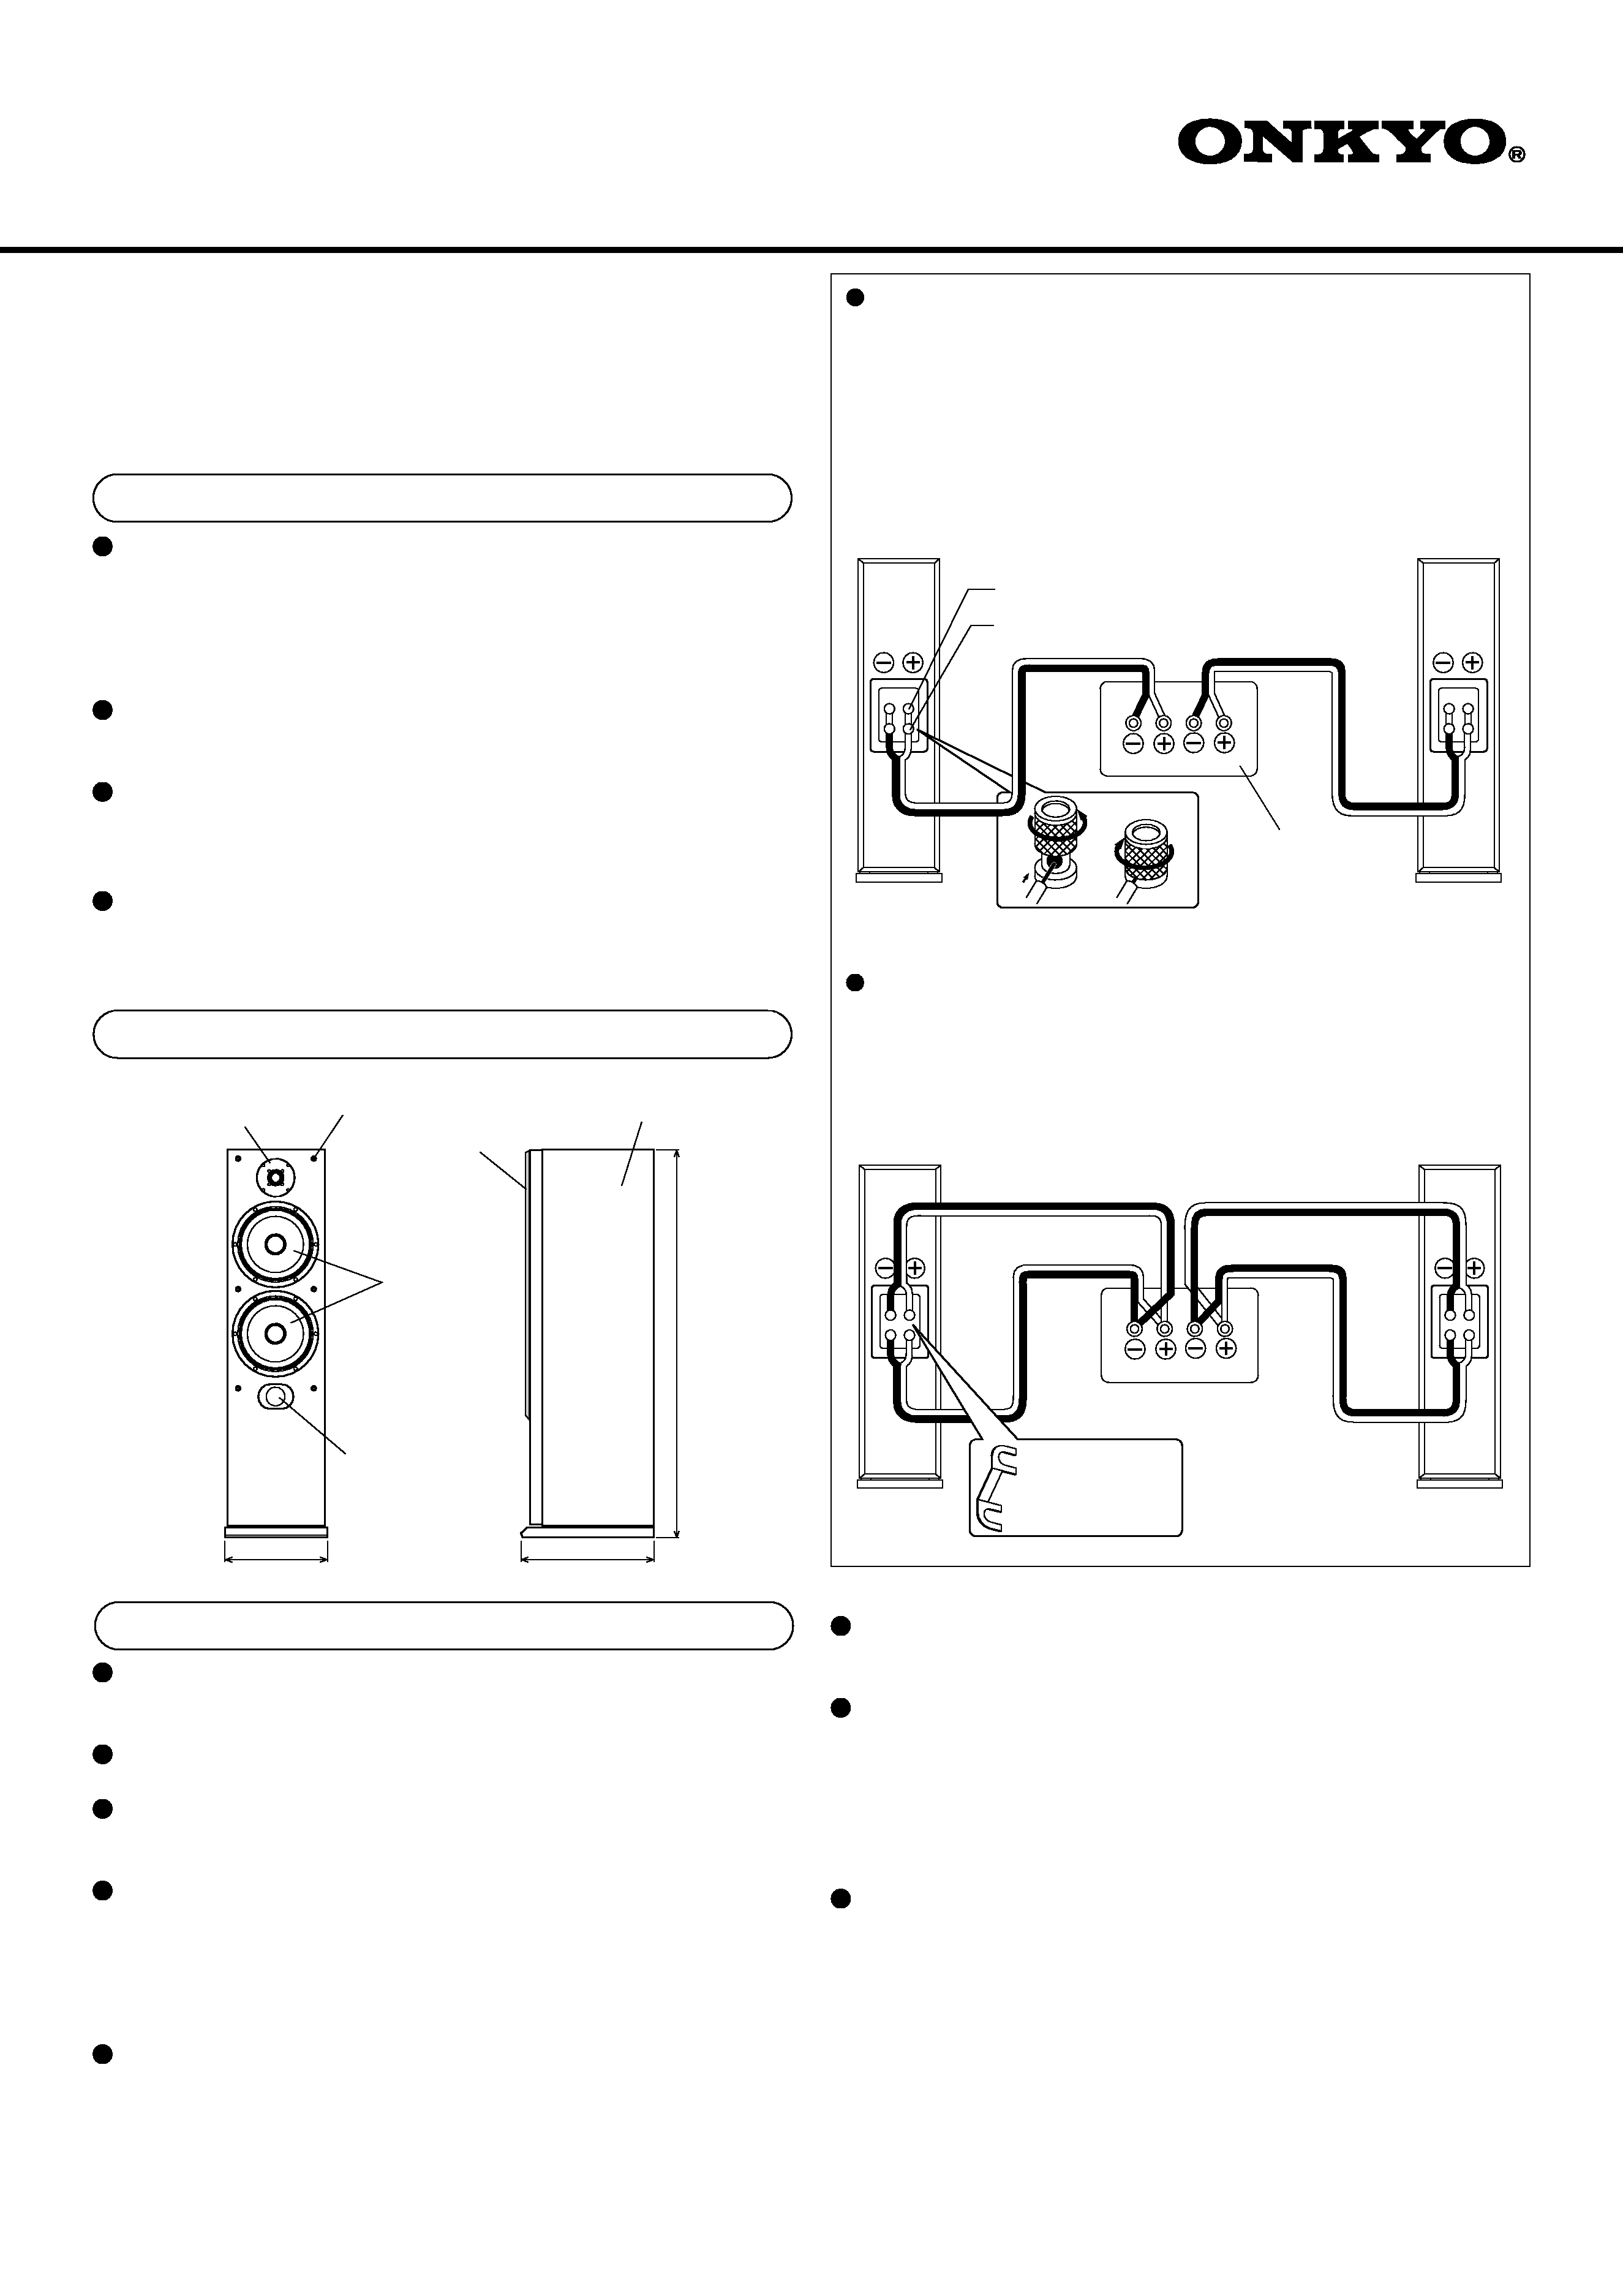
Specifications
Model
SKF-101
Type
2-way bass reflex
Impedance
6
Maximum input power
150 W
Output sound pressure level
86 dB/W/m
Frequency response
32 Hz-35 kHz
Crossover frequency
1800 Hz
Cabinet capacity
33 L
Speaker
Woofer: 16-cm cone x 2
Tweeter: 2.5-cm dome
Dimensions
216 (W) x 921 (H) x 285 (D) mm
8-1/2" x 36-1/4" x 11-1/4"
(Overall dimensions)
Weight
14.2 kg, 31.3 lbs
Accessory
2.5-m speaker cable (1 pc.)
Instruction manual (1 pc.)
Others
Magnetic shielding
Specifications and appearance may subject to change for
improvement without prior notice.
Warranty Claim
You can find the serial number on the rear panel of the unit.
In case of warranty claim, please report this number.
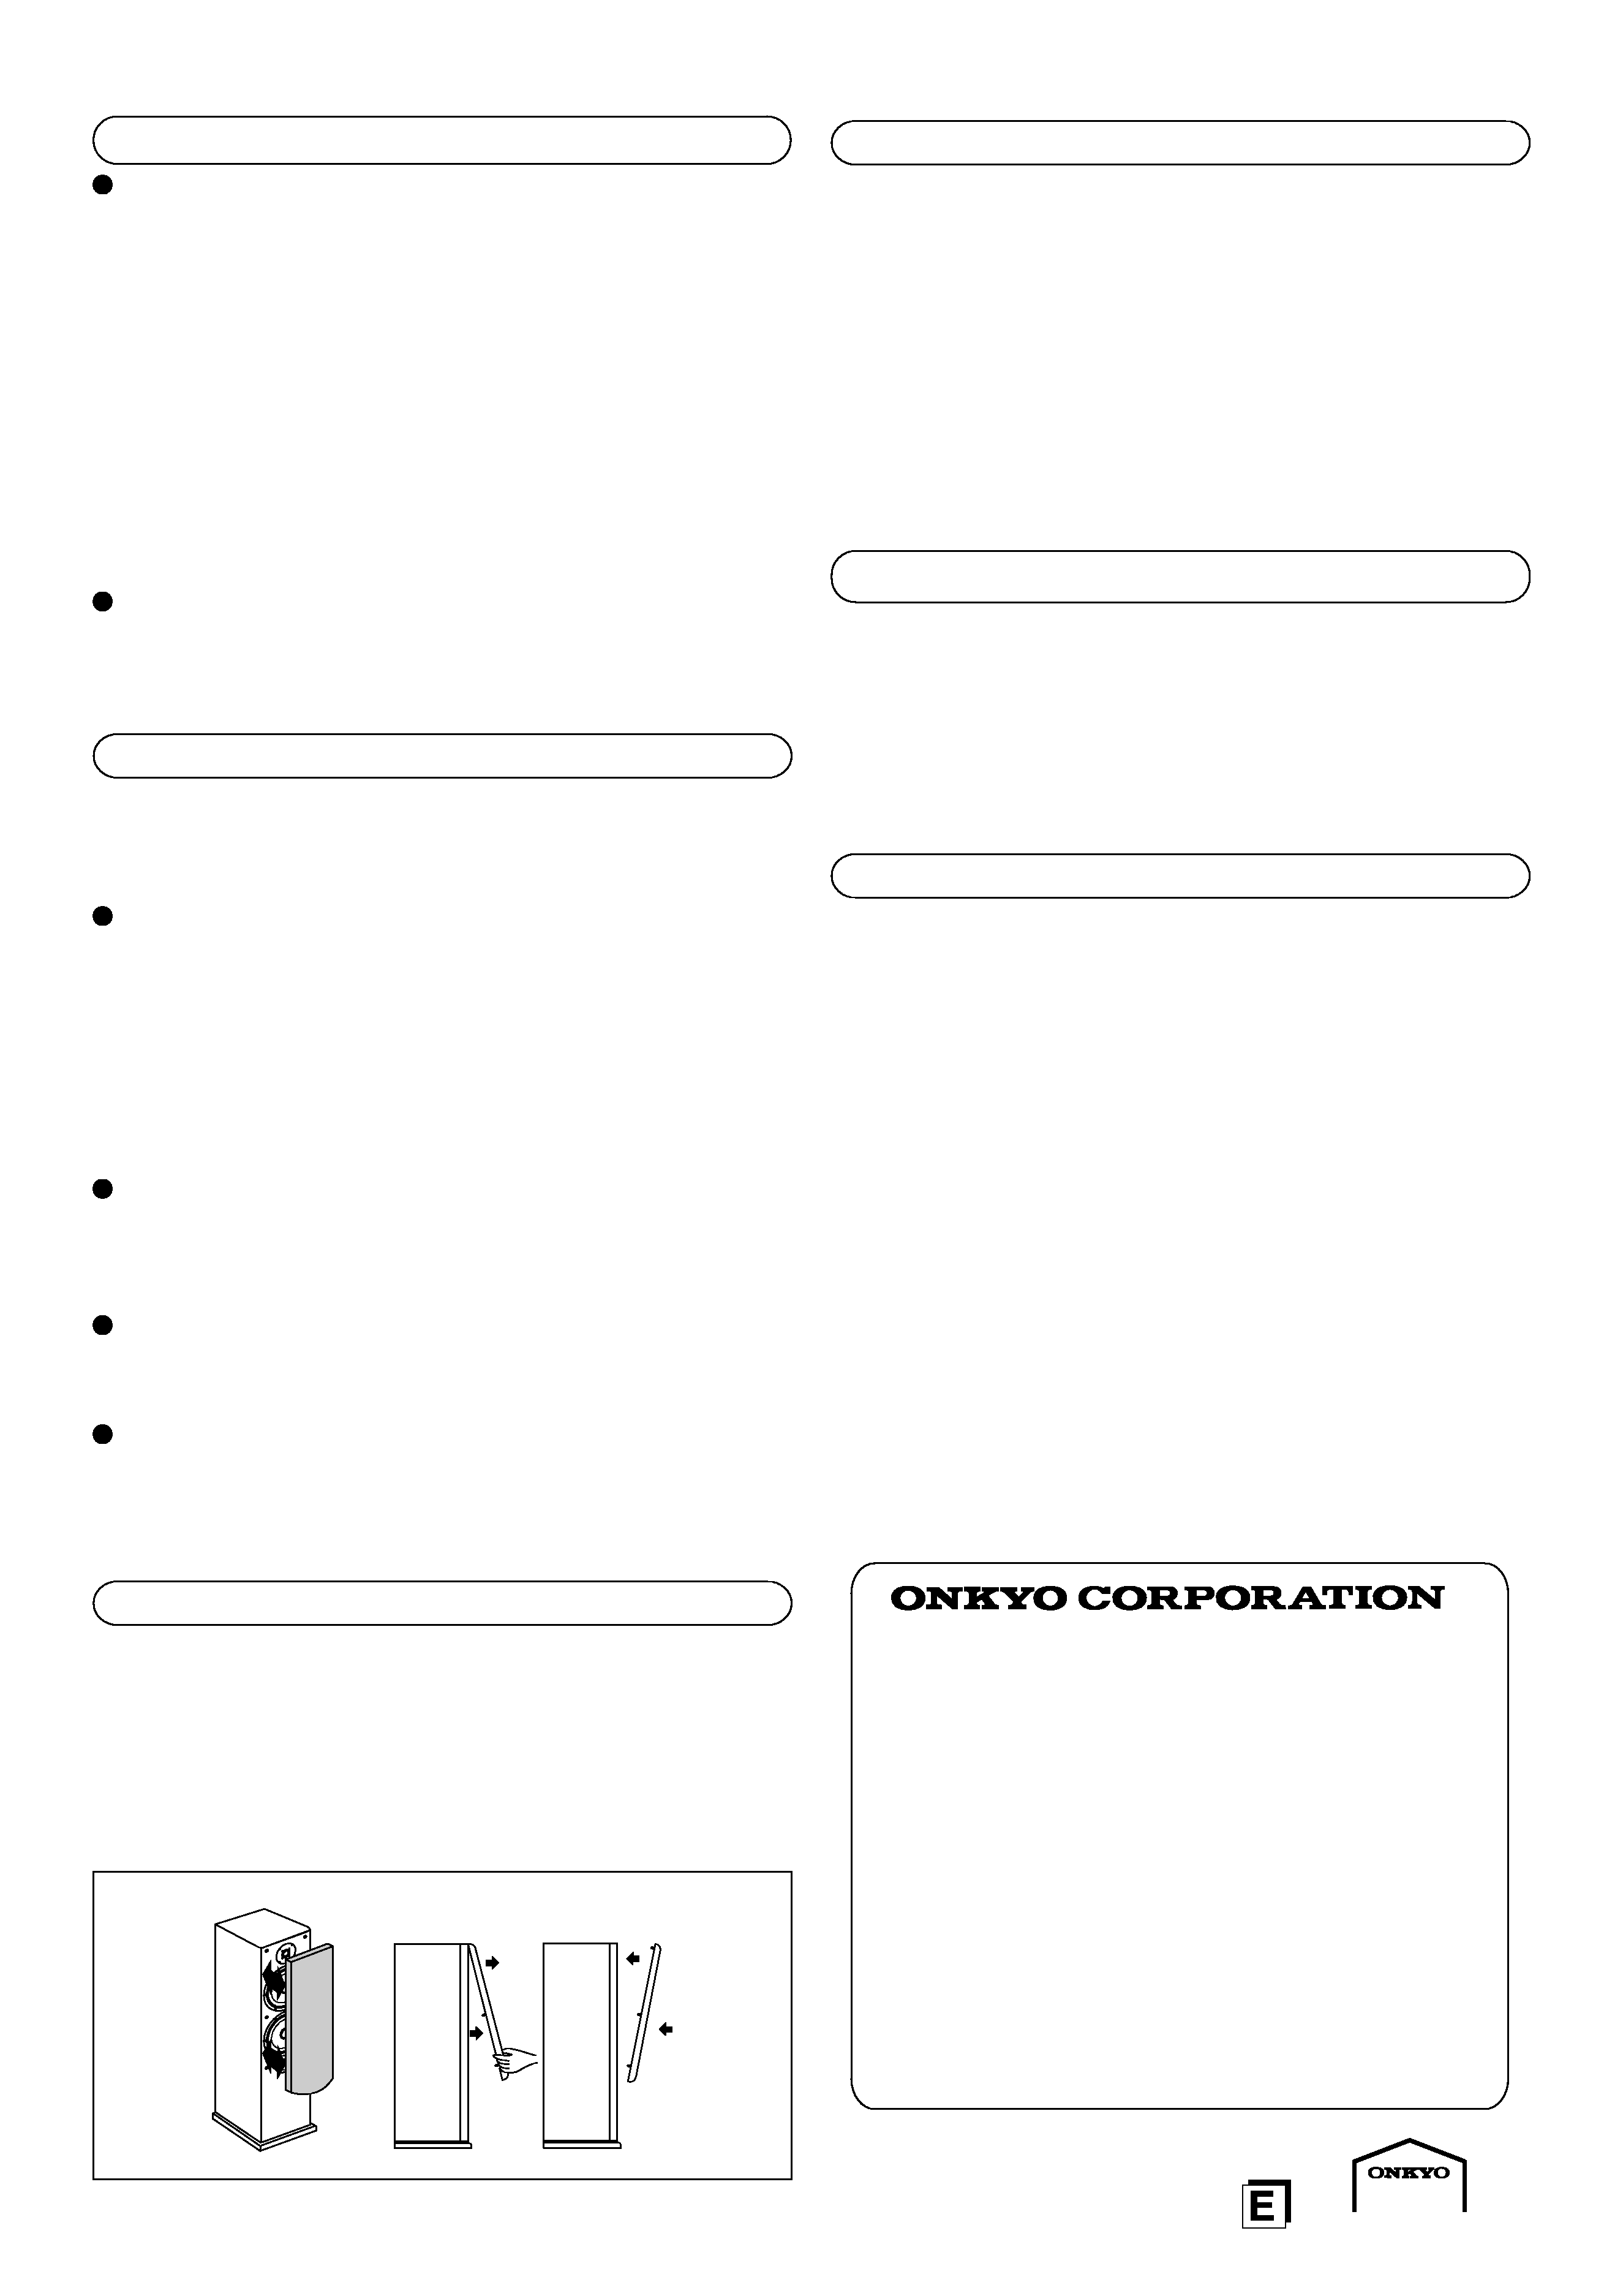
Attaching and detaching the speaker grilles
This speaker system uses detachable grilles. Use the following method
to attach or detach the grilles.
1. While holding the bottom edge of the speaker grille with your both
hands, pull it gently toward you to remove the bottom of the grille.
2. In the same way, gently pull the upper edge of the speaker grille
toward you to remove it from the main unit.
3. To replace the grill, push the projections at the corners into the
grille plug holes on the speaker cabinet.
Replacement
Removal
Precaution on use
This speaker system can handle the specified input power when it
is used for ordinary music reproduction. If the following abnormal
signals are fed to the speaker, however, an overcurrent may flow in
the internal circuits, causing burning or breakage of the wires even
if the input power is below the specified rating.
1. Noise produced when FM station is not tuned in
2. Sound produced when fast-forwarding cassette tape deck
3. High-frequency sound generated by an oscillator, an electronic
musical instruments, etc.
4. Oscillating amplifier signals
5. Special test signals produced by audio checking CD, etc.
6. Sound produced when connecting or disconnecting audio
connection cables (Always turn off the amplifier's power before
connecting or disconnecting cables.)
7. Howling when a microphone is used
Do not place magnetic objects such as screwdrivers and iron parts
near the tweeter since they use speakers with strong magnets.
Otherwise, the objects may be attracted, causing injury or damag-
ing the diaphragm.

Reviews

There are no reviews of this manual yet.