NAD S170I Owner's Manual

Cover page of NAD S170I Owner's Manual

Owner's Manual for NAD S170I, downloadable as a PDF file.

We also have service manual to this model.

Manual details

  • Immediate download after payment.
  • Delivered as a PDF file.
  • The manual has 164 pages
  • File size: 1.77 MB
  • Available language versions: Portuguese, Swedish, French, English, Spanish, German, Italian
  • Different language versions may vary sligthly in file size and page count.

We guarantee that...

  • our manuals are complete,
  • our manuals are checked with antivirus,
  • We'll issue refund if the manual is damaged, incomplete or unreadable (our refund policy)

Sample pages

Thumbnail of page 1Thumbnail of page 2Thumbnail of page 3Thumbnail of page 4
Thumbnail of page 5Thumbnail of page 6Thumbnail of page 7Thumbnail of page 8
Thumbnail of page 9
background image
S170i
AV Surround Sound Preamplifier
ENGLISH
FRANÇAIS
DEUTSCH
ESP
AÑOL
®
Owner's Manual
Manuel d'Installation
Bedienungsanleitung
Manual del Usuario
background image
S170i
AV Surround Sound Preamplifier
ENGLISH
FRANÇAIS
DEUTSCH
ESP
AÑOL
®
Owner's Manual
Manuel d'Installation
Bedienungsanleitung
Manual del Usuario
background image
ENGLISH
FRANÇAIS
DEUTSCH
ESP
AÑOL
IT
ALIANO
POR
TUGUÊS
SVENSKA
2
SAFETY INFORMATION
EXPLANATION OF GRAPHICAL SYMBOLS
The lightning flash with arrowhead symbol, within an equilateral triangle, is intended to alert
the user to the presence of uninsulated "dangerous voltage" within the product's enclosure
that may be of sufficient magnitude to constitute a risk of electric shock to persons.
The exclamation point within an equilateral triangle is intended to alert the user to the presence
of important operating and maintenance (servicing) instructions in the literature accompanying
the appliance.
PRECAUTIONS
Read the Operating Instructions carefully and completely before operating the unit. Be sure to keep the
Operating Instructions for future reference. All warnings and cautions in the Operating Instructions and
on the unit should be strictly followed, as well as the safety suggestions below.
INSTALLATION
1Water and Moisture - Do not use this unit near water, such as near a bathtub, washbowl, swimming
pool, or the like.
2 Heat - Do not use this unit near sources of heat, including heating vents, stoves, or other appliances
that generate heat. It also should not be placed in temperatures less than 5°C (41°F) or greater then
35°C (95°F).
3 Mounting surface - Place the unit on a flat, even surface.
4Ventilation - The unit should be situated with adequate space around it so that proper ventilation is
assured. allow 10 cm (4 in.) clearance from the rear and the top of the unit, and 5 cm (2 in.) from
each side. - Do not place on a bed, rug, or similar surface that may block the ventilation openings. -
Do not install the unit in a bookcase cabinet, or airtight rack where ventilation may be impeded.
5 Objects and liquid entry - Take care that objects or liquids do not get inside the unit through the
ventilation openings.
6 Carts and stands - When placed or mounted on a stand or cart, the unit should be moved with care.
Quick stops, excessive force, and uneven surfaces may cause the unit and cart to overturn or fall.
7 Condensation - Moisture may form on the CD pickup lens when:
· The unit is moved from a cold spot to a warm spot.
· The heating system has just been turned on.
· The unit is used in a very humid room.
· The unit is cooled by an air conditioner.
When this unit has condensation inside, it may not function normally. Should this occur, leave the unit
for a few hours, then try to operate again.
8Wall or ceiling mounting - The unit should not be mounted on a wall or ceiling, unless specified in
the Operating Instructions.
WARNING! TO REDUCE THE RISK OF FIRE OR ELECTRONIC SHOCK, DO NOT EXPOSE
THIS APPLIANCE TO RAIN OR MOISTURE
This product is manufactured to comply with the radio interference requirements of EEC DIRECTIVE
89/68/EEC and 73/23/EEC
background image
3
SAFETY INFORMATION
ENGLISH
FRANÇAIS
DEUTSCH
ESP
AÑOL
IT
ALIANO
POR
TUGUÊS
SVENSKA
ELECTRIC POWER
1 Power Sources - Connect this unit only to power sources specified in the Operating Instructions, and
as marked on the unit.
2 Polarization - As a safety feature, some units are equipped with polarized AC power plugs which can
only be inserted one way into a power outlet. If it is difficult or impossible to insert the AC power plug
into an outlet, turn the plug over and try again. If it still does not easily insert into the outlet, please
call a qualified service technician to service or replace the outlet. To avoid defeating the safety feature
of the polarized plug, do not force it into a power outlet.
3 AC power cord - When disconnecting the AC power cord, pull it out by the AC power plug. Do not
pull the cord itself.
· Never handle the AC power plug with wet hands, as this could result in fire or shock.
· Power cords should be routed to avoid being severely bent, pinched, or walked upon. Pay particular
attention to the cord from the unit to the power socket.
·Avoid overloading AC outlets and extension cords beyond their capacity, as this could result in fire
or shock.
4 Extension cord - To help prevent electric shock, do not use a polarized AC power plug with an
extension cord, receptacle, or other outlet unless the polarized plug can be completely inserted to
prevent exposure of the blades of the plug.
5 When not in use - Unplug the AC power cord from the AC outlet if the unit will not be used for
several months or more. When the cord is plugged in, a small amount of current continues to flow to
the unit, even when the power is turned off.
CAUTION
Modifications or adjustments to this product, which are not expressly approved by the manufacturer, may
void the user's right or authority to operate this product.
MAINTENANCE
Clean the unit only as recommended in the Operating Instructions.
DAMAGE REQUIRING SERVICE
Have the unit serviced by a qualified service technician if
· The AC power plug has been damaged.
· Foreign objects or liquid have gotten inside the unit.
· The unit has been exposed to rain or water - The unit does not seem to operate normally.
· The unit exhibits a marked change in performance.
· The unit has been dropped, or the cabinet has been damaged
DO NOT ATTEMPT TO SERVICE THE UNIT YOURSELF
OWNER'S RECORD
For your convenience, record the model number and serial number (you will find them on the rear of your
set) in the space provided below. Please refer to them when you contact your dealer in case of difficulty.
Model No. :
Serial No. :
background image
ENGLISH
FRANÇAIS
DEUTSCH
ESP
AÑOL
IT
ALIANO
POR
TUGUÊS
SVENSKA
4
Safety Information . . . . . . . . . . . . . . . . . . . . . . . . . . . . . . . . . . . . . . . . . . . . . . . . . . . . . . . . . . .2-3
Getting the Most from the NAD S170i . . . . . . . . . . . . . . . . . . . . . . . . . . . . . . . . . . . . . . . . . . . .5
Unpacking and Setup . . . . . . . . . . . . . . . . . . . . . . . . . . . . . . . . . . . . . . . . . . . . . . . . . . . . . . . . . .6
What's in the Box. . . . . . . . . . . . . . . . . . . . . . . . . . . . . . . . . . . . . . . . . . . . . . . . . . . . . . . . . . . . 6
Choosing a Location. . . . . . . . . . . . . . . . . . . . . . . . . . . . . . . . . . . . . . . . . . . . . . . . . . . . . . . . . . 6
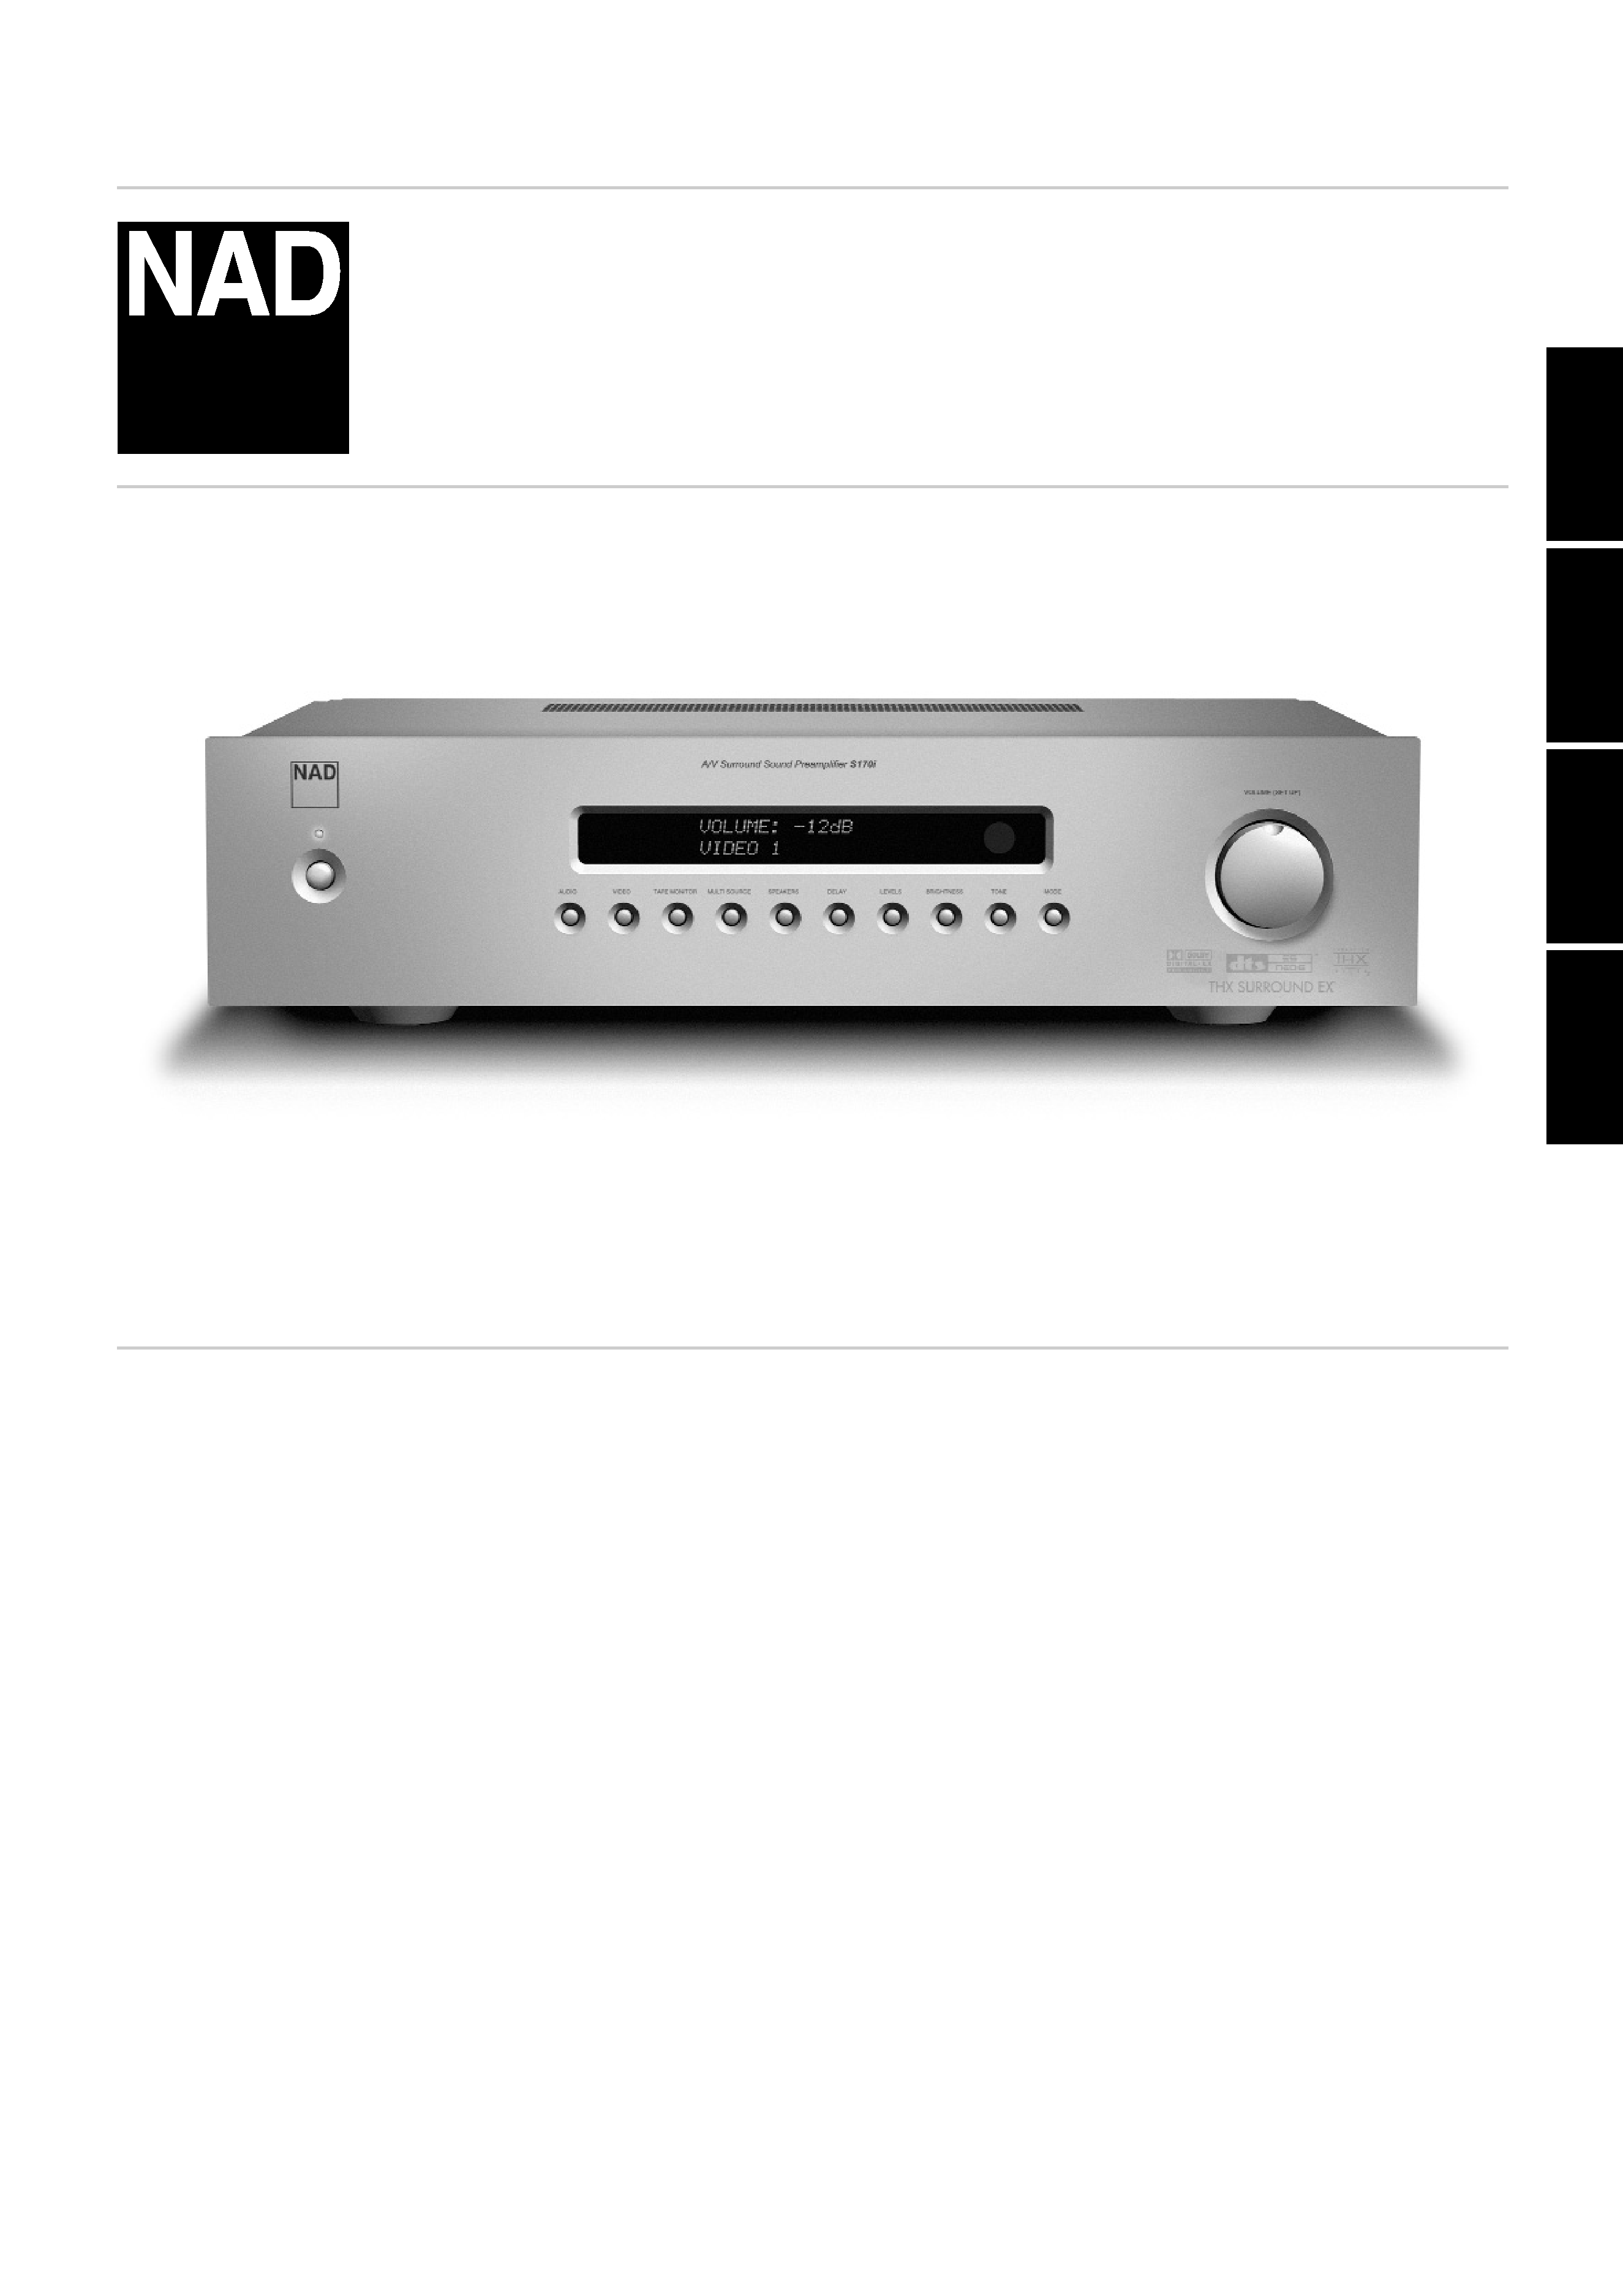
About the S170i . . . . . . . . . . . . . . . . . . . . . . . . . . . . . . . . . . . . . . . . . . . . . . . . . . . . . . . . . . . . .7-8
E.A.R.S. . . . . . . . . . . . . . . . . . . . . . . . . . . . . . . . . . . . . . . . . . . . . . . . . . . . . . . . . . . . . . . . . . . . 7
About THX. . . . . . . . . . . . . . . . . . . . . . . . . . . . . . . . . . . . . . . . . . . . . . . . . . . . . . . . . . . . . . . . . 7
Ease of Use . . . . . . . . . . . . . . . . . . . . . . . . . . . . . . . . . . . . . . . . . . . . . . . . . . . . . . . . . . . . . . . . 7
Integration . . . . . . . . . . . . . . . . . . . . . . . . . . . . . . . . . . . . . . . . . . . . . . . . . . . . . . . . . . . . . . . . . 7
Upgradability . . . . . . . . . . . . . . . . . . . . . . . . . . . . . . . . . . . . . . . . . . . . . . . . . . . . . . . . . . . . . . . 8
About the HTR 2 System Remote Control . . . . . . . . . . . . . . . . . . . . . . . . . . . . . . . . . . . . . . . . . . 8
About the ZR 2 Zone 2 Multi Source Remote Control . . . . . . . . . . . . . . . . . . . . . . . . . . . . . . . . . 8
Quickstart . . . . . . . . . . . . . . . . . . . . . . . . . . . . . . . . . . . . . . . . . . . . . . . . . . . . . . . . . . . . . . . . . . .9
Play a DVD Movie (or Music CD) . . . . . . . . . . . . . . . . . . . . . . . . . . . . . . . . . . . . . . . . . . . . . . . . . 9
Front Panel . . . . . . . . . . . . . . . . . . . . . . . . . . . . . . . . . . . . . . . . . . . . . . . . . . . . . . . . . . . . . . . . .10
Rear Panel . . . . . . . . . . . . . . . . . . . . . . . . . . . . . . . . . . . . . . . . . . . . . . . . . . . . . . . . . . . . . . . . . .11
Setting up the S170i . . . . . . . . . . . . . . . . . . . . . . . . . . . . . . . . . . . . . . . . . . . . . . . . . . . . . . . . . .12
Getting Started. . . . . . . . . . . . . . . . . . . . . . . . . . . . . . . . . . . . . . . . . . . . . . . . . . . . . . . . . . . . . 12
Using the HTR 2 Remote. . . . . . . . . . . . . . . . . . . . . . . . . . . . . . . . . . . . . . . . . . . . . . . . . . . . . . 12
Dealing With Hum and Noise . . . . . . . . . . . . . . . . . . . . . . . . . . . . . . . . . . . . . . . . . . . . . . . . . . 12
About the On-Screen Displays (OSD) and Front-Panel Readout . . . . . . . . . . . . . . . . . . . . . . . .13
Displaying the Menus . . . . . . . . . . . . . . . . . . . . . . . . . . . . . . . . . . . . . . . . . . . . . . . . . . . . . . . . 13
Configuring the S170i . . . . . . . . . . . . . . . . . . . . . . . . . . . . . . . . . . . . . . . . . . . . . . . . . . . . . .14-20
Display setup . . . . . . . . . . . . . . . . . . . . . . . . . . . . . . . . . . . . . . . . . . . . . . . . . . . . . . . . . . . . . . 14
Audio setup . . . . . . . . . . . . . . . . . . . . . . . . . . . . . . . . . . . . . . . . . . . . . . . . . . . . . . . . . . . . . . . 15
Speaker Setup . . . . . . . . . . . . . . . . . . . . . . . . . . . . . . . . . . . . . . . . . . . . . . . . . . . . . . . . . . . . . 17
Level setup . . . . . . . . . . . . . . . . . . . . . . . . . . . . . . . . . . . . . . . . . . . . . . . . . . . . . . . . . . . . . . . . 17
Delay setup . . . . . . . . . . . . . . . . . . . . . . . . . . . . . . . . . . . . . . . . . . . . . . . . . . . . . . . . . . . . . . . 18
Source Setup . . . . . . . . . . . . . . . . . . . . . . . . . . . . . . . . . . . . . . . . . . . . . . . . . . . . . . . . . . . . . . 19
Trigger setup . . . . . . . . . . . . . . . . . . . . . . . . . . . . . . . . . . . . . . . . . . . . . . . . . . . . . . . . . . . . . . 20
Using the S170i . . . . . . . . . . . . . . . . . . . . . . . . . . . . . . . . . . . . . . . . . . . . . . . . . . . . . . . . . . .22-30
Selecting Sources . . . . . . . . . . . . . . . . . . . . . . . . . . . . . . . . . . . . . . . . . . . . . . . . . . . . . . . . . . . 22
Adjusting the Volume . . . . . . . . . . . . . . . . . . . . . . . . . . . . . . . . . . . . . . . . . . . . . . . . . . . . . . . . 23
Setting Listening Modes . . . . . . . . . . . . . . . . . . . . . . . . . . . . . . . . . . . . . . . . . . . . . . . . . . . . . . 23
Adjusting Channel Levels . . . . . . . . . . . . . . . . . . . . . . . . . . . . . . . . . . . . . . . . . . . . . . . . . . . . . 26
Adjusting the Tone Controls . . . . . . . . . . . . . . . . . . . . . . . . . . . . . . . . . . . . . . . . . . . . . . . . . . . 27
Front Panel Operations . . . . . . . . . . . . . . . . . . . . . . . . . . . . . . . . . . . . . . . . . . . . . . . . . . . . . . . 28
Listening in a Remote Zone (MultiSource) . . . . . . . . . . . . . . . . . . . . . . . . . . . . . . . . . . . . . . . . . 29
NAD Link . . . . . . . . . . . . . . . . . . . . . . . . . . . . . . . . . . . . . . . . . . . . . . . . . . . . . . . . . . . . . . . . . 29
System Integration (RS-232) . . . . . . . . . . . . . . . . . . . . . . . . . . . . . . . . . . . . . . . . . . . . . . . . . . . 30
Using the HTR 2 Remote Control . . . . . . . . . . . . . . . . . . . . . . . . . . . . . . . . . . . . . . . . . . . . .31-38
Overview of the HTR 2 . . . . . . . . . . . . . . . . . . . . . . . . . . . . . . . . . . . . . . . . . . . . . . . . . . . . . . . 31
Learning Codes From Other Remotes . . . . . . . . . . . . . . . . . . . . . . . . . . . . . . . . . . . . . . . . . . . . 32
Library Mode . . . . . . . . . . . . . . . . . . . . . . . . . . . . . . . . . . . . . . . . . . . . . . . . . . . . . . . . . . . . . . 32
Punch-Through. . . . . . . . . . . . . . . . . . . . . . . . . . . . . . . . . . . . . . . . . . . . . . . . . . . . . . . . . . . . . 33
Copy a Command From Another Key . . . . . . . . . . . . . . . . . . . . . . . . . . . . . . . . . . . . . . . . . . . . 33
Macro Commands . . . . . . . . . . . . . . . . . . . . . . . . . . . . . . . . . . . . . . . . . . . . . . . . . . . . . . . . . . 34
Recording Macros. . . . . . . . . . . . . . . . . . . . . . . . . . . . . . . . . . . . . . . . . . . . . . . . . . . . . . . . . . . 34
Executing Macros . . . . . . . . . . . . . . . . . . . . . . . . . . . . . . . . . . . . . . . . . . . . . . . . . . . . . . . . . . . 34
Key-Illumination Time-out . . . . . . . . . . . . . . . . . . . . . . . . . . . . . . . . . . . . . . . . . . . . . . . . . . . . . 34
Factory Reset . . . . . . . . . . . . . . . . . . . . . . . . . . . . . . . . . . . . . . . . . . . . . . . . . . . . . . . . . . . . . . 35
Delete Mode . . . . . . . . . . . . . . . . . . . . . . . . . . . . . . . . . . . . . . . . . . . . . . . . . . . . . . . . . . . . . . 35
Summary of HTR 2 modes . . . . . . . . . . . . . . . . . . . . . . . . . . . . . . . . . . . . . . . . . . . . . . . . . . . . 36
HTR 2 Tables. . . . . . . . . . . . . . . . . . . . . . . . . . . . . . . . . . . . . . . . . . . . . . . . . . . . . . . . . . . . . . . 36
Troubleshooting . . . . . . . . . . . . . . . . . . . . . . . . . . . . . . . . . . . . . . . . . . . . . . . . . . . . . . . . . . . . .37
Specifications . . . . . . . . . . . . . . . . . . . . . . . . . . . . . . . . . . . . . . . . . . . . . . . . . . . . . . . . . . . . . . . .38
TABLE OF CONTENTS
background image
5
GETTING THE MOST FROM THE NAD S170i
THANK YOU FOR CHOOSING NAD.
The S170i A/V Surround Sound Preamplifier is one of the most technologically advanced surround-
processor/preamplifiers yet devised, incorporating advanced, ultra-high-speed 32-bit digital signal
processing, an architecture that is fully upgradeable (in both hardware and software), and extraordinarily
precise 24-bit precision/96 kHz-sampling digital-to-analog conversion for all channels.
More importantly, it is among the most musically transparent and spatially accurate designs available, the
culmination of everything we've learned, over a quarter-century, about music and home-theater
reproduction. With our company's "Music First" design philosophy as its guiding design principle, we're
confident that the S170i will make good our promise to you of delivering both a state-of-the-art surround
home-theater experience, and a genuinely audiophile-quality music listening, for many years to come.
We urge you to take a few minutes now to read right through this manual. Investing a little time now, at
the outset, might save you a good deal of time later, and is by far the best way to ensure that you make
the most of your investment in the NAD S170i, and get the most from this powerful and flexible home
theater component.
One more thing: We urge you to register your S170i ownership on the NAD Worldwide Web site:
HTTP://NADELECTRONICS.COM/W/REGISTRATION.HTML
This is by far the best way to ensure that we at NAD world headquarters can inform you of possible future
software and firmware updates, changes that might significantly enhance the performance and utility of your
S170i. Please also send in your warranty card, so that your local NAD organization will have a record of your
purchase, and save your original purchase receipt. This will assure you of warranty service in your area.
ENGLISH
FRANÇAIS
DEUTSCH
ESP
AÑOL
IT
ALIANO
POR
TUGUÊS
SVENSKA

Reviews

There are no reviews of this manual yet.