NAD C660 Owner's Manual

Cover page of NAD C660 Owner's Manual

Owner's Manual for NAD C660, downloadable as a PDF file.

We also have service manual to this model.

Manual details

  • Immediate download after payment.
  • Delivered as a PDF file.
  • The manual has 30 pages
  • File size: 0.99 MB
  • Available language versions: Portuguese, Swedish, French, English, Spanish, German, Italian
  • Different language versions may vary sligthly in file size and page count.

We guarantee that...

  • our manuals are complete,
  • our manuals are checked with antivirus,
  • We'll issue refund if the manual is damaged, incomplete or unreadable (our refund policy)

Sample pages

Thumbnail of page 1Thumbnail of page 2Thumbnail of page 3Thumbnail of page 4
Thumbnail of page 5Thumbnail of page 6Thumbnail of page 7Thumbnail of page 8
Thumbnail of page 9
background image
C660
Compact Disc Recorder
Owner's Manual
GB
Manuel d'Installation
F
Bedienungsanleitung
D
Manual del Usuario
E
Manuale delle Istruzioni
I
Manual do Proprietário
P
Bruksanvisning
S
C660 manual
27/2/01
6:02 pm
Page 1
background image
C660
Compact Disc Recorder
Owner's Manual
GB
Manuel d'Installation
F
Bedienungsanleitung
D
Manual del Usuario
E
Manuale delle Istruzioni
I
Manual do Proprietário
P
Bruksanvisning
S
C660 manual
27/2/01
6:02 pm
Page 1
background image
GB
2
SAFETY INFORMATION
Introduction Chapter 1
EXPLANATION OF GRAPHICAL SYMBOLS
The lightning flash with arrowhead symbol, within an equilateral triangle, is intended to alert
the user to the presence of uninsulated "dangerous voltage" within the product's enclosure
that may be of sufficient magnitude to constitute a risk of electric shock to persons.
The exclamation point within an equilateral triangle is intended to alert the user to the presence
of important operating and maintenance (servicing) instructions in the literature accompanying
the appliance.
PRECAUTIONS
Read the Operating Instructions carefully and completely before operating the unit. Be sure to keep the
Operating Instructions for future reference. All warnings and cautions in the Operating Instructions and on
the unit should be strictly followed, as well as the safety suggestions below.
INSTALLATION
1 Water and Moisture - Do not use this unit near water, such as near a bathtub, washbowl, swimming
pool, or the like.
2 Heat - Do not use this unit near sources of heat, including heating vents, stoves, or other appliances
that generate heat. It also should not be placed in temperatures less than 5°C (41°F) or greater then
35°C (95°F).
3 Mounting surface - Place the unit on a flat, even surface.
4 Ventilation - The unit should be situated with adequate space around it so that proper ventilation is
assured. allow 10 cm (4 in.) clearance from the rear and the top of the unit, and 5 cm (2 in.) from each
side. - Do not place on a bed, rug, or similar surface that may block the ventilation openings. - Do not
install the unit in a bookcase cabinet, or airtight rack where ventilation may be impeded.
5 Objects and liquid entry - Take care that objects or liquids do not get inside the unit through the
ventilation openings.
6 Carts and stands - When placed or mounted on a stand or cart, the unit should be moved with care.
Quick stops, excessive force, and uneven surfaces may cause the unit and cart to overturn or fall.
7 Condensation - Moisture may form on the CD pickup lens when:
· The unit is moved from a cold spot to a warm spot.
· The heating system has just been turned on.
· The unit is used in a very humid room.
· The unit is cooled by an air conditioner.
When this unit has condensation inside, it may not function normally. Should this occur, leave the unit
for a few hours, then try to operate again.
8 Wall or ceiling mounting - The unit should not be mounted on a wall or ceiling, unless specified in
the Operating Instructions.
WARNING! TO REDUCE THE RISK OF FIRE OR ELECTRONIC SHOCK, DO NOT EXPOSE
THIS APPLIANCE TO RAIN OR MOISTURE
This product is manufactured to comply with the radio interference requirements of EEC DIRECTIVE
89/68/EEC and 73/23/EEC
C660 manual
27/2/01
6:02 pm
Page 2
background image
GB
3
SAFETY INFORMATION
Chapter 1 Introduction
ELECTRIC POWER
1 Power Sources - Connect this unit only to power sources specified in the Operating Instructions, and
as marked on the unit.
2 Polarization - As a safety feature, some units are equipped with polarized AC power plugs which can
only be inserted one way into a power outlet. If it is difficult or impossible to insert the AC power plug
into an outlet, turn the plug over and try again. If it still does not easily insert into the outlet, please call
a qualified service technician to service or replace the outlet. To avoid defeating the safety feature of
the polarized plug, do not force it into a power outlet.
3 AC power cord - When disconnecting the AC power cord, pull it out by the AC power plug. Do not
pull the cord itself.
· Never handle the AC power plug with wet hands, as this could result in fire or shock.
· Power cords should be routed to avoid being severely bent, pinched, or walked upon. Pay particular
attention to the cord from the unit to the power socket.
· Avoid overloading AC outlets and extension cords beyond their capacity, as this could result in fire
or shock.
4 Extension cord - To help prevent electric shock, do not use a polarized AC power plug with an
extension cord, receptacle, or other outlet unless the polarized plug can be completely inserted to
prevent exposure of the blades of the plug.
5 When not in use - Unplug the AC power cord from the AC outlet if the unit will not be used for
several months or more. When the cord is plugged in, a small amount of current continues to flow to
the unit, even when the power is turned off.
CAUTION
Modifications or adjustments to this product, which are not expressly approved by the manufacturer, may
void the user's right or authority to operate this product.
MAINTENANCE
Clean the unit only as recommended in the Operating Instructions.
DAMAGE REQUIRING SERVICE
Have the unit serviced by a qualified service technician if
· The AC power plug has been damaged.
· Foreign objects or liquid have gotten inside the unit.
· The unit has been exposed to rain or water - The unit does not seem to operate normally.
· The unit exhibits a marked change in performance.
· The unit has been dropped, or the cabinet has been damaged
DO NOT ATTEMPT TO SERVICE THE UNIT YOURSELF
OWNER'S RECORD
For your convenience, record the model number and serial number (you will find them on the rear of your
set) in the space provided below. Please refer to them when you contact your dealer in case of difficulty.
Model No. :
Serial No. :
C660 manual
27/2/01
6:02 pm
Page 3
background image
GB
4
TABLE OF CONTENTS
Introduction Chapter 1
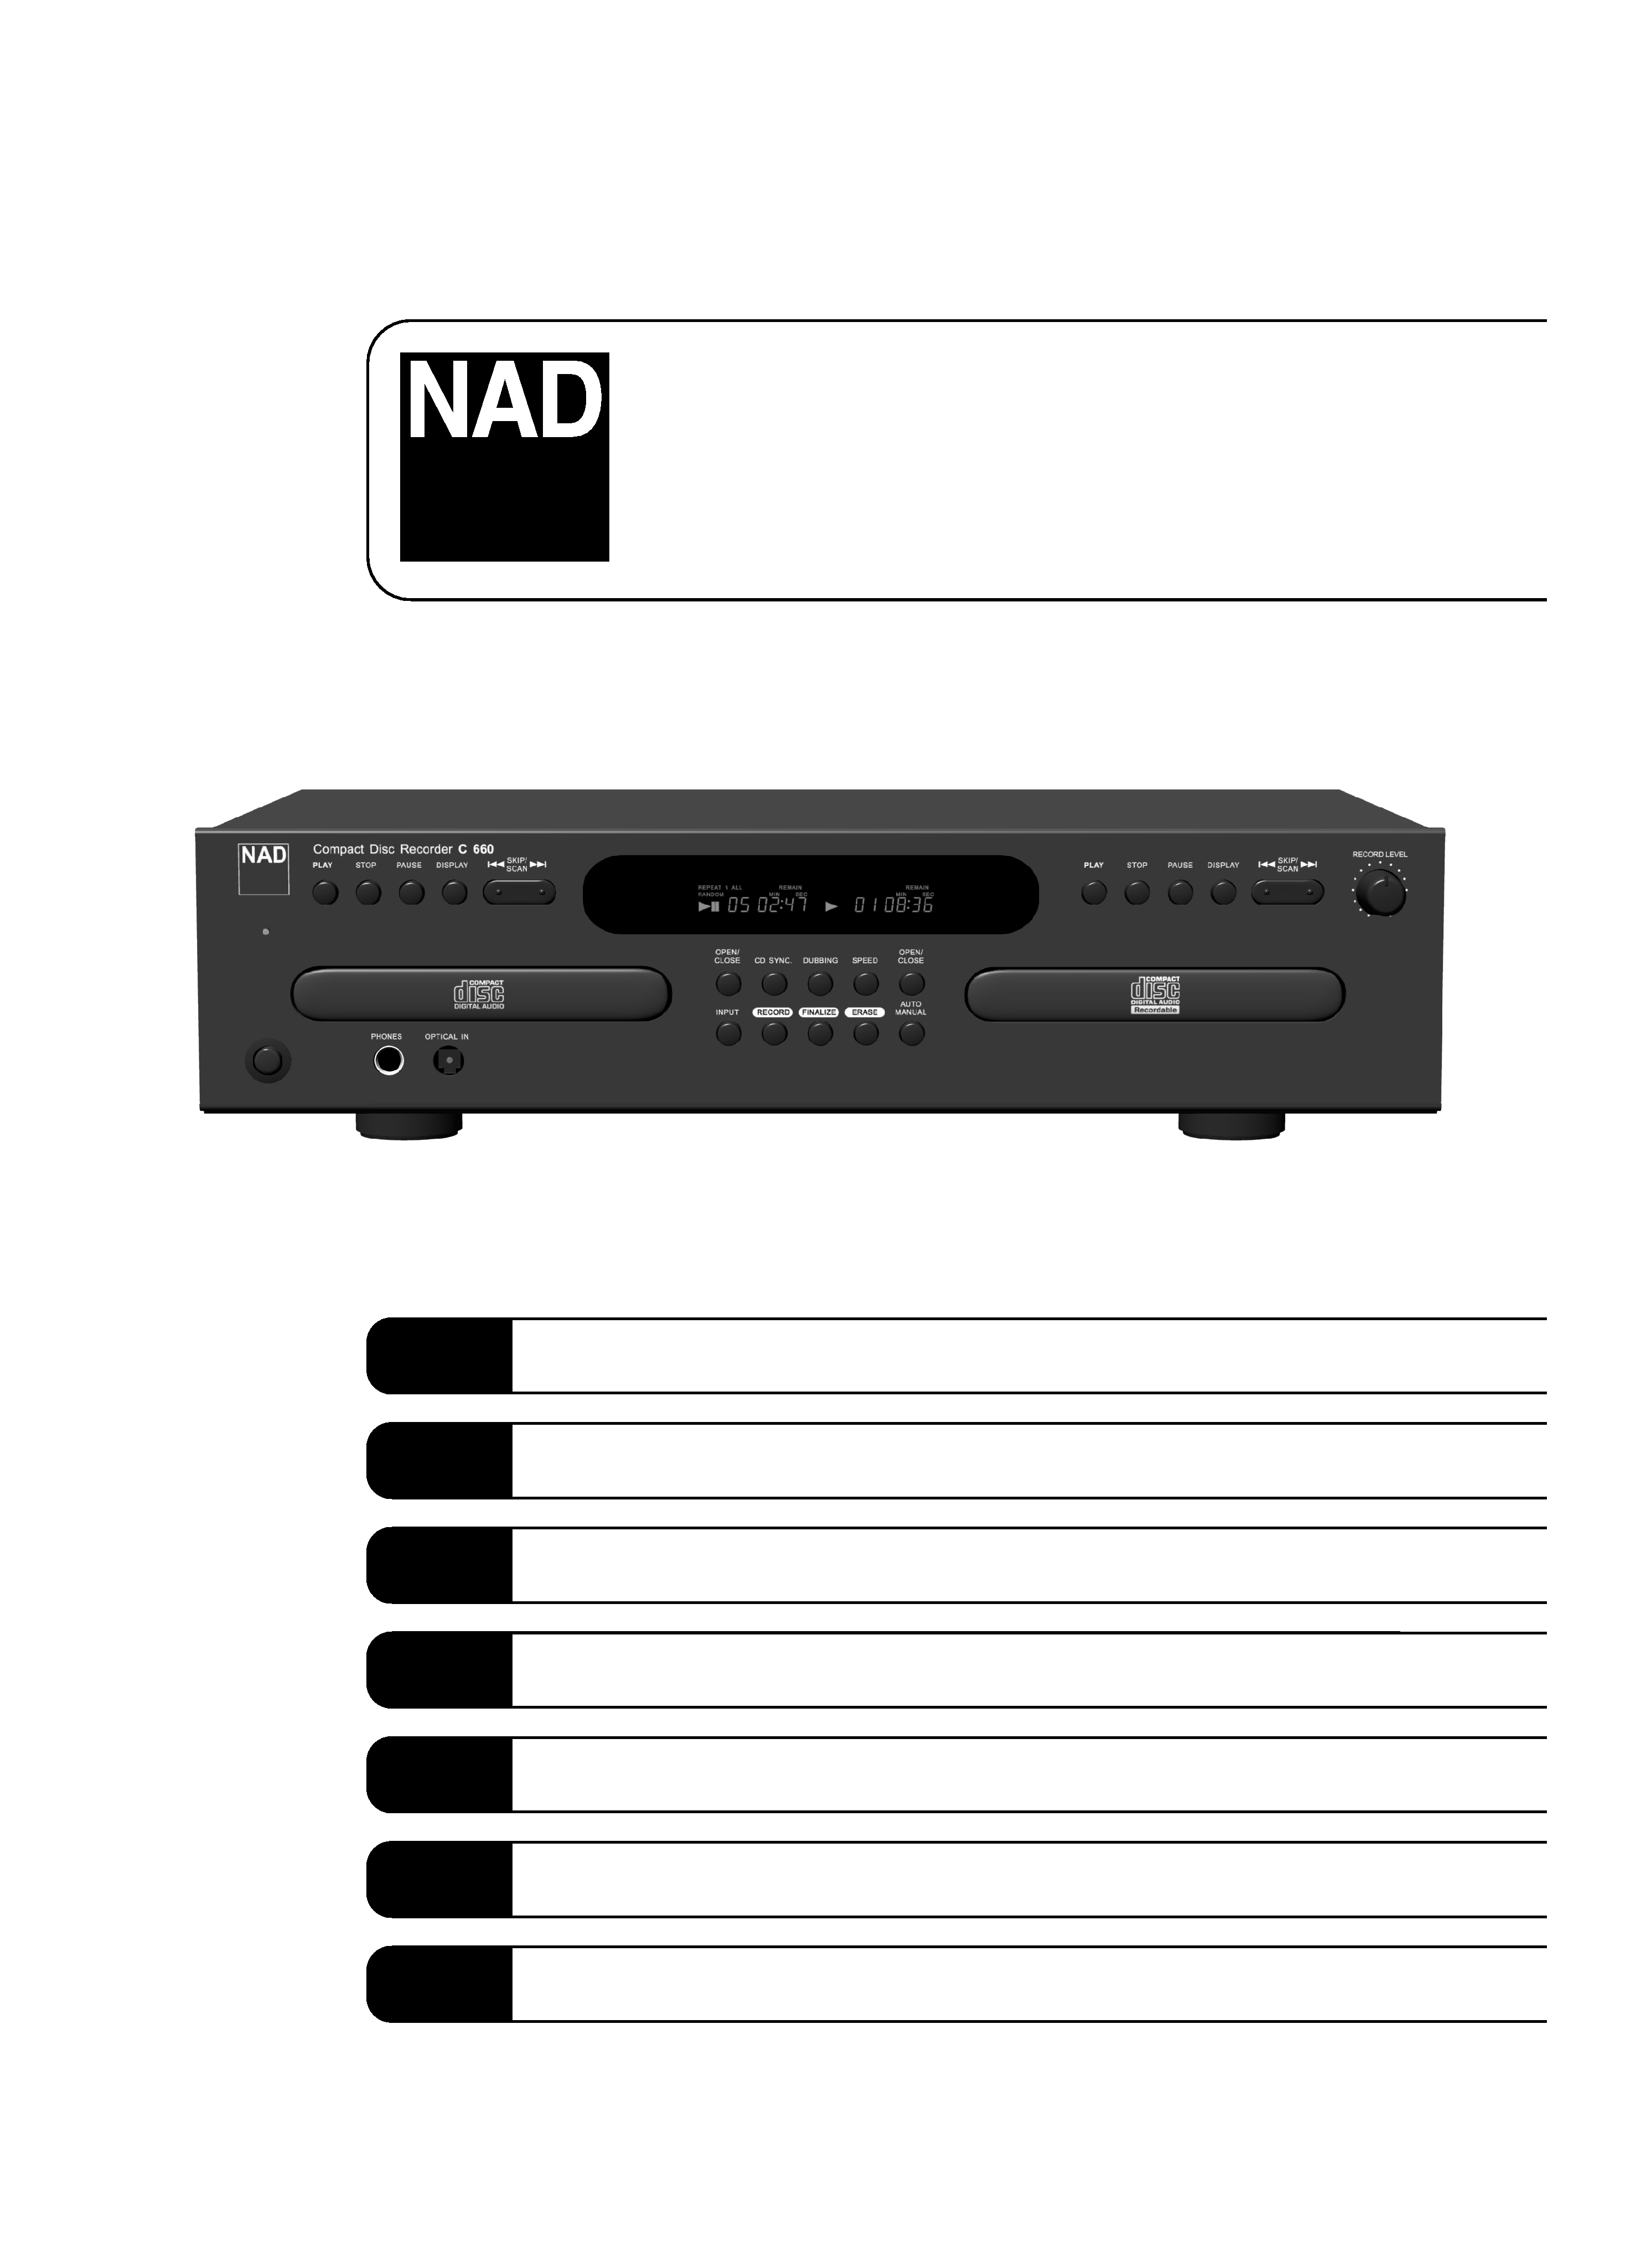
CHAPTER 1: INTRODUCTION
SAFETY INFORMATION . . . . . . . . . . . . . . . . . . . . . . . . . . . . . . . . . . . . . . . . . . . . . . . . . . . . . . .2-3
FEATURES . . . . . . . . . . . . . . . . . . . . . . . . . . . . . . . . . . . . . . . . . . . . . . . . . . . . . . . . . . . . . . . . . . .4
BEFORE OPERATION . . . . . . . . . . . . . . . . . . . . . . . . . . . . . . . . . . . . . . . . . . . . . . . . . . . . . . . . .5-6
TYPES OF DISCS . . . . . . . . . . . . . . . . . . . . . . . . . . . . . . . . . . . . . . . . . . . . . . . . . . . . . . . . . . . . 5
ACCESSORIES . . . . . . . . . . . . . . . . . . . . . . . . . . . . . . . . . . . . . . . . . . . . . . . . . . . . . . . . . . . . . . 5
CLEANING THE CABINET . . . . . . . . . . . . . . . . . . . . . . . . . . . . . . . . . . . . . . . . . . . . . . . . . . . . . . 6
STORING DISCS . . . . . . . . . . . . . . . . . . . . . . . . . . . . . . . . . . . . . . . . . . . . . . . . . . . . . . . . . . . . . 6
CARE OF DISCS . . . . . . . . . . . . . . . . . . . . . . . . . . . . . . . . . . . . . . . . . . . . . . . . . . . . . . . . . . . . . 6
REMOTE CONTROL . . . . . . . . . . . . . . . . . . . . . . . . . . . . . . . . . . . . . . . . . . . . . . . . . . . . . . . . . . 6
IDENTIFICATION OF CONTROLS . . . . . . . . . . . . . . . . . . . . . . . . . . . . . . . . . . . . . . . . . . . . . . .7-10
FRONT PANEL . . . . . . . . . . . . . . . . . . . . . . . . . . . . . . . . . . . . . . . . . . . . . . . . . . . . . . . . . . . . . . 7
INFORMATION DISPLAY . . . . . . . . . . . . . . . . . . . . . . . . . . . . . . . . . . . . . . . . . . . . . . . . . . . . . . . 8
REAR PANEL . . . . . . . . . . . . . . . . . . . . . . . . . . . . . . . . . . . . . . . . . . . . . . . . . . . . . . . . . . . . . . . 9
BUTTONS ON THE REMOTE CONTROL . . . . . . . . . . . . . . . . . . . . . . . . . . . . . . . . . . . . . . . . . . . 10
CHAPTER 2: CONNECTIONS
CONNECTIONS . . . . . . . . . . . . . . . . . . . . . . . . . . . . . . . . . . . . . . . . . . . . . . . . . . . . . . . . . . . .11-12
CONNECTION DIAGRAM . . . . . . . . . . . . . . . . . . . . . . . . . . . . . . . . . . . . . . . . . . . . . . . . . . . . . 11
PLAY DECK CONNECTIONS . . . . . . . . . . . . . . . . . . . . . . . . . . . . . . . . . . . . . . . . . . . . . . . . . . . 12
RECORD DECK CONNECTIONS . . . . . . . . . . . . . . . . . . . . . . . . . . . . . . . . . . . . . . . . . . . . . . . . 12
POWER CONNECTIONS . . . . . . . . . . . . . . . . . . . . . . . . . . . . . . . . . . . . . . . . . . . . . . . . . . . . . . 12
USING HEADPHONES . . . . . . . . . . . . . . . . . . . . . . . . . . . . . . . . . . . . . . . . . . . . . . . . . . . . . . . 12
CHAPTER 3: RECORDINGS
LOADING DISCS . . . . . . . . . . . . . . . . . . . . . . . . . . . . . . . . . . . . . . . . . . . . . . . . . . . . . . . . . . .13-14
INFORMATION DISPLAY . . . . . . . . . . . . . . . . . . . . . . . . . . . . . . . . . . . . . . . . . . . . . . . . . . . . . . 13
NOTES ON THE OPC LIMIT OF CD-R DISCS . . . . . . . . . . . . . . . . . . . . . . . . . . . . . . . . . . . . . . . . 14
RECORDING . . . . . . . . . . . . . . . . . . . . . . . . . . . . . . . . . . . . . . . . . . . . . . . . . . . . . . . . . . . . . .15-19
PRECAUTIONS . . . . . . . . . . . . . . . . . . . . . . . . . . . . . . . . . . . . . . . . . . . . . . . . . . . . . . . . . . . . . 15
DISC DUBBING . . . . . . . . . . . . . . . . . . . . . . . . . . . . . . . . . . . . . . . . . . . . . . . . . . . . . . . . . . . . 16
CD SYNC RECORDING . . . . . . . . . . . . . . . . . . . . . . . . . . . . . . . . . . . . . . . . . . . . . . . . . . . . . . . 17
MANUAL RECORDING . . . . . . . . . . . . . . . . . . . . . . . . . . . . . . . . . . . . . . . . . . . . . . . . . . . . . . . 18
NUMBERING TRACKS . . . . . . . . . . . . . . . . . . . . . . . . . . . . . . . . . . . . . . . . . . . . . . . . . . . . . . . 19
DIGITAL RECORDING LEVEL CONTROL (DRLC) . . . . . . . . . . . . . . . . . . . . . . . . . . . . . . . . . . . . . . 19
FINALIZATION . . . . . . . . . . . . . . . . . . . . . . . . . . . . . . . . . . . . . . . . . . . . . . . . . . . . . . . . . . . .20-21
UNFINALIZATION . . . . . . . . . . . . . . . . . . . . . . . . . . . . . . . . . . . . . . . . . . . . . . . . . . . . . . . . . . . 20
ERASING AN ENTIRE CD-RW DISC . . . . . . . . . . . . . . . . . . . . . . . . . . . . . . . . . . . . . . . . . . . . . . 21
ERASING INDIVIDUAL TRACKS . . . . . . . . . . . . . . . . . . . . . . . . . . . . . . . . . . . . . . . . . . . . . . . . . 21
CHAPTER 4: PLAYBACK
PLAYBACK . . . . . . . . . . . . . . . . . . . . . . . . . . . . . . . . . . . . . . . . . . . . . . . . . . . . . . . . . . . . . . .22-25
BASIC OPERATION . . . . . . . . . . . . . . . . . . . . . . . . . . . . . . . . . . . . . . . . . . . . . . . . . . . . . . . . . . 22
RANDOM PLAYBACK . . . . . . . . . . . . . . . . . . . . . . . . . . . . . . . . . . . . . . . . . . . . . . . . . . . . . . . 23
REPEAT PLAYBACK . . . . . . . . . . . . . . . . . . . . . . . . . . . . . . . . . . . . . . . . . . . . . . . . . . . . . . . . . 23
PROGRAMMED PLAYBACK . . . . . . . . . . . . . . . . . . . . . . . . . . . . . . . . . . . . . . . . . . . . . . . . . . .24
MP3, HDCD and CD-TEXT DISC PLAYBACK . . . . . . . . . . . . . . . . . . . . . . . . . . . . . . . . . . . . . . . 25
DUAL PLAY MODE . . . . . . . . . . . . . . . . . . . . . . . . . . . . . . . . . . . . . . . . . . . . . . . . . . . . . . . . . . .26
CHANGING THE TIME DISPLAY MODE
. . . . . . . . . . . . . . . . . . . . . . . . . . . . . . . . . . . . . . . . . . .26
CHAPTER 5: ADDITIONAL INFORMATION
TROUBLESHOOTING . . . . . . . . . . . . . . . . . . . . . . . . . . . . . . . . . . . . . . . . . . . . . . . . . . . . . . . . . .27
ALERT MESSAGES
. . . . . . . . . . . . . . . . . . . . . . . . . . . . . . . . . . . . . . . . . . . . . . . . . . . . . . . . . . .28
RESTRICTIONS ON DIGITAL RECORDING . . . . . . . . . . . . . . . . . . . . . . . . . . . . . . . . . . . . . . . . . .29
SPECIFICATIONS . . . . . . . . . . . . . . . . . . . . . . . . . . . . . . . . . . . . . . . . . . . . . . . . . . . . . . . . . . . . .29
TEXT
Recordable
ReWritable
HDCD®, High Definition
Digital® and Pacific MicrosonicsTM
are either registered trademarks or
trademarks of Pacific Microsonics,
Inc., in the United States and/or
other countries. HDCD system
manufactured under license from
Pacific Microsonics, Inc.
FEATURES
· Dual deck CD player and CD-
R/CD-RW recorder.
· Dual play capability.
· 4x dubbing speed for both CD-R
and CD-RW discs.
· Built in 32 to 96 kHz sampling
converter
· Optical and coaxial digital inputs
and outputs.
· Front panel digital input for use
with portable devices.
· Extensive playback programming
capabilities
· MP3 Disc Playback.
· HDCD decoding provides
superior reproduction of all CDs,
whether HDCD-encoded or not.
When HDCD-encoded discs are
played, special circuitry reveals
detail and fidelity not possible in
ordinary CDs.
C660 manual
27/2/01
6:02 pm
Page 4
background image
GB
5
BEFORE OPERATION
Chapter 1 Introduction
TYPES OF DISCS
CD-R AND CD-RW DISCS
For recording and playback you can use the CD-R and CD-RW discs with the logos shown below.
With a CD-R disc, you can add recordings until the disc is full, but you cannot erase any of them.
With a CD-RW disc, you can add and erase recordings as needed.
· Depending on the conditions of
the surface of CD-R/RW disc (e.g.
dirt, scratch, fingerprint, etc.), the
head part of the first recorded
track may be cut off.
ACCESSORIES
The package contains
the following items.
· CDR disc (1)
· Audio cords (2)
· Coaxial digital cable (1)
· Remote control (1)
· Batteries (2)
· Owner's manual (1)
Insert the dust cap in the DIGITAL IN
(OPTICAL) jack on the front panel
when not using the jack.
Disc
Recording
Playback
CD-R
Can
be
recorded
only
incrementally.
When finalized, can be played
on conventional CD players.
CD-RW
Can be recorded and erased as
needed.
This type of disc can only be
played
back
on
CDRW
compatible players. Even when
finalized the disc can be erased
as needed.
CONVENTIONAL AUDIO CDS
Discs with the following logo can be played back on this unit, but no recordings can be made
on them.
When you load a CD-R. CD-RW or any other disc that is not compatible with this unit, "ERROR" may
appear on the display to warn you that the disc cannot be used with this unit.
NOTE
· Do not use irregular shaped CDs (example: heart-shaped, octagonal ones). It may result in malfunction.
· Do not attach any seal or label to either side (the recordable side or the labelled side) of a CD-R/RW
disc. It may cause malfunction.
· The unit may not play a CD-R/RW disc that is recorded on personal computers or some kinds of CD-
R/RW recorders because of differences in recording platforms.
· Do not use a CD-R/RW disc which contains non-audio data or computer files.
· Trouble may occur in this unit if a CD-R/RW disc with dirt or scratches is used. In such case, refer to
"ALERT MESSAGES" on page 28.
Recordable
ReWritable
CAUTION
Do not open and close the disc tray of the record deck unnecessarily with a non-finalized CD-R disc
inside. See page 14 for details.
WARNING
The digital recording capabilities which this unit provides are for personal use only. Dubbing
copyrighted material without permission of the copyright owner is a violation of the copyright laws.
C660 manual
27/2/01
6:02 pm
Page 5

Reviews

There are no reviews of this manual yet.