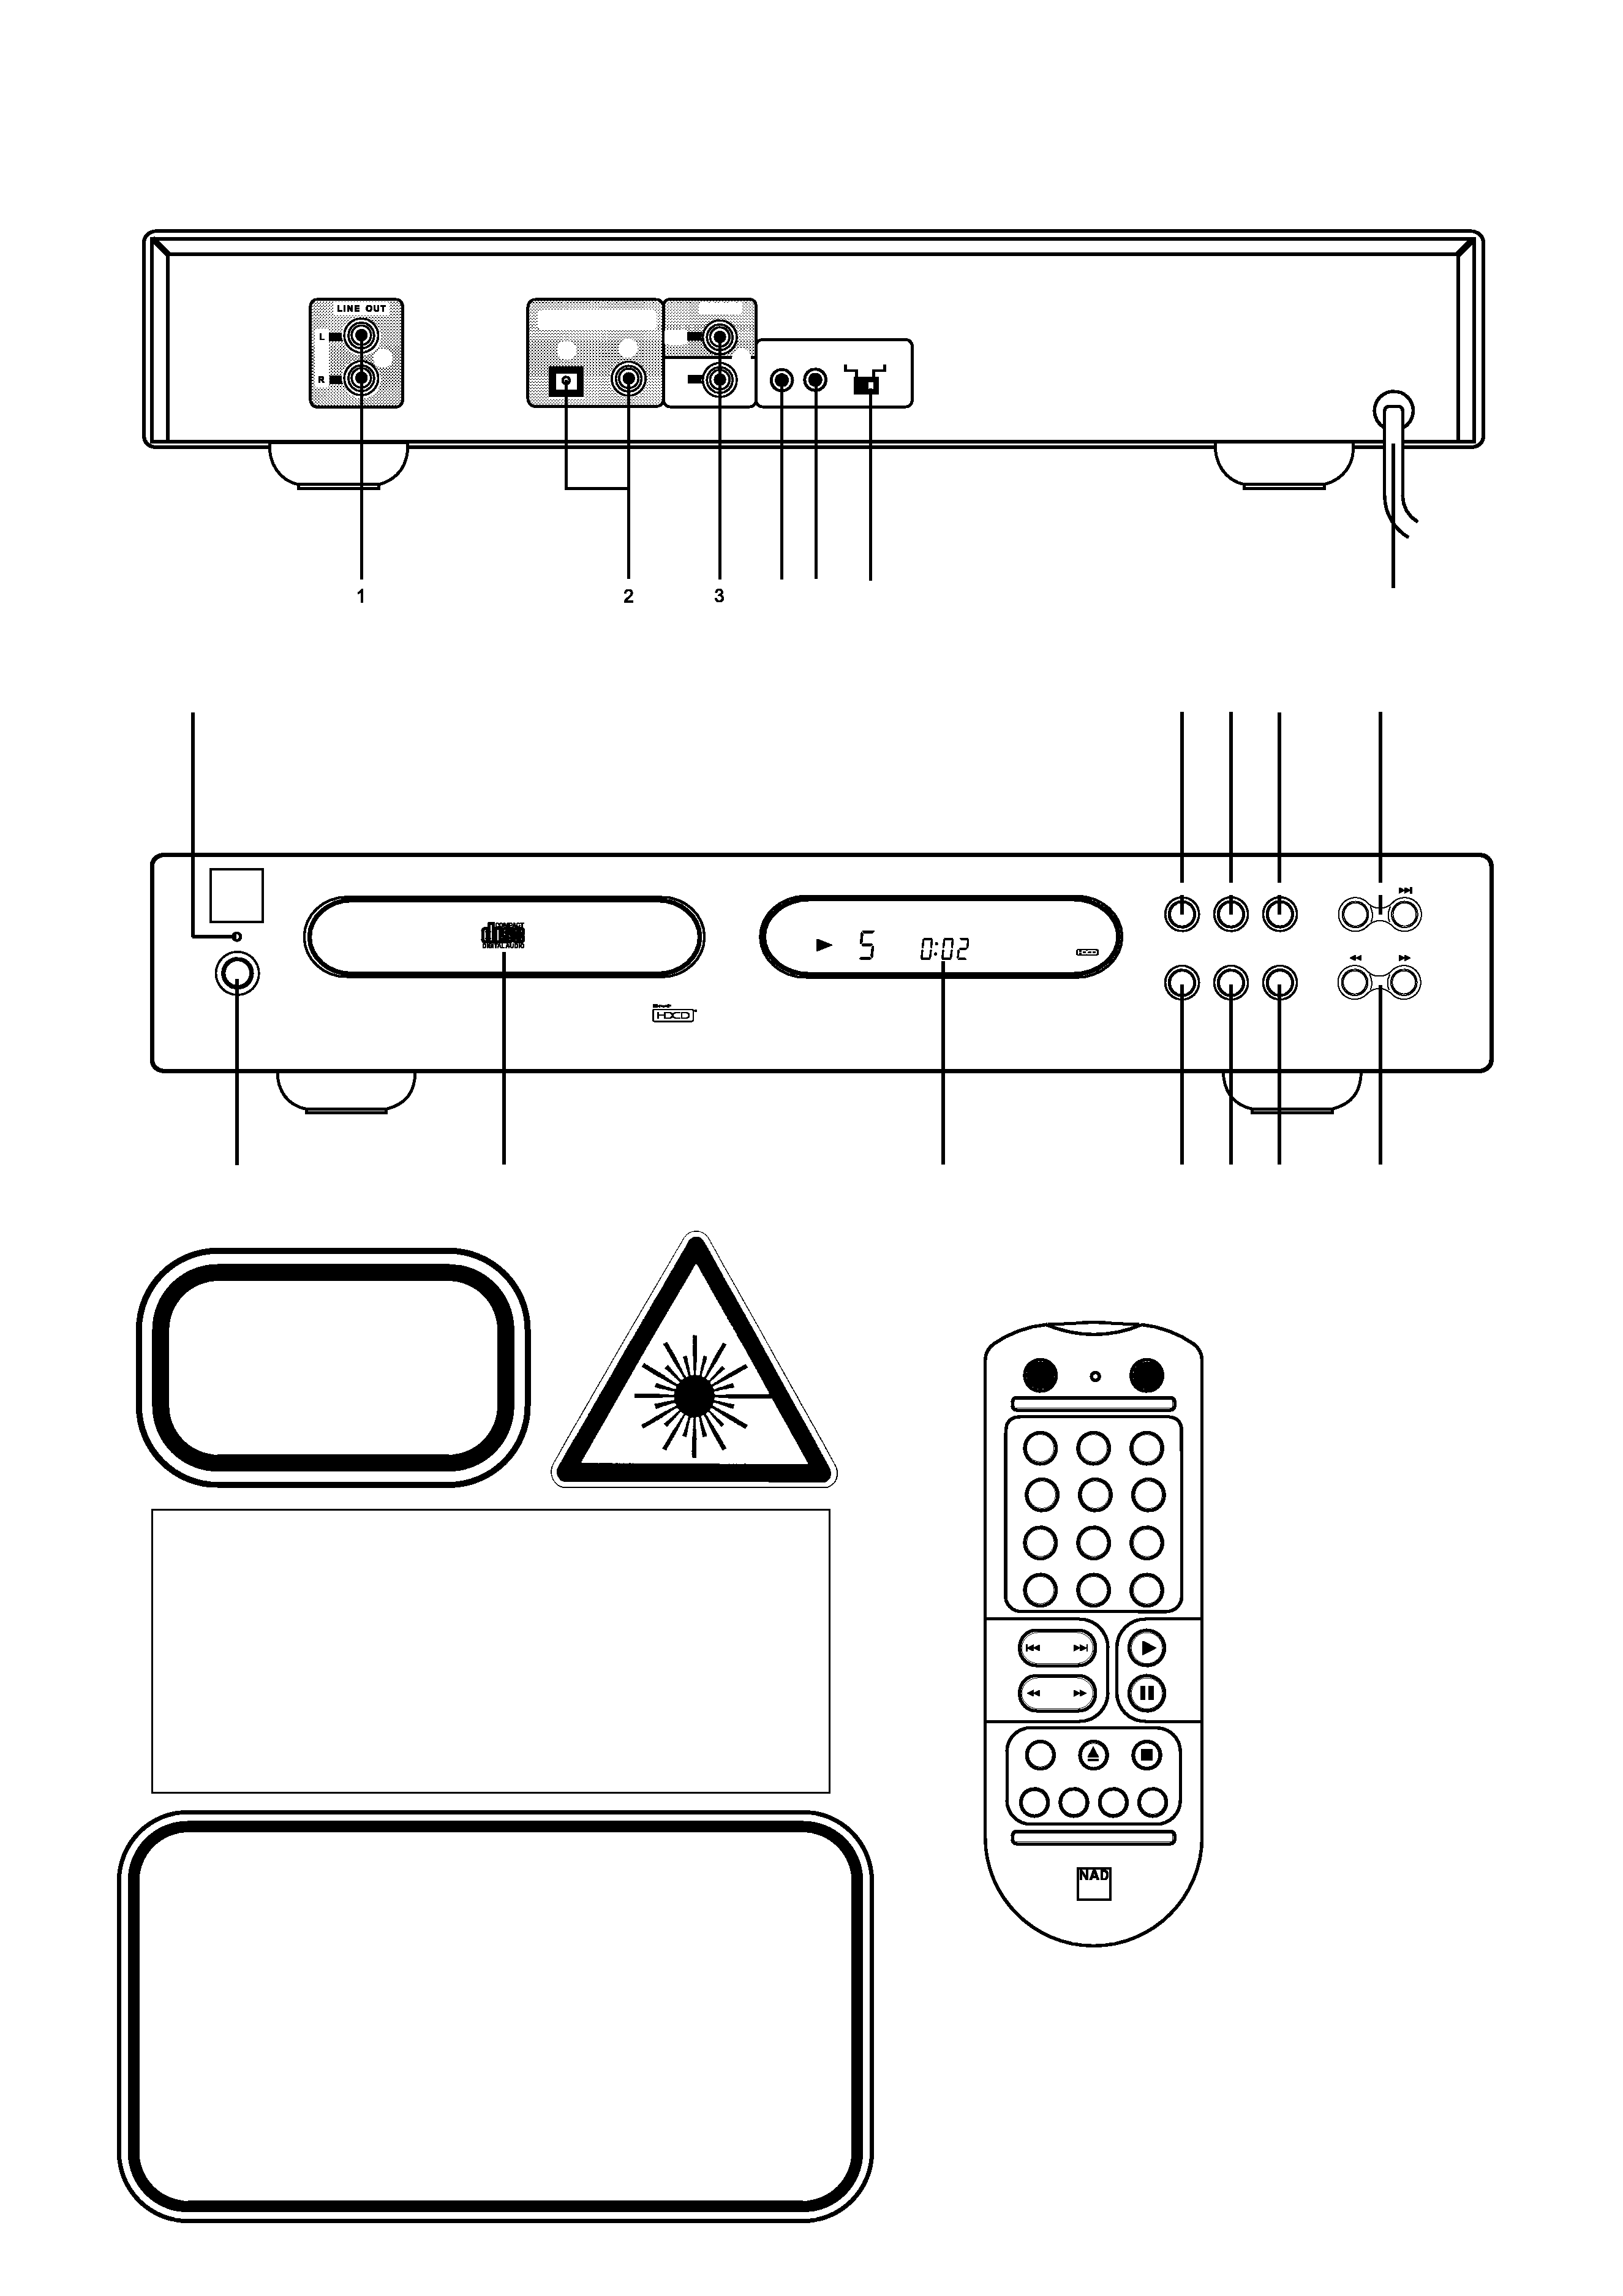
NAD C542 Owner's Manual

Cover page of NAD C542 Owner's Manual

Owner's Manual for NAD C542, downloadable as a PDF file.

We also have service manual to this model.

Manual details

  • Immediate download after payment.
  • Delivered as a PDF file.
  • The manual has 44 pages
  • File size: 2.02 MB
  • Available language versions: English, Dutch
  • Different language versions may vary sligthly in file size and page count.

We guarantee that...

  • our manuals are complete,
  • our manuals are checked with antivirus,
  • We'll issue refund if the manual is damaged, incomplete or unreadable (our refund policy)

Sample pages

Thumbnail of page 1Thumbnail of page 2Thumbnail of page 3Thumbnail of page 4
Thumbnail of page 5Thumbnail of page 6Thumbnail of page 7Thumbnail of page 8
Thumbnail of page 9
background image
Owner's Manual
GB
C 542
Compact Disc Player
Bedienungsanleitung
D
Manuel d'Installation
F
Bruksanvisning
S
Manual do Proprietário
P
Manual del Usuario
E
Manuale delle Istruzioni
I
background image
Owner's Manual
GB
C 542
Compact Disc Player
Bedienungsanleitung
D
Manuel d'Installation
F
Bruksanvisning
S
Manual do Proprietário
P
Manual del Usuario
E
Manuale delle Istruzioni
I
background image
background image
DIGIT
DIGITAL
AL
OPTICAL
OPTICAL OUT
OUT
DIGIT
DIGITAL
AL
OUT
OUT
+12V TRIGGER
+12V TRIGGER
IR IN
IN
OFF
OFF
AUT
AUTO
D
NA LINK
OUT
IN
©
2003
NAD
C
542
4
5
6
7
©
2003
NAD
C
542
NAD
C 542
Compact Disc Player
SEC
6 7 8
9 10
MIN
46
8
11
5
12
79
10
1
2
3
3
FRONT PANEL CONTROLS
REAR PANEL CONNECTIONS
THIS DIGITAL APPARATUS DOES NOT EXCEED THE CLASS B LIMITS
FOR RADIO NOISE EMISSIONS FROM DIGITAL APPARATUS AS SET OUT
IN THE RADIO INTERFERENCE REGULATIONS OF THE CANADIAN
DEPARTMENT OF COMMUNICATIONS.
LE PRESENT APPAREIL NUMVERIQUE N'EMET PAS DE BRUITS
RADIOELECTRIQUES DEPASSANT LES LIMITES APPLICABLES AUX
APPAREILS NUMERIQUES DE LA CLASSE B PRESCRITES DANS LE
REGLEMENT SUR LE BROUILLAGE RADIO ELECTRIQUE EDICTE PAR LE
MINISTERE DES COMMUNICATIONS DU CANADA.
WARNING! INVISIBLE LASER RADIATION WHEN OPEN AND INTERLOCKS DEFEATED.
AVOID EXPOSURE TO BEAM.
VORSICHT! UNSICHTBARE LASERSTRAHLEN TRITT AUS, WENN DECKEL GEÖffnet und
wenn sicherheitsverriegelung ÜberbrÜckt ist. Nicht dem strahl aussetzen.
ADVARSEL - USYNLIG LASERSTRÅLING VED ÅBNING, NÅR SIKKERHEDSAFBRYDERE ER
UDE AF FUNKTION.UNDGÅ UDSÆTTELSE FOR STRÅLUNG.
ADVARSEL - USYNLIG LASERSTRÅLING NÅR DEKSEL ÅPNES OG SIKKERHEDSLÅS
BRYTES. UNNGÅ EKSPONERING FOR STRÅLEN.
VARNING - OSYNLIG LASERSTRÅLNING NÄR DENNA DEL ÄR ÖPPNAD OCH SPÄRRAR ÄR
URKOPPLADE. STRÅLEN ÄR FARLIG.
VARO! - AVATTAESSA JA SUOJALUKITUS OHITETTAESSA OLET ALTTIINA
NÄKYMÄTÖNNTÄ LASERSÄTEILYLLE. ÄLÄ KATSO SÄTEESEEN.
REMOTE CONTROL
2
5
8
4
7
3
6
9
0
1
CD 6
ON
OFF
+10
RANDOM
10
REPEAT
PROGRAM
TIME
DELETE
SCAN
SKIP
OPEN/CLOSE
STOP
OPEN
PLAY PAUSE
STOP
TIME
RANDOM
SCAN
SKIP
REPEAT
background image
GB
4
NAD C 542 Compact Disc Player
REAR PANEL CONNECTIONS
1. LINE OUTPUT
Connect a cable from these jacks to your amplifier. Plug one end
of a twin RCA-to-RCA lead into the L (upper) and R (lower) output
jacks. Connect the other end of the cable to your stereo amplifier's
CD input, or to any other "line-level" input jacks (such as the
AUXiliary inputs). Do NOT connect this cable to the amplifier's
PHONO input jacks. The RCA sockets on your NAD
C 542 are
colour coded for convenience. Red and white are Right and Left
audio respectively, and yellow for NAD Link and Digital Out.
Ensure that leads and sockets are not damaged in any way and all
sockets are firmly pushed home.
2. DIGITAL OPTICAL & COAXIAL OUTPUT
The digital playback signal is available at this output jack. The
serial data output is taken after the error correction but before the
digital-to-analogue conversion and filtering. The output is
transformer-isolated from the built-in D-to-A circuits. It may be
connected to any digital signal processor that conforms to the
Sony/Philips (SPDIF) standard.
To use the digital output, connect a cable from this jack to the "CD
Digital" or equivalent input on a digital processor or recorder. For
QUICK START
best results, the cable should be a 75 ohm coaxial cable of the
type used for video signals, with an RCA phono plug at each end
or the cable should be an optical cable terminated with a TOS
Link connector. (To distinguish them from similar phono-plug
cables used for analogue audio signals, video and digital signal
cables often are colour-coded with yellow plugs.)
3. NAD LINK IN/OUT
The NAD-Link connector is used to pass commands from other units
fitted with NAD-Link connectors. This allows centralised control of a
complete system, and also allows some of the basic functions of
other NAD components (such as a tuner, or cassette-deck) also
equipped with NAD-Link to be controlled with an NAD system remote
control. To function with such other units, connect the
C 542's NAD-
Link Out to the NAD-Link In on the other unit. NAD-Link connectors
can be daisy-chained, IN to OUT, so that a whole system can be
controlled from the remote control facilities of one unit.
NOTES: It is advisable not to connect NAD-Link if these units that
have their own built-in remote control command receiver and are
positioned together, in direct view from the remote control
handset. If you are unsure, try operating the products without
NAD-Link first; If the unit responds to the remote control
command, it will not be necessary to connect NAD-Link.
Never loop the last unit back to the first NAD unit in the NAD-Link
chain. Unplug all units from the mains before connecting or
disconnecting NAD-Link.
4. IR IN
This input is connected to the output of an IR (infrared)
repeater (Xantech or similar), or the IR output of another
component to allow control of the
C 542 from a remote location.
Ask your dealer or custom installer for further details.
The 12V trigger Input allows the
C 542 to be switched remotely
from STANDBY to ON and vice-versa by ancillary equipment such
as a pre-amp, AV processor etc. The controlling device must be
equipped with a 12V trigger output to use this feature.
7. AC LINE CORD
Connect this power cord to an AC mains wall outlet or to an AC
convenience outlet at the rear of your amplifier
A.
B.
When the switch is set to the OFF position, the unit ignores
any trigger In command. The front panel buttons and Power
On/Off buttons on remote control toggles between Power On
and Standby Mode. This is the correct setting for most
installations.
For control by an external 12V trigger signal, set the switch
to AUTO position, and the
C 542 will Power On when the
trigger Input is high (12V present). In this setting, the front
panel and the remote control ON/STANDBY controls are
defeated; only the 12V Trigger Input can turn the
C 542 ON.
The unit will go to Standby mode if the trigger goes from
high to low (no 12V present). The unit will not go to
standby mode using any button on front panel and remote
control. When the external power is first applied to the unit,
the unit will go to the status directed by Trigger input when
the switch is set to AUTO.
NOTE ON INSTALLATION
5. +12V TRIGGER IN
6. +12V TRIGGER SWITCH
Install the NAD
C 542 Compact Disc player on a level, vibration-
free surface. (Severe vibration, or operation in a tilted position,
may cause the player to mis-track.) The player may be stacked
with other stereo components, as long as there is adequate
ventilation around it. If the player is placed in close proximity to
a radio tuner (AM or FM), a VCR, or a television set, the operation
of its digital circuits may produce static that would interfere with
reception of weak broadcast signals. If this occurs, move the CD
player away from other devices or switch it off when viewing or
listening to broadcasts.
Connect a twin RCA-to-RCA lead from the L (left) and R (right)
Line Output jacks to the corresponding CD inputs on your
amplifier.
Plug in the AC power cord.
Press the green POWER button to turn on the player.
Press OPEN to open the disc drawer.
Place a CD, label side up, in the tray's circular recess. Be
certain that the disc is centred within the recess.
Press PLAY/PAUSE. The drawer closes automatically, and the
disc begins to play.
At any time you may press SKIP or to select different tracks on
the disc.
Press PLAY/PAUSE if you want to stop play temporarily while
keeping the pickup at its current position on the disc. Press
PLAY/PAUSE again when you want to resume playback. Press
STOP if you want to end play and reset the pickup to the
beginning of the disc.
1.
2.
3.
4.
5.
6.
7.
8.
background image
5
GB
3. DISPLAY
The display provides information about playback status and about the
optical pickup's location on the disc. The displayed track/time
information is obtained by reading inaudible "sub-codes" in the disc.
TRACK NUMBER Each disc is segmented into numbered tracks
when the recording is made; typically each numbered track will
correspond to a different song, symphonic movement, etc. These
track numbers are identified on the CD package and are encoded
in the disc by its manufacturer. In some CDs, at the manufacturer's
option, tracks may be sub-divided into sections identified by Index
numbers. This player does not display Index numbers.
TIME Normally this display shows the time elapsed since the
beginning of the current track. Using the TIME button you can
switch the display to show the remaining number of tracks and
playing time to the end of the disc. When you load a different disc
and use the OPEN button (No. 4) to close the disc drawer, the
display shows the number of tracks and the total playing time of
all the tracks on the disc.
REMAIN REMAIN lights up in the lower-left corner of the display
if you have pressed the TIME button to show the remaining
number of tracks and time of the disc.
REPEAT 1 "REPEAT" and "1" light up respectively in the centre
and upper-left corner during repeat-play of a single track.
"REPEAT" and "ALL" light up during repeat-play of the entire
program or disc
RANDOM When the C 542's random mode has been selected,
"RANDOM" will be shown in the Display Panel.
CALENDAR DISPLAY TRACK LISTING Displays a list of tracks
available on the disc. As each track is played its number is
blanked out on the Track Listing, giving a simple indication of how
much of the disc has been played and how much remains. The
number for the current track being played blinks. The display
shows up to 16 numbered tracks.
OVER If the loaded disc contains over 16 tracks, "OVER" will light
up in the bottom centre area of the display.
MEMORY During Program Play or programming for Program
Play, MEMORY will light up.
PROGRAM Together with MEMORY, PROGRAM will light up during
playback of a selection of pre-programmed tracks of the disc.
STATUS A right-pointing arrowhead
, located near the left
edge of the time display, lights up during PLAY. Two vertical bars
indicate that the player is in PAUSE. In STOP mode the
display reverts to showing the total number of tracks and playing
time of the disc.
no dISC When no disc is present or when you load a disc that
cannot be read (because it is dirty or is upside-down) "no dISC"
lights up in the display.
REMOTE RECEIVER An infrared sensor, located at the right-
hand portion of the display window, receives commands from the
remote control. There must be a clear line-of-sight path from the
remote control to this window; if that path is obstructed, the
remote control may not work.
HDCD® indicator This indicator will light up when an HDCD®
encoded disc is played. For more information on HDCD® refer to
chapter "HDCD".
4. OPEN
Press this button to open the disc drawer, and press it again to
close the drawer. If this button is pressed while a disc is being
played, playback will stop, the pickup will reset to the beginning of
the disc and the drawer will open. Opening the drawer will also
delete the players memory for Program Play. When the disc drawer
is open, the drawer-closing mechanism can also be activated by
pressing PLAY or by gently pushing the drawer inward.
NOTE: The disc drawer is opened and closed by an internal
motor. Do not close the drawer by hand with the power off.
When the drawer closes, the player scans the disc's TOC (Table Of
Contents) and displays the total number of tracks and playing time
on the disc. If you press PLAY to close the drawer this information
is skipped, and play commences immediately at Track 1.
5. PLAY/PAUSE
This dual-function button alternates between starting and stopping
playback. Press to start play or to resume play after Pause. During
play, press this button to stop playback temporarily, keeping the
optical pickup at its current position on the disc. The PLAY mode
is identified by a right-pointing arrowhead in the display. The
PAUSE mode is identified by two vertical bars
. To resume
playback at the exact point where it stopped, press PLAY/PAUSE
again. If you don't want to resume play at the same point, you may
use the SKIP and SCAN controls to cue the pickup to a different
starting point before pressing PLAY again.
6. TIME
The TIME button alternates between displaying the elapsed or
remaining tracks and time of the disc or program being played. In
the default setting, the display will indicate the current track
number and time elapsed since the beginning of the track. Press
the button once to display the total number of remaining tracks
and time of the disc or program being played. Press again to
revert to the default, elapsed time display.
7. STOP
Press the STOP button once to stop playback, and re-sets the
pickup to the beginning of the disc. The display reverts to showing
the number of tracks and total playing time on the disc. If the CD
player was programmed to play a selection of tracks, the program
will be retained in the player's memory. Pressing STOP a second
time will also delete the program. Pressing STOP twice will also
disengage Repeat and Random play if these were engaged.
8. REPEAT
This button engages the Repeat Play mode, an endless-repeat
cycle. Press the Repeat button once to select the REPEAT 1 mode,
in which only the current track is repeated over and over again.
Pressing the Repeat button once again selects the REPEAT ALL
mode, in which the entire disc is played from beginning to end,
over and over again. Press the Repeat button a third time to cancel
the repeat cycle and return to normal operation.
FRONT PANEL CONTROLS
1. POWER ON/OFF
Press this button to switch on the power to the disc player.
Press again and release to switch the power off. The display will
light up to indicate the unit is switched on and ready for use.
2. DISC DRAWER
To play a disc, press the OPEN button to open the disc drawer.
Place the CD within the large circular recess in the drawer, with
its transparent playing surface facing down. The label must face
UP. CD-3 discs (3-inch CD "singles") can be played without the
aid of an adapter. Place the disc in the drawer, centered in the
smaller circular recess, with its label facing UP.
NOTE: This player was not designed to accommodate a "damping
disc" placed on a CD, nor two CDs stacked together. It plays audio
CDs, but not discs identified as CD-V, DVD, CD-I, CD-ROM,
or PHOTO CD. Refer also to chapter "A note on CD-R and CD-RW
audio discs".

Reviews

There are no reviews of this manual yet.