KENWOOD LZ-701W Owner's Manual

Cover page of KENWOOD LZ-701W Owner's Manual

Owner's Manual for KENWOOD LZ-701W, downloadable as a PDF file.

We also have service manual to this model.

Manual details

  • Immediate download after payment.
  • Delivered as a PDF file.
  • The manual has 18 pages
  • File size: 1.58 MB
  • Available language versions: Japanese, English
  • Different language versions may vary sligthly in file size and page count.

We guarantee that...

  • our manuals are complete,
  • our manuals are checked with antivirus,
  • We'll issue refund if the manual is damaged, incomplete or unreadable (our refund policy)

Sample pages

Thumbnail of page 1Thumbnail of page 2Thumbnail of page 3Thumbnail of page 4
Thumbnail of page 5Thumbnail of page 6Thumbnail of page 7Thumbnail of page 8
Thumbnail of page 9
background image
LZ-701W
7-inch WIDE SCREEN MONITOR
INSTRUCTION MANUAL
MONITEUR GRAND ECRAN 7 pouces
MODE D'EMPLOI
7-Zoll BREITBILD MONITOR
BEDIENUNGSANLEITUNG
7 inch BREEDBEELDMONITOR
GEBRUIKSAANWIJZING
MONITOR A SCHERMO AMPIO 7 pollici
ISTRUZIONI PER L'USO
MONITOR DE PANTALLA PANORÁMICA DE 7 pulgadas
MANUAL DE INSTRUCCIONES
MONITOR DE ECRÃ LARGO de 7 polegadas
MANUAL DE INSTRUÇÕES
© PRINTED IN JAPAN B64-1932-00+ (E)
LA DICHIARAZIONE DI CONFORMITA' "CE"
DI QUESTO PRODOTTO E' DEPOSITATA
PRESSO:
KENWOOD ELECTRONICS EUROPE B.V.
AMSTERDAMSEWEG 37
1422 AC UITHOORN
THE NETHERLANDS
LZ-701W(E)_00Cov_m2
02.12.20
1:39 PM
Page 3
background image
English
2
Contents
Safety Precautions. . . . . . . . . . . . . . . . . . . . . . . . . . . . . . . . . . . 3
Operation
Power . . . . . . . . . . . . . . . . . . . . . . . . . . . . . . . . . . . . . . . . . . . . . . . . . . . . . . . . . . . . .4
Switching the Monitor's Picture . . . . . . . . . . . . . . . . . . . . . . . . . . . . . . . . . . . . . . . . .4
Switching the Screen Mode <When the KTC-V800N/V800P is connected> . . . . . . . .4
Adjusting the Picture Quality . . . . . . . . . . . . . . . . . . . . . . . . . . . . . . . . . . . . . . . . . . .5
Selecting the Channels <When the KTC-V800N/V800P is connected> . . . . . . . . . . .6
Setting the Function
Selecting the Preset Bands <When the KTC-V800N/V800P is connected> . . . . . . . . .6
Selecting the Seek Mode <When the KTC-V800N/V800P is connected> . . . . . . . . . . .7
Station Preset Memory <When the KTC-V800N/V800P is connected> . . . . . . . . . . . .7
Selecting the Reception Area <When the KTC-V800P is connected> . . . . . . . . . . . . .7
Setting the Remote Sensor On/Off . . . . . . . . . . . . . . . . . . . . . . . . . . . . . . . . . . . . . . .8
FM Transmitter Function <When the KTC-V800N/V800P is connected> . . . . . . . . . . .8
Switching the AV Output <When the KTC-V800N/V800P is connected> . . . . . . . . . . .8
Remote Control Function <Provided with the KTC-V800N/V800P> . . . . . . . . 9
Installation
Accessories . . . . . . . . . . . . . . . . . . . . . . . . . . . . . . . . . . . . . . . . . . . . . . . . . . . . . . . .10
Installation Procedure . . . . . . . . . . . . . . . . . . . . . . . . . . . . . . . . . . . . . . . . . . . . . . . .10
Installation for Monitor Unit . . . . . . . . . . . . . . . . . . . . . . . . . . . . . . . . . . . . . . . . . . .11
Installation for the Video Box Unit . . . . . . . . . . . . . . . . . . . . . . . . . . . . . . . . . . . . . .14
Connection . . . . . . . . . . . . . . . . . . . . . . . . . . . . . . . . . . . . . . . . . . . . . . . . . . . . . . . .15
Troubleshooting Guide . . . . . . . . . . . . . . . . . . . . . . . . . . . . . . . 16
Specifications . . . . . . . . . . . . . . . . . . . . . . . . . . . . . . . . . . . . . 17
The control screens shown in this manual are for explanation purposes
only. The actual screens and design differ.
IM_W_English_ver.5
02.12.20
1:38 PM
Page 2
background image
3
Safety Precautions
To prevent injury and/or fire, take the following precautions:
· Ensure that the unit is securely installed. Otherwise it may fly out of place during
collisions and other jolts.
· When extending the ignition or ground wires, make sure to use automotive-grade
wires or other wires with an area of 0.75mm2 (AWG18) or more to prevent wire
deterioration and damage to the wire coating.
·To prevent short circuits, never put or leave any metallic objects (e.g., coins or metal
tools) inside the unit.
· If the unit starts to emit smoke or strange smells, turn off the power immediately
and consult your Kenwood dealer
· Be careful not to drop the unit or subject it to strong shock.
The unit may break or crack because it contains glass parts.
· Do not touch the liquid crystal fluid if the LCD is damaged or broken due to shock.
The liquid crystal fluid may be dangerous to your health or even fatal.
If the liquid crystal fluid from the LCD contacts your body or clothing, wash it off
with soap immediately.
To prevent damage to the machine, take the following precautions:
· Make sure to ground the unit to a negative 12V DC power supply.
· Do not open the back covers of the unit.
· Do not install the unit in a spot exposed to direct sunlight or excessive heat or
humidity. Also avoid places with too much dust or the possibility of water splashing.
· Do not subject the monitor unit to excessive shock, as it is a piece of precision
equipment.
· When replacing a fuse, only use a new one with the prescribed rating. Using a fuse
with the wrong rating may cause your unit to malfunction.
·To prevent short circuits when replacing a fuse, first disconnect the wiring harness.
· Do not use any screws except for the ones provided. The use of improper screws
might result in damage to the main unit.
·You cannot view TV/ video pictures whilst the vehicle is moving. To enjoy TV/ video
pictures, find a safe place to park and engage the parking brake.
· If you experience problems during installation, consult your Kenwood dealer.
· If the unit does not seem to be working right, try pressing the reset button first. If
that does not solve the problem, consult your Kenwood dealer.
NOTE
2CAUTION
2WARNING
7.0-inch WIDE COLOR LCD MONITOR
Reset button
IM_W_English_ver.5
02.12.20
1:38 PM
Page 3
background image
English
4
Operation
Power
Turning on the power
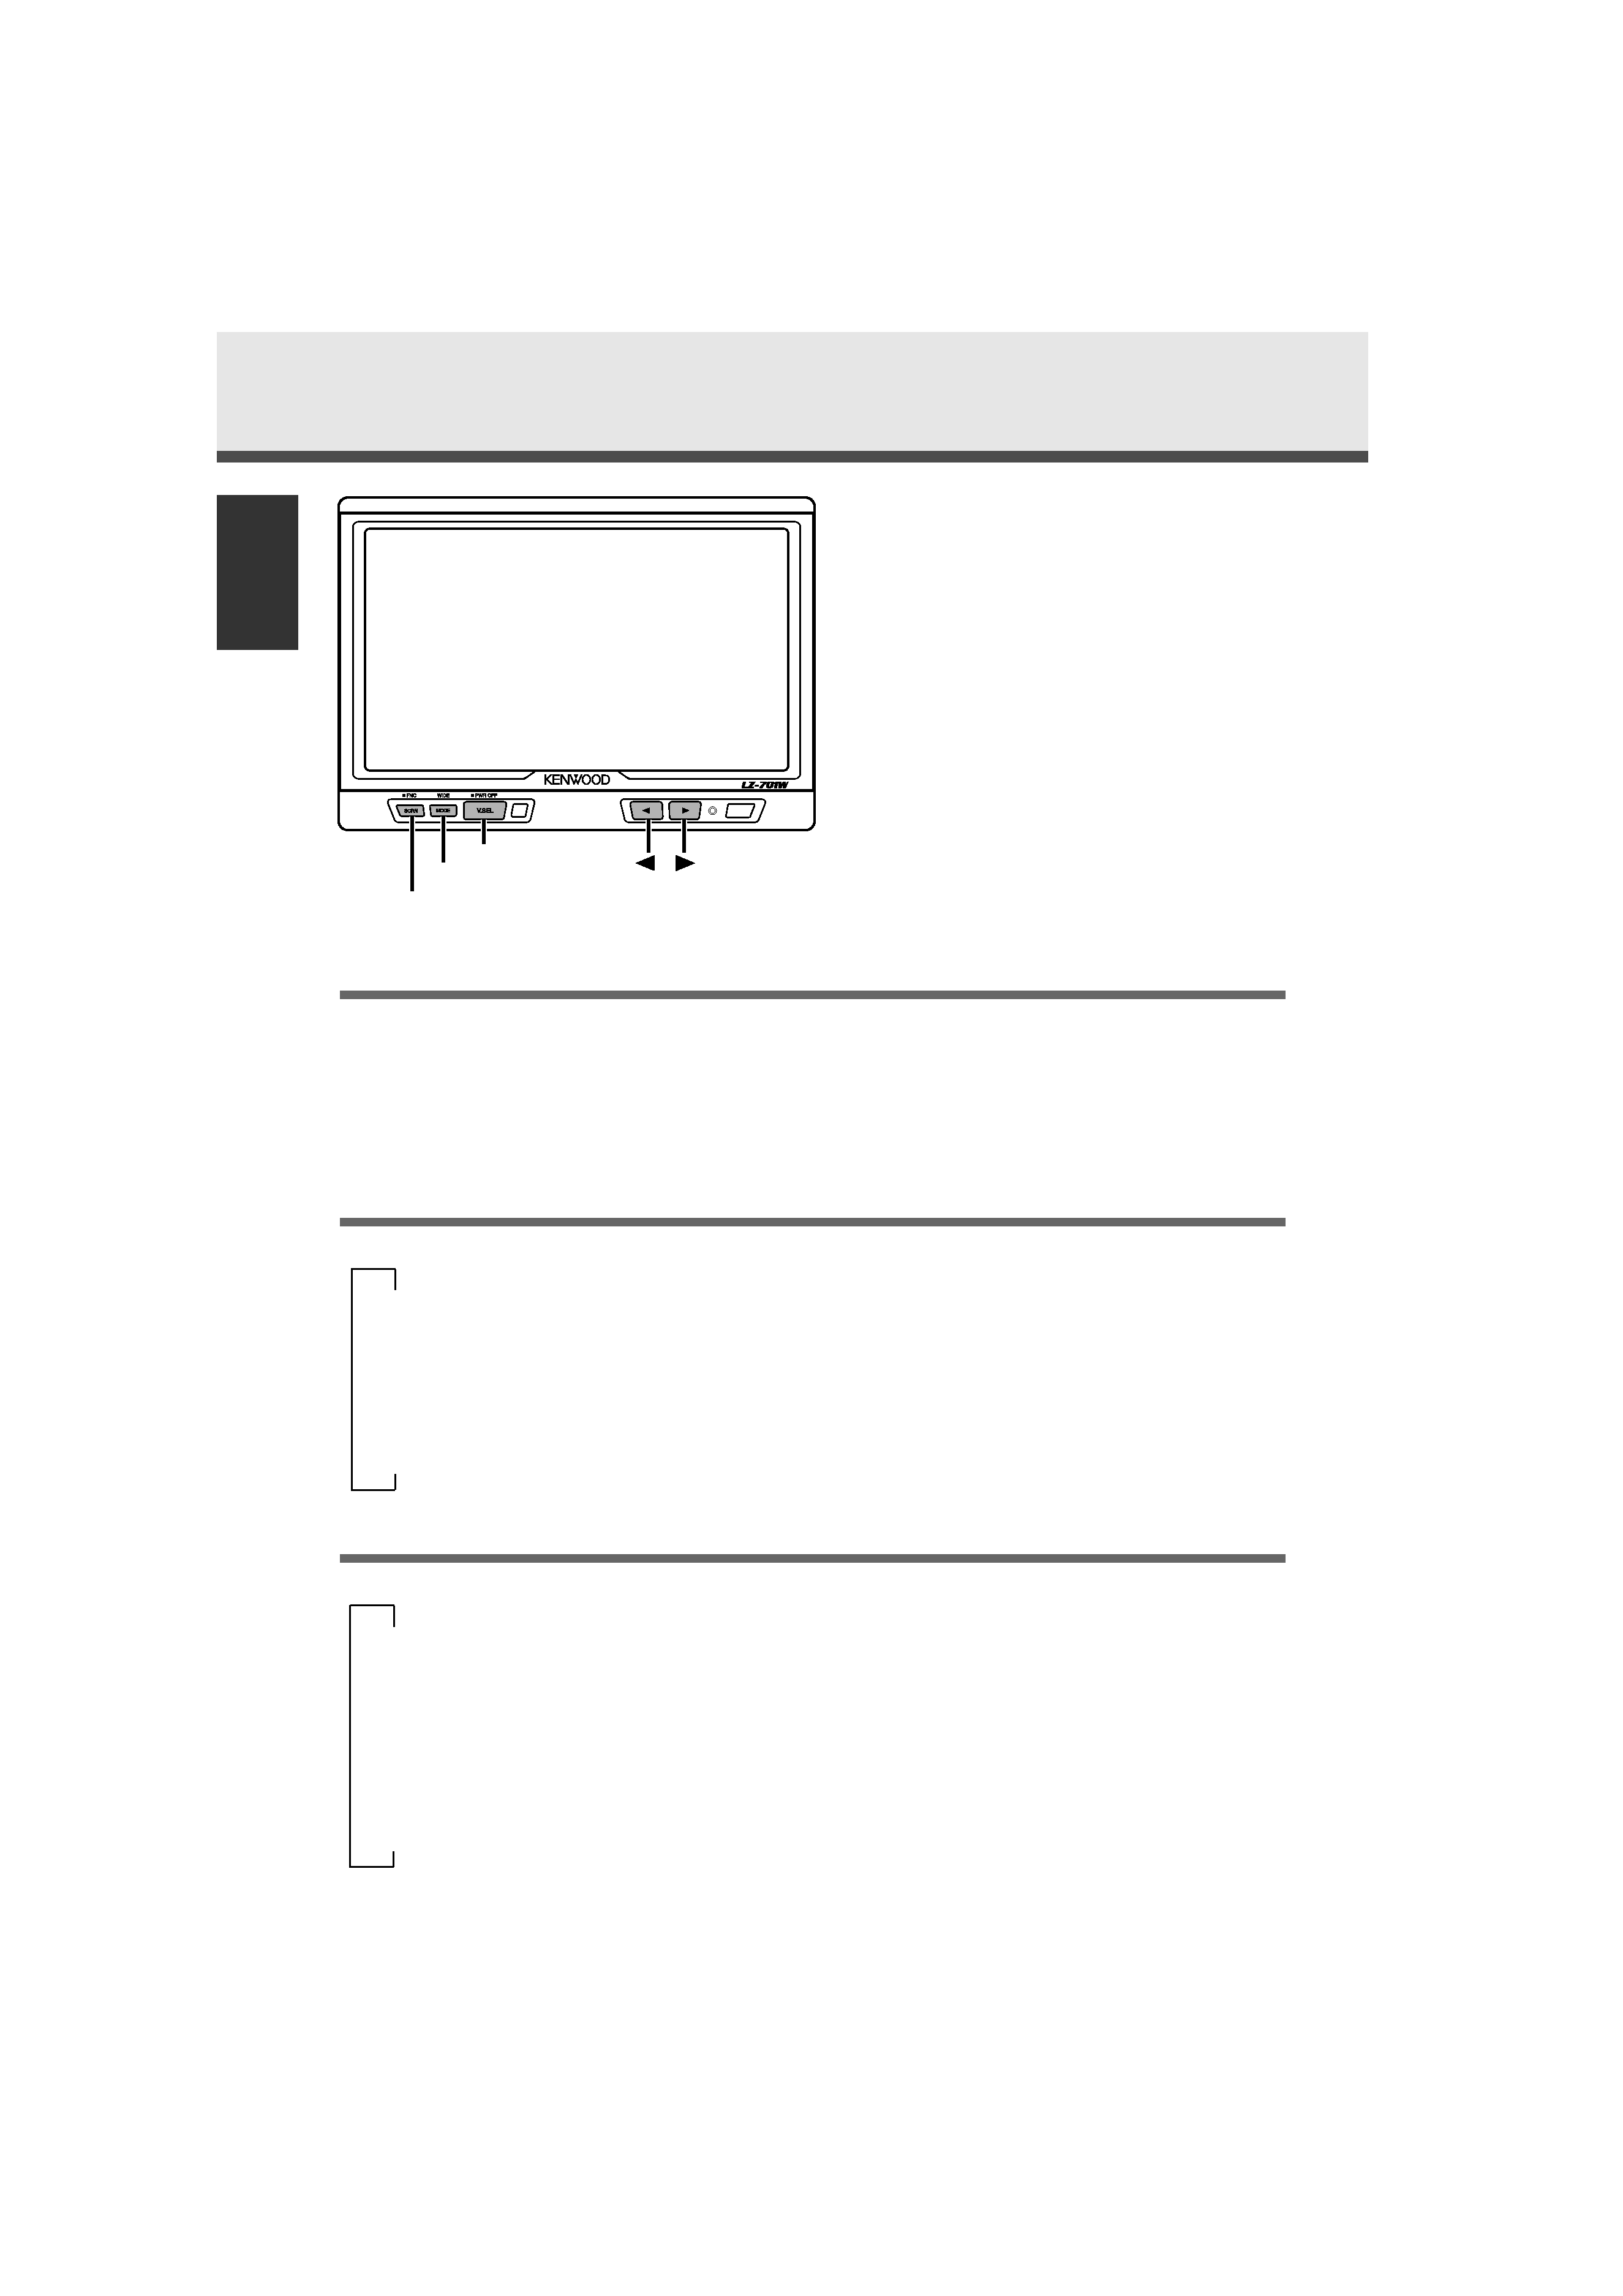
Press the V.SEL button.
Turning off the power
Press the V.SEL button for at least two seconds.
Switching the Monitor's Picture
<When the KTC-V800N or KTC-V800P is connected>
Each time you press the V.SEL button, the monitor's picture switches as follows:
[TV]: Television picture
[NAV]: Navigation picture (RGB picture)
[VIDEO1]: Video 1 picture (AV-IN1)
[VIDEO2]: Video 2 picture (AV-IN2)
Switching the Screen Mode
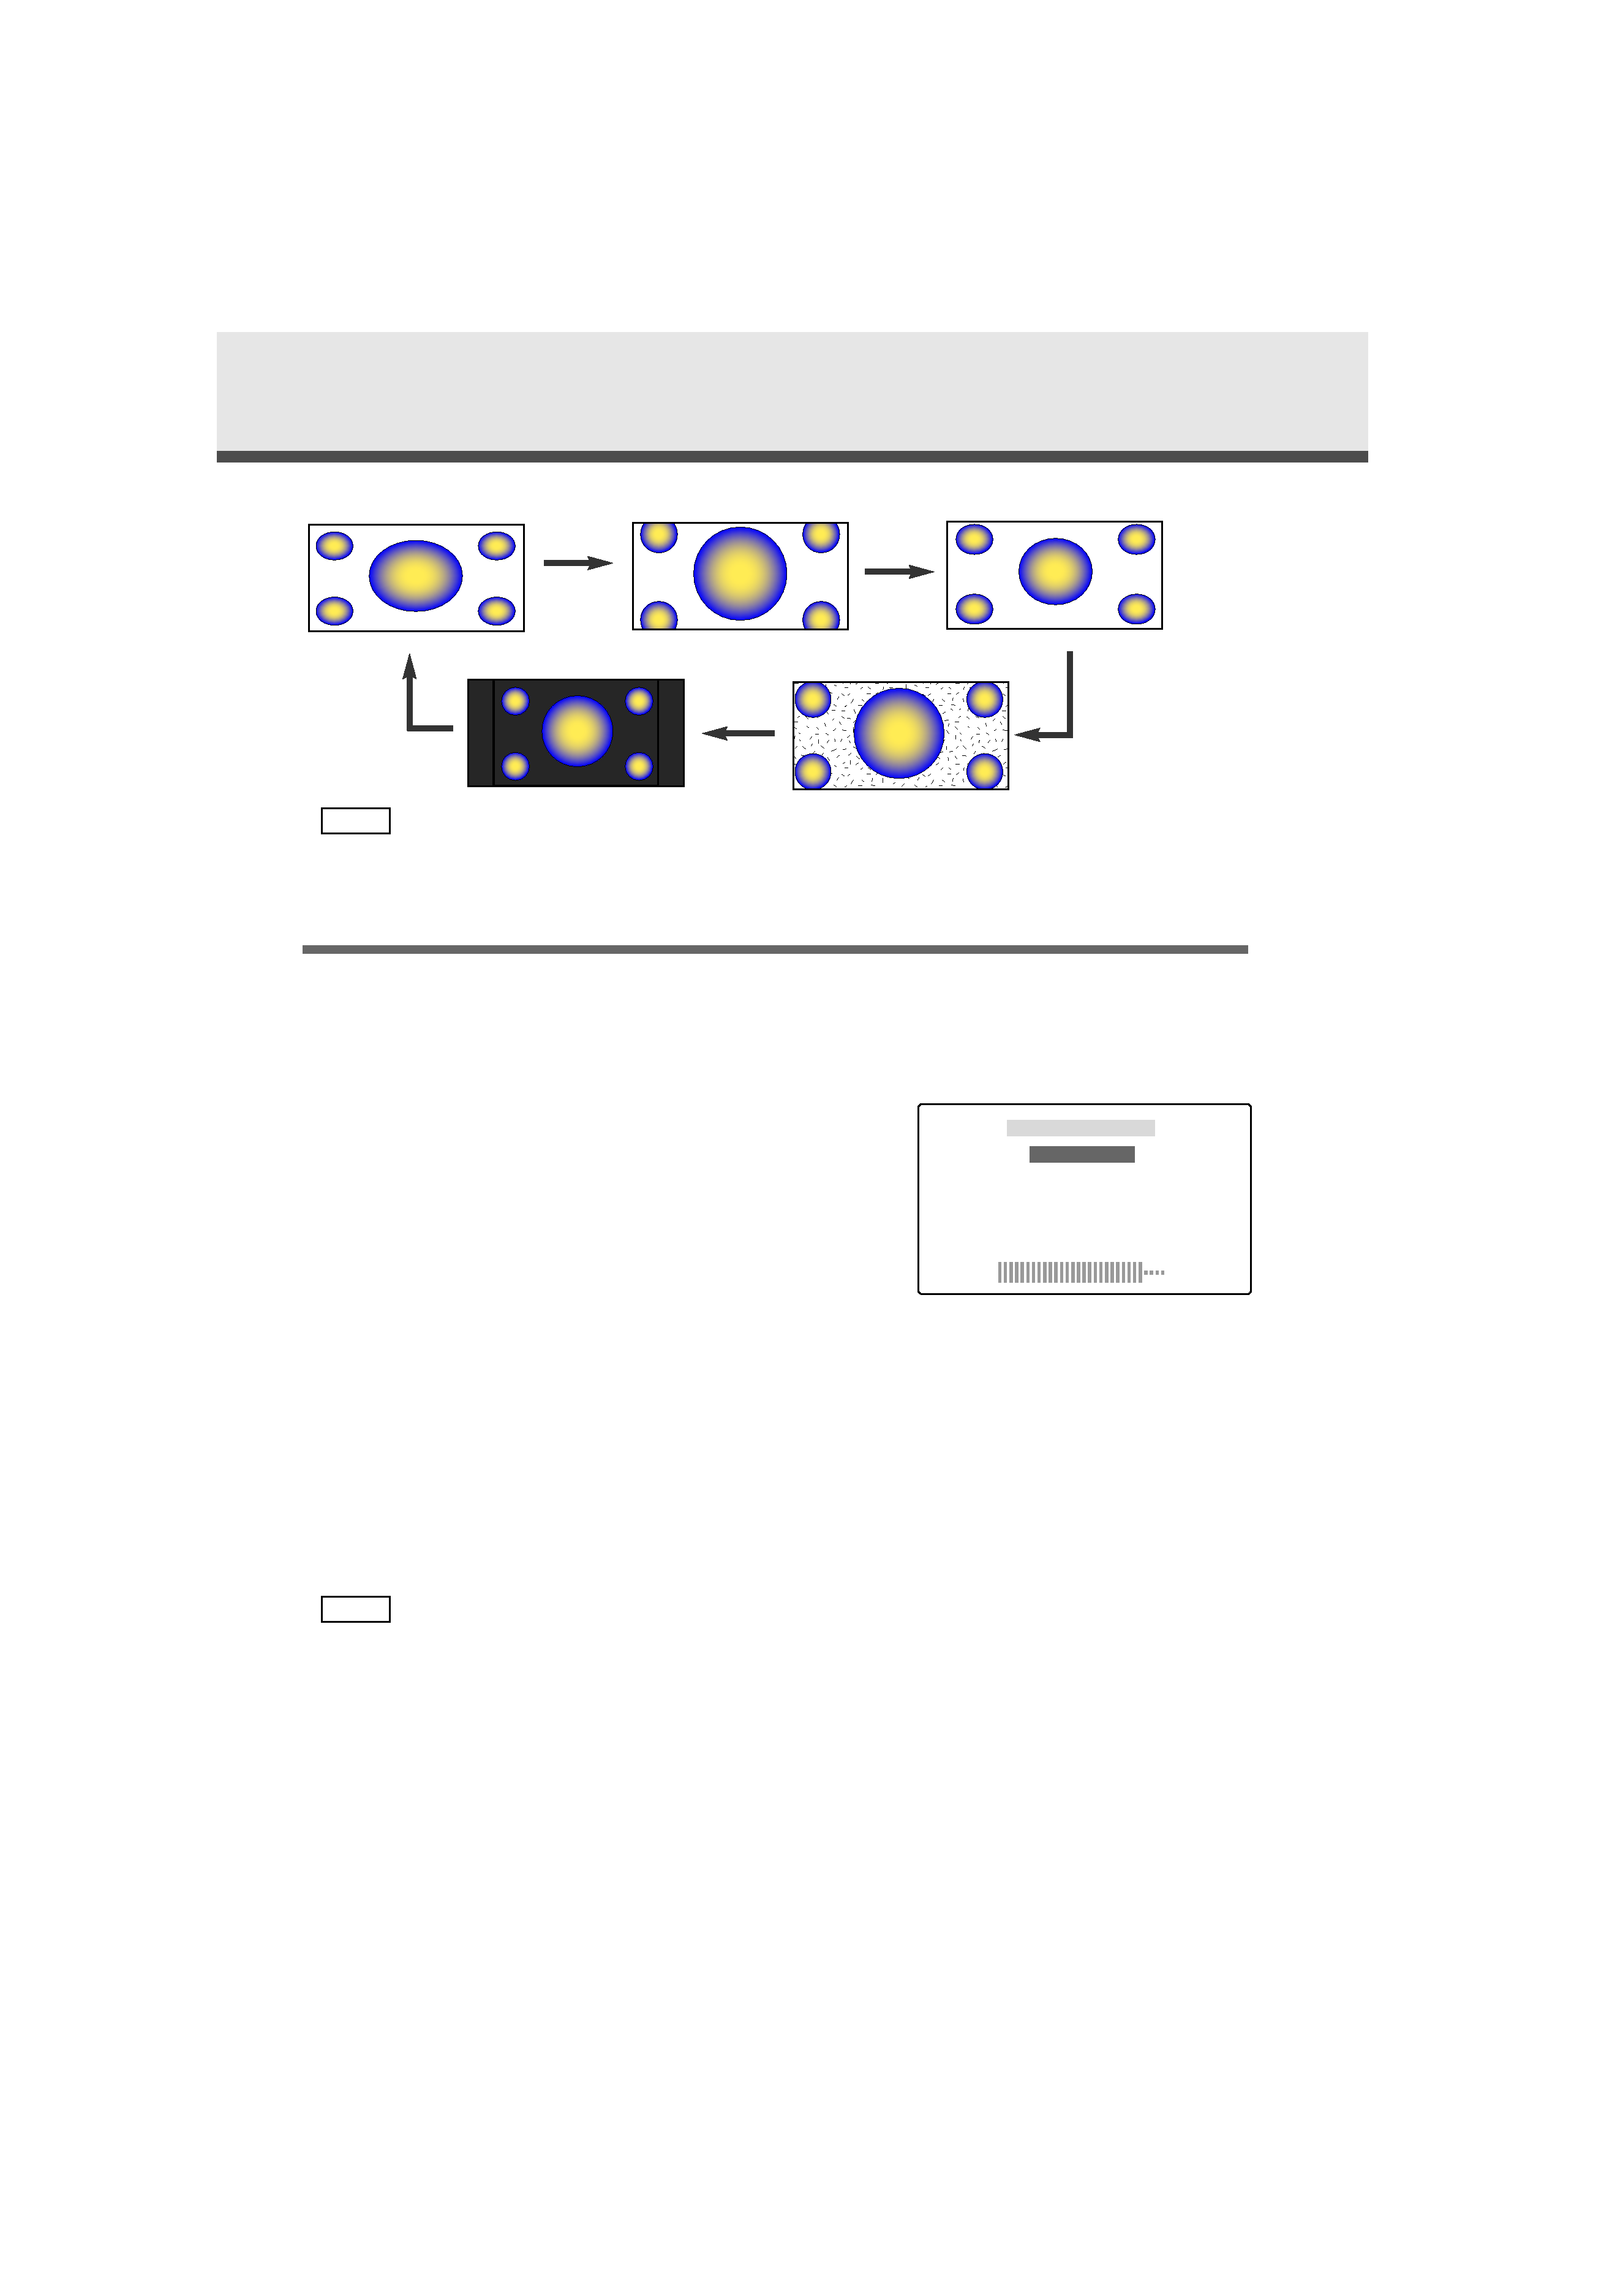
Each time you press the MODE button, the screen mode switches as follows:
[FULL]: Full picture mode
[ZOOM]: Zoom picture mode
[JUST]: Just picture mode
[CINEMA]: Cinema picture mode
[NORMAL]: Normal picture mode
7.0-inch WIDE COLOR LCD MONITOR
SCRN
MODE
V.SEL
IM_W_English_ver.5
02.12.20
1:38 PM
Page 4
background image
5
You cannot operate when the navigation picture is displayed.
<When the KTC-V800N or KTC-V800P is connected>
Adjusting the Picture Quality
Press the SCRN button, the picture quality adjustment screen to be displayed.
Each time you press the SCRN button, the adjustment item can be selected..
Press the [
2 ] or [ 3 ] button to adjust the value.
[BRIGHTNESS] (for Day time screen)
Press the [
3 ] button for a brighter screen.
Press the [
2 ] button for a darker screen.
[TINT]
Press the [
3 ] button for a stronger green level.
Press the [
2 ] button for a stronger red level.
[COLOR]
Press the [
3 ] button for a deeper color.
Press the [
2 ] button for a paler color.
[DIMMER] (for Night time screen)
Press the [
3 ] button for a brighter screen.
Press the [
2 ] button for a darker screen.
[CONTRAST]
Press the [
3 ] button for stronger contrast.
Press the [
2 ] button for less contrast.
[BLACK LEVEL]
Press the [
3 ] button for less black level.
Press the [
2 ] button for a stronger black level.
· The [ TINT ] cannot be adjusted for the picture of PAL.
· The [ TINT ] and [ COLOR ] cannot be adjusted for the navigation picture.
· [BRIGHTNESS] and [DIMMER] initial values are maximum.
· As regards [DIMMER] adjustment:
· When the condition is bright around the periphery of the monitor unit, the brightness does
not change even when [DIMMER] is adjusted.
· When set to maximum, even if the monitor unit periphery dims, there is no change in from
the brightness set with [BRIGHTNESS].
· There is no connection with the vehicle's illumination switch. (A sensor is installed facing the
front of monitor unit for light detection).
· If you make no key operation for 10 seconds, the picture quality adjustment screen is
automatically cancelled.
NOTE
3
2
1
NOTE
;;;
;;;
yyy
yyy
;;;
;;;
[ NORMAL ]
[ FULL ]
[ ZOOM ]
;;;
;;;
yyy
yyy
;;;
;;;
yyy
yyy
[ JUST ]
[ CINEMA ]
SCREEN CONTROL
TINT
COLOR
DIMMER
CONTRAST
BLACK LEVEL
BRIGHTNESS
+
-
IM_W_English_ver.5
02.12.20
1:38 PM
Page 5

Reviews

There are no reviews of this manual yet.