4 English
English
To prevent injury and/or fire, take the following
precautions:
· Ensure that the unit is securely installed. Otherwise it
may fly out of place during collisions and other jolts.
· When extending the ignition, battery or ground wires,
make sure to use automotive-grade wires or other wires
with an area of 0.75mm2 (AWG18) or more to prevent
cable deterioration and damage to the cable coating.
· To prevent short circuits, never put or leave any metallic
objects (e.g., coins or metal tools) inside the unit.
· If the unit starts to emit smoke or strange smells, turn
off the power immediately and consult your Kenwood
dealer.
· Do not touch the liquid crystal fluid if the LCD is
damaged or broken due to shock. The liquid crystal fluid
may be dangerous to your health or even fatal.
If the liquid crystal fluid from the LCD contacts your body
or clothing, wash it off with soap immediately.
To prevent damage to the machine, take the
following precautions:
· Make sure to ground the unit to a negative 12V DC
power supply.
· Do not open the top or bottom covers of the unit.
· Do not install the unit in a spot exposed to direct sunlight
or excessive heat or humidity. Also avoid places with too
much dust or the possibility of water splashing.
· Do not subject the faceplate to excessive shock, as it is
a piece of precision equipment.
· When replacing a fuse, only use a new one with the
prescribed rating. Using a fuse with the wrong rating
may cause your unit to malfunction.
· To prevent short circuits when replacing a fuse, first
disconnect the wiring harness.
· Do not use any screws except for the ones provided.
The use of improper screws might result in damage to
the main unit.
· You cannot view video pictures whilst the vehicle is
moving. To enjoy TV/video pictures, find a safe place to
park and engage the parking brake.
· If you experience problems during installation, consult
your Kenwood dealer.
· If the unit does not seem to be working right, try
pressing the reset button first. If that does not solve the
problem, consult your Kenwood dealer.
Screen brightness during low temperatures
When the temperature of the unit falls such as during
winter, the liquid crystal panel's screen will become darker
than usual. Normal brightness will return after using the
monitor for a whilst.
Audio units you can control from the
KVT-815DVD/745DVD/715DVD Receiver (in
November of 2003):
KDC-CX89, KDC-CX87, KDC-CX85, KDC-C719, KDC-C717,
KDC-C715, KDC-C669, KDC-C667, KDC-C665, KDC-C469,
KDC-C467, KDC-C465, KDC-D301, KTC-9090DAB,
KDV-C830, KDV-C840, KDV-C860, KTC-SR901/SR902,
KPA-CP100, KTC-WB100, KTC-V500N/P/E (Set the "O-N"
switch to "N" position if provided.)
Navigation units you can control from the
KVT-815DVD/745DVD/715DVD Receiver (in
November of 2003):
KNA-DV2100, KNA-DV3100
Loading and Replacing the battery
Use one lithium battery (CR2025).
Insert the batteries with the + and - poles aligned
properly, following the illustration inside the case.
Store unused batteries out of the reach of children. Contact
a doctor immediately if the battery is accidentally
swallowed.
Do not set the remote on hot places such as above the
dashboard.
· The provided batteries are intended for use in operation
checking, and their service life may be short.
· When the remote controllable distance becomes short,
replace both of the batteries with new ones.
Cleaning the panel and monitor
When the operator panel and monitor panels are dirty, wipe
and clean them using a soft cloth (such as a commercially
available silicon coated cloth). When contaminated
excessively, clean them using a cloth dipped in a neutral
detergent first, then remove the detergent using a dry
cloth.
Do not use a hard cloth and a volatile chemical (such as an
alcohol). If used, the panel surface may be scratched or
printed letters may be erased.
Cleaning the disc slot
As dust can accumulate in the disc slot, clean it
occasionally. Your discs can get scratched if you put them
in a dusty disc slot.
Lens Fogging
Right after you turn on the car heater in cold weather, dew
or condensation may form on the lens in the disc player of
the unit. Called lens fogging, discs may be impossible to
play. In such a situation, remove the disc and wait for the
condensation to evaporate. If the unit still does not operate
normally after a whilst, consult your Kenwood dealer.
2WARNING
NOTE
2CAUTION
2WARNING
Before Use
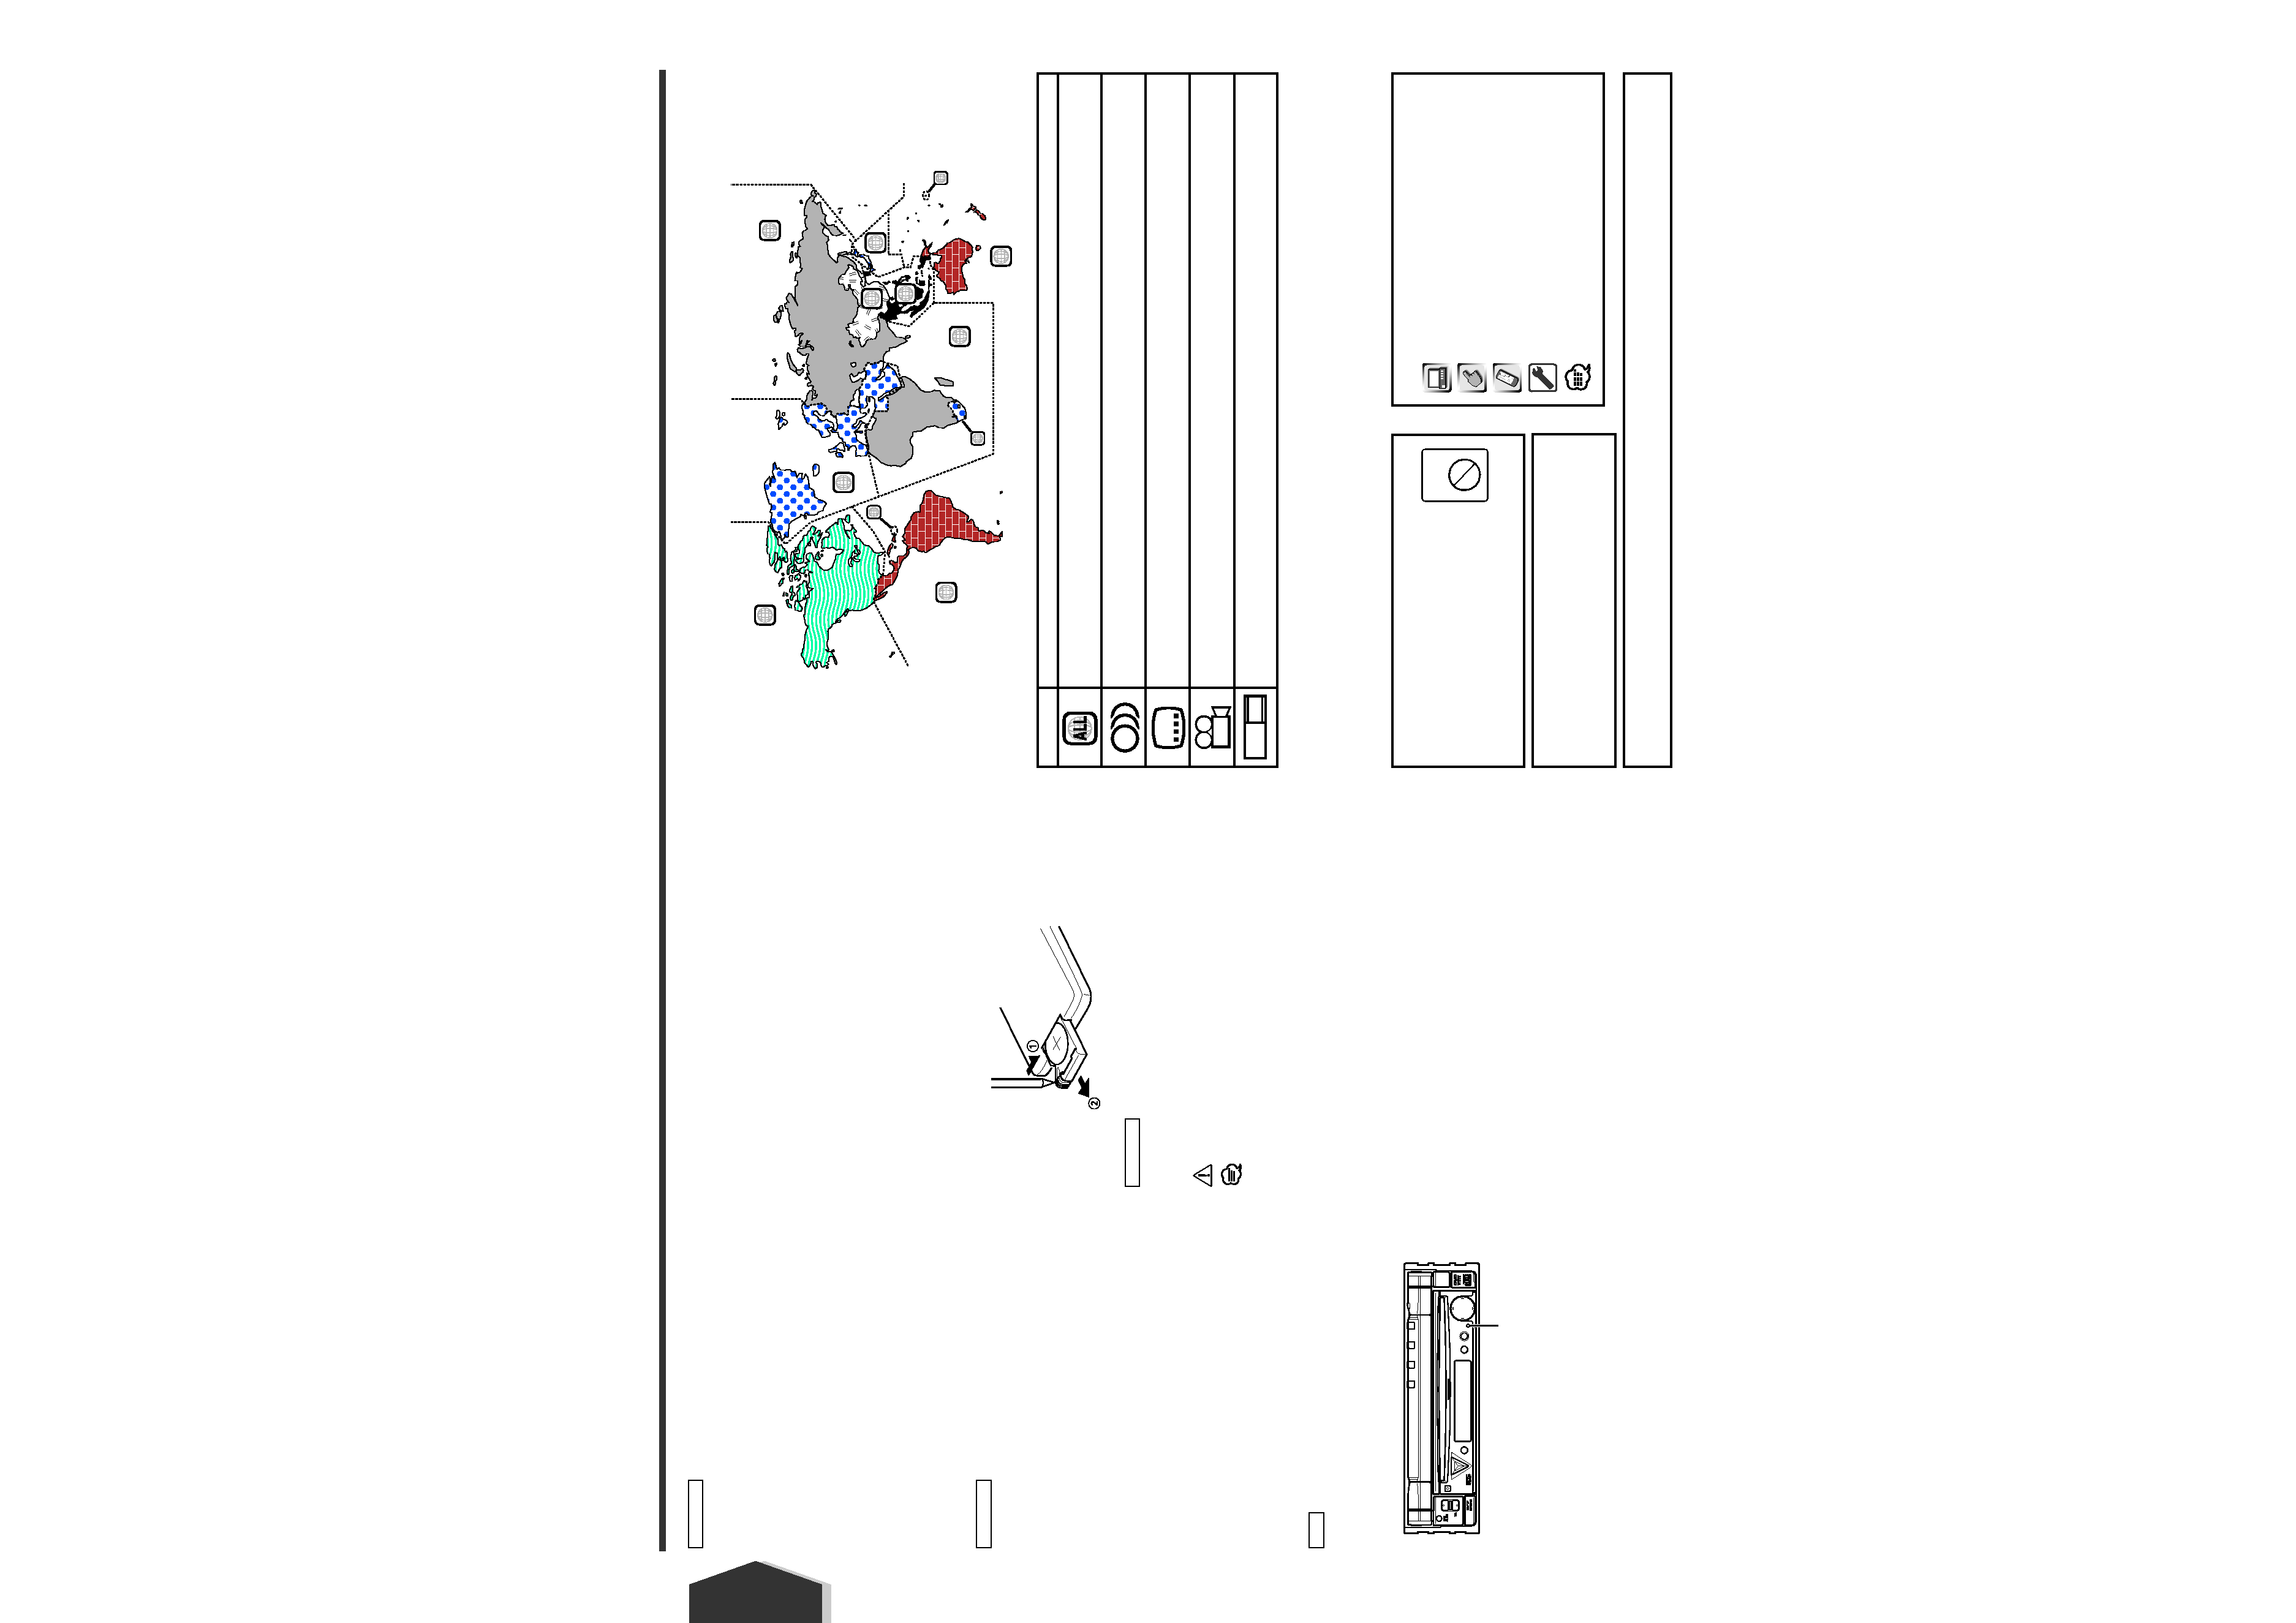
Region codes in the world
The DVD players are given a region code according to the country or area it is marketed, as shown in the following map.
Icons on the DVD discs
Unplayable discs
This player cannot play back any of the following discs.
· DVD-ROM/DVD-RAM discs
· HQ-VCD discs
· CDV discs (Only the audio part can be reproduced)
· CD-G/CD-EG/CD-EXTRA discs (Only the audio can be reproduced)
· Photo CD discs
· DVD-Audio
Also, you cannot play back the DVD-R/RW and DVD+R/RW discs if not recorded in the DVD-Video format.
English 5
1
2
4
1
5
4
5
2
1
2
6
3
Icon
Description
Indicates the region code where the disc can be played.
Number of voice languages recorded with the audio function. The number in the icon indicates the number
of voice languages. (Max. 8 languages)
Number of subtitle languages recorded with the subtitle function. The number in the icon indicates the
number of subtitle languages. (Max. 32 languages)
Number of angles provided by the angle function. The number in the icon indicates the number of angles.
(Max. 9 angles)
Aspect ratios that can be selected. "LB" stands for Letter Box and "PS" for Pan/Scan. In the example on the
left, the 16:9 video can be converted into letter box video.
8
32
9
16:9 LB
The illustrations of the display and the panel appearing in this
manual are examples used to explain more clearly how the
controls are used. Therefore, what appears on the display in the
illustrations may differ from what appears on the display on the
actual equipment, and some of the illustrations on the display
may represent something impossible in actual operation.
Time is displayed on each control screen in the 12 hour clock display type (with AM/PM displayed) or in the 24 hour clock display type
(without AM/PM displayed) depending on the sales area. The display type cannot be changed. In this instruction manual, screens of the
24 hour display type are used as examples.
Explanation of icons used on this manual
Indicates the key operation on the receiver.
Indicates the button you must touch.
Indicates the key or joystick operation on the remote
controller.
The initial value of each setup is shown.
Gives an additional information or an operation advice.
Restrictions due to difference between discs
Some DVD and VCD discs can be played only in
certain playback modes according to the
intentions of the software producers. As this
player plays discs according to their intentions,
some functions may not work as intended by you.
Please be sure to read the instructions provided
with each disc. When an inhibition icon is
displayed on the monitor, it indicates that the disc being played
is under the restriction as described above.
Inhibition
icon
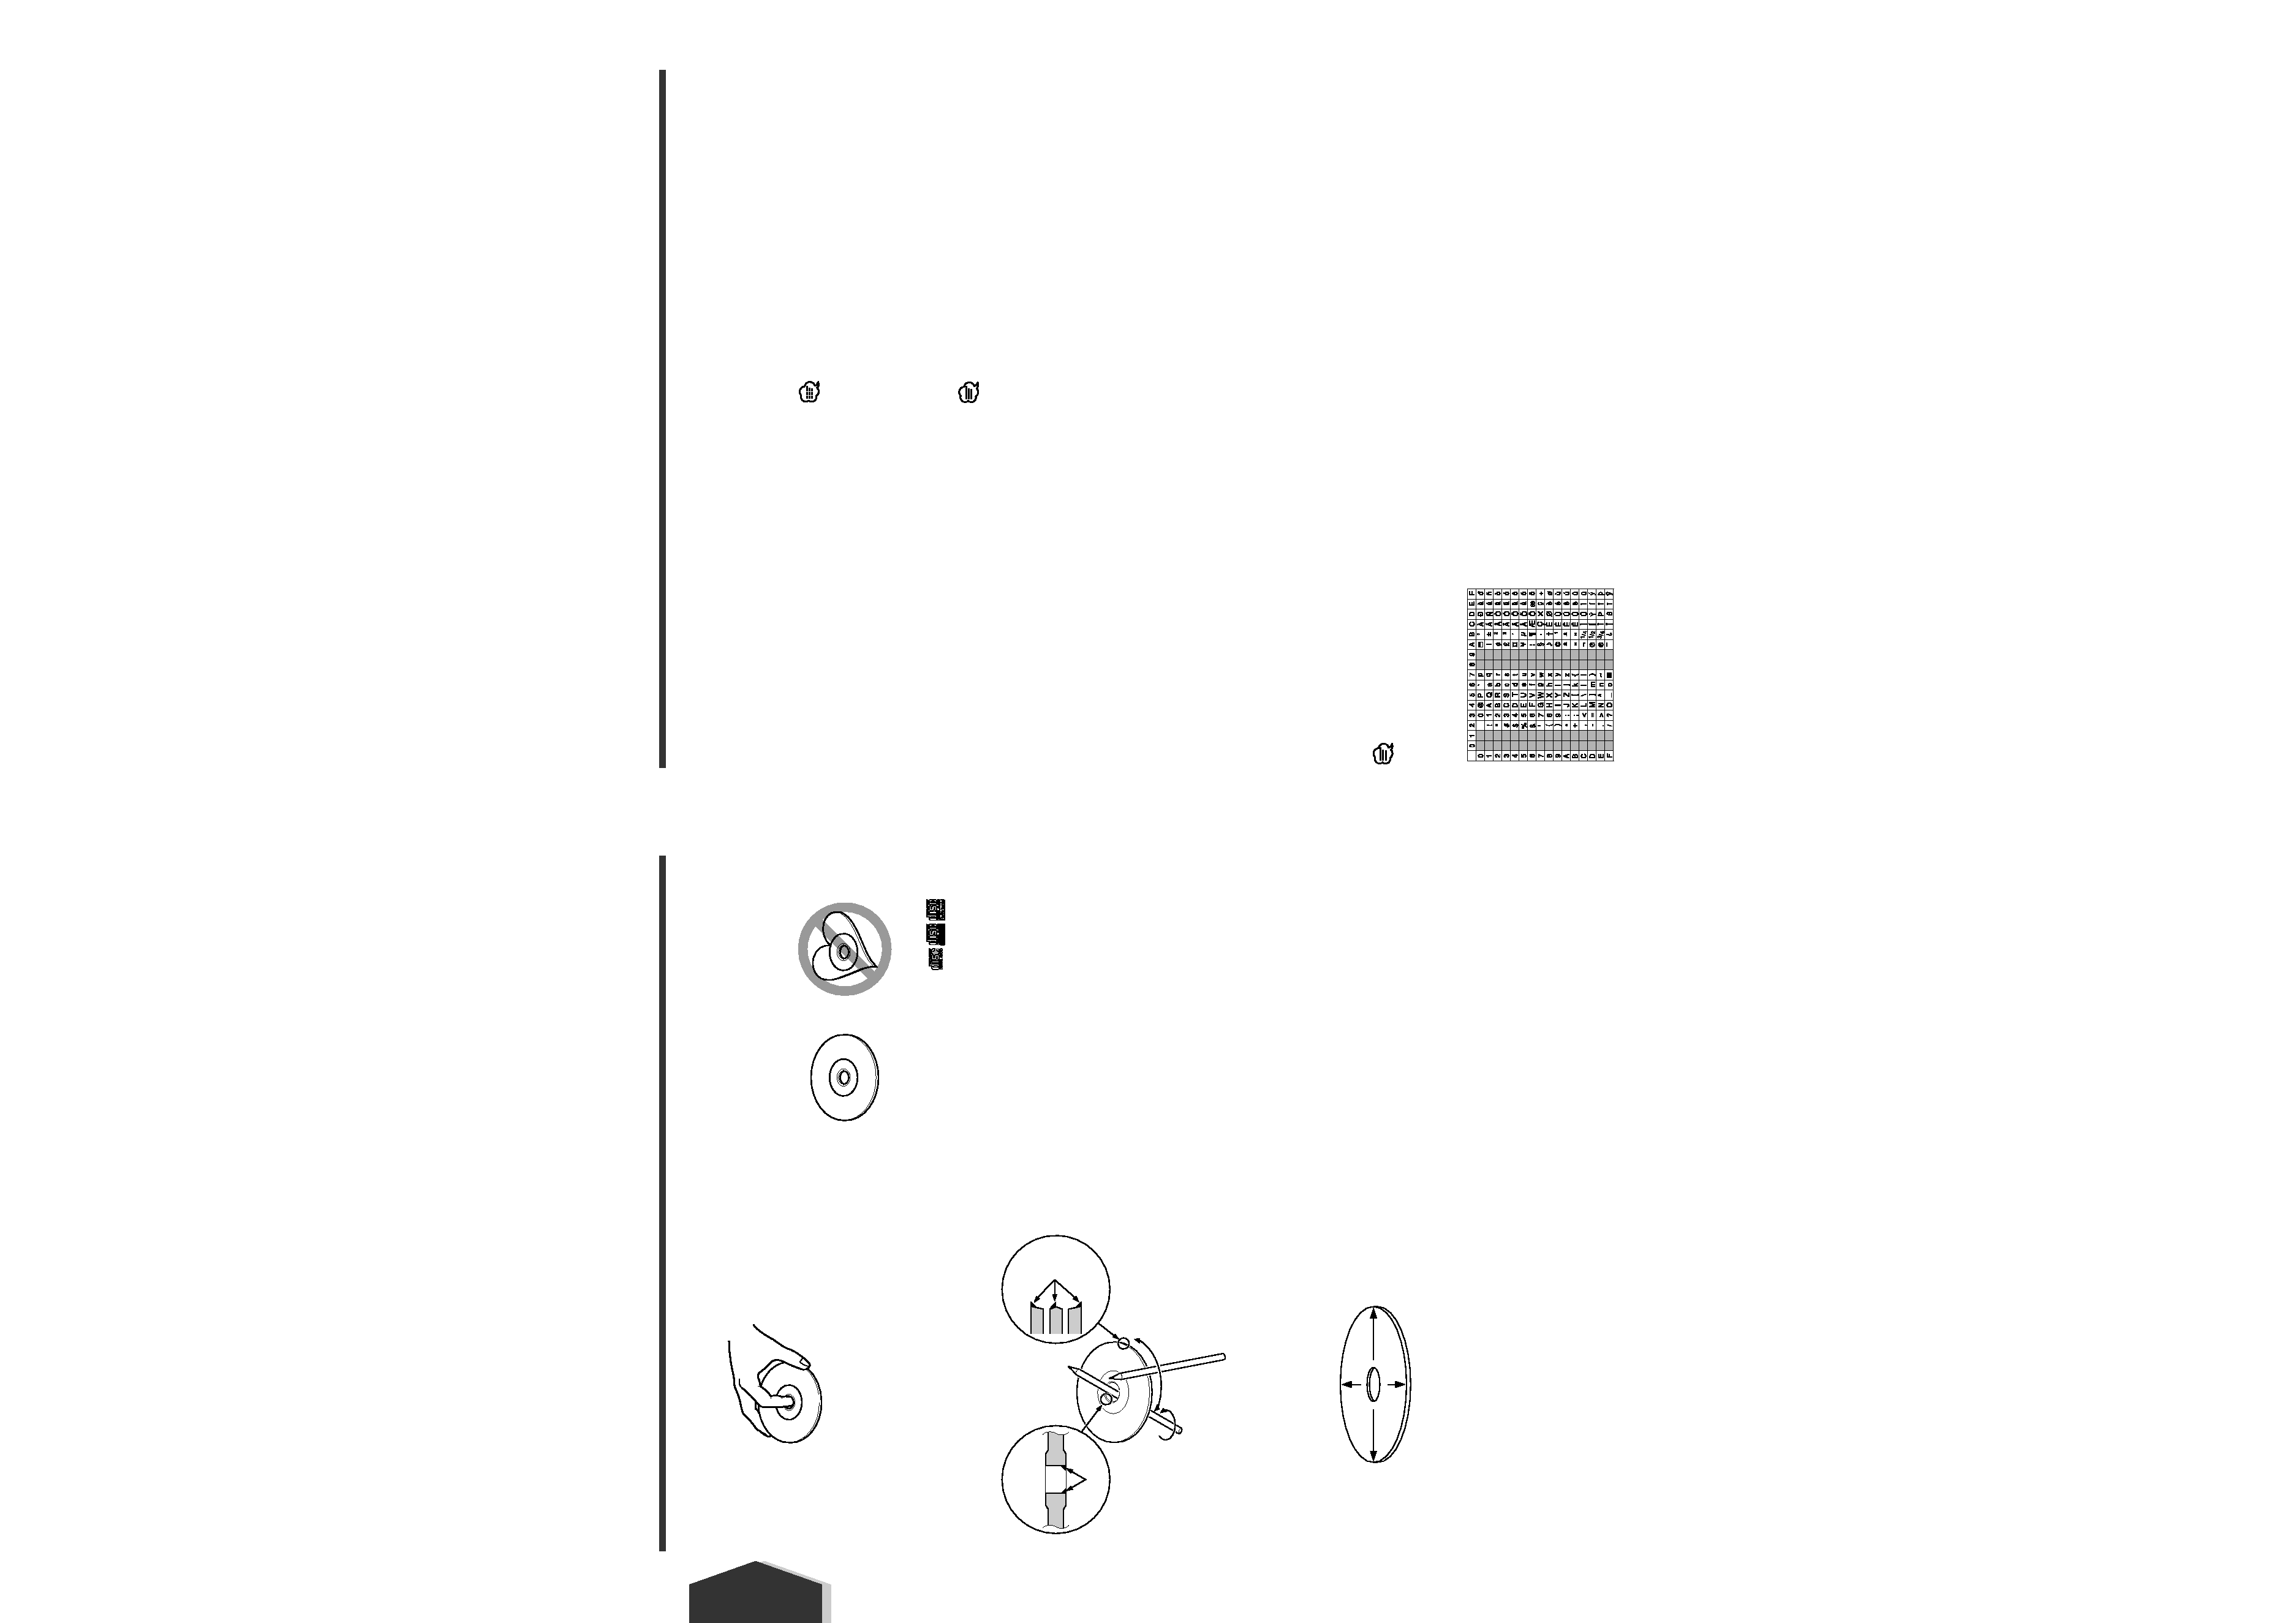
Reset button
Keep on slide
Pull out