KENWOOD KRF-V5560D Owner's Manual

Cover page of KENWOOD KRF-V5560D Owner's Manual

Owner's Manual for KENWOOD KRF-V5560D, downloadable as a PDF file.

We also have service manual to this model.

Manual details

  • Immediate download after payment.
  • Delivered as a PDF file.
  • The manual has 36 pages
  • File size: 1.36 MB
  • Available language versions: English
  • Different language versions may vary sligthly in file size and page count.

We guarantee that...

  • our manuals are complete,
  • our manuals are checked with antivirus,
  • We'll issue refund if the manual is damaged, incomplete or unreadable (our refund policy)

Sample pages

Thumbnail of page 1Thumbnail of page 2Thumbnail of page 3Thumbnail of page 4
Thumbnail of page 5Thumbnail of page 6Thumbnail of page 7Thumbnail of page 8
Thumbnail of page 9
background image
AUDIO VIDEO SURROUND RECEIVER
VR-605
VR-615
KRF-V5060D
KRF-V4060D
KRF-V5560D
INSTRUCTION MANUAL
KENWOOD CORPORATION
B60-5197-20 03
ID
(K, P, T, M, Y, X, E2)
0109
This instruction manual is for some models. Model availability and features
(functions) may differ depending on the country and sales area.
About the supplied remote control
Compared to standard remote controls, the remote control supplied with this receiver has several
operation modes. These modes enable the remote control to control other audio/video components. In
order to effectively use the remote control it is important to read the operating instructions and obtain a
proper understanding of the remote control and how to switch its operation modes (etc.).
Using the remote control without completely understanding its design and how to switch the operation
modes may result in incorrect operations.
*5197/01-07/EN
26/03/2002, 2:48 PM
1
background image
2 EN
VIDEO 2
COAXIAL
DVD
DIGITAL IN
CD / DVD
OPTICAL
VOLTAGE
SELECTOR
AC110V-120V / 220V-240V~
50 / 60Hz
SWITCHED
TOTAL 90W MAX.
AC OUTLETS
AC 220-
240V~
AC 110-
120V~
SPEAKERS
SURROUND
SPEAKERS
(8-16
)
CENTER
SPEAKER
(8-16
)
FRONT
SPEAKERS
(8-16
)
GRAY
WHITE
GREEN
BLUE
RED
LC
R
L
R
CENTER
SUB WOOFER
PRE OUT
SUB
WOOFER
SURROUND
FRONT
DVD / 6CH INPUT
PLAY IN
VIDEO 2
DVD
AUDIO
REC OUT PLAY IN
VIDEO1
PHONO
REC OUT PLAY IN
MD / TAPE
CD / DVD
L
R
GND
VIDEO 1
OUT
VIDEO 1
IN
VIDEO
VIDEO 2
IN
DVD
IN
MONITOR
OUT
ANTENNA
GND
AM
FM
75
75
µs
AM 10kHz
FM 100kHz
50
µs
AM 9kHz
FM 50kHz
DE-
EMPHASIS
CHANNEL
SPACE
SYSTEM
CONTROL
+
-
+
-
As an
ENERGY STAR® Partner, Kenwood
Corporation has determined that this
product meets the
ENERGY STAR®
guidelines for energy efficiency.This
product can save energy. Saving energy
reduces air pollution and lowers utility bills.
Units are designed for operation as follows.
U.S.A. and Canada ........................................... AC 120 V only
Australia ........................................................... AC 240 V only
Europe and U.K. ............................................... AC 230 V only
China and Russia ............................................. AC 220 V only
Other countries .......... AC 110-120 / 220-240 V switchable*
Before applying the power
Caution : Read this page carefully to ensure safe
operation.
Safety precautions
WARNING :
TO PREVENT FIRE OR ELECTRIC SHOCK,
DO NOT EXPOSE THIS APPLIANCE TO
RAIN OR MOISTURE.
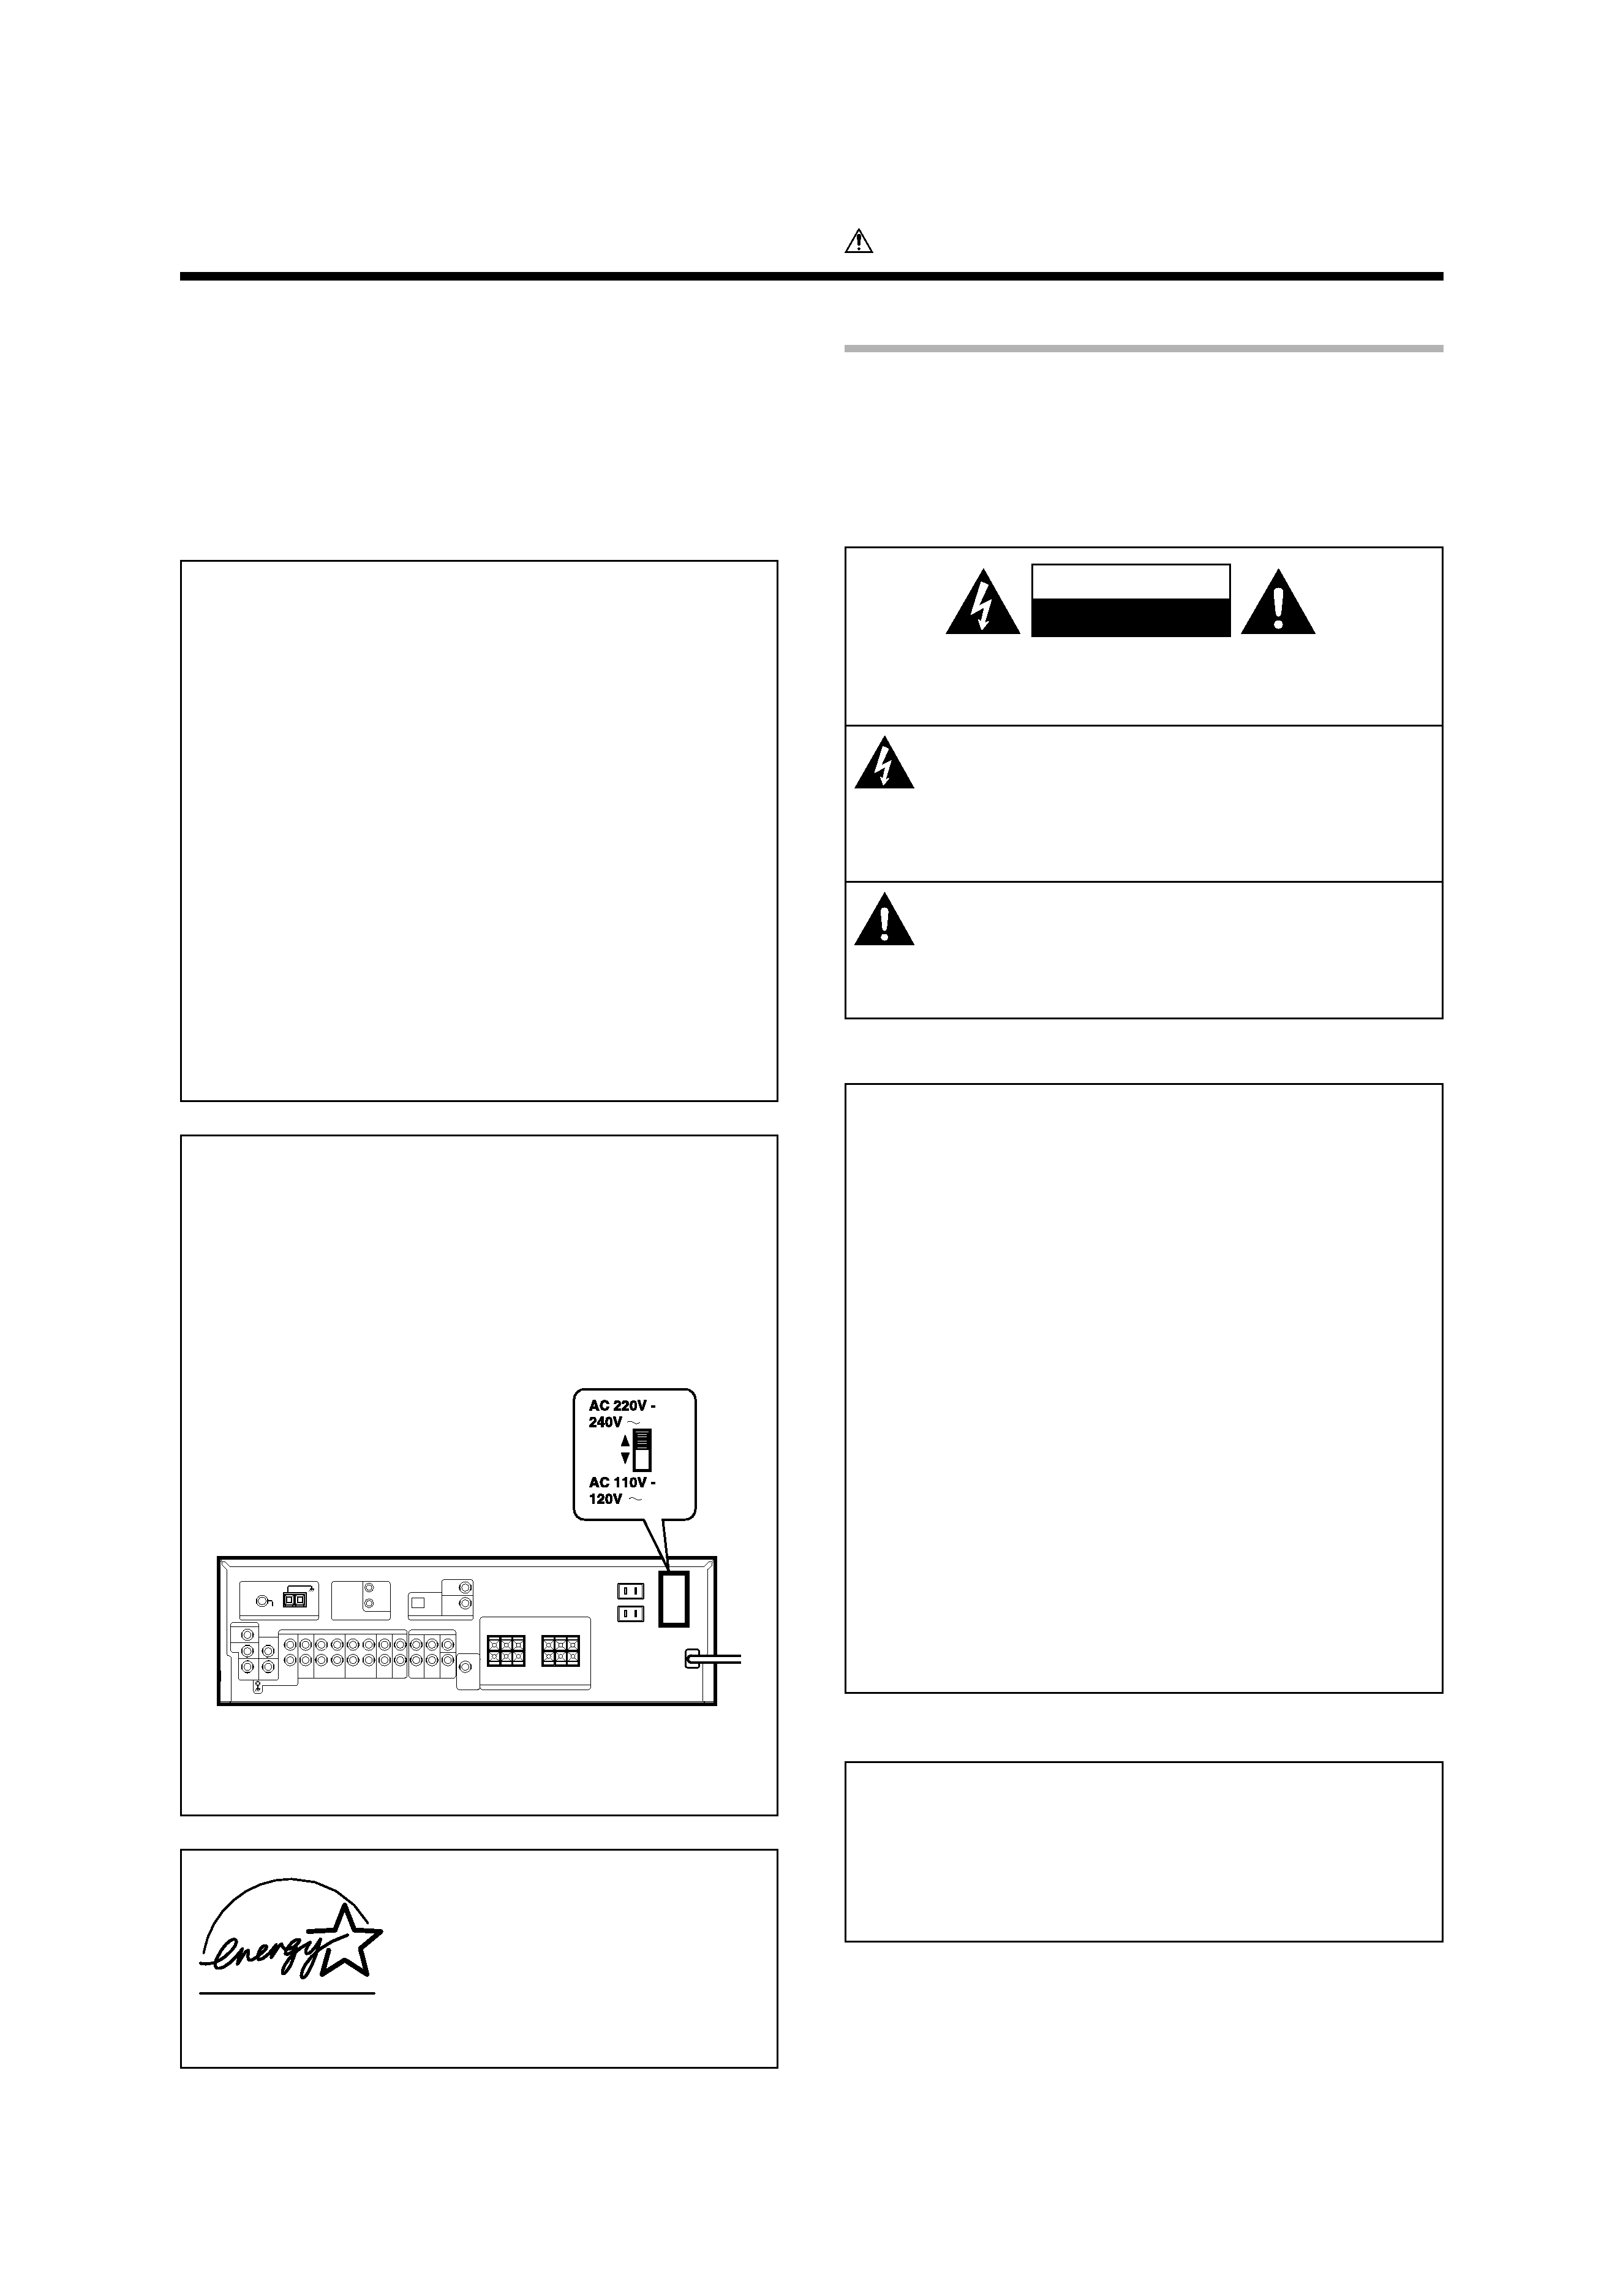
* AC voltage selection
The AC voltage selector switch on the rear panel is set to the voltage
that prevails in the area to which the unit is shipped.
Before
connecting the power cord to your AC outlet, make sure that the
setting position of this switch matches your line voltage. If not, it
must be set to your voltage in accordance with the following direction.
AC voltage selector switch
Note :
Our warranty does not cover damage caused by excessive line
voltage due to improper setting of the AC voltage selector switch.
Move switch lever to match
your line voltage with a small
screwdriver or other pointed
tool.
For the U.S.A.
Note to CATV system installer:
This reminder is provided to call the CATV system installer's attention
to Article 820-40 of the NEC that provides guidelines for proper
grounding and, in particular, specifies that the cable ground shall be
connected to the grounding system of the building, as close to the
point of cable entry as practical.
For the United Kingdom
Factory fitted moulded mains plug
1. The mains plug contains a fuse. For replacement, use only a 13-
Amp ASTA-approved (BS1362) fuse.
2. The fuse cover must be refitted when replacing the fuse in the
moulded plug.
3. Do not cut off the mains plug from this equipment. If the plug fitted
is not suitable for the power points in your home or the cable is too
short to reach a power point, then obtain an appropriate safety
approved extension lead or adaptor, or consult your dealer.
If nonetheless the mains plug is cut off, remove the fuse and
dispose of the plug immediately, to avoid a possible shock hazard
by inadvertent connection to the mains supply.
IMPORTANT : The wires in the mains lead are coloured in accor-
dance with the following code:
Blue
: Neutral
Brown : Live
Do not connect those leads to the earth terminal of a three-pin plug.
CAUTION
RISK OF ELECTRIC SHOCK
DO NOT OPEN
CAUTION: TO REDUCE THE RISK OF ELECTRIC SHOCK, DO NOT
REMOVE COVER (OR BACK). NO USER-SERVICEABLE PARTS IN-
SIDE. REFER SERVICING TO QUALIFIED SERVICE PERSONNEL.
THE LIGHTNING FLASH WITH ARROWHEAD SYMBOL,
WITHIN AN EQUILATERAL TRIANGLE, IS INTENDED TO
ALERT THE USER TO THE PRESENCE OF UNINSULATED
"DANGEROUS VOLTAGE" WITHIN THE PRODUCT'S EN-
CLOSURE THAT MAY BE OF SUFFICIENT MAGNITUDE TO
CONSTITUTE A RISK OF ELECTRIC SHOCK TO PERSONS.
THE EXCLAMATION POINT WITHIN AN EQUILATERAL TRI-
ANGLE IS INTENDED TO ALERT THE USER TO THE PRES-
ENCE OF IMPORTANT OPERATING AND MAINTENANCE
(SERVICING) INSTRUCTIONS IN THE LITERATURE ACCOM-
PANYING THE APPLIANCE.
FCC WARNING
This equipment may generate or use radio frequency energy. Changes
or modifications to this equipment may cause harmful interference
unless the modifications are expressly approved in the instruction
manual. The user could lose the authority to operate this equipment
if an unauthorized change or modification is made.
NOTE:
This equipment has been tested and found to comply with the limits
for a Class B digital device, pursuant to Part 15 of the FCC Rules.
These limits are designed to provide reasonable protection against
harmful interference in a residential installation. This equipment may
cause harmful interference to radio communications, if it is not
installed and used in accordance with the instructions. However,
there is no guarantee that interference will not occur in a particular
installation. If this equipment does cause harmful interference to
radio or television reception, which can be determined by turning the
equipment off and on, the user is encouraged to try to correct the
interference by one or more of the following measures:
­ ­ Reorient or relocate the receiving antenna.
­ ­ Increase the separation between the equipment and receiver.
­ ­ Connect the equipment into an outlet on a circuit different from
that to which the receiver is connected.
­ ­ Consult the dealer or an experienced radio / TV technician for
help.
For the U.S.A.
*5197/01-07/EN
26/03/2002, 2:48 PM
2
background image
3 EN
Unpacking
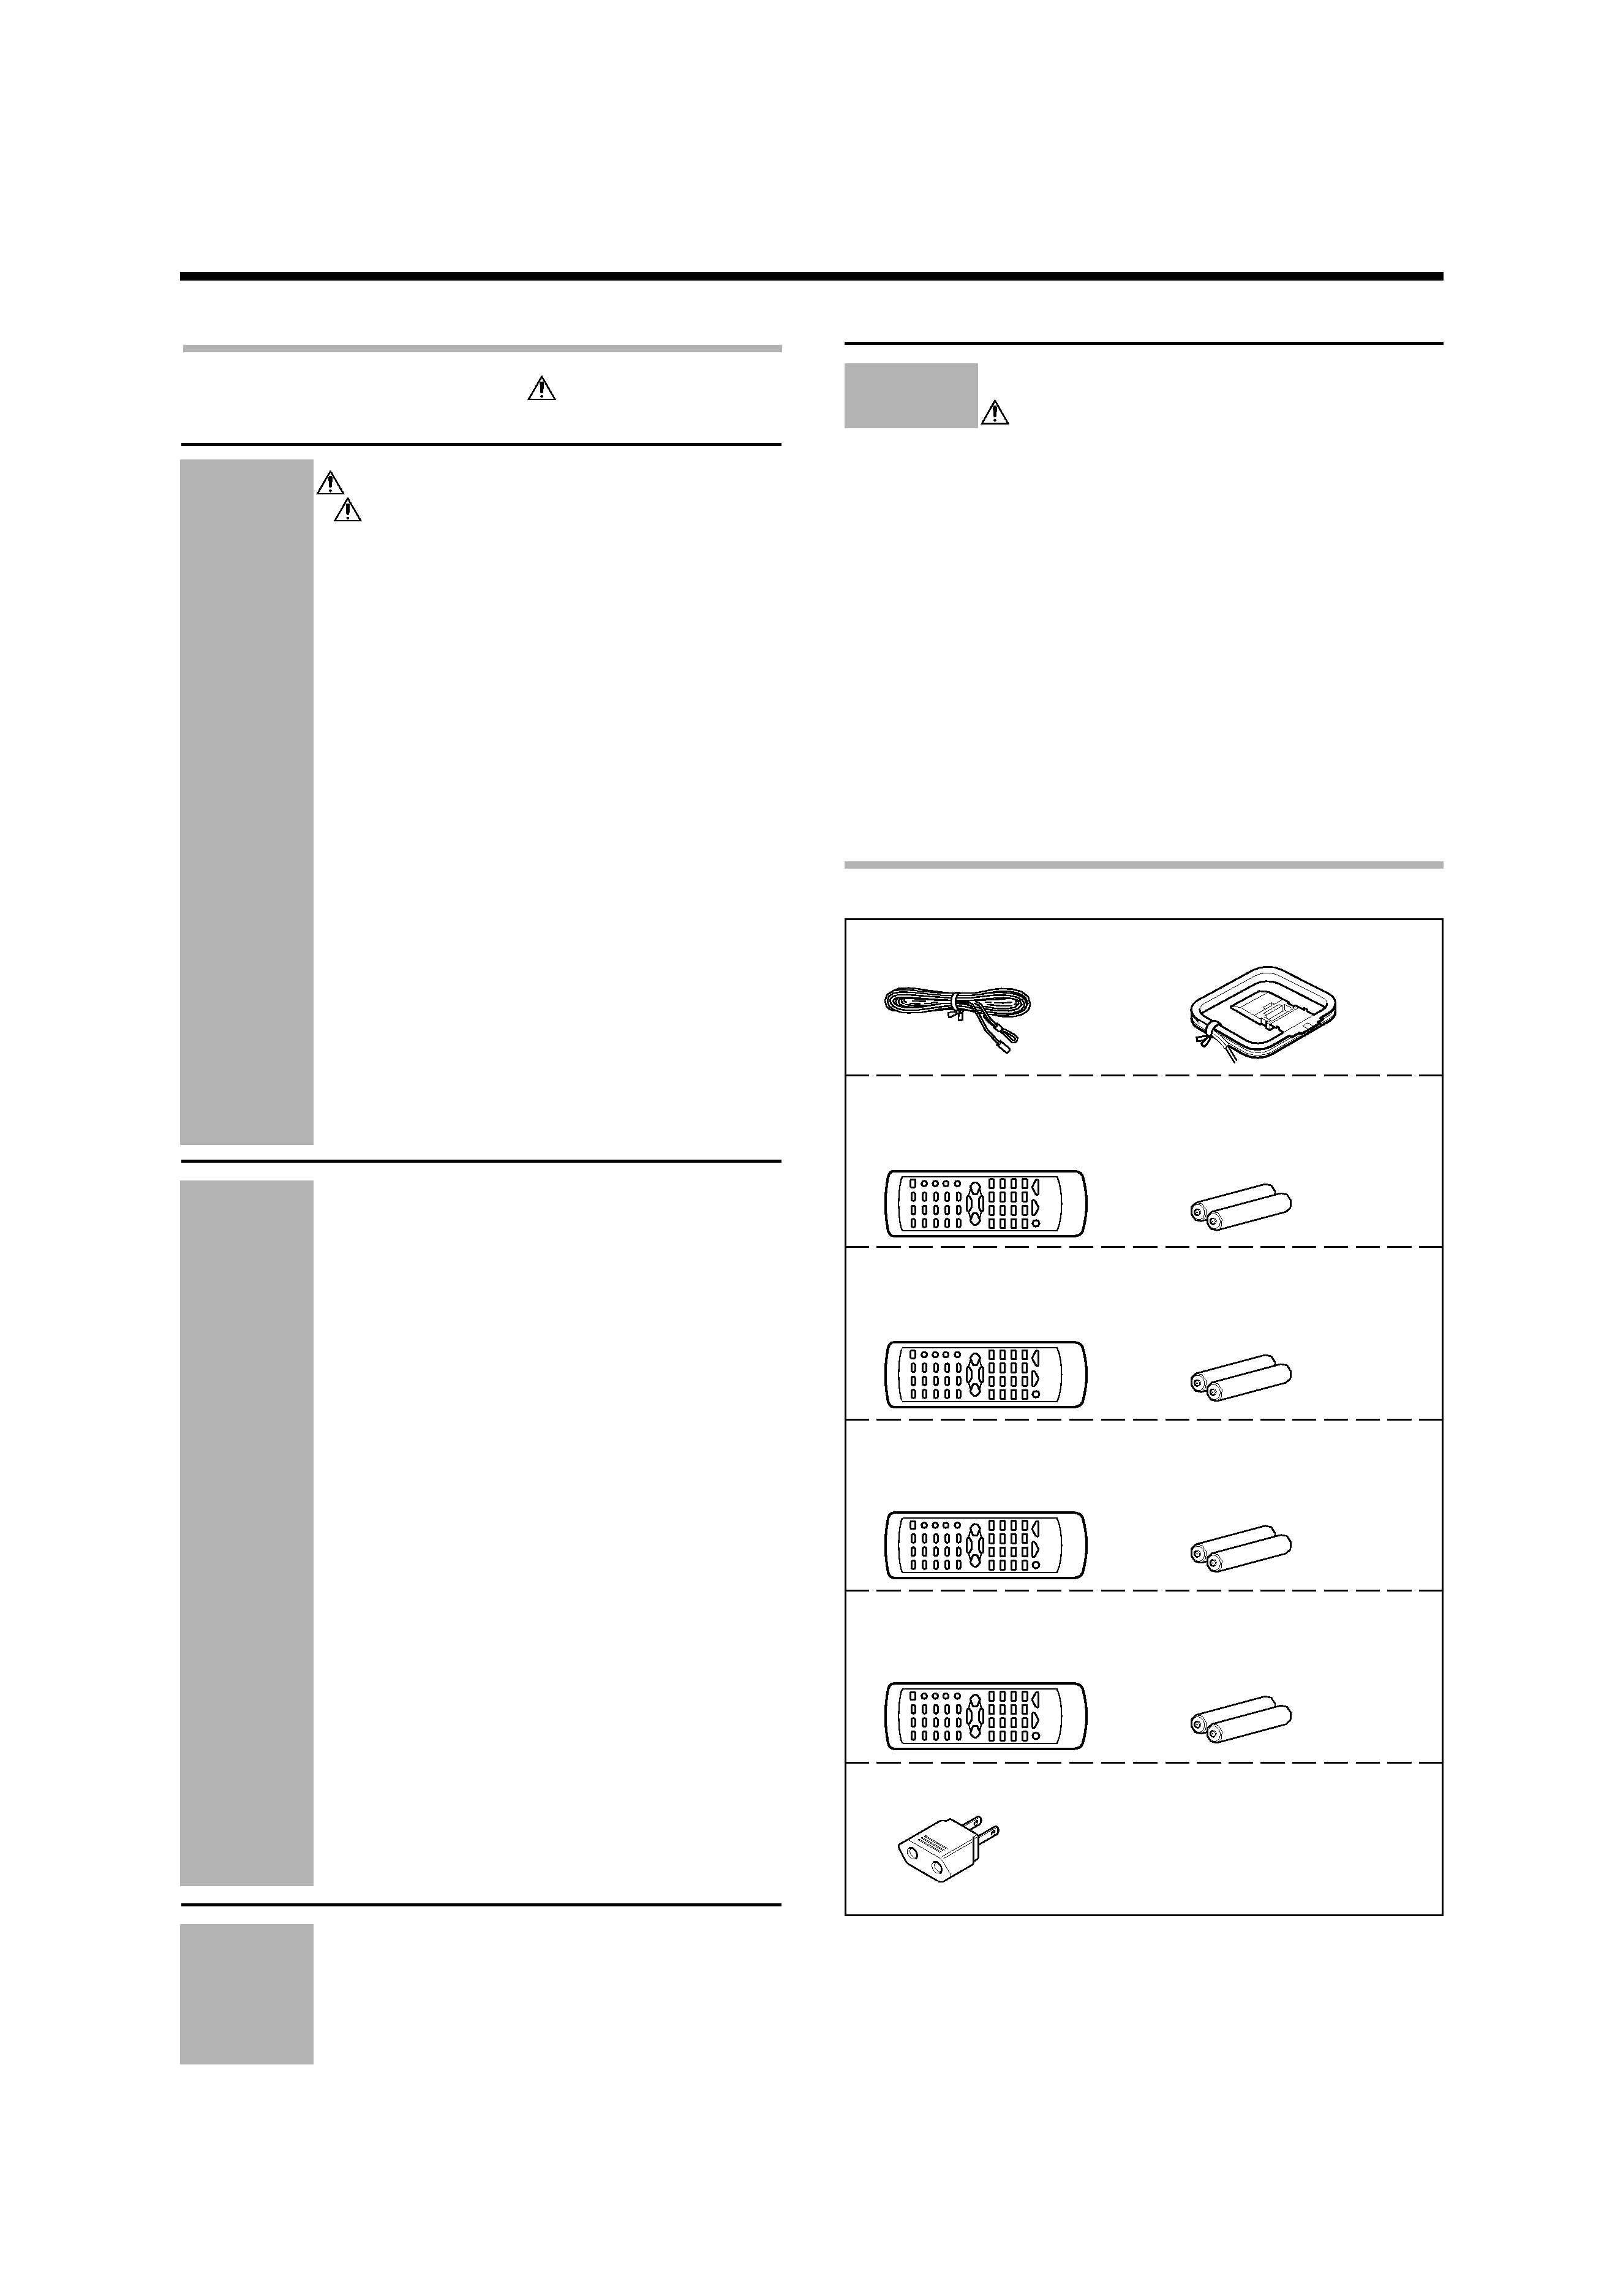
Unpack the unit carefully and make sure that all accessories are present.
FM indoor antenna (1)
AM loop antenna (1)
For VR-605, KRF-V4060D and KRF-V5560D
Remote control unit (1)
Batteries (R6/AA) (2)
RC-R0621
For VR-615 and KRF-V5060D
Remote control unit (1)
Batteries (R6/AA) (2)
RC-R0620
For KRF-V5060D (For the U.K. and Europe only)
Remote control unit (1)
Batteries (R6/AA) (2)
RC-R0622
For KRF-V4060D and KRF-V5560D (For the U.K. and Europe only)
Remote control unit (1)
Batteries (R6/AA) (2)
RC-R0623
*AC plug adapter (1)
*Use to adapt the plug on the power
cord to the shape of the wall outlet.
(Accessory only for regions where
use is necessary.)
If any accessories are missing, or if the unit is damaged or fails to operate,
notify your dealer immediately. If your unit was shipped to you directly,
notify your shipper immediately. Kenwood recommend that you retain
the original carton and packing materials in case you need to move or ship
the unit in the future.
Keep this manual handy for future reference.
In case of difficulty .......................................... 34
Specifications .................................................. 36
Before applying the power .............................. 2
Safety precautions ............................................. 2
Unpacking .......................................................... 3
How to use this manual ..................................... 4
Special features ................................................. 4
Names and functions of parts ......................... 5
Main Unit ........................................................... 5
Remote control unit (RC-R0621) (VR-605/KRF-
V4060D/V5560D) and (RC-R0620) (VR-615/KRF-
V5060D) ............................................................. 6
Remote control unit (RC-R0623) (KRF-V4060D/
V5560D) and (RC-R0622) (KRF-V5060D) (For the
U.K. and Europe only) ........................................ 7
Setting up the system ........................................ 8
Connecting audio components .......................... 9
Connecting video components ........................ 10
Digital connections .......................................... 11
Connecting a DVD player (6-channel input) (For
VR-615/KRF-V5060D only) ............................... 12
Connecting the speakers ................................. 13
Connecting the terminals ................................ 14
Connecting the antennas ................................. 14
Connecting the system control ....................... 15
Preparing the remote control .......................... 16
Preparing for surround sound ....................... 17
Speaker settings .............................................. 17
Normal playback .............................................. 19
Preparing for playback ..................................... 19
Listening to a source component .................... 19
Adjusting the sound ......................................... 20
Recording .......................................................... 21
Recording audio (analog sources) ................... 21
Recording video ............................................... 21
Recording audio (digital sources) .................... 21
Listening to radio broadcasts ....................... 22
Tuning (non-RDS) radio stations ...................... 22
Using RDS (Radio Data System) (For the U.K.
and Europe only) .............................................. 22
Presetting radio stations manually .................. 23
Receiving preset stations ................................ 23
Receiving preset stations in order (P.CALL) ... 23
Using the RDS DISPLAY key (For the U.K. and
Europe only) ..................................................... 24
Presetting RDS stations (RDS AUTO MEMORY)
(For the U.K. and Europe only) ........................ 24
Tuning by Program TYpe (PTY search) (For the
U.K. and Europe only) ...................................... 25
Ambience effects ............................................. 26
Surround modes .............................................. 26
Surround play ................................................... 28
DVD 6-channel playback (For VR-615/KRF-
V5060D only) .................................................... 29
Convenient functions ....................................... 29
Basic remote control operations for other com-
ponents .............................................................. 32
DVD player operation keys .............................. 32
CASSETTE deck, CD player & MD recorder
operations ........................................................ 33
Contents
Caution : Read the pages marked
carefully to ensure
safe operation.
Before applying the power
Preparations
Operations
Remote
Control
Additional
Information
*5197/01-07/EN
26/03/2002, 2:48 PM
3
background image
4 EN
Special features
True home theater sound
This receiver incorporates a wide variety of surround modes to bring you
maximum enjoyment from your video software. Select a surround mode
according to your equipment or the software you are going to play and
enjoy!
§
Memory back up function
Please note that the following items will be deleted from the unit's
memory if the power cord is disconnected from the AC outlet for
approximately 1 day.
· Power mode.
· Distance setting.
· Input selector settings.
· Input mode setting.
· Picture output.
· Midnight mode setting.
· Speaker ON/OFF.
· PRO LOGIC II mode setting.
· Volume level.
· Broadcast band.
· BASS, TREBLE, INPUT level.
· Frequency setting.
· Dimmer level.
· Preset stations.
· MD/TAPE settings.
· Tuning mode.
· Listen mode setting.
· CINEMA EQ ON/OFF.
· Speaker settings.
· LOUDNESS ON/OFF.
· SW RE-MIX ON/OFF.
Before applying the power
How to use this manual
This manual is divided into four sections, Preparations, Operations,
Remote Control, and Additional Information.
Preparations
Shows you how to connect your audio and video components to the
receiver and prepare the surround processor.
Since this receiver works with all of your audio and video components,
we will guide you in setting up your system to be as easy as possible.
Operations
Shows you how to operate the various functions available on the
receiver.
Remote Control
Shows you how to operate other components using the remote control,
as well as a detailed explanation of all remote control operations. Once
you have registered your components with the proper setup codes, you'll
be able to operate both this receiver and your other AV components (TV,
VCR, DVD player, CD player, etc.) using the remote control supplied with
this receiver.
Additional Information
Shows you additional information such as "In case of difficulty" (trouble-
shooting) and "Specifications".
Maintenance of the unit
When the front panel or case becomes dirty, wipe with a soft, dry
cloth. Do not use thinner, benzine, alcohol, etc. for these agents may
cause discoloration.
In regard to contact cleaner
Do not use contact cleaners because it could cause a malfunction. Be
specially careful not to use contact cleaners containing oil, for they
may deform the plastic component.
Dolby Digital
The DOLBY DIGITAL mode lets you enjoy full digital surround from
software processed in the Dolby Digital format. Dolby Digital provides up
to 5.1 channels of independent digital audio for better sound quality and
more powerful presence than conventional Dolby Surround.
Dolby PRO LOGIC
II
DOLBY PRO LOGIC
II, whilst totally compatible with its predecessor
PRO LOGIC, provides greater advantages in surround sound. It allows
user to enjoy the conventional stereo or Dolby Surround with a convinc-
ing "5.1 like" presentation. PRO LOGIC
II offers special features for
controlling the overall spatial, dimensionality and frontal sound field
imaging. PRO LOGIC
II produces an impressive surround sound from
video software marked
and three-dimensional space
from music CD. When listening to music, you will be able to enjoy the
experience of sheer STEREO surround sound.
DTS
DTS (Digital Theater System) is a 5.1 channel digital audio format that
provides five full-spectrum channels and one low-frequency (subwoofer)
channel for unprecedented clarity, optimum channel separation and a
(wide) dynamic range.
In the DTS mode, the 5.1 channel digital input from a DTS CD, LD or DVD
disc (carrying the "DTS" marking) can be played in Digital Surround.
Important:
When a DTS disc is played on a CD, LD or DVD player, noise may be
output from the analog output. It is recommended that you connect the
digital output of the player to the digital input of this unit.
DSP surround modes
The DSP (Digital Signal Processor) used for this receiver incorporates a
variety of high quality adjustable sound fields, like "ARENA", "JAZZ
CLUB", THEATER", STADIUM" and "DISCO". It is compatible with
almost any kind of program source.
DVD 6-channel input (For VR-615/KRF-V5060D only)
If you own a DVD player equipped with 6-channel output, this receiver
allows you to obtain the full surround sound impact of DVD source
material featuring multi-channel encoding. Since the source signals are
digital and each channel is input independently, the resulting ambience
is far superior to what can be achieved with conventional surround sound
systems.
CINEMA EQ
Cinema EQ mode will produce a more dynamic sound quality in any
conditions. You can enjoy a more impressive sound effect when you
switch CINEMA EQ ON during Dolby Digital and DTS playback.
Universal IR (InfraRed) remote control
In addition to the basic receiver, the remote control supplied with this
receiver can also operate almost all of your remote controllable audio and
video components. Just follow the simple setup procedure to register
the components you have connected.
RDS (Radio Data System) tuner (For the U.K. and
Europe only)
The receiver is equipped with an RDS tuner that provides several
convenient tuning functions: RDS Auto Memory, to automatically preset
up to 40 RDS stations broadcasting different programs; station name
display, to show you the name of the current broadcast station; and PTY
search to let you tune stations by program type.
PTY (Program TYpe) search (For the U.K. and Europe
only)
Tune the stations by specifying the type of program you want to hear.
*5197/01-07/EN
26/03/2002, 2:48 PM
4
background image
5 EN
POWER
STANDBY
DIMMER
SPEAKERS ON / OFF
PHONES
CINEMA EQ
LISTEN MODE
INPUT MODE
BAND
AUTO
MEMORY
DSP
DTS
DOLBY DIGITAL
SOUND
SET UP
MULTI CONTROL
INPUT SELECTOR
DOWN
MUTE
UP
VOLUME CONTROL
ON
OFF
POWER
STANDBY
ON / STANDBY
ON / STANDBY
Names and functions of parts
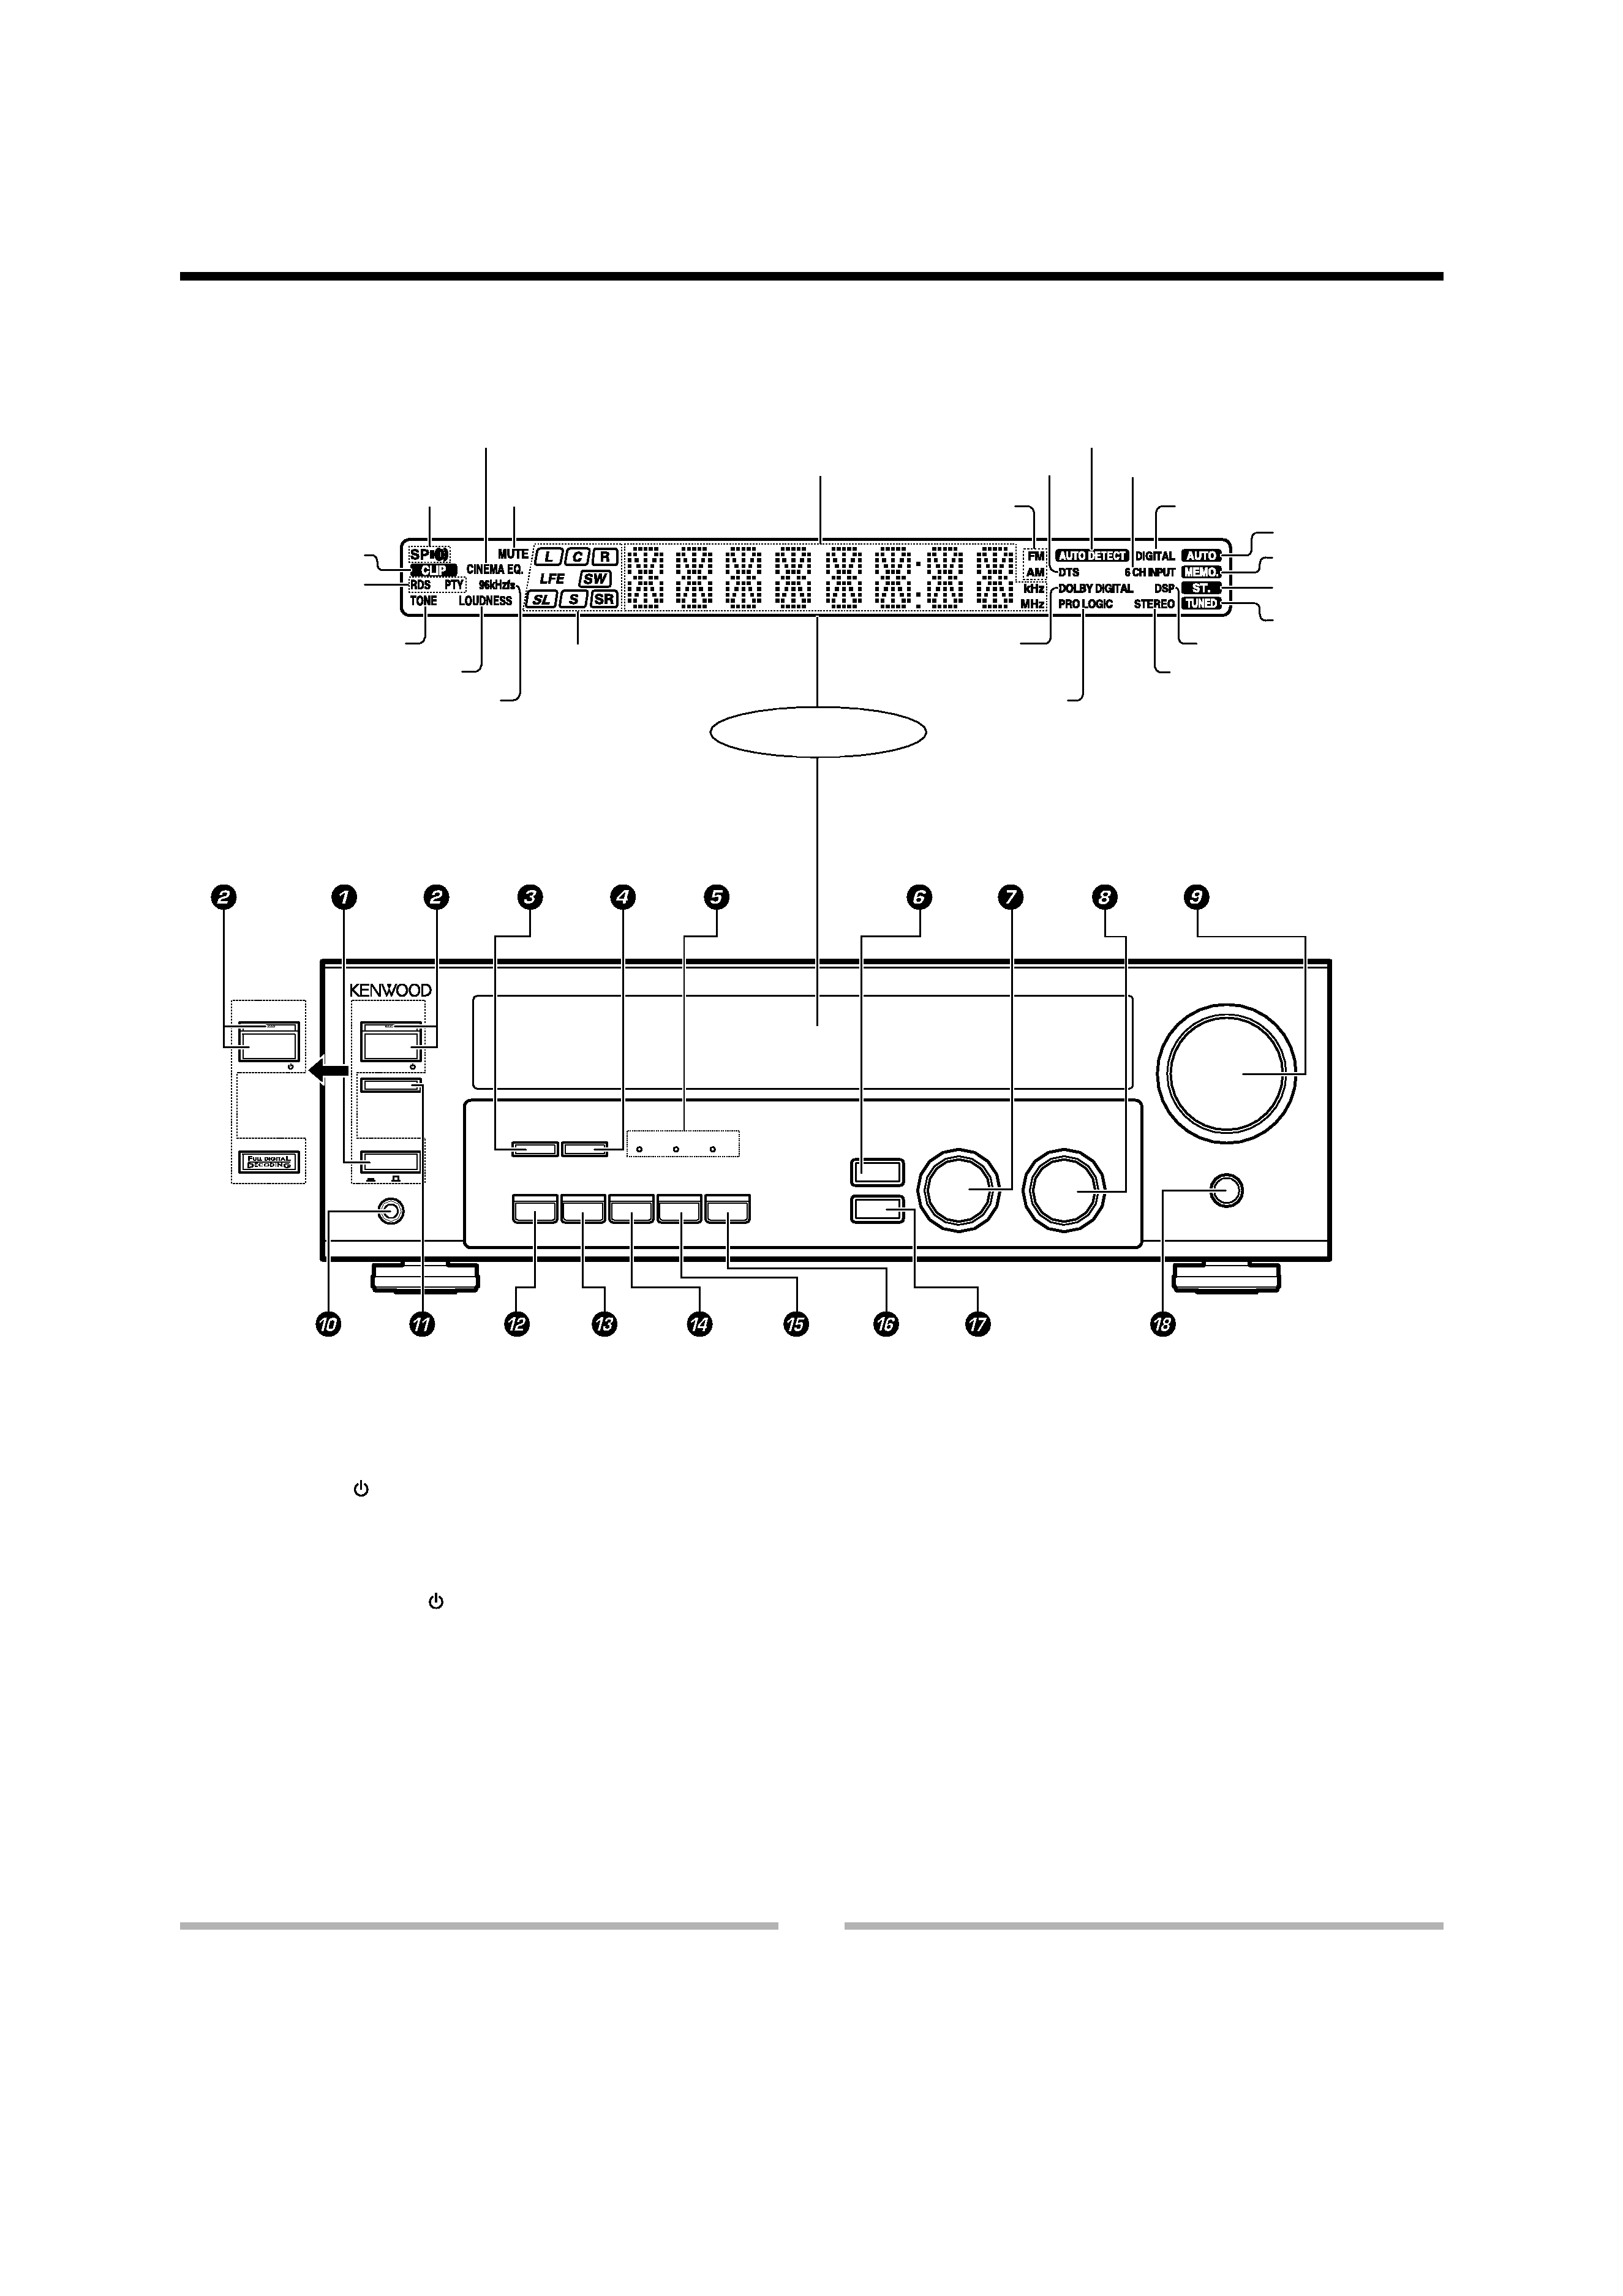
1 POWER ON/OFF key
&
(For KRF-V5060D/V4060D/V5560D)
Use to turn the main power ON/OFF.
2 ON/STANDBY (
) key
&
(For KRF-V5060D/V4060D/V5560D)
Use to switch the power ON/STANDBY when
the POWER is turned ON.
STANDBY indicator
2 POWER ON/STANDBY (
) key
(For VR-605/615)
&
Use to turn the power ON/STANDBY.
STANDBY indicator
3 DIMMER key
Use to select the REC MODE.
¡
Use to adjust the brightness of the display.
º
4 LISTEN MODE key
·
Use to select the listening mode.
5 Surround indicators
DSP mode indicator
·
Lights when the receiver is in the DSP mode.
DTS mode indicator
·
Lights when the receiver is in the DTS mode.
DOLBY DIGITAL indicator
·
Lights when the receiver is in the Dolby
Digital mode.
6 SOUND key
ª
Use to adjust the sound quality and the ambi-
ence effects.
7 MULTI CONTROL knob
&
Use to control a variety of settings.
8 INPUT SELECTOR knob
(
Use to select the input sources.
9 VOLUME CONTROL knob
(
0 PHONES jack
)
Use for headphone listening.
! SPEAKERS ON/OFF keys
(
Use to turn the speakers ON/OFF.
@ CINEMA EQ key
)
Use to switch the status of CINEMA EQ.
# INPUT MODE key
8
Use to switch between full auto, digital and
analog inputs.
$ BAND key
TM
Use to select the broadcast band.
% AUTO key
Use to change "TAPE" indication to "MD".
(
Use to select the auto tuning mode.
TM
^ MEMORY key
£
Use to store radio stations in the preset
memory.
& SET UP key
&
Use to select the speakers' settings etc.
* MUTE key
)
Use to temporarily mute the sound.
Main Unit
For VR-605/
615
Standby mode
While the standby indicator is lit, a small amount of power is supplied to
the system to back-up the memory. This is called standby mode. Under
the condition, the system can be turned ON by the remote control unit.
Display
Speaker selection indicators
Input channel indicators
Output channel indicators
Band indicators
STEREO indicator
Frequency display,
Input display,
Preset channel display,
Surround mode display
Speaker indicator
PRO LOGIC
indicator
AUTO DETECT
indicator
DOLBY DIGITAL
indicator
DTS indicator
CLIP indicator
AUTO indicator
MEMO. indicator
ST. indicator
TUNED indicator
MUTE indicator
TONE indicator
LOUDNESS indicator
96kHzfs indicator
DSP indicator
DIGITAL indicator
CINEMA EQ. indicator
RDS indicators
6CH INPUT indicator
Connection at POWER ON/OFF key (for KRF-V5060D/V4060D/
V5560D)
The power in this equipment will not be completely cut off from the AC
wall outlet when the main switch is turned OFF.
*5197/01-07/EN
26/03/2002, 2:48 PM
5

Reviews

There are no reviews of this manual yet.