KENWOOD KRC-508S Owner's Manual

Cover page of KENWOOD KRC-508S Owner's Manual

Owner's Manual for KENWOOD KRC-508S, downloadable as a PDF file.

We also have service manual to this model.

Manual details

  • Immediate download after payment.
  • Delivered as a PDF file.
  • The manual has 36 pages
  • File size: 0.52 MB
  • Available language versions: English
  • Different language versions may vary sligthly in file size and page count.

We guarantee that...

  • our manuals are complete,
  • our manuals are checked with antivirus,
  • We'll issue refund if the manual is damaged, incomplete or unreadable (our refund policy)

Sample pages

Thumbnail of page 1Thumbnail of page 2Thumbnail of page 3Thumbnail of page 4
Thumbnail of page 5Thumbnail of page 6Thumbnail of page 7Thumbnail of page 8
Thumbnail of page 9
background image
KRC-608
KRC-508S
©B64-1632-00 (K)
Take the time to read through this instruction manual.
Familiarity with installation and operation procedures will help you obtain the
best performance from your new cassette-receiver.
For your records
Record the serial number, found on the back of the unit, in the spaces designated on
the warranty card, and in the space provided below. Refer to the model and serial
numbers whenever you call upon your KENWOOD dealer for information or service on
the product.
Model KRC-608/508S Serial number
CASSETTE RECEIVER
INSTRUCTION MANUAL
AMPLI-TUNER-LECTEUR DE CASSETTE
MODE D'EMPLOI
RADIO CASSETTE
MANUAL DE INSTRUCCIONES
KRC-608(K) Cover_r0
00.12.29 1:59 PM
Page 1
background image
-- 2 --
English
Contents
Before use
Safety precautions ........................................................................3
General features
Power............................................................................................5
Volume ..........................................................................................5
Attenuator .....................................................................................5
Switching Modes ..........................................................................6
Loudness ......................................................................................6
Audio Control Setting ....................................................................6
Mobile Preset................................................................................7
Theft Deterrent Faceplate .............................................................8
Tuner features
Tuning .........................................................................................10
Station Preset Memory ...............................................................10
Auto Memory Entry.....................................................................10
Station Name Preset (SNPS).......................................................11
Switching Display for Tuner ........................................................11
Cassette player features
Playing Cassette Tapes ...............................................................12
Fast Forwarding and Rewinding Cassette Tapes........................13
Using Dolby B Noise Reduction ..................................................13
Switching Tape Types .................................................................13
Using Direct Program Search System (DPSS) ............................13
Blank Skip....................................................................................14
Music Repeat ..............................................................................14
Tape counter display ...................................................................14
External disc control features
Playing Disc mode.......................................................................16
Switching Display for Discs.........................................................16
Fast Forwarding and Reversing Disc Play ...................................16
Track Search................................................................................17
Disc Search .................................................................................17
Track / Disc Repeat .....................................................................17
Track Scan...................................................................................18
Disc Scan ....................................................................................18
Random Play ...............................................................................18
Magazine Random Play...............................................................18
Text Scroll ...................................................................................19
Presetting Disc Names (DNPS)...................................................20
Menu settings
Menu System..............................................................................21
Touch Sensor Tone .....................................................................22
Manual Time Adjustment............................................................22
Calendar Adjustment...................................................................22
Calendar Mode............................................................................22
Memo Mode ...............................................................................22
Security Code..............................................................................24
Selectable Illumination ................................................................25
Contrast Adjustment ...................................................................25
Dimmer .......................................................................................25
Switching Graphic Display...........................................................25
Black Mask..................................................................................25
ec4/dB (Sound Coodinate system)..............................................25
Clean Reception System Circuit (CRSC) .....................................26
Text Scroll ...................................................................................26
Installation
Accessories.................................................................................27
Installation Procedure..................................................................27
Connecting Wires to Terminals...................................................28
Installation ...................................................................................29
Troubleshooting Guide .......................................32
Specifications .....................................................34
KRC-608(K)_U.S_r2
00.12.27 0:11 PM
Page 2
background image
-- 3 --
To prevent injury or fire, take the
following precautions:
· Insert the unit all the way in until it is fully
locked in place. Otherwise it may fall out of
place when jolted.
· When extending the ignition, battery, or
ground wires, make sure to use automotive-
grade wires or other wires with a 0.75mm2
(AWG18) or more to prevent wire
deterioration and damage to the wire coating.
· To prevent a short circuit, never put or leave
any metallic objects (such as coins or metal
tools) inside the unit.
· If the unit starts to emit smoke or strange
smells, turn off the power immediately and
consult your Kenwood dealer.
· Make sure not to get your fingers caught
between the faceplate and the unit.
· Be careful not to drop the unit or subject it to
strong shock.
The unit may break or crack because it
contains glass parts.
· Do not touch the liquid crystal fluid if the LCD
is damaged or broken due to shock. The
liquid crystal fluid may be dangerous to your
health or even fatal.
If the liquid crystal fluid from the LCD
contacts your body or clothing, wash it off
with soap immediately.
2WARNING
To prevent damage to the machine,
take the following precautions:
· Make sure to ground the unit to a negative
12V DC power supply.
· Do not open the top or bottom covers of the
unit.
· Do not install the unit in a spot exposed to
direct sunlight or excessive heat or humidity.
Also avoid places with too much dust or the
possibility of water splashing.
· Do not set the removed faceplate or the
faceplate case in areas exposed to direct
sunlight, excessive heat or humidity. Also
avoid places with too much dust or the
possibility of water splashing.
· To prevent deterioration, do not touch the
terminals of the unit or faceplate with your
fingers.
· Do not subject the faceplate to excessive
shock, as it is a piece of precision equipment.
· When replacing a fuse, only use a new one
with the prescribed rating. Using a fuse with
the wrong rating may cause your unit to
malfunction.
· To prevent a short circuit when replacing a
fuse, first disconnect the wiring harness.
· Do not place any object between the
faceplate and the unit.
· Do not use your own screws. Use only the
screws provided. If you use the wrong
screws, you could damage the unit.
2CAUTION
· Do not apply excessive force to the open
faceplate or place objects on it. Doing so will
cause damage or breakdown.
IMPORTANT INFORMATION
You cannot connect the unit directly to the
following CD automatic changers. If you want
to use older changers with the unit, follow
the directions below according to the type of
changer you own:
· KDC-C200 / KDC-C300 / KDC-C400
Use the extension cable and the control box
attached to the CD changer, and the optional
CA-DS100 converter cord.
· KDC-C301 / KDC-C600 / KDC-C800 / KDC-
C601 / KDC-C401
Use the extension cable attached to the CD
changer, and the optional CA-DS100
converter cord.
· KDC-C100 / KDC-C302 / C205 / C705 /
non-Kenwood CD changers
Cannot be used with this model.
You can damage both your unit and
the CD changer if you connect them
incorrectly.
2CAUTION
Safety precautions
KRC-608(K)_U.S_r2
00.12.27 0:11 PM
Page 3
background image
-- 4 --
English
· If you experience problems during
installation, consult your Kenwood dealer.
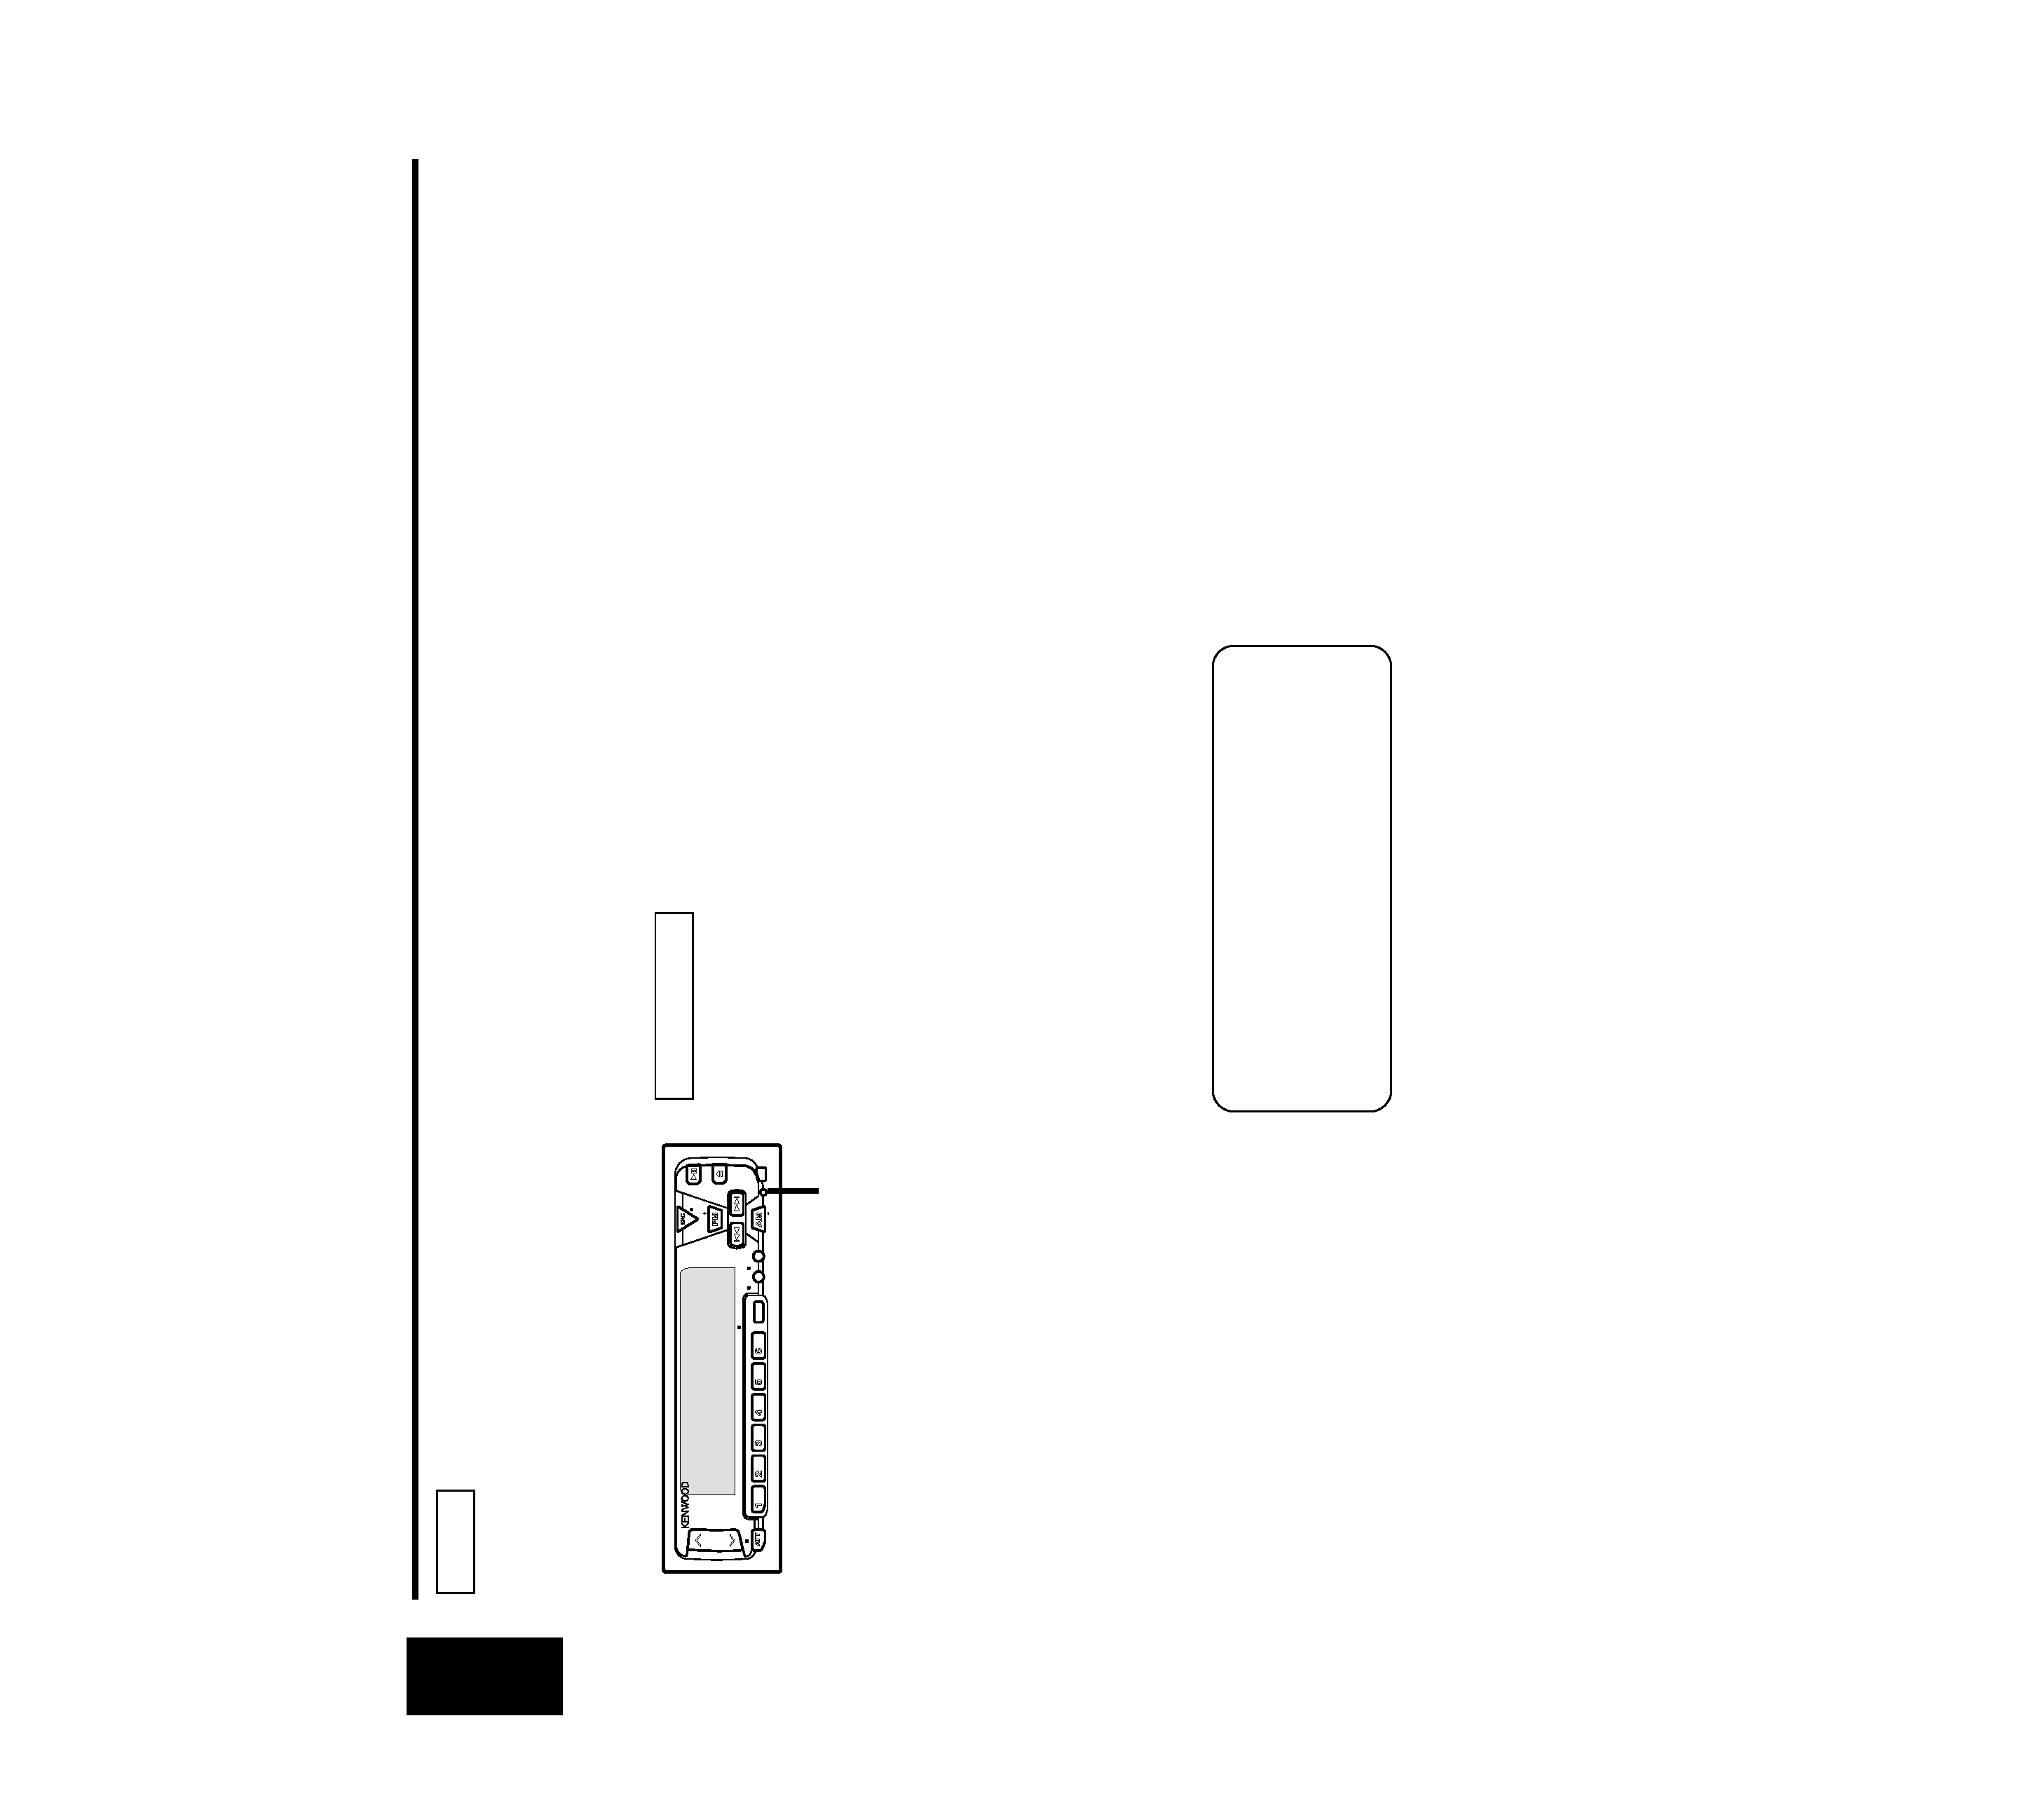
· If the unit does not seem to be working right,
try pressing the reset button first. If that does
not solve the problem, consult your Kenwood
dealer.
· Characters in the LCD may become difficult
to read in temperatures below 41 °F (5 °C).
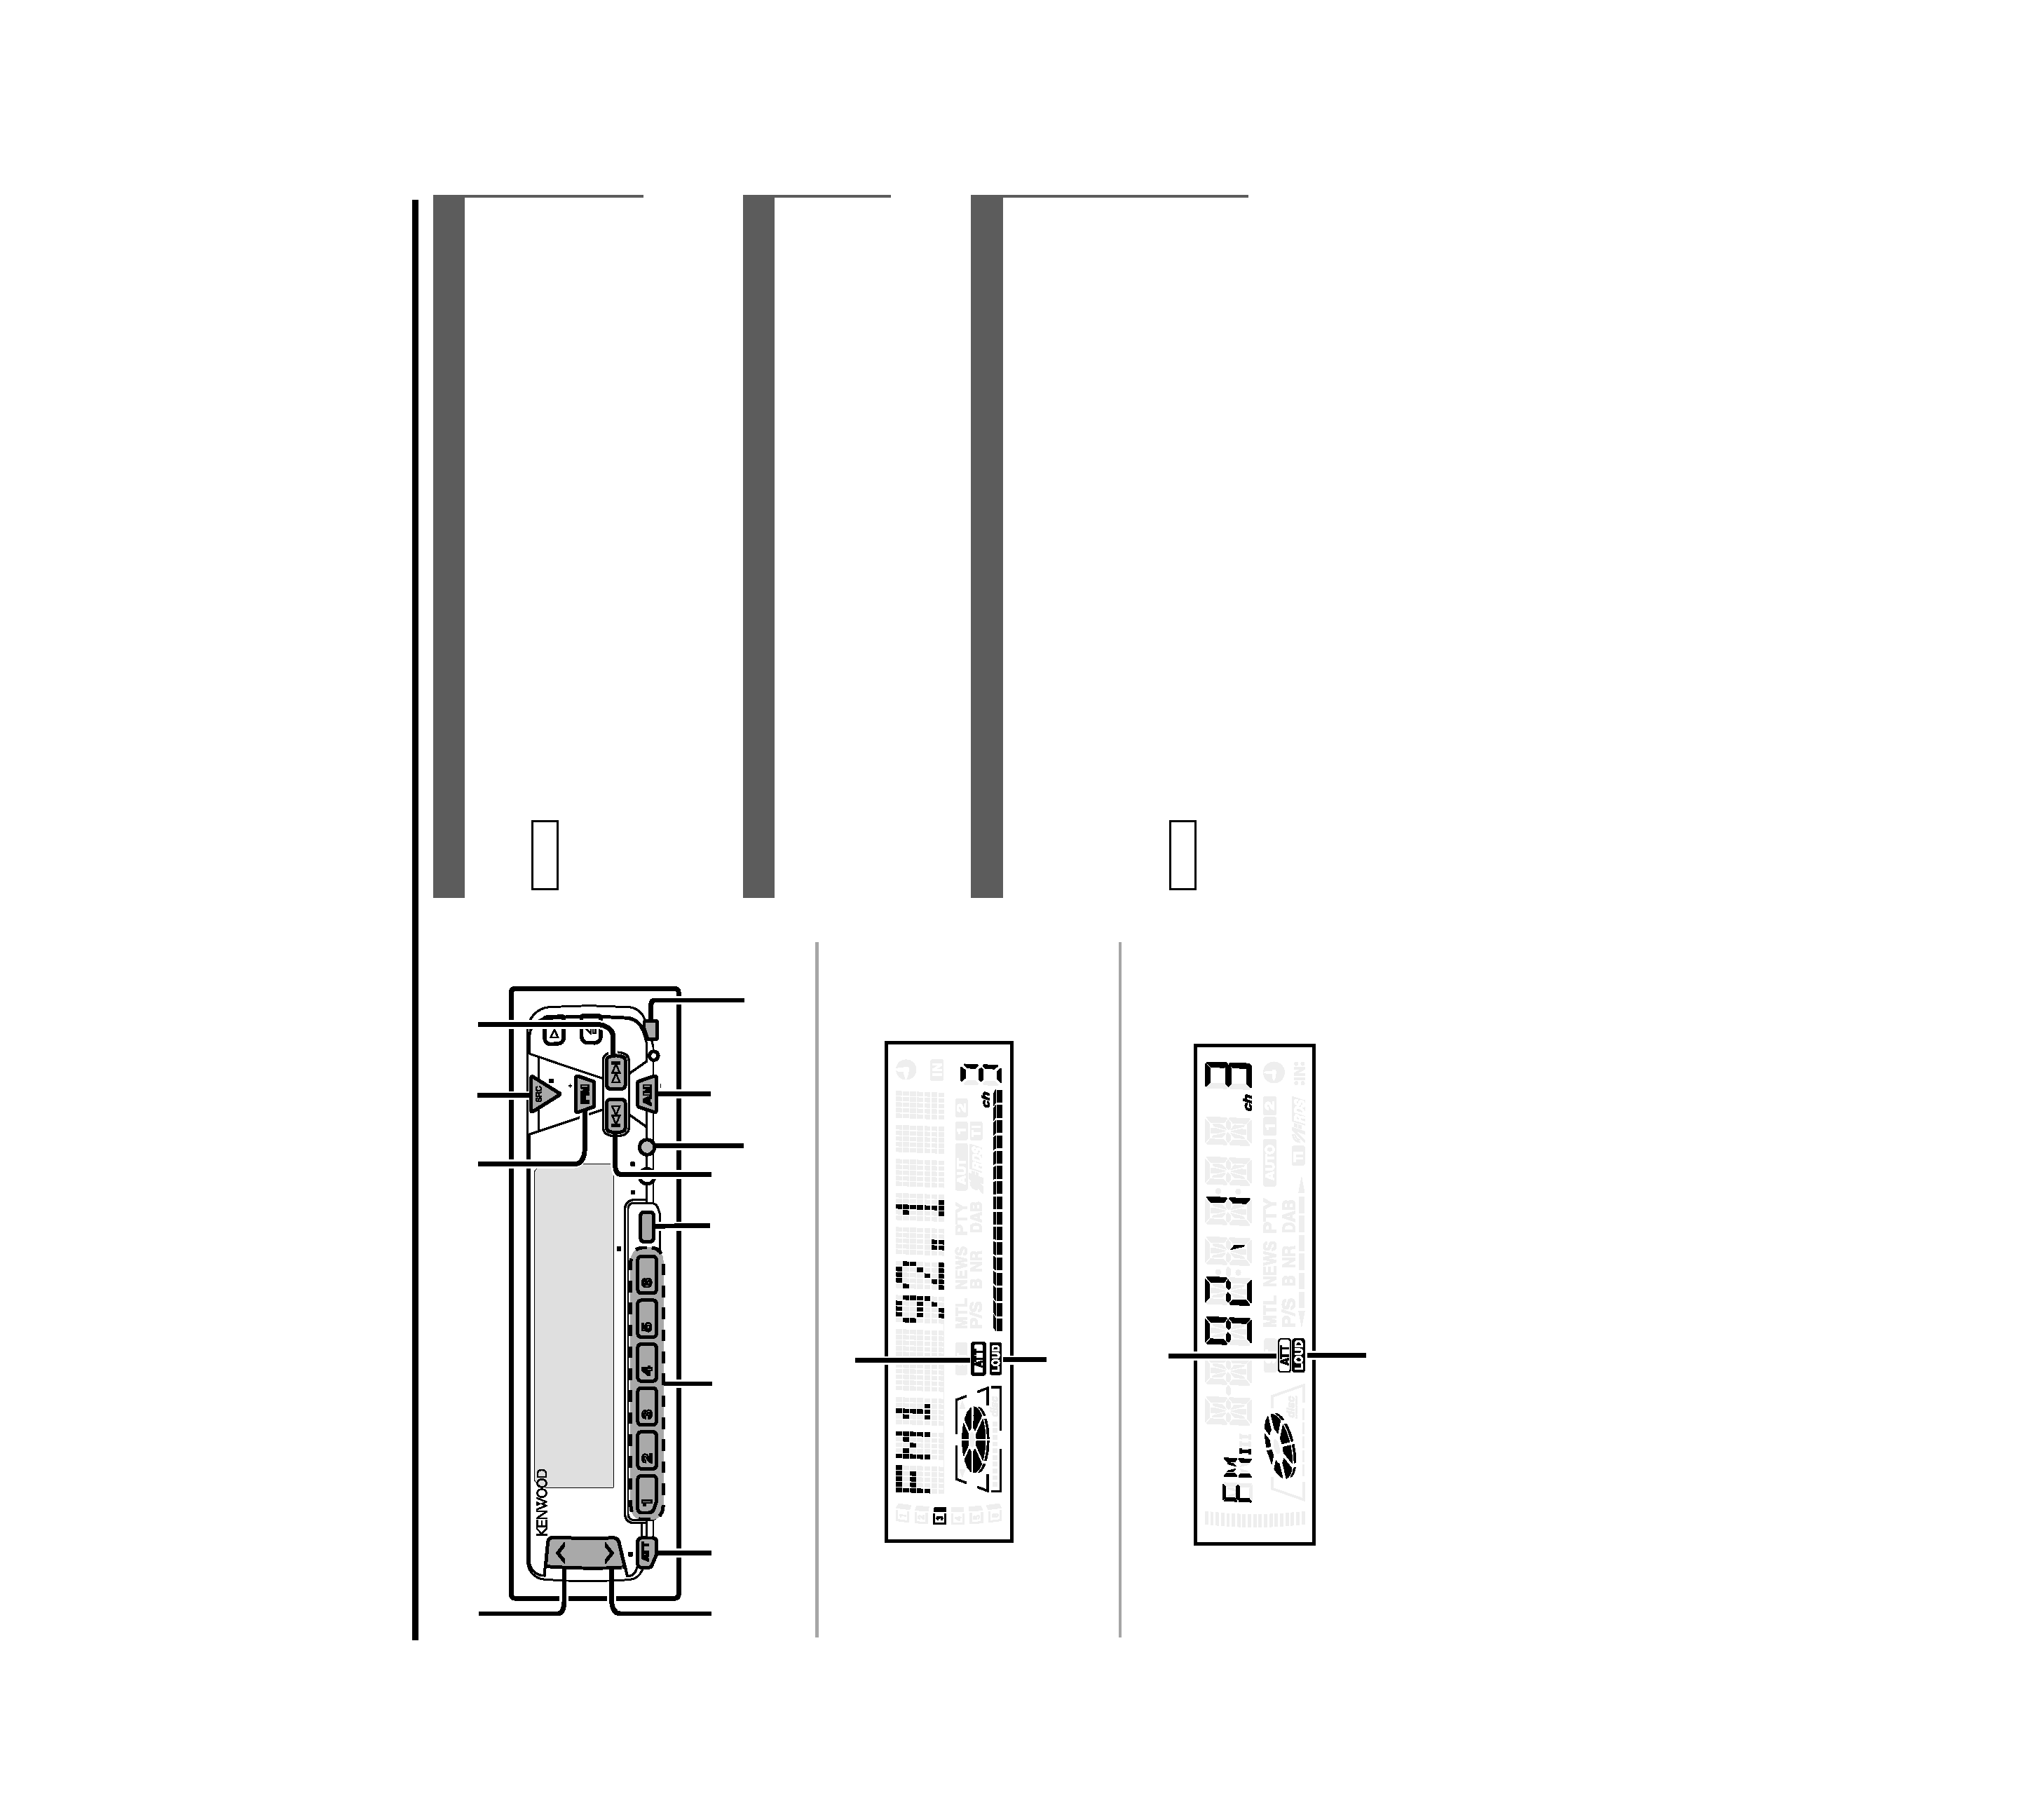
· The illustrations of the display and the panel
appearing in this manual are examples used
to explain more clearly how the controls are
used. Therefore, what appears on the display
in the illustrations may differ from what
appears on the display on the actual
equipment, and some of the illustrations on
the display may represent something
impossible in actual operation.
· The functions that can be used and the
information that can be displayed will differ
depending on the external disc players being
connected.
· We recommend the use of the Security Code
function (see p. 24) to prevent theft.
NOTE
Cleaning the Faceplate Terminals
If the terminals on the unit or faceplate get
dirty, wipe them with a dry, soft cloth.
Cleaning the Unit
If the front panel gets dirty, turn off the
power and wipe the panel with a dry silicon
cloth or soft cloth.
Do not wipe the panel with a hard cloth or a
cloth dampened by volatile solvents such as
paint thinner and alcohol. They can scratch
the surface of the panel and/or cause the
indicator letters to peel off.
2CAUTION
Cleaning the Tape Head
After you have listened to many cassettes
over a long period of time, magnetic powder
from the tapes and dust accumulates on the
tape head, causing noise and a deterioration
in sound quality. Clean the tape head using a
cleaning tape or cleaning kit designed for use
in car audio systems.
Handling Cassette Tapes
· Do not play a cassette whose tape has gone
slack. In such a case, wind it tight using a
pencil or the like in one of the spools. Playing
slack cassette tapes can result in the tape
tangling around the capstan and/or pinch
rollers, causing trouble.
· Do not play a deformed cassette or one
whose label is starting to come off, as it can
cause the unit to malfunction.
· Do not leave tapes in hot places, such as on
dashboards and other spots exposed to
direct sunlight, or near heater outlets. They
can deform the cassette.
· Avoid using extremely long cassette tapes,
such as 100-minute-long tapes. Such tapes
are very thin, and can tangle easily around
the pinch rollers or other parts inside the unit,
causing unit failure.
· Remove a cassette tape from the unit when
not listening to it for a while. If you leave a
tape in the unit too long, it may stick to the
tape head and cause unit malfunction.
Dolby noise reduction manufactured under
license from Dolby Laboratories Licensing
Corporation.
"DOLBY" and the double-D symbol are
trademarks of Dolby Laboratories Licensing
Corporation.
Safety precautions
FCC WARNING
This equipment may generate or use radio
frequency energy. Changes or modifications
to this equipment may cause harmful
interference unless the modifications are
expressly approved in the instruction manual.
The user could lose the authority to operate
this equipment if an unauthorized change or
modification is made.
EJECT
PWR
OFF
LOUD
MENU
AUTO
AME
DISP
NAME.S
SCAN
B NR
B.S/RDM
REP
D.SCN
MTL/M.RDM
DISC
DISC
DAB
PROG
AUD
Reset button
KRC-608(K)_U.S_r2
00.12.27 0:11 PM
Page 4
background image
Turning on the power:
Press the SRC (source) button.
Turn the power on before carrying out the following procedures.
Turning off the power:
Press the PWR OFF button for at least one second.
NOTE
Power
General features
-- 5 --
EJECT
PWR
OFF
LOUD
MENU
AUTO
AME
DISP
NAME.S
SCAN
B NR
B.S/RDM
REP
D.SCN
MTL/M.RDM
DISC
DISC
DAB
PROG
#1-6
¢
AM
4
SRC/
PWR OFF
ATT/
LOUD
u
d
FM
AUD
AUD
NAME.S
KRC-608
KRC-508S
ATT indicator
LOUD indicator
ATT indicator
LOUD indicator
Release button
This function allows you to turn down the volume quickly.
Turning Attenuator On/Off:
Press the ATT button to switch the attenuator on and off.
When the attenuator is on, the ATT indicator blinks.
When the attenuator is off, the volume returns to the original
level.
Turning the volume up, or turning it all the way down deactivates
the attenuator function.
NOTE
Attenuator
Increasing Volume:
Press the u button to turn up the volume.
Decreasing Volume:
Press the d button to turn down the volume.
Volume
KRC-608(K)_U.S_r2
00.12.27 0:11 PM
Page 5

Reviews

There are no reviews of this manual yet.