KENWOOD KFC-W3000L Owner's Manual

Cover page of KENWOOD KFC-W3000L Owner's Manual

Owner's Manual for KENWOOD KFC-W3000L, downloadable as a PDF file.

Manual details

  • Immediate download after payment.
  • Delivered as a PDF file.
  • The manual has 59 pages
  • File size: 3.82 MB
  • Available language versions: French, Arabic, English, Russian, Spanish, Dutch, German, Italian
  • Different language versions may vary sligthly in file size and page count.

We guarantee that...

  • our manuals are complete,
  • our manuals are checked with antivirus,
  • We'll issue refund if the manual is damaged, incomplete or unreadable (our refund policy)

Sample pages

Thumbnail of page 1Thumbnail of page 2Thumbnail of page 3Thumbnail of page 4
Thumbnail of page 5Thumbnail of page 6Thumbnail of page 7Thumbnail of page 8
Thumbnail of page 9
background image
KFC-W3000L
KFC-W3000LS
ILLUMINATED SUBWOOFER
INSTRUCTION MANUAL
HAUT-PARLEUR DE GRAVES LUMINEUX
MODE D'EMPLOI
BELEUCHTETER SUBWOOFER
BEDIENUNGSANLEITUNG
SUBWOOFER MET VERLICHTING
GEBRUIKSAANWIJZING
SUBWOOFER ILLUMINATO
ISTRUZIONI PER L'USO
ALTAVOZ DE SUBGRAVES ILUMINADO
MANUAL DE INSTRUCCIONES
HCTPKC O KCATA
© B61-1329-00/00 (W) KW
ENGLISH
FR
ANÇ
AIS
DEUT
SCH
NEDERL
ANDS
IT
ALIANO
ESP
AÑOL
B61-1329_EN.indd 1
08.3.13 5:13:42 PM
background image
ENGLISH
2 English
IMPORTANT SAFETY INSTRUCTIONS
Caution: Read this page carefully to ensure safe operation.
WARNING
WARNING
· Before mounting or wiring etc., be sure to remove the wire from
the battery minus terminal.
(Not doing so can cause shorts or fires.)
· To prevent a short circuit, never put or leave any metallic objects
(such as coins or metal tools) inside the unit.
· In the event the unit generates smoke or abnormal smell, im-
mediately switch the power OFF. After this, please contact your
dealer or nearest service station as soon as possible.
POWER OFF!
· Connect the illumination lamp-equipped speakers to DC 12V,
negative ground.
· Do not attempt to open or modify the unit, for this could cause
fire hazard or malfunction.
· After taking the unit out of the polyethylene bag, be sure to dis-
pose of the polyethylene bag out of the reach of children. Oth-
erwise, they may play with the bag, which could cause hazard of
suffocation.
CAUTION
CAUTION
· Installation and wiring of the product requires expert skill and
experience. To ensure safety, be sure to have your dealer or spe-
cialist perform the installation and wiring.
· Do not install the speaker in a spot exposed to direct sunlight or
excessive heat or humidity.
· Do not install the speakers in locations which may be subject to
water or moisture.
· Do not install the speakers in unstable locations or locations
subject to dust.
· If the fuse blows, after checking to see if the wiring cord has
shorted, be sure to replace with the stipulated size (amperage)
fuse as displayed on the fuse box.
(Using fuses other than the stipulated size can cause fires.)
Check the display!
To replace the fuse, refer to the vehicle instruction manual.
· To prevent a short circuit when replacing a fuse, disconnect the
wiring harness at first.
· Do not use gasoline, naphtha, or any type of solvent to clean the
speaker. Clean by wiping with a soft, dry cloth.
· Connect the speaker wires to appropriate speaker connectors
separately. Sharing the negative wire of the speaker or ground-
ing speaker wires to the metal body of the car can cause this
unit to fail.
· When making a hole under a seat, inside the trunk, or some-
where else in the vehicle, check that there is nothing hazardous
on the opposite side such as a gasoline tank, brake pipe; or wir-
ing harness, and be careful not to cause scratches or other dam-
age.
· For ground wire mounting, do not fasten the wire to an airbag,
steering or brake line system or other critical safety unit bolts or
nut.
(Can cause accidents.)
· When mounting, be sure to mount in a place that will not inter-
fere with driving or be dangerous to passengers during sudden
braking etc.
(Cause of injury or accidents.)
· After installing the unit, check to make sure that electrical equip-
ment such as the brake lamps, turn signal lamps and windshield
wipers operate normally.
· The driver should always stop the vehicle in a safe place before
performing the following action.
­ Remote control operation
· Do not use the product for purposes other than on-board
mounting.
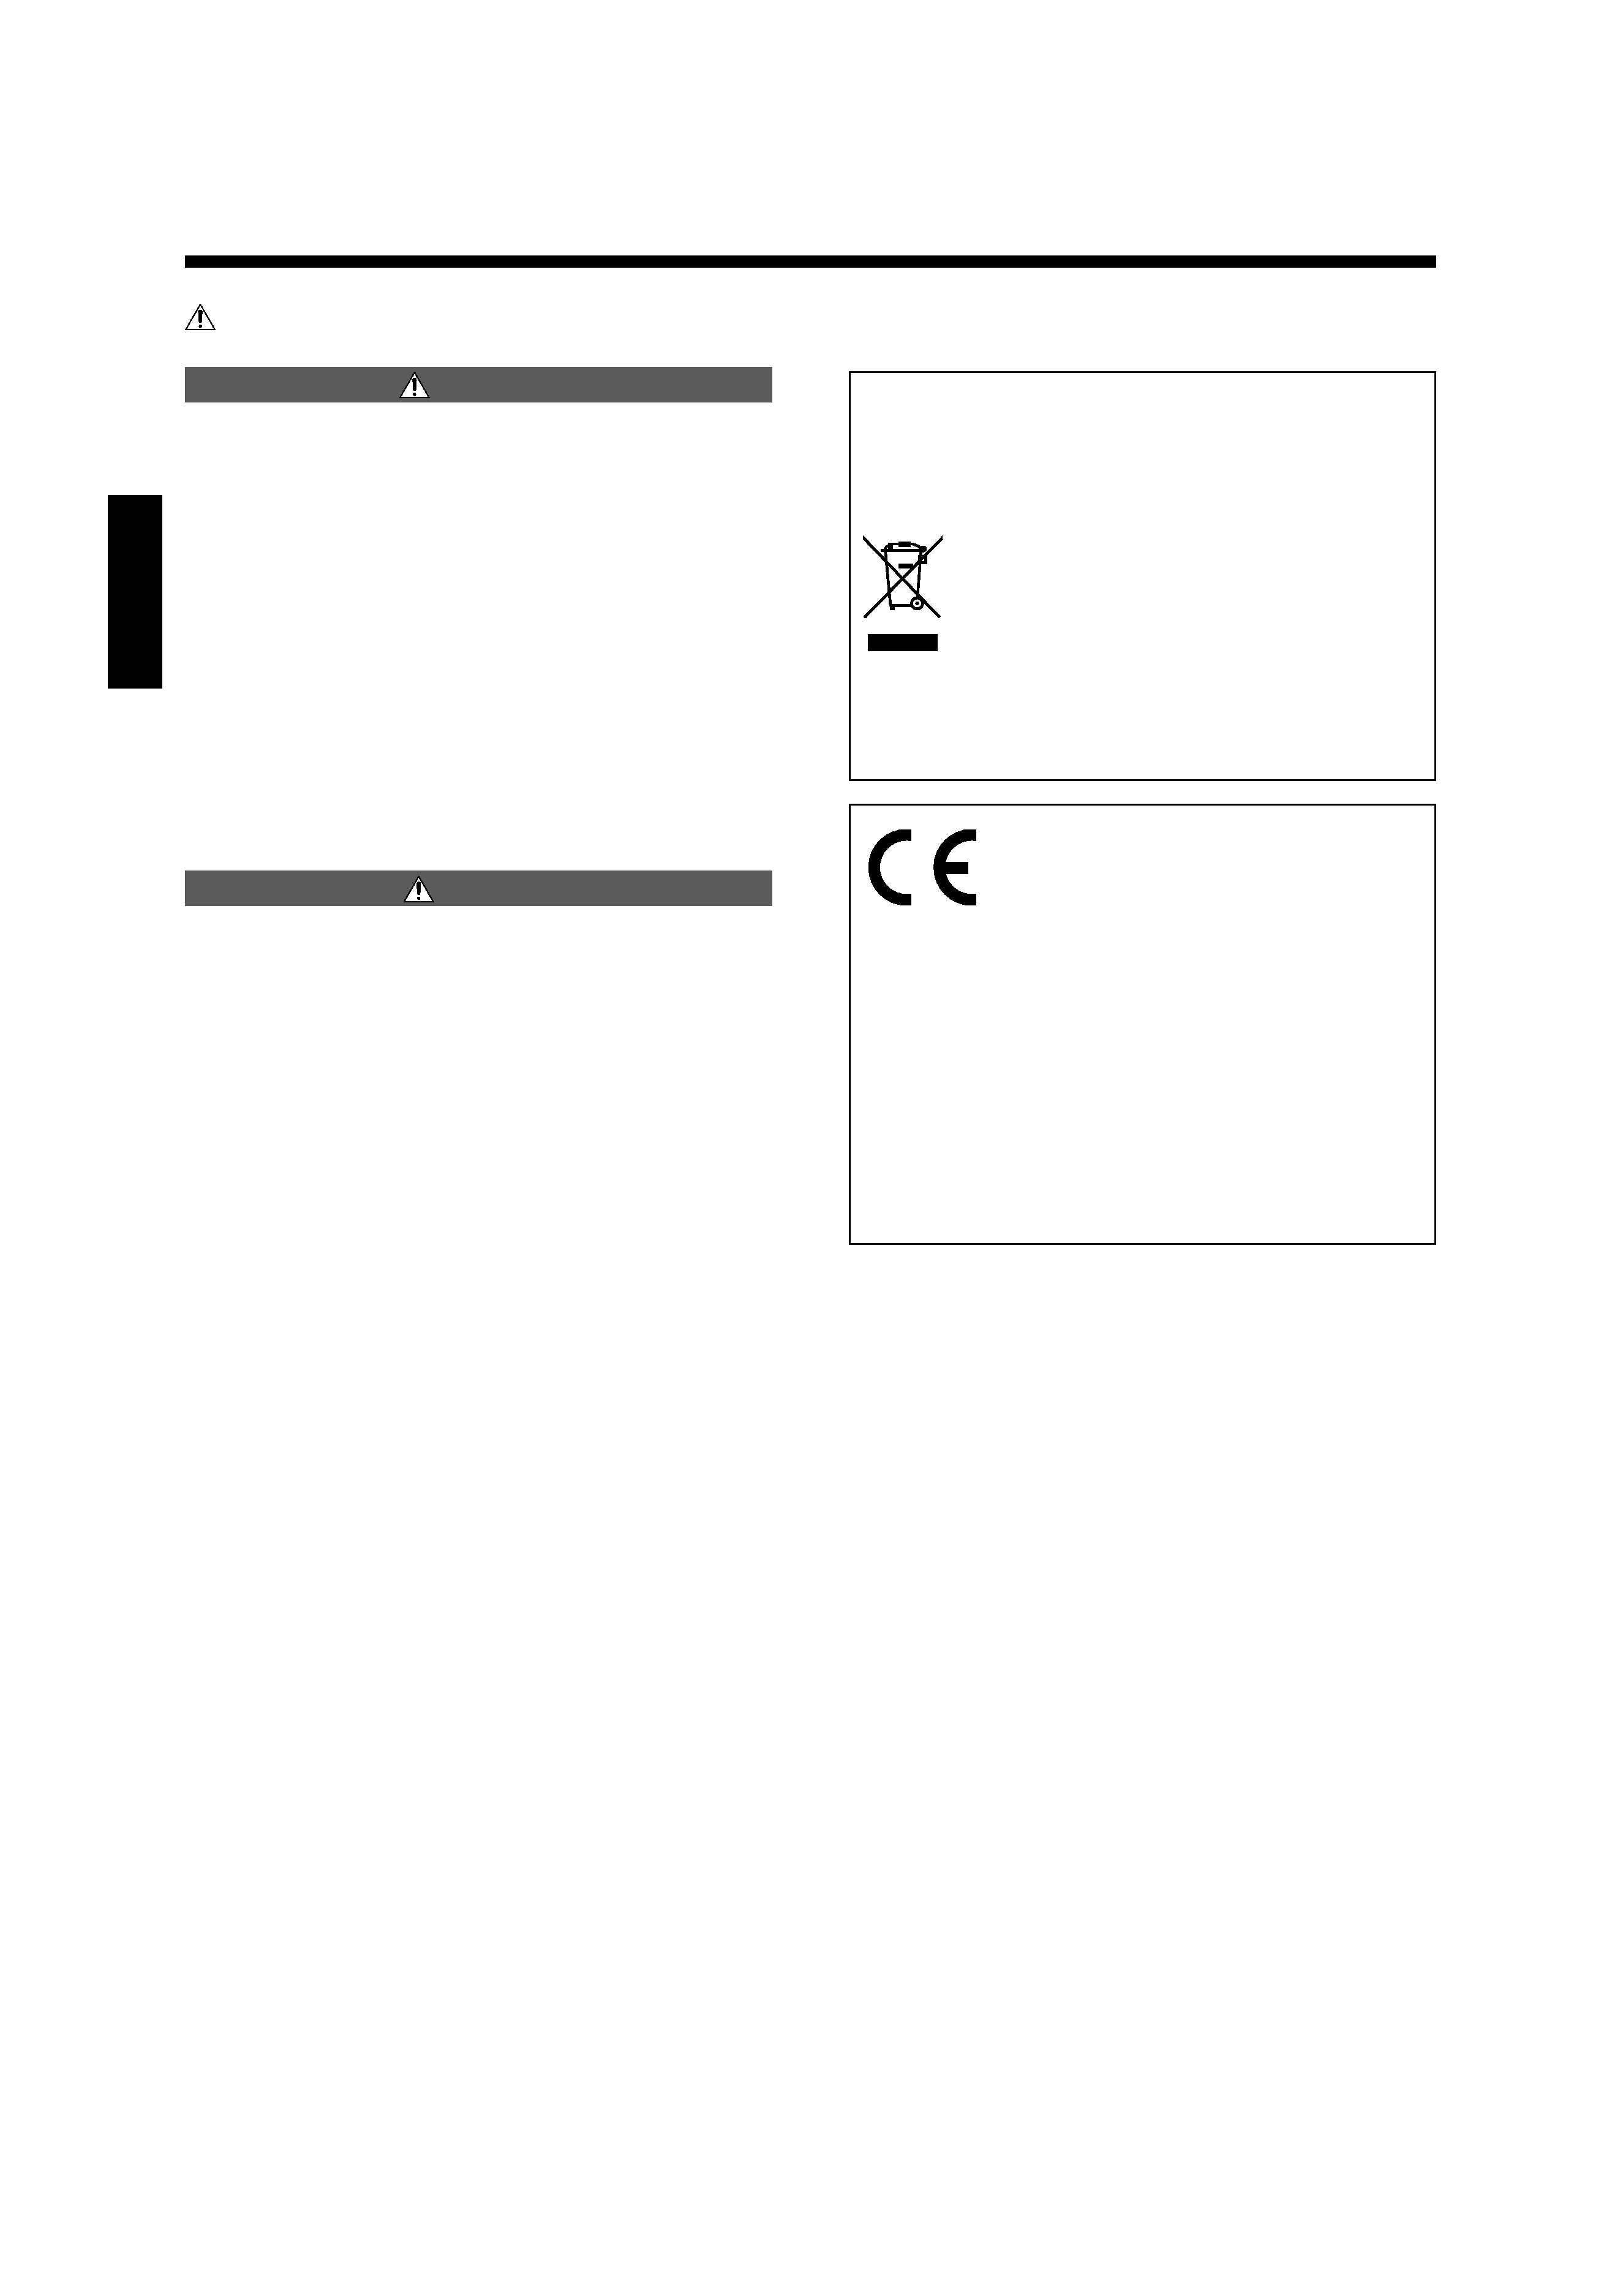
Information on Disposal of Old Electrical
and Electronic Equipment (applicable for EU
countries that have adopted separate waste
collection systems)
Products with the symbol (crossed-out wheeled
bin) cannot be disposed as household waste.
Old electrical and electronic equipment should be
recycled at a facility capable of handling these items
and their waste by products.
Contact your local authority for details in locating a
recycle facility nearest to you.
Proper recycling and waste disposal will help conserve resourc-
es whilst preventing detrimental effects on our health and the
environment.
Declaration of Conformity with
regard to the EMC Directive
2004/108/EC
Manufacturer:
Kenwood Corporation
2967-3 Ishikawa-machi, Hachioji-shi, Tokyo,
192-8525 Japan
EU Representative's:
Kenwood Electronics Europe BV
Amsterdamseweg 37, 1422 AC UITHOORN,
The Netherlands
FCC WARNING
This equipment may generate or use radio frequency energy.
Changes or modifications to this equipment may cause harmful
interference unless the modifications are expressly approved in the
instruction manual. The user could lose the authority to operate
this equipment if an unauthorized change or modification is made.
FCC NOTE
This equipment has been tested and found to comply with the lim-
its for a Class B digital device, pursuant to Part 15 of the FCC Rules.
These limits are designed to provide reasonable protection against
harmful interference in a residential installation. This equipment
may cause harmful interference to radio communications, if it is not
installed and used in accordance with the instructions. However,
there is no guarantee that interference will not occur in a particular
installation. If this equipment does cause harmful interference to
radio or television reception, which can be determined by turning
the equipment off and on, the user is encouraged to try to correct
the interference by one or more of the following measures:
· Reorient or relocate the receiving antenna.
· Increase the separation between the equipment and receiver.
· Connect the equipment into an outlet on a circuit different from
that to which the receiver is connected.
· Consult the dealer or an experienced radio/TV technician for
help.
For Canada
NOTICE: This Class B digital apparatus complies with Canadian
ICES-003.
B61-1329_EN.indd 2
08.3.13 5:13:43 PM
background image
English
3
ENGLISH
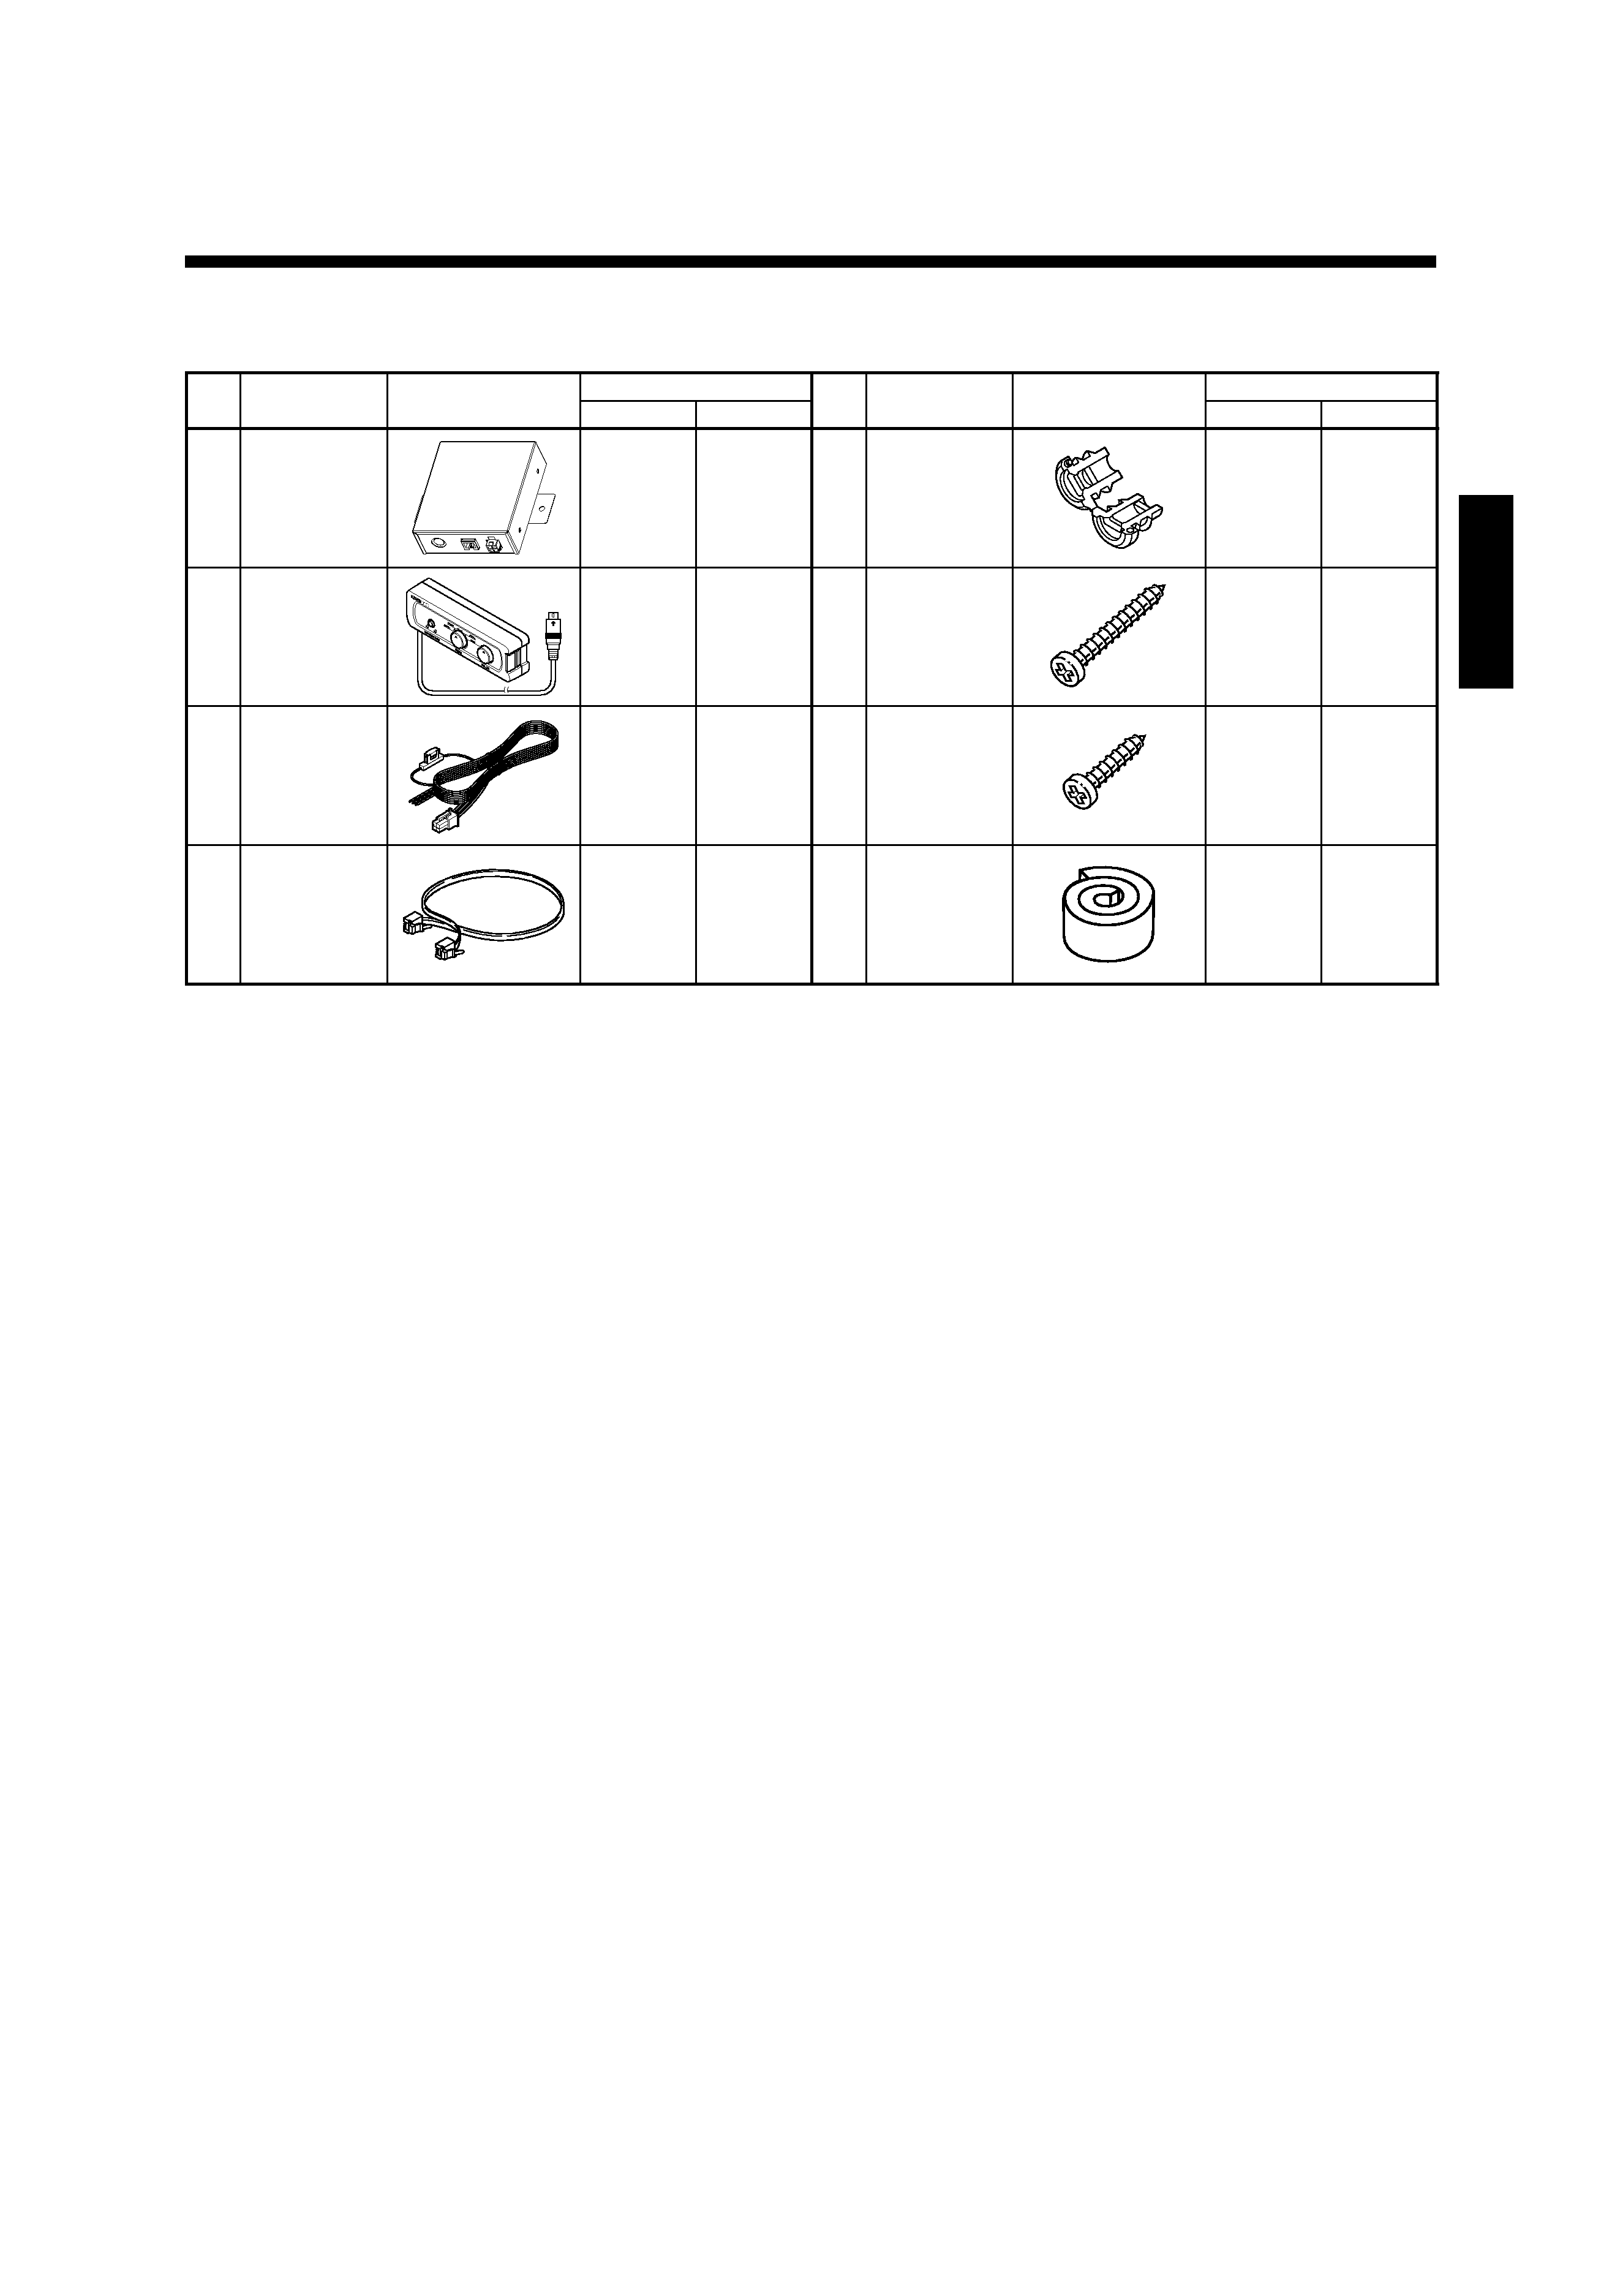
Parts included
No.
Part Name
Outside Shape
Quantity
No.
Part Name
Outside Shape
Quantity
KFC-W3000L KFC-W3000LS
1 Control box
5 Cord bush
11
2
Remote control
(Cord length:
6 m)
6
Screw
(ø 4 x 35)
88
3
DC cable
(Cable length:
1.5 m)
7
Screw
(ø 4 x 16)
4
Link cable
(Cable length:
1 m)
11
8 Cushion
11
B61-1329_EN.indd 3
08.3.14 9:04:55 AM
background image
ENGLISH
4 English
Caution:
Before wiring, be sure to remove the wire from the negative terminal of the battery. After completing all wiring, check the correct wirings
again. After checking, connect the wire from the negative terminal of the battery.
Connection
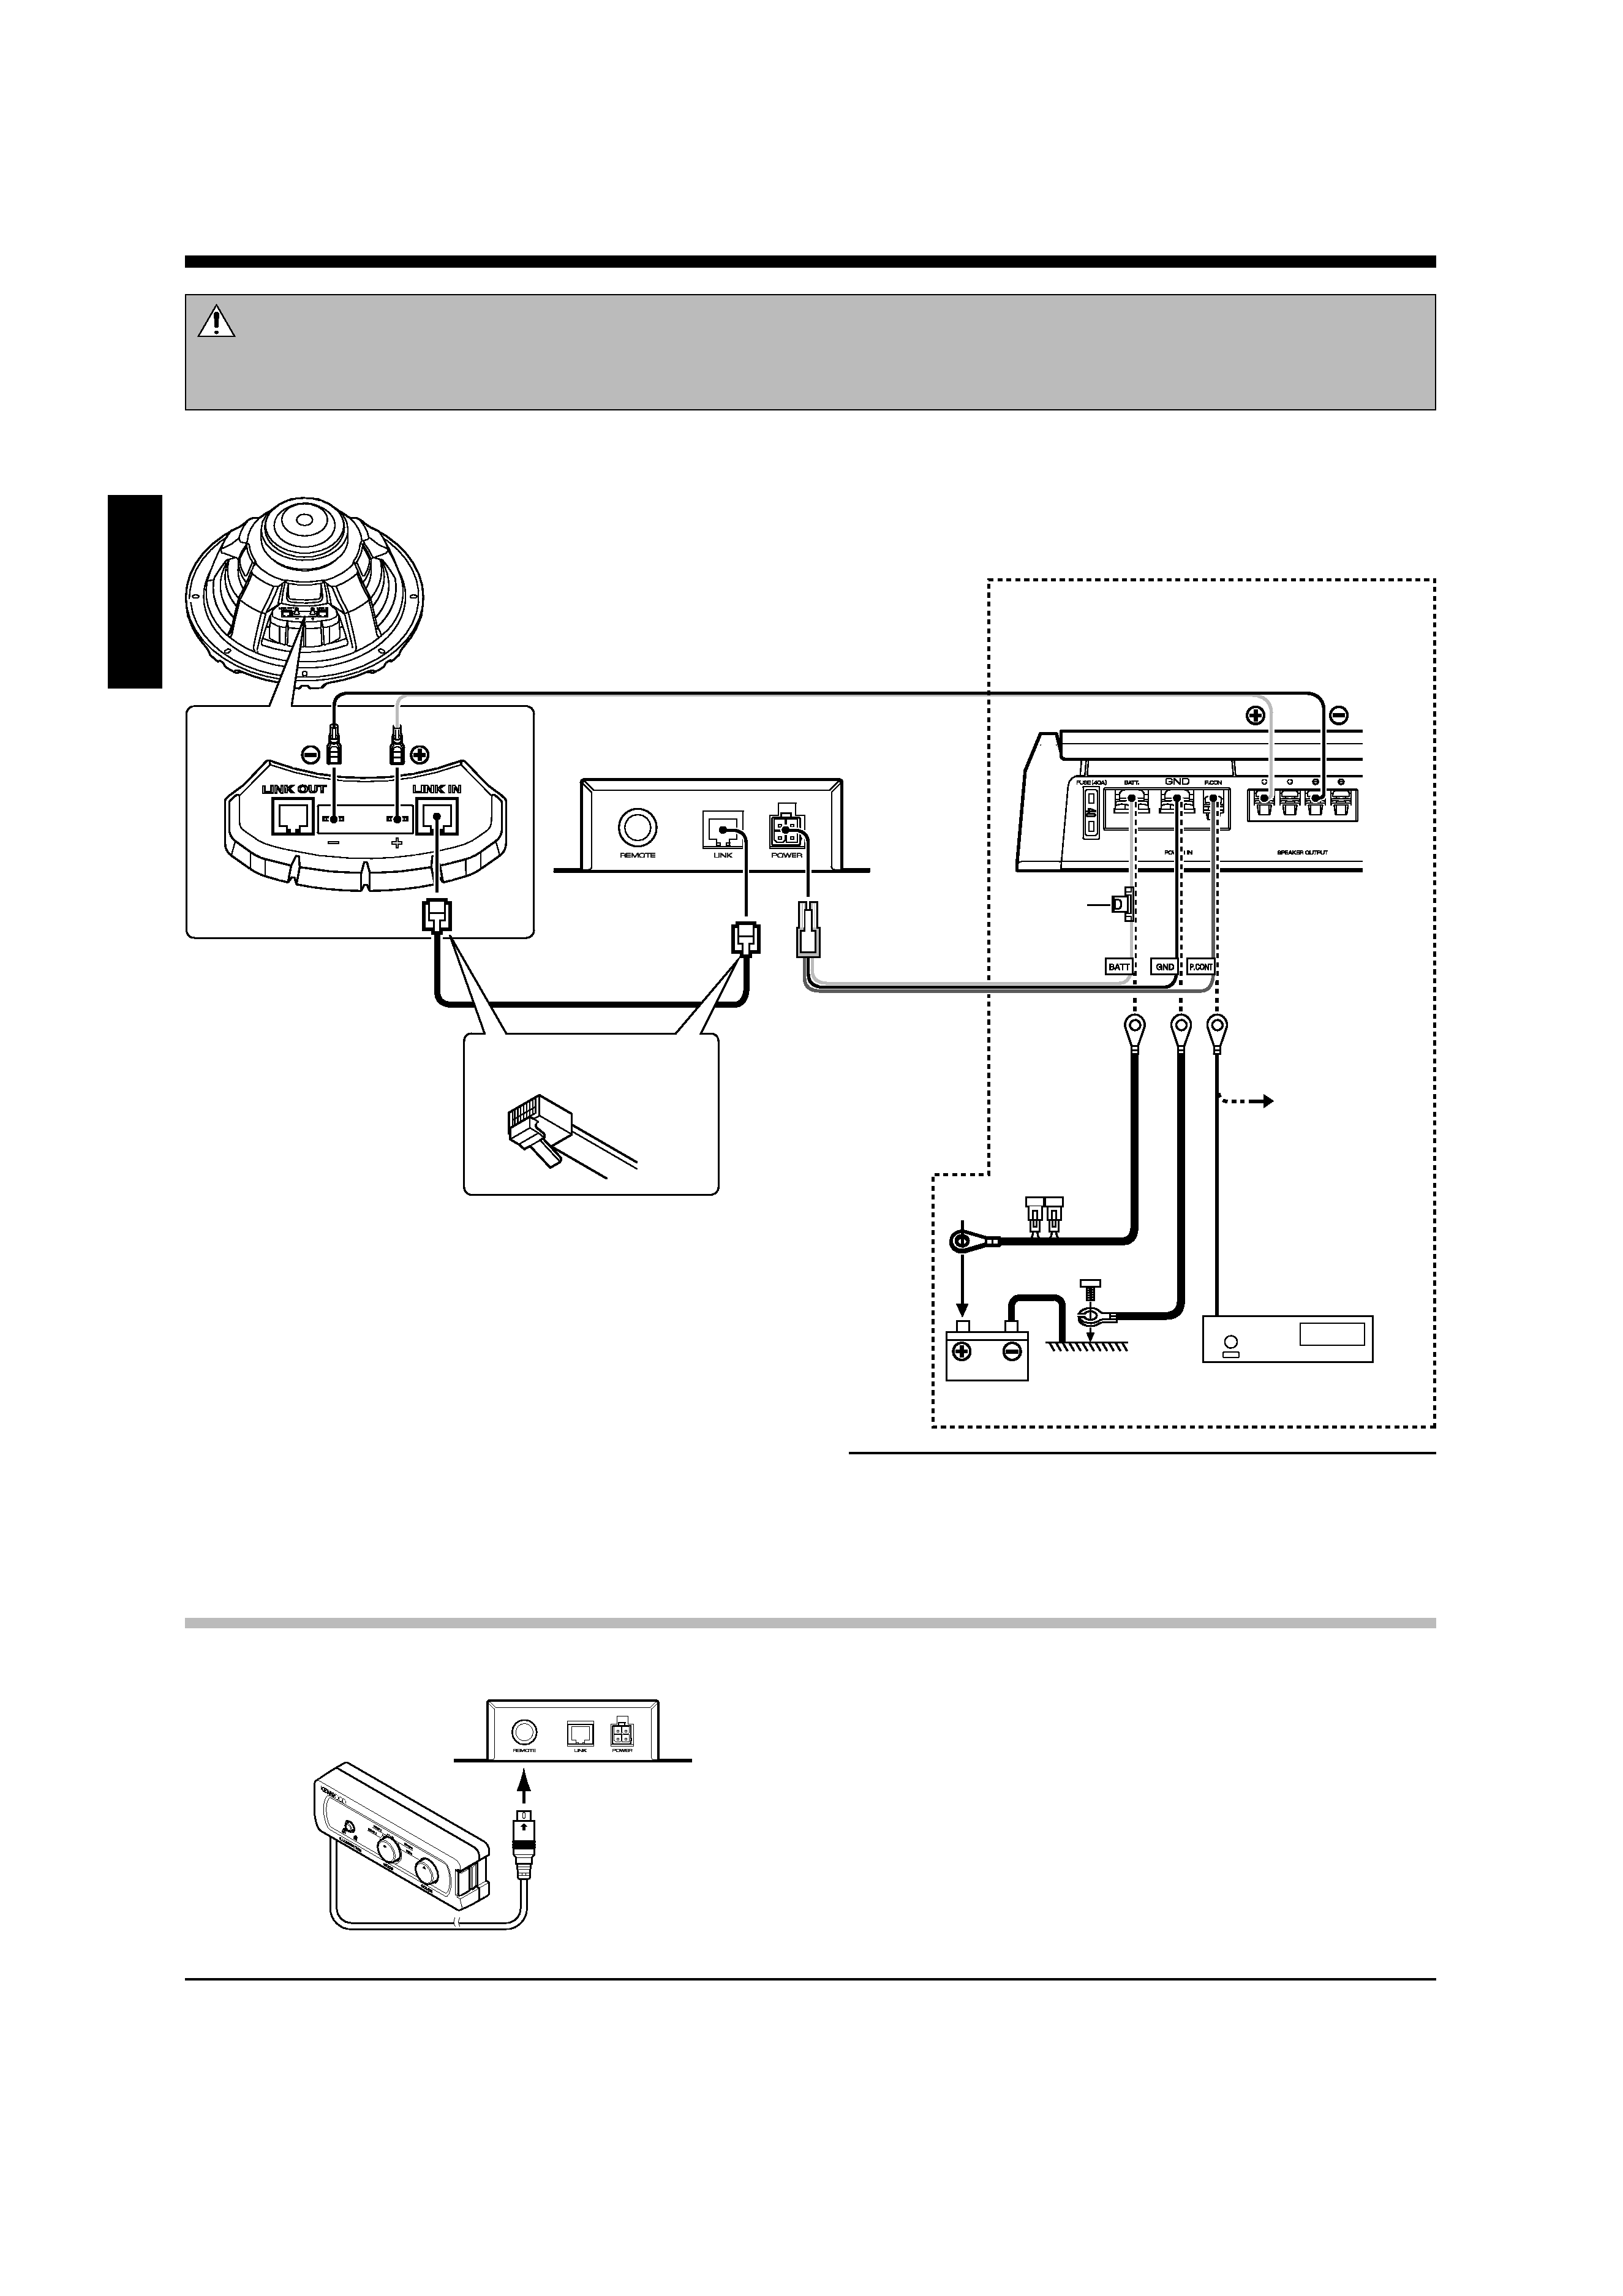
Connecting the remote control unit
2 Remote control
Note:
The illumination function cannot be used when the Remote control
2 is not connected. Be sure to connect the Remote control 2 to the
Control box
1.
1 Control box
Connect the Remote control
2 to the REMOTE termi-
nal of the Control box
1.
Woofer unit
(KFC-W3000L)
1 Control box
4 Link cable
3 DC cable
BATT: Yellow
GND: Black
P.CONT: Blue/White
Fuse (2A)
Speaker cord (Commercially available)
Amplifier
Connect with the lock part of
LINK jack facing down.
Center unit
Battery
If there is no
power control
terminal in the am-
plifier, connect the
blue/white wire to
the accessory line
(ignition key
switch ACC posi-
tion line).
Amplifier is not included in this product.
Please use a commercially available amplifier.
1 Connect the POWER jack of the Control box 1
and amplifier using DC cable
3.
(If there is no power control terminal in the ampli-
fier, connect to the accessory (ACC) line.)
2 Connect the LINK jack of the Control box 1 and
LINK IN jack of the Woofer unit using Link cable
4.
(A modular cable (commercially available) cannot
be used.)
3 Connect the amplifier and the Woofer unit with
speaker cords.
Notes:
· The illumination function cannot be used if the Link cable
4 is
connected erroneously to the LINK OUT jack of the Woofer unit.
Be sure to connect the Link cable
4 to the LINK IN jack.
· Do not plug or unplug the connection cables without switching
the power off. Otherwise, malfunction may result.
B61-1329_EN.indd 4
08.3.13 5:13:44 PM
background image
English
5
ENGLISH
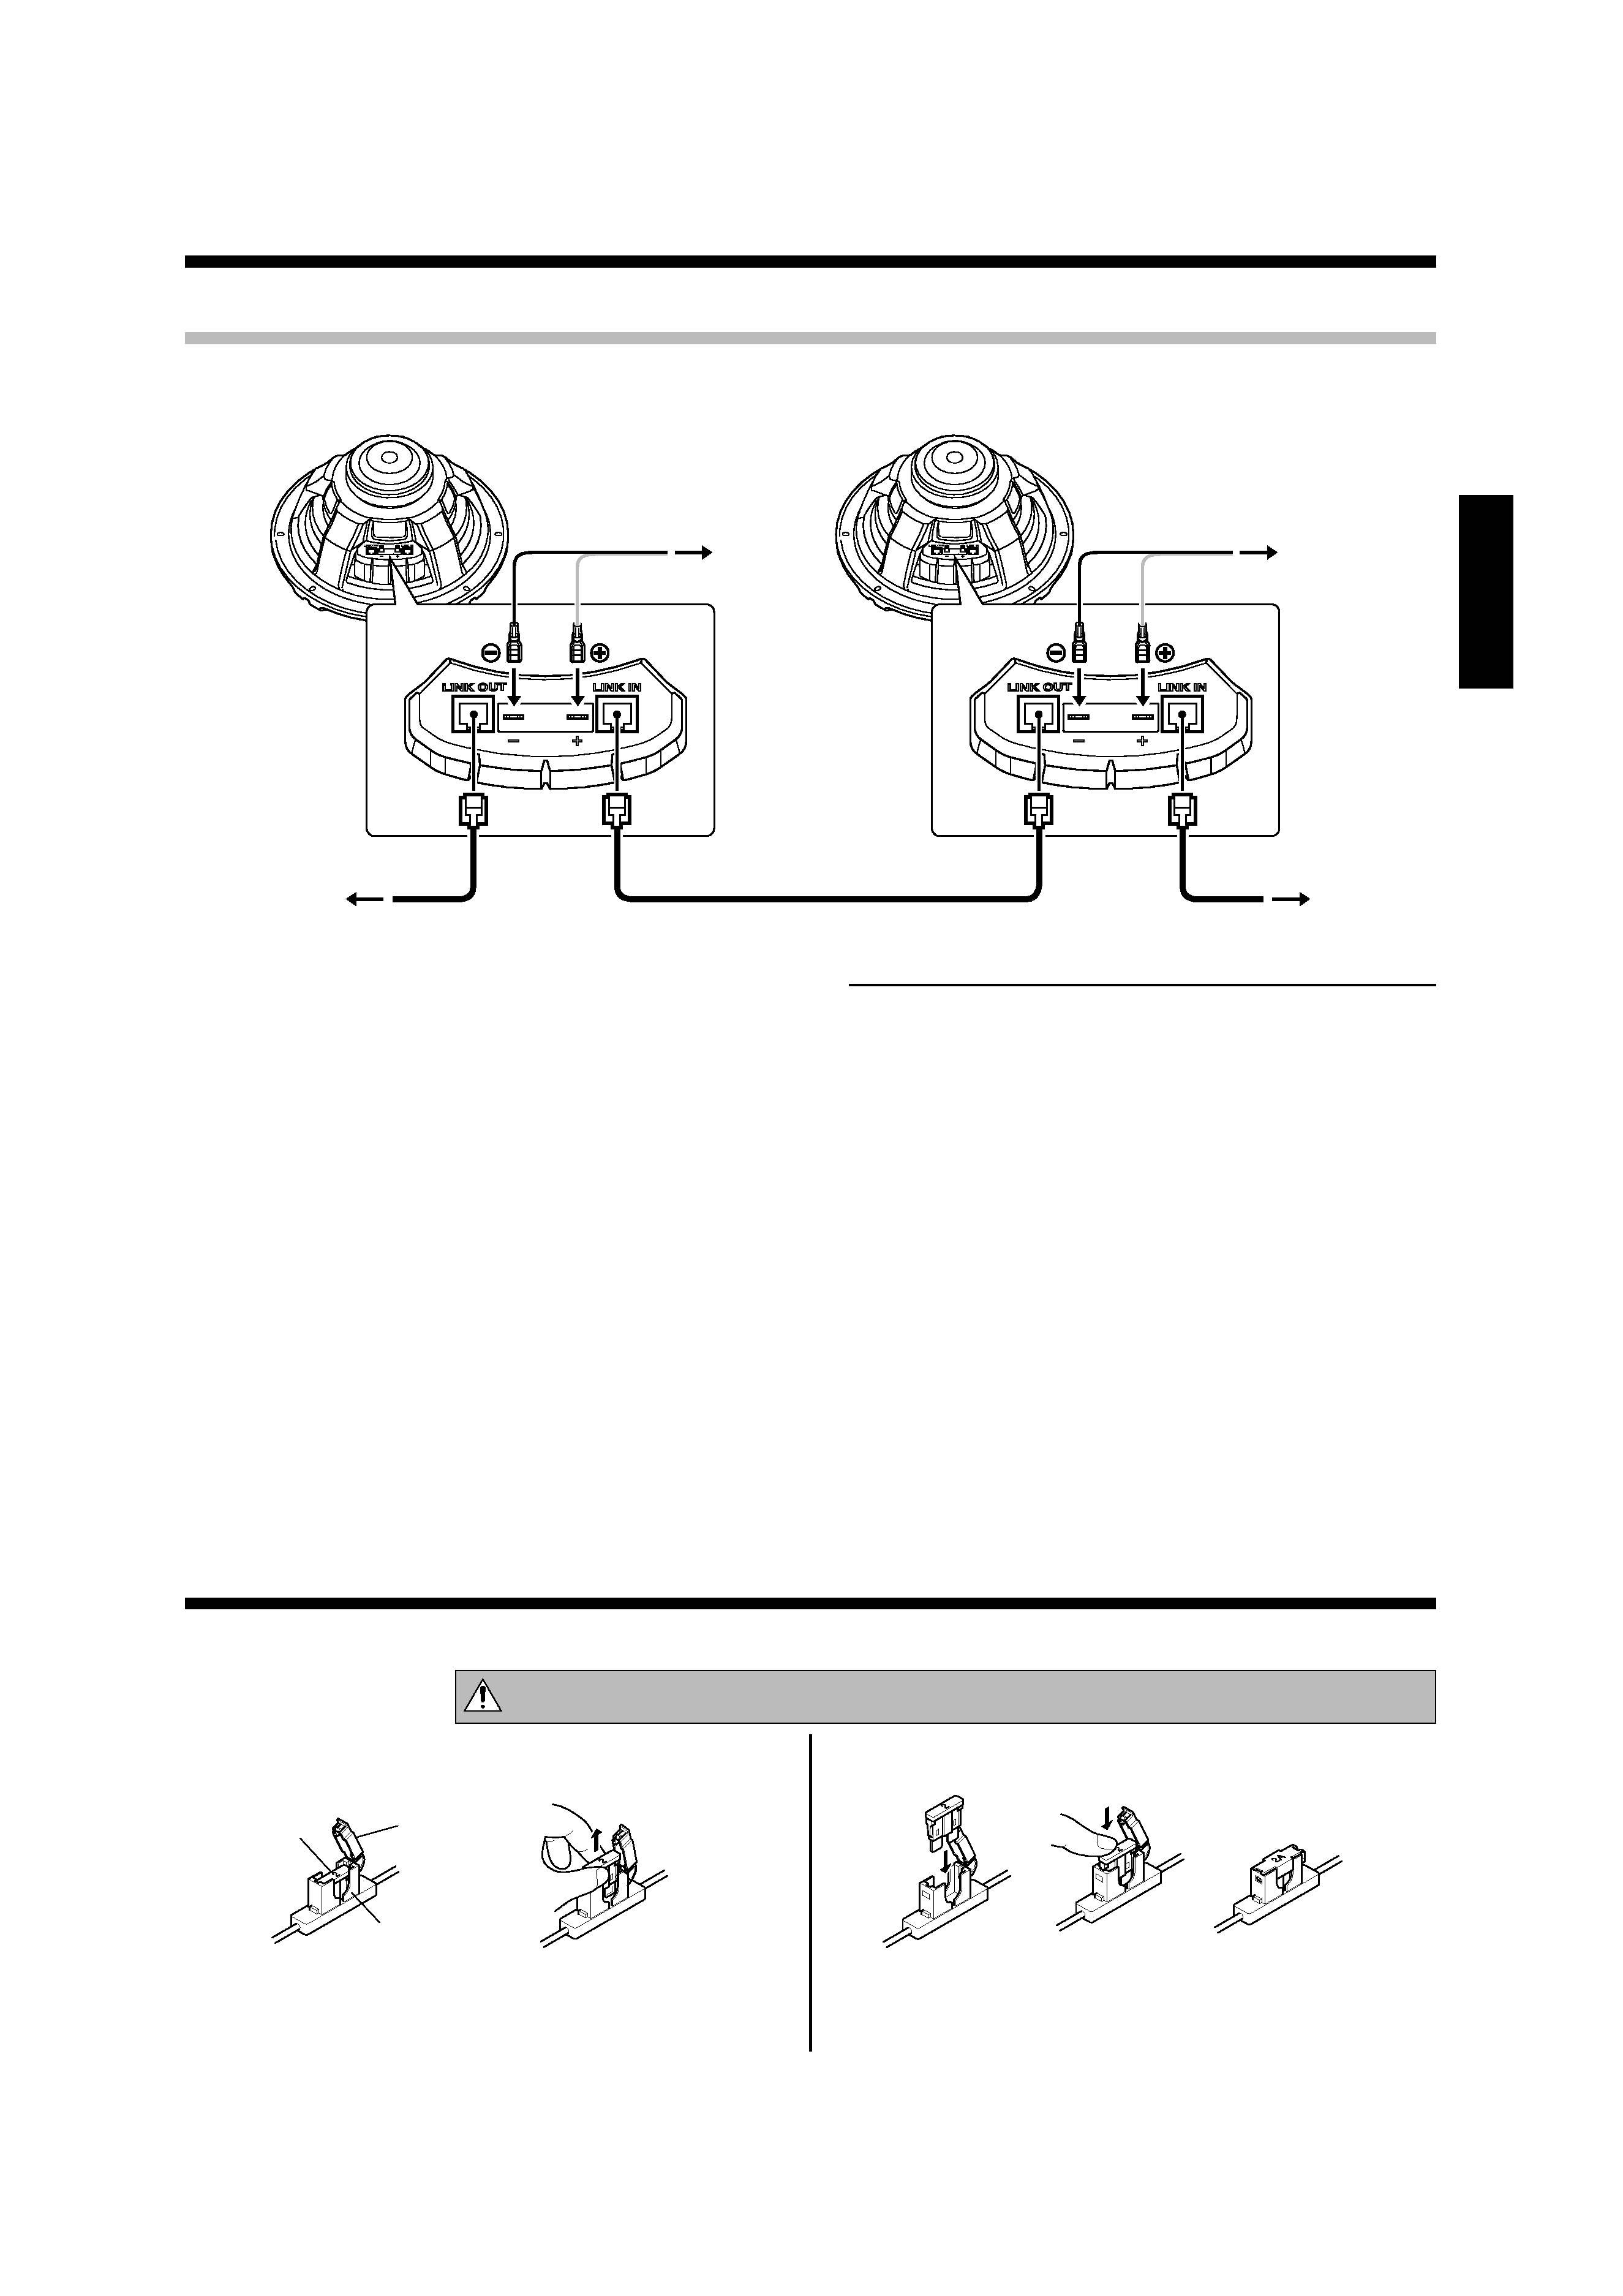
Connecting KFC-W3000L and KFC-W3000LS (KFC-W3000LS user only)
Notes:
· The illumination function of the KFC-W3000LS is enabled only
when it is connected to the KFC-W3000L through the Link cable
4.
The illumination function cannot be used when the KFC-
W3000LS is not connected to the KFC-W3000L.
· The maximum number of connected KFC-W3000LS units is 3
(the maximum total number of Woofer units including the KFC-
W3000L is 4).
· The illumination function cannot be used if the Link cable
4 is
connected erroneously to the LINK OUT jack of the Woofer unit
2 (KFC-W3000LS). Be sure to connect the Link cable 4 to the
LINK IN jack.
· The illumination is synchronized with the music signal input at
the speaker terminal of the Woofer unit
1 (KFC-W3000L).
The illuminations of the connected Woofer units
2, 3, 4 (KFC-
W3000LS) light according to the Woofer unit
1 (KFC-W3000L).
Note that they are not synchronized with the signals input to
them.
· Do not plug or unplug the connection cables without switching
the power off. Otherwise, malfunction may result.
Woofer unit
1
(KFC-W3000L)
Woofer unit
2
(KFC-W3000LS)
Amplifier
Amplifier
1 Control box
Woofer unit
3
Woofer unit
4
4 Link cable
1 Connect the LINK OUT jack of the Woofer unit 1
(KFC-W3000L) and LINK IN jack of the Woofer unit
2 (KFC-W3000LS) using Link cable 4.
2 Connect the amplifier and the Woofer unit with
speaker cords.
Fuse exchange
Exchange with the specified capacity fuse.
Removal
Insertion
Fuse
Cover
Fuse holder
Replacement fuse 2A
1 Open the cover.
2 Grasp with pliers and pull up.
1 Insert the fuse gently into the fuse holder and
push in all the way with your finger or tool.
2 Close the cover.
Caution: Be sure to replace with same capacity (amperage) as displayed on the fuse. This product is 2A.
B61-1329_EN.indd 5
08.3.13 5:13:46 PM

Reviews

There are no reviews of this manual yet.