KENWOOD KDV-MP6339U Owner's Manual

Cover page of KENWOOD KDV-MP6339U Owner's Manual

Owner's Manual for KENWOOD KDV-MP6339U, downloadable as a PDF file.

Manual details

  • Immediate download after payment.
  • Delivered as a PDF file.
  • The manual has 52 pages
  • File size: 3.27 MB
  • Available language versions: Arabic, English, Chinese Traditional
  • Different language versions may vary sligthly in file size and page count.

We guarantee that...

  • our manuals are complete,
  • our manuals are checked with antivirus,
  • We'll issue refund if the manual is damaged, incomplete or unreadable (our refund policy)

Sample pages

Thumbnail of page 1Thumbnail of page 2Thumbnail of page 3Thumbnail of page 4
Thumbnail of page 5Thumbnail of page 6Thumbnail of page 7Thumbnail of page 8
Thumbnail of page 9
background image
DVD-RECEIVER
KDV-MP6339U
KDV-MP6439U
INSTRUCTION MANUAL
© B64-4244-08/00 GET0557-001A (M/X)
background image
DVD-RECEIVER
KDV-MP6339U
KDV-MP6439U
INSTRUCTION MANUAL
© B64-4244-08/00 GET0557-001A (M/X)
background image
2 | KDV-MP6339U/KDV-MP6439U
Contents
Before use
3
Playable disc type
6
Preparation
7
Basic operations
8
Basic operations
-- Remote controller
9
Main elements and features
Listening to the radio
11
When an FM stereo broadcast is hard to receive
FM station automatic presetting
--SSM (Strong-station Sequential Memory)
Manual presetting
Listening to the preset station on
the Preset Station List
Disc operations
13
Operations using the control panel
Selecting a folder/track on the list
(only for MP3/WMA/WAV file)
Operations using the remote controller
Operations using the on-screen bar
Operations using the control screen
Operations using the list screen
Listening to the USB
device
23
Dual Zone operations
24
Listening to the iPod
25
When connecting with the USB cable
Operations using the control screen
Listening to the other external
components
29
Selecting a preset sound
mode
31
General settings--PSM
33
Disc setup menu
37
Title assignment
39
More about this unit
40
Troubleshooting
47
Specifications
51
background image
English | 3
Before use
2WARNING
To prevent injury or fire, take the
following precautions:
· To prevent a short circuit, never put or leave any
metallic objects (such as coins or metal tools) inside
the unit.
· Do not watch or fix your eyes on the unit's display
when you are driving for any extended period.
· DO NOT operate the unit while driving. If you need
to operate the unit while driving, be sure to look
around carefully.
How to reset your unit
· If the unit fails to operate properly, press the Reset
button. The unit returns to factory settings when
the Reset button is pressed.
How to forcibly eject a disc
"Please Eject" appears on the display.
Cleaning the Unit
If the faceplate of this unit is stained, wipe it with a
dry soft cloth such as a silicon cloth.
If the faceplate is stained badly, wipe the stain off
with a cloth moistened with neutral cleaner, then
wipe it again with a clean soft dry cloth.
¤
· Applying spray cleaner directly to the unit may affect its
mechanical parts. Wiping the faceplate with a hard cloth
or using a volatile liquid such as thinner or alcohol may
scratch the surface or erases characters.
Cleaning the Faceplate Terminals
If the terminals on the unit or faceplate get dirty,
wipe them with a clean soft dry cloth.
Lens Fogging
When you turn on the car heater in cold weather,
dew or condensation may form on the lens in the
disc player of the unit. Called lens fogging, this
condensation on the lens may not allow discs to
play. In such a situation, remove the disc and wait
for the condensation to evaporate. If the unit still
does not operate normally after a while, consult your
Kenwood dealer.
Caution for DualDisc playback
The Non-DVD side of a "DualDisc" does not comply
with the "Compact Disc Digital Audio" standard.
Therefore, the use of Non-DVD side of a DualDisc on
this product may not be recommended.
background image
4 | KDV-MP6339U/KDV-MP6439U
Notes
· If you experience problems during installation,
consult your Kenwood dealer.
· When you purchase optional accessories, check
with your Kenwood dealer to make sure that they
work with your model and in your area.
· The illustrations of the display and the panel
appearing in this manual are examples used to
explain more clearly how the controls are used.
Therefore, what appears on the display in the
illustrations may differ from what appears on the
display on the actual equipment, and some of the
illustrations on the display may be inapplicable.
· If you have parked the car for a long time in hot or
cold weather, wait until the temperature in the car
becomes normal before operating the unit.
Handling discs
· Do not touch the recording surface of the disc.
· Do not stick tape etc. on the disc, or use a disc with
tape stuck on it.
· Do not use disc type accessories.
· Clean from the center of the disc and move
outward.
· When removing discs from this unit, pull them out
horizontally.
· If the disc center hole or outside rim has burrs,
use the disc only after removing the burrs with a
ballpoint pen etc.
Discs that cannot be used
· Discs that are not round cannot be used.
· Discs with coloring on the recording surface or
discs that are dirty cannot be used.
· This unit can only play the CDs with
.
This unit may not correctly play discs which do not
have the mark.
· You cannot play a CD-R or CD-RW that has not
been finalized. (For the finalization process refer to
your CD-R/CD-RW writing software, and your CD-
R/CD-RW recorder instruction manual.)
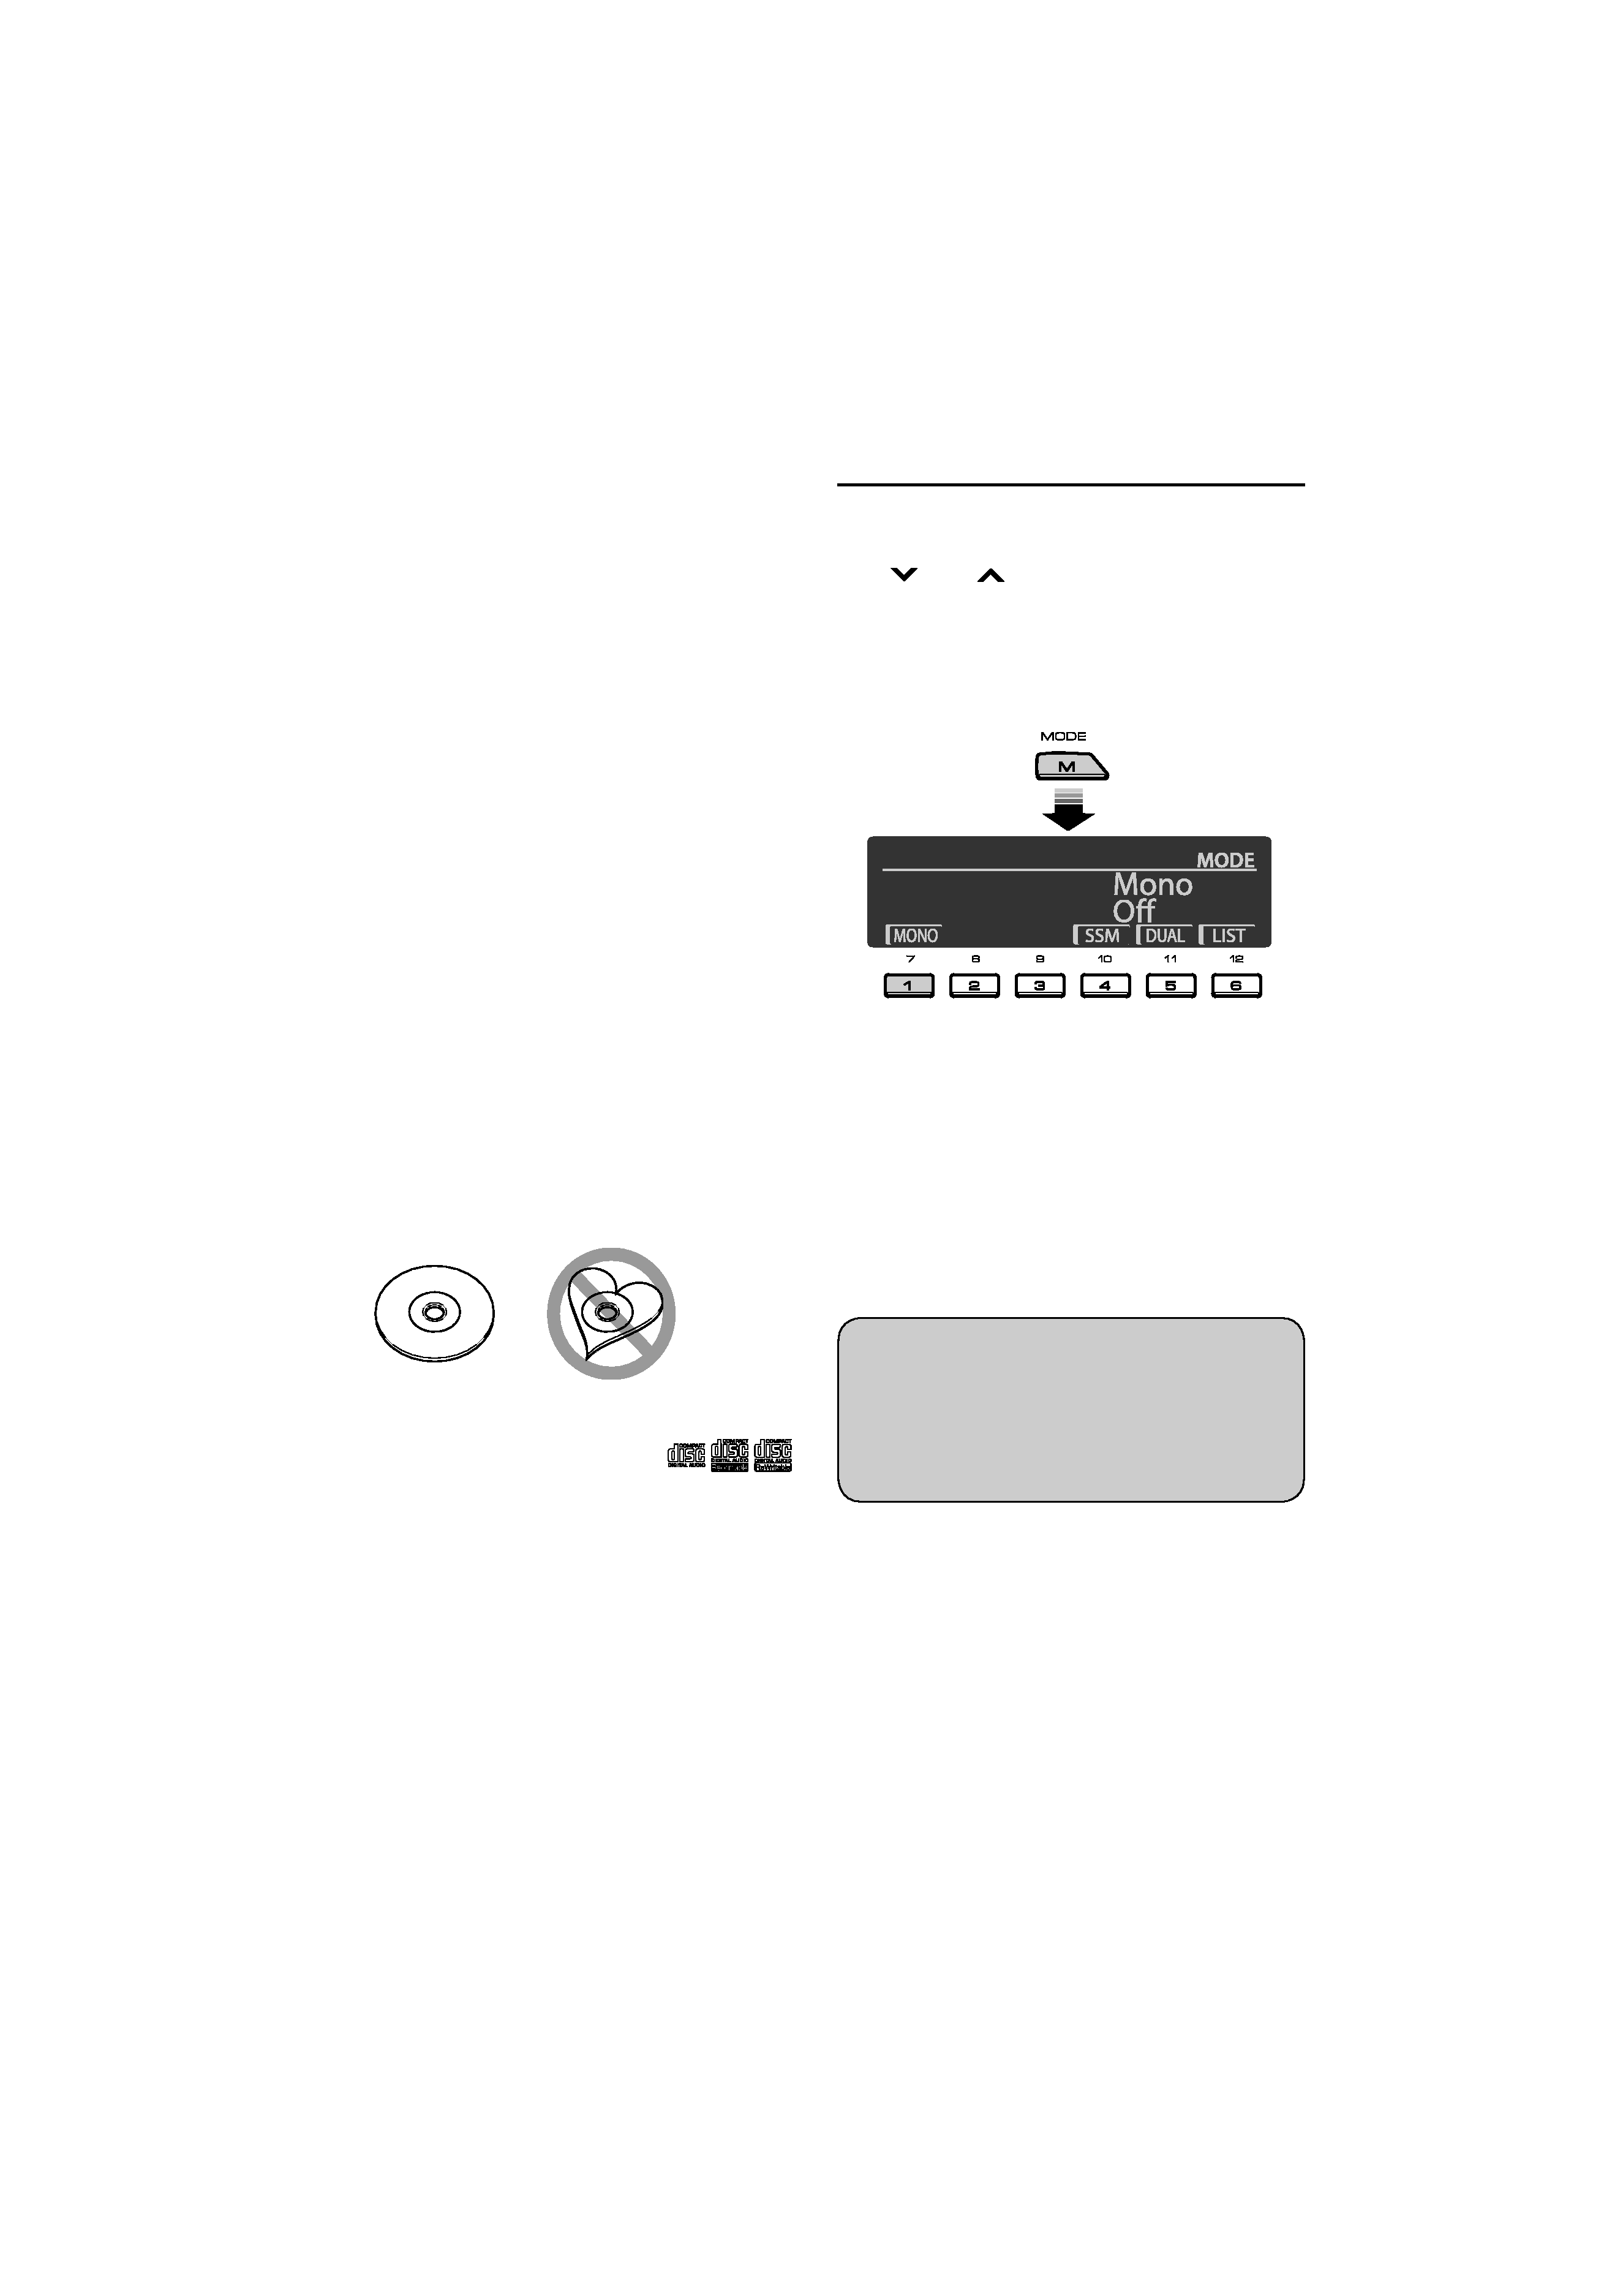
How to use the M MODE and SEL
buttons
If you use M MODE or SEL (select), the display and some
controls (such as the number buttons,
4 /¢ buttons, 5/ buttons, and the
control dial) enter the corresponding control mode.
Ex.: When you press number button 1 after pressing
M MODE, to operate the FM tuner.
To use these controls for original functions, press
M MODE again.
· However, pressing SEL makes the unit enters a
different mode.
· Waiting for about 15 seconds without pressing any of
these buttons will automatically cancels the control.
Indication language:
In this manual, English indications are used
for purposes of explanation. You can select
the indication language on the monitor on the
"LANGUAGE" setting (see page 37).
background image
English | 5
"DTS" and "DTS Digital Out" are registered trademarks
of DTS, Inc.
This product incorporates copyright protection
technology that is protected by U.S. patents and
other intellectual property rights. Use of this
copyright protection technology must be authorized
by Macrovision, and is intended for home and
other limited viewing uses only unless otherwise
authorized by Macrovision. Reverse engineering or
disassembly is prohibited.
Manufactured under license under U.S. Patent #:
5,451,942 & other U.S. and worldwide patents issued
& pending. DTS and DTS Digital Out are registered
trademarks and the DTS logos and Symbol are
trademarks of DTS, Inc. © 1996-2007 DTS, Inc. All
Rights Reserved.
is a trademark of DVD Format/Logo Licensing
Corporation registered in the U.S., Japan and other
countries.
Manufactured under license from Dolby Laboratories.
"Dolby" and the double-D symbol are trademarks of
Dolby Laboratories.
DivX, DivX Ultra Certified, and associated logos are
trademarks of DivX, inc. and are used under license.
Official DivX® Ultra Certified product
Plays all versions of DivX® video (including DivX® 6)
with enhanced playback of DivX® media files and the
DivX® Media Format
iPod is a trademark of Apple Inc., registered in the
U.S. and other countries.
Microsoft and Windows Media are either registered
trademarks or trademarks of Microsoft Corporation in
the United States and/or other countries.
The marking of products using lasers
(Except for some areas)
CLASS 1
LASER PRODUCT
The label is attached to the chassis/case and says
that the component uses laser beams that have been
classified as Class 1. It means that the unit is utilizing
laser beams that are of a weaker class. There is no
danger of hazardous radiation outside the unit.
Detaching the control panel
Avoid touching the connectors.
Attaching the control panel
Opening and closing the control
panel
Open...
Close...

Reviews

There are no reviews of this manual yet.