KENWOOD KDC-PS9060R Owner's Manual

Cover page of KENWOOD KDC-PS9060R Owner's Manual

Owner's Manual for KENWOOD KDC-PS9060R, downloadable as a PDF file.

We also have service manual to this model.

Manual details

  • Immediate download after payment.
  • Delivered as a PDF file.
  • The manual has 46 pages
  • File size: 0.51 MB
  • Available language versions: English
  • Different language versions may vary sligthly in file size and page count.

We guarantee that...

  • our manuals are complete,
  • our manuals are checked with antivirus,
  • We'll issue refund if the manual is damaged, incomplete or unreadable (our refund policy)

Sample pages

Thumbnail of page 1Thumbnail of page 2Thumbnail of page 3Thumbnail of page 4
Thumbnail of page 5Thumbnail of page 6Thumbnail of page 7Thumbnail of page 8
Thumbnail of page 9
background image
KDC-PS9060R
KDC-8060R
KDC-7060R
©B64-1181-00 (EW)
COMPACT
DIGITAL AUDIO
CD-RECEIVER
INSTRUCTION MANUAL
background image
KDC-PS9060R
KDC-8060R
KDC-7060R
©B64-1181-00 (EW)
COMPACT
DIGITAL AUDIO
CD-RECEIVER
INSTRUCTION MANUAL
background image
Contents
-- 2 --
English
Before use
Safety precautions ........................................................................3
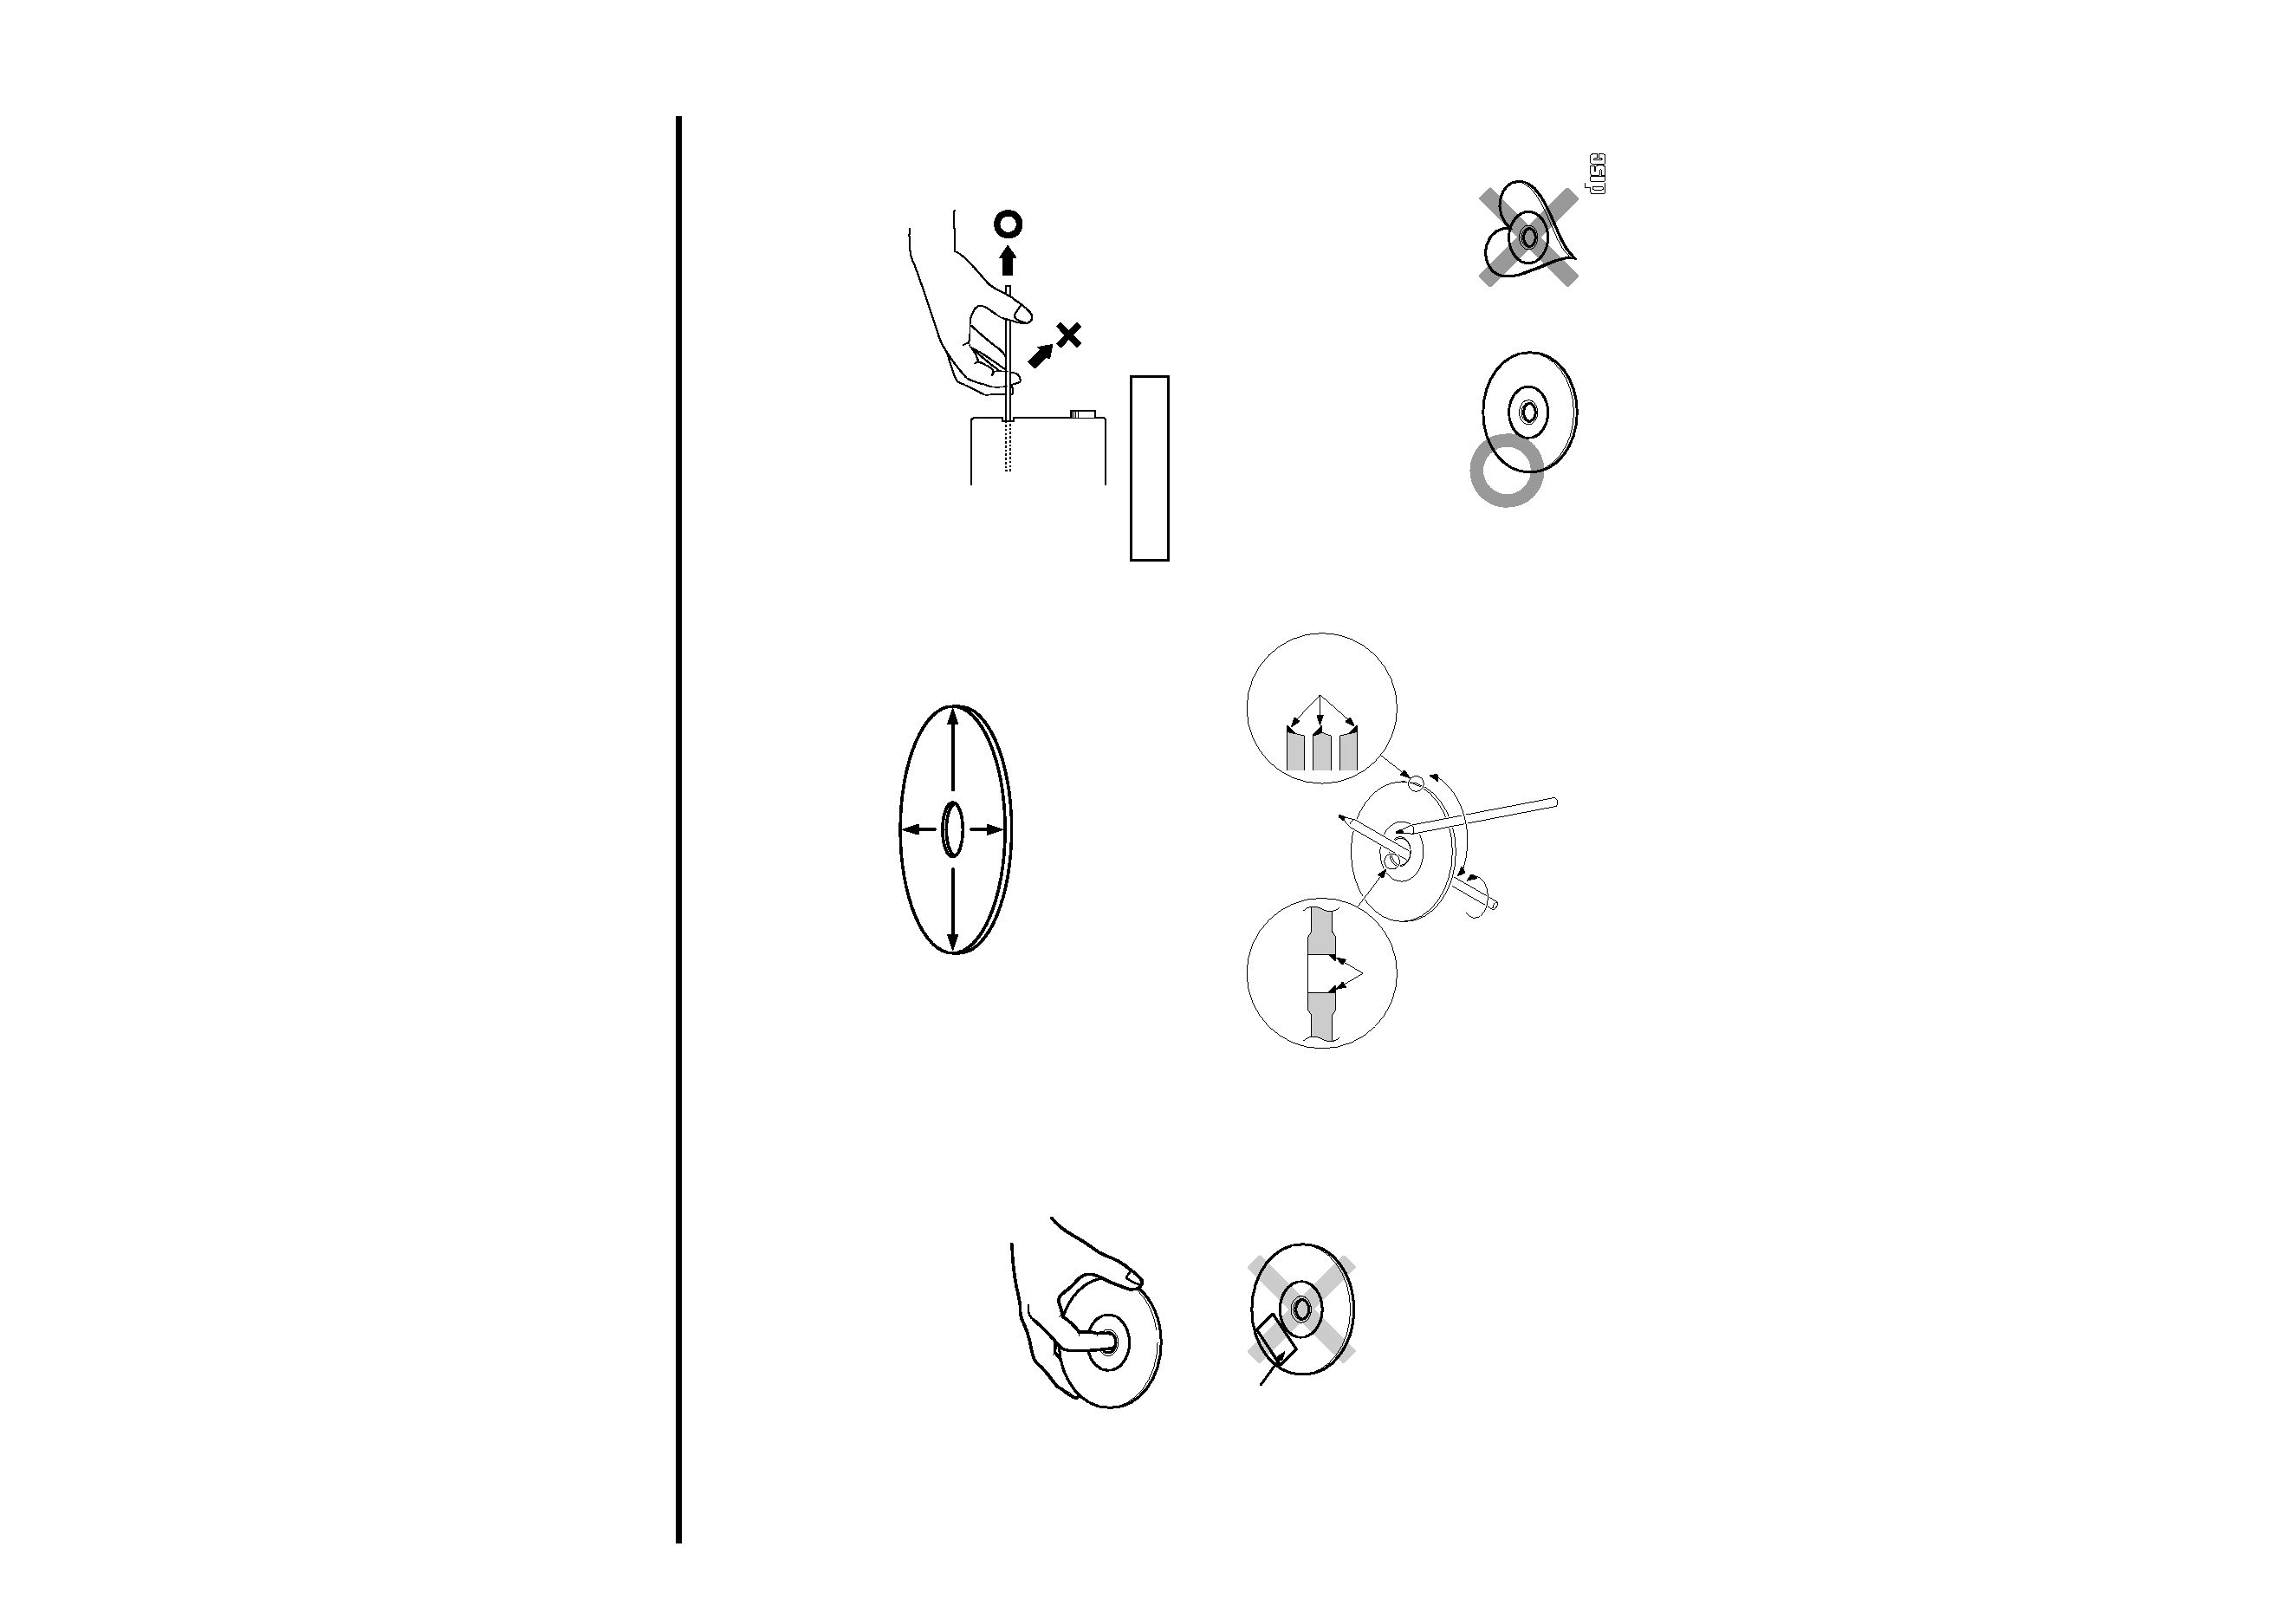
Handling Compact discs................................................................5
Buttons and Display
Basic operations............................................................................6
Tuner features...............................................................................6
RDS features.................................................................................7
Disc control features .....................................................................7
Other features...............................................................................8
Steering remote control ................................................................8
Remote control .............................................................................8
Basic operations
Stealth Retraction Mechanism......................................................9
Switching Modes ........................................................................10
Volume ........................................................................................10
Attenuator ...................................................................................10
Loudness ....................................................................................10
Menu System..............................................................................10
Tuner features
K2I (Kenwood Inteligent Twin IF) ................................................12
Selecting Tuning Mode ...............................................................12
Tuning .........................................................................................12
Local Seek Function ....................................................................13
Monaural Reception ....................................................................13
Switching Display for Tuner (non-RDS station) ...........................13
Station Preset Memory ...............................................................13
Auto Memory Entry.....................................................................14
Direct Access Tuning ..................................................................14
Preset station seek with Programme service name ...................15
RDS features
RDS (Radio Dara System) ...........................................................15
EON (Enhanced Other Network).................................................15
Alarm...........................................................................................15
AF (Alternative Frequency) Function ...........................................16
Restricting RDS Region (Region Restrict Function) ....................16
Traffic Information Function ........................................................16
Auto TP Seek Function................................................................17
Presetting Volume for Traffic Information/News ........................17
News Bulletin Function with PTY News Timeout Setting...........18
Programme Type (PTY) Function ................................................18
Disc control features
Playing CDs .................................................................................20
Playing Other Disc mode ............................................................21
Fast Forwarding and Reversing Disc Play ...................................21
Track Search................................................................................21
Disc Search .................................................................................22
Track / Disc Repeat Function ......................................................22
Track Scan Function ....................................................................22
Disc Scan Function......................................................................23
Random Play Function ................................................................23
Magazine Random Play Function ................................................23
Presetting Disc Names ...............................................................24
Text Scroll ...................................................................................25
Switching Display for Discs.........................................................26
Direct Track Search .....................................................................26
Direct Disc Search.......................................................................27
Disc Name Preset Play (DNPP) ...................................................27
Other features
Audio Control Setting ..................................................................28
Table of Audio Control Setting ....................................................28
Switching Preout.........................................................................29
TEL Mute Function......................................................................29
Navigation Mute Function ...........................................................29
Touch sensor tone ......................................................................30
Selectable Illumination ................................................................30
Contrast Adjustment ...................................................................30
Automatic Dimmer Function .......................................................30
Switching Graphic Display...........................................................31
Switching Clock Display ..............................................................31
Switching Spectrum Analyzer Display.........................................31
Adjusting Time ............................................................................32
Code Security Function ...............................................................33
Basic operations of remote control (Optional) ...................34
Basic operations of steering remote control ......................36
Installation
Accessories.................................................................................37
Installation Procedure..................................................................37
Connecting Cables to Terminals .................................................38
Installation ...................................................................................39
Removing the Unit ......................................................................40
Attaching Steering Remote Control ............................................41
Troubleshooting guide.............................................................42
Specifications.............................................................................45
background image
-- 3 --
To prevent injury and/or fire, take the
following precautions:
· Insert the unit all the way until it is fully
locked in place. Otherwise it may fly out of
place during collisions and other jolts.
· When extending the ignition, battery or
ground cables, make sure to use automotive-
grade cables or other cables with an area of
0.75mm2 (AWG18) or more to prevent cable
deterioration and damage to the cable
coating.
· To prevent short circuits, never put or leave
any metallic objects (e.g., coins or metal
tools) inside the unit.
· If the unit starts to emit smoke or strange
smells, turn off the power immediately and
consult your Kenwood dealer.
· Make sure not to get your fingers caught
between the faceplate and the unit.
· Be careful not to drop the unit or subject it to
strong shock.
The unit may break or crack because it
contains glass parts.
· Do not touch the liquid crystal fluid if the LCD
is damaged or broken due to shock. The
liquid crystal fluid may be dangerous to your
health or even fatal.
If the liquid crystal fluid from the LCD
contacts your body or clothing, wash it off
with soap immediately.
2WARNING
To prevent damage to the machine,
take the following precautions:
· Make sure to ground the unit to a negative
12V DC power supply.
· Do not open the top or bottom covers of the
unit.
· Do not install the unit in a spot exposed to
direct sunlight or excessive heat or humidity.
Also avoid places with too much dust or the
possibility of water splashing.
· Do not subject the faceplate to excessive
shock, as it is a piece of precision equipment.
· When replacing a fuse, only use a new one
with the prescribed rating. Using a fuse with
the wrong rating may cause your unit to
malfunction.
· To prevent short circuits when replacing a
fuse, first disconnect the wiring harness.
· Do not place any object between the
faceplate and the unit.
· During installation, do not use any screws
except for the ones provided. The use of
improper screws might result in damage to
the main unit.
2CAUTION
IMPORTANT INFORMATION
You cannot connect the unit directly to the
following CD automatic changers. For users
who want to use older changers with the
unit, follow the directions below according to
the type of changer you own:
· KDC-C200 / KDC-C300 / KDC-C400
Use the extension cable and the control box
attached to the CD changer, and the optional
CA-DS100 converter cable.
· KDC-C301 / KDC-C600 / KDC-C800 / KDC-C601 /
KDC-C401
Use the extension cable attached to the CD
changer, and the optional CA-DS100
converter cable.
· KDC-C100 / KDC-C302 / C205 / C705 /
non-Kenwood CD changers
Cannot be used with this model.
You can damage both your unit and
the CD changer if you connect them
incorrectly.
2CAUTION
Safety precautions
background image
-- 4 --
English
· If you experience problems during
installation, consult your Kenwood dealer.
· If the unit fails to operate properly, press the
RESET button. When the faceplate is not
visible, press "the touch-sensitive spot" at
the rear of the faceplate (as illustrated on p.9)
to make the faceplate control appear. The
unit returns to factory settings when the
RESET button is pressed. If the unit still fails
to operate properly after the RESET button
has been pressed, contact your local
KENWOOD dealer for assistance.
· Press the reset button if the CD auto changer
is first controlled and operates incorrectly.
The original operating condition will return.
· We strongly recommend the use of the Code
Security function (see p.33) to prevent theft.
NOTE
AUD
DISC
SCAN
RDM
REP
D.SCN
M.RDM
MENU
LOUD
40W
4
x
DISP/
TEXT
NAME. S
EJECT
PTY
CLOSE
PWR OFF
DAB
TI
VOL
ADJ
TUNER
Reset button
Cleaning the Unit
If the front panel gets dirty, turn off the
power and wipe the panel with a dry silicon
cloth or soft cloth.
Do not wipe the panel with a stiff cloth or a
cloth dampened by volatile solvents such as
paint thinner and alcohol. They can scratch
the surface of the panel and/or cause the
indicator letters to peel off.
2CAUTION
Safety precautions
Cleaning the CD Slot
As dust can accumulate in the CD slot, clean
it occasionally. Your CDs can get scratched if
you put them in a dusty CD slot.
Lens Fogging
Right after you turn on the car heater in cold
weather, dew or condensation may form on
the lens in the CD player of the unit. Called
lens fogging, CDs may be impossible to play.
In such a situation, remove the disc and wait
for the condensation to evaporate. If the unit
still does not operate normally after a whilst,
consult your Kenwood dealer.
The marking of products using lasers
(Except for some areas)
The label is attached to the chassis/case and
says that the component uses laser beams
that have been classified as Class 1. It means
that the unit is utilizing laser beams that are
of a weaker class. There is no danger of
hazardous radiation outside the unit.
CLASS 1
LASER PRODUCT
background image
-- 5 --
Playing a CD that is dirty, scratched
or warped can cause the sound to
skip and the unit to operate
incorrectly, resulting in worsened
sound quality. Take the following
precautions to prevent your CDs from
getting scratched or damaged.
Handling CDs
· Do not touch the recorded side of the CD
(i.e., the side opposite the label) when
holding it.
· Do not stick tape on either side of the CD.
Storing CDs
· Do not store CDs in areas exposed to direct
sunlight ­ such as a car seat or above the
fascia panel (dashboard) ­ or other hot
places.
· Remove CDs from the unit when not
listening to them for a whilst, and put them
back in their cases. Do not stack CDs that
have been removed from their cases or prop
them against something.
Cleaning CDs
If a CD has become dirty, wipe it off gently
using a commercially available cleaning cloth
or a soft cotton cloth, starting from the
centre of the disc and moving outward. Do
not clean CDs with conventional record
cleaners, anti- static formulas, or chemicals
such as paint thinner or benzene.
Checking New CDs for Burrs
When playing a new CD for the first time,
check that there are not any burrs stuck to
the perimeter of the disc or in the central
hole. CDs with burrs stuck on them may not
load properly or may skip whilst playing.
Remove burrs using a ballpoint pen or a
similar utensil.
Do Not Load CD Accessories in Slot
Do not use commercially available CD
accessories that can be loaded into the CD
slot, such as stabilisers, protective sheets, or
CD cleaning discs, since they can cause the
unit to malfunction.
Removing the CD
Only remove the CD from the machine in a
horizontal direction. You may damage the
surface of the CD if you try pulling it down as
it ejects.
Do Not Load 8-cm (3-in.) CDs in the
CD slot
If you try to load an 8-cm CD with its adapter
into the unit, the adapter might separate
from the CD and damage the unit.
Do Not Use Special Shape CDs
· Be sure to use round shape CDs only for this
unit and do not use any special shape CDs.
Use of special shape CDs may cause the
unit to malfunction.
· Be sure to use CDs with disc mark
only for this unit.
2CAUTION
Tape
Burrs
Burrs
Handling Compact discs
COMPACT
DIGITAL AUDIO

Reviews

There are no reviews of this manual yet.