KENWOOD KAC-X11D Owner's Manual

Cover page of KENWOOD KAC-X11D Owner's Manual

Owner's Manual for KENWOOD KAC-X11D, downloadable as a PDF file.

Manual details

  • Immediate download after payment.
  • Delivered as a PDF file.
  • The manual has 8 pages
  • File size: 1.07 MB
  • Available language versions: English
  • Different language versions may vary sligthly in file size and page count.

We guarantee that...

  • our manuals are complete,
  • our manuals are checked with antivirus,
  • We'll issue refund if the manual is damaged, incomplete or unreadable (our refund policy)

Sample pages

Thumbnail of page 1Thumbnail of page 2Thumbnail of page 3Thumbnail of page 4
Thumbnail of page 5Thumbnail of page 6Thumbnail of page 7Thumbnail of page 8
Thumbnail of page 9
background image
KAC-X11D
CLASS D MONO POWER AMPLIFIER
INSTRUCTION MANUAL
© B64-4198-00/00 (MV)
KAC-X11D_M_1English.indd 1
08.10.21 3:57:08 PM
background image
KAC-X11D
CLASS D MONO POWER AMPLIFIER
INSTRUCTION MANUAL
© B64-4198-00/00 (MV)
KAC-X11D_M_1English.indd 1
08.10.21 3:57:08 PM
background image
English
Safety precautions
WARNING
To prevent injury or fire, take the following precautions:
· Mountingandwiringthisproductrequiresskillsandexperience.Forsafety's
sake,leavethemountingandwiringworktoprofessionals.
· Whenextendingtheignition,battery,orgroundwires,makesuretouse
automotive-gradewiresorotherwireswiththerangeof14mm2(AWG6)
to21mm2(AWG4)topreventwiredeteriorationanddamagetothewire
coating.
· Topreventashortcircuit,neverputorleaveanymetallicobjects(suchas
coinsormetaltools)insidetheunit.
· Iftheunitstartstoemitsmokeorstrangesmells,turnoffthepower
immediatelyandconsultyourKenwooddealer.
· Donottouchtheunitduringusebecausethesurfaceoftheunitbecomes
hotandmaycauseburnsiftouched.
CAUTION
To prevent damage to the machine, take the following
precautions:
· Besuretheunitisconnectedtoa12VDCpowersupplywithanegative
groundconnection.
· Donotopenthetoporbottomcoversoftheunit.
· Donotinstalltheunitinaspotexposedtodirectsunlightorexcessiveheat
orhumidity.Alsoavoidplaceswithtoomuchdustorthepossibilityofwater
splashing.
· Whenreplacingafuse,onlyuseanewonewiththeprescribedrating.Usinga
fusewiththewrongratingmaycauseyourunittomalfunction.
· Topreventashortcircuitwhenreplacingafuse,firstdisconnectthewiring
harness.
NOTE
· Ifyouexperienceproblemsduringinstallation,consultyourKenwooddealer.
· Iftheunitdoesnotseemtobeworkingright,consultyourKenwooddealer.
Cleaning the unit
Ifthefrontpanelgetsdirty,turnoffthepowerandwipethepanelwithadry
siliconclothorsoftcloth.
CAUTION
Donotwipethepanelwithahardclothoraclothdampenedbyvolatile
solventssuchaspaintthinnerandalcohol.Theycanscratchthesurfaceofthe
paneland/orcausetheindicatorletterstopeeloff.
To prevent battery rise
WhentheunitisusedintheACCONpositionwithoutturningtheengineON,it
depletesthebattery.Useitafterstartingtheengine.
Protection function
Theprotectionfunctionisactivatedinthefollowingsituations:
Thisunitisequippedwithaprotectionfunctionforprotectingthisunitandyour
speakersfromvariousaccidentsorproblemsthatcanoccur.
Whentheprotectionfunctionistriggered,thePROTECTIONindicatorlightsand
theamplifierstopsoperating.
· Whenaspeakerwiremaybeshort-circuited.
· Whenaspeakeroutputcontactsground.
· WhentheunitmalfunctionsandaDCsignalissenttothespeakeroutput.
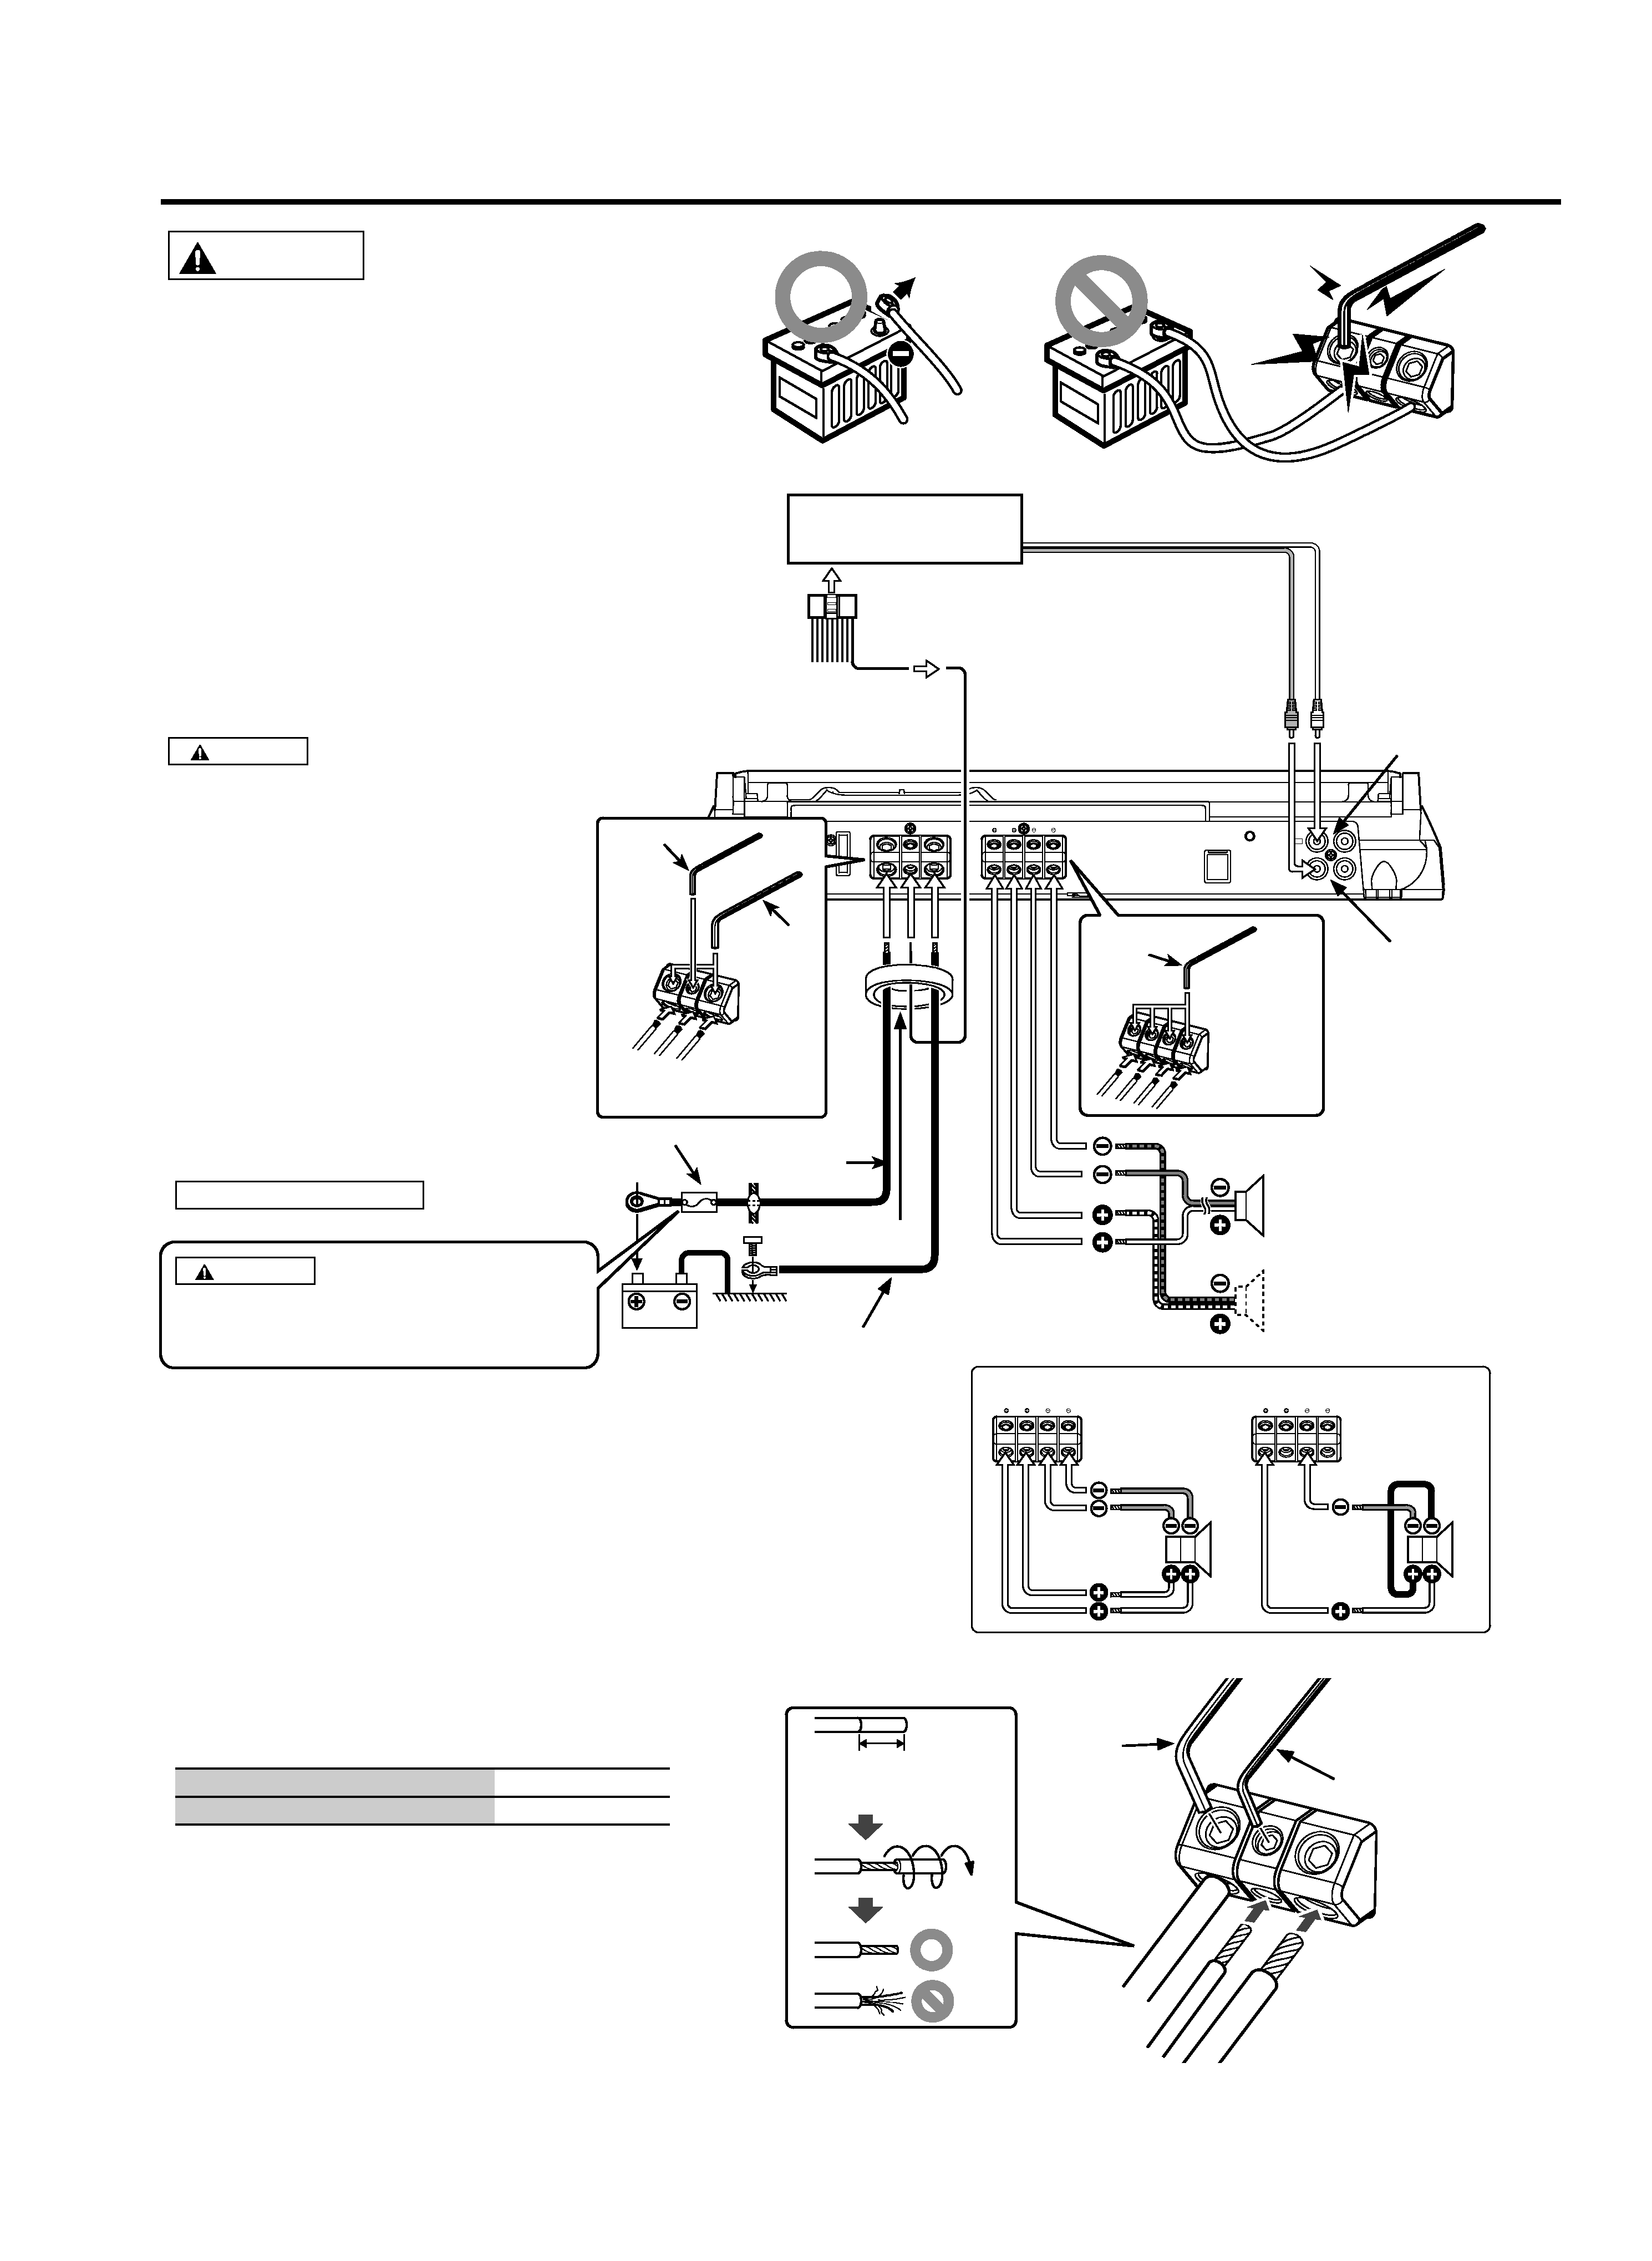
Wiring
· Takethebatterywireforthisunitdirectlyfromthebattery.Ifit'sconnectedto
thevehicle'swiringharness,itcancauseblownfusesetc.
· Ifabuzzingnoiseisheardfromthespeakerswhentheengineisrunning,
connectalinenoisefilter(optional)toeachofthebatterywire.
· Donotallowthewiretodirectlycontacttheedgeoftheironplatebyusing
Grommets.
· Connectthegroundwiretoametalpartofthecarchassisthatactsasan
electricalgroundpassingelectricitytothebattery`snegative
·terminal.Do
notturnthepoweronifthegroundwireisnotconnected.
· Besuretoinstallaprotectivefuseinthepowercordnearthebattery.The
protectivefuseshouldbethesamecapacityastheunit'sfusecapacityor
somewhatlarger.
· Forthepowercordandground,useavehicletype(fireproof )powerwring
cordwithacurrentcapacitygreaterthantheunit'sfusecapacity.(Useapower
wiringcordwiththerangeof14mm2(AWG6)to21mm2(AWG4).
· Whenmorethanonepoweramplifieraregoingtobeused,useapower
supplywiringwireandprotectivefuseofgreatercurrent-handlingcapacity
thanthetotalmaximumcurrentdrawnbyeachamplifier.
Speaker Selection
· Theratedinputpowerofthespeakersthataregoingtobeconnectedshould
begreaterthanthemaximumoutputpower(inWatts)oftheamplifier.Useof
speakershavinginputpowerratingsthatarelessthantheoutputpowerof
theamplifierwillcausesmoketobeemittedaswellasdamage.
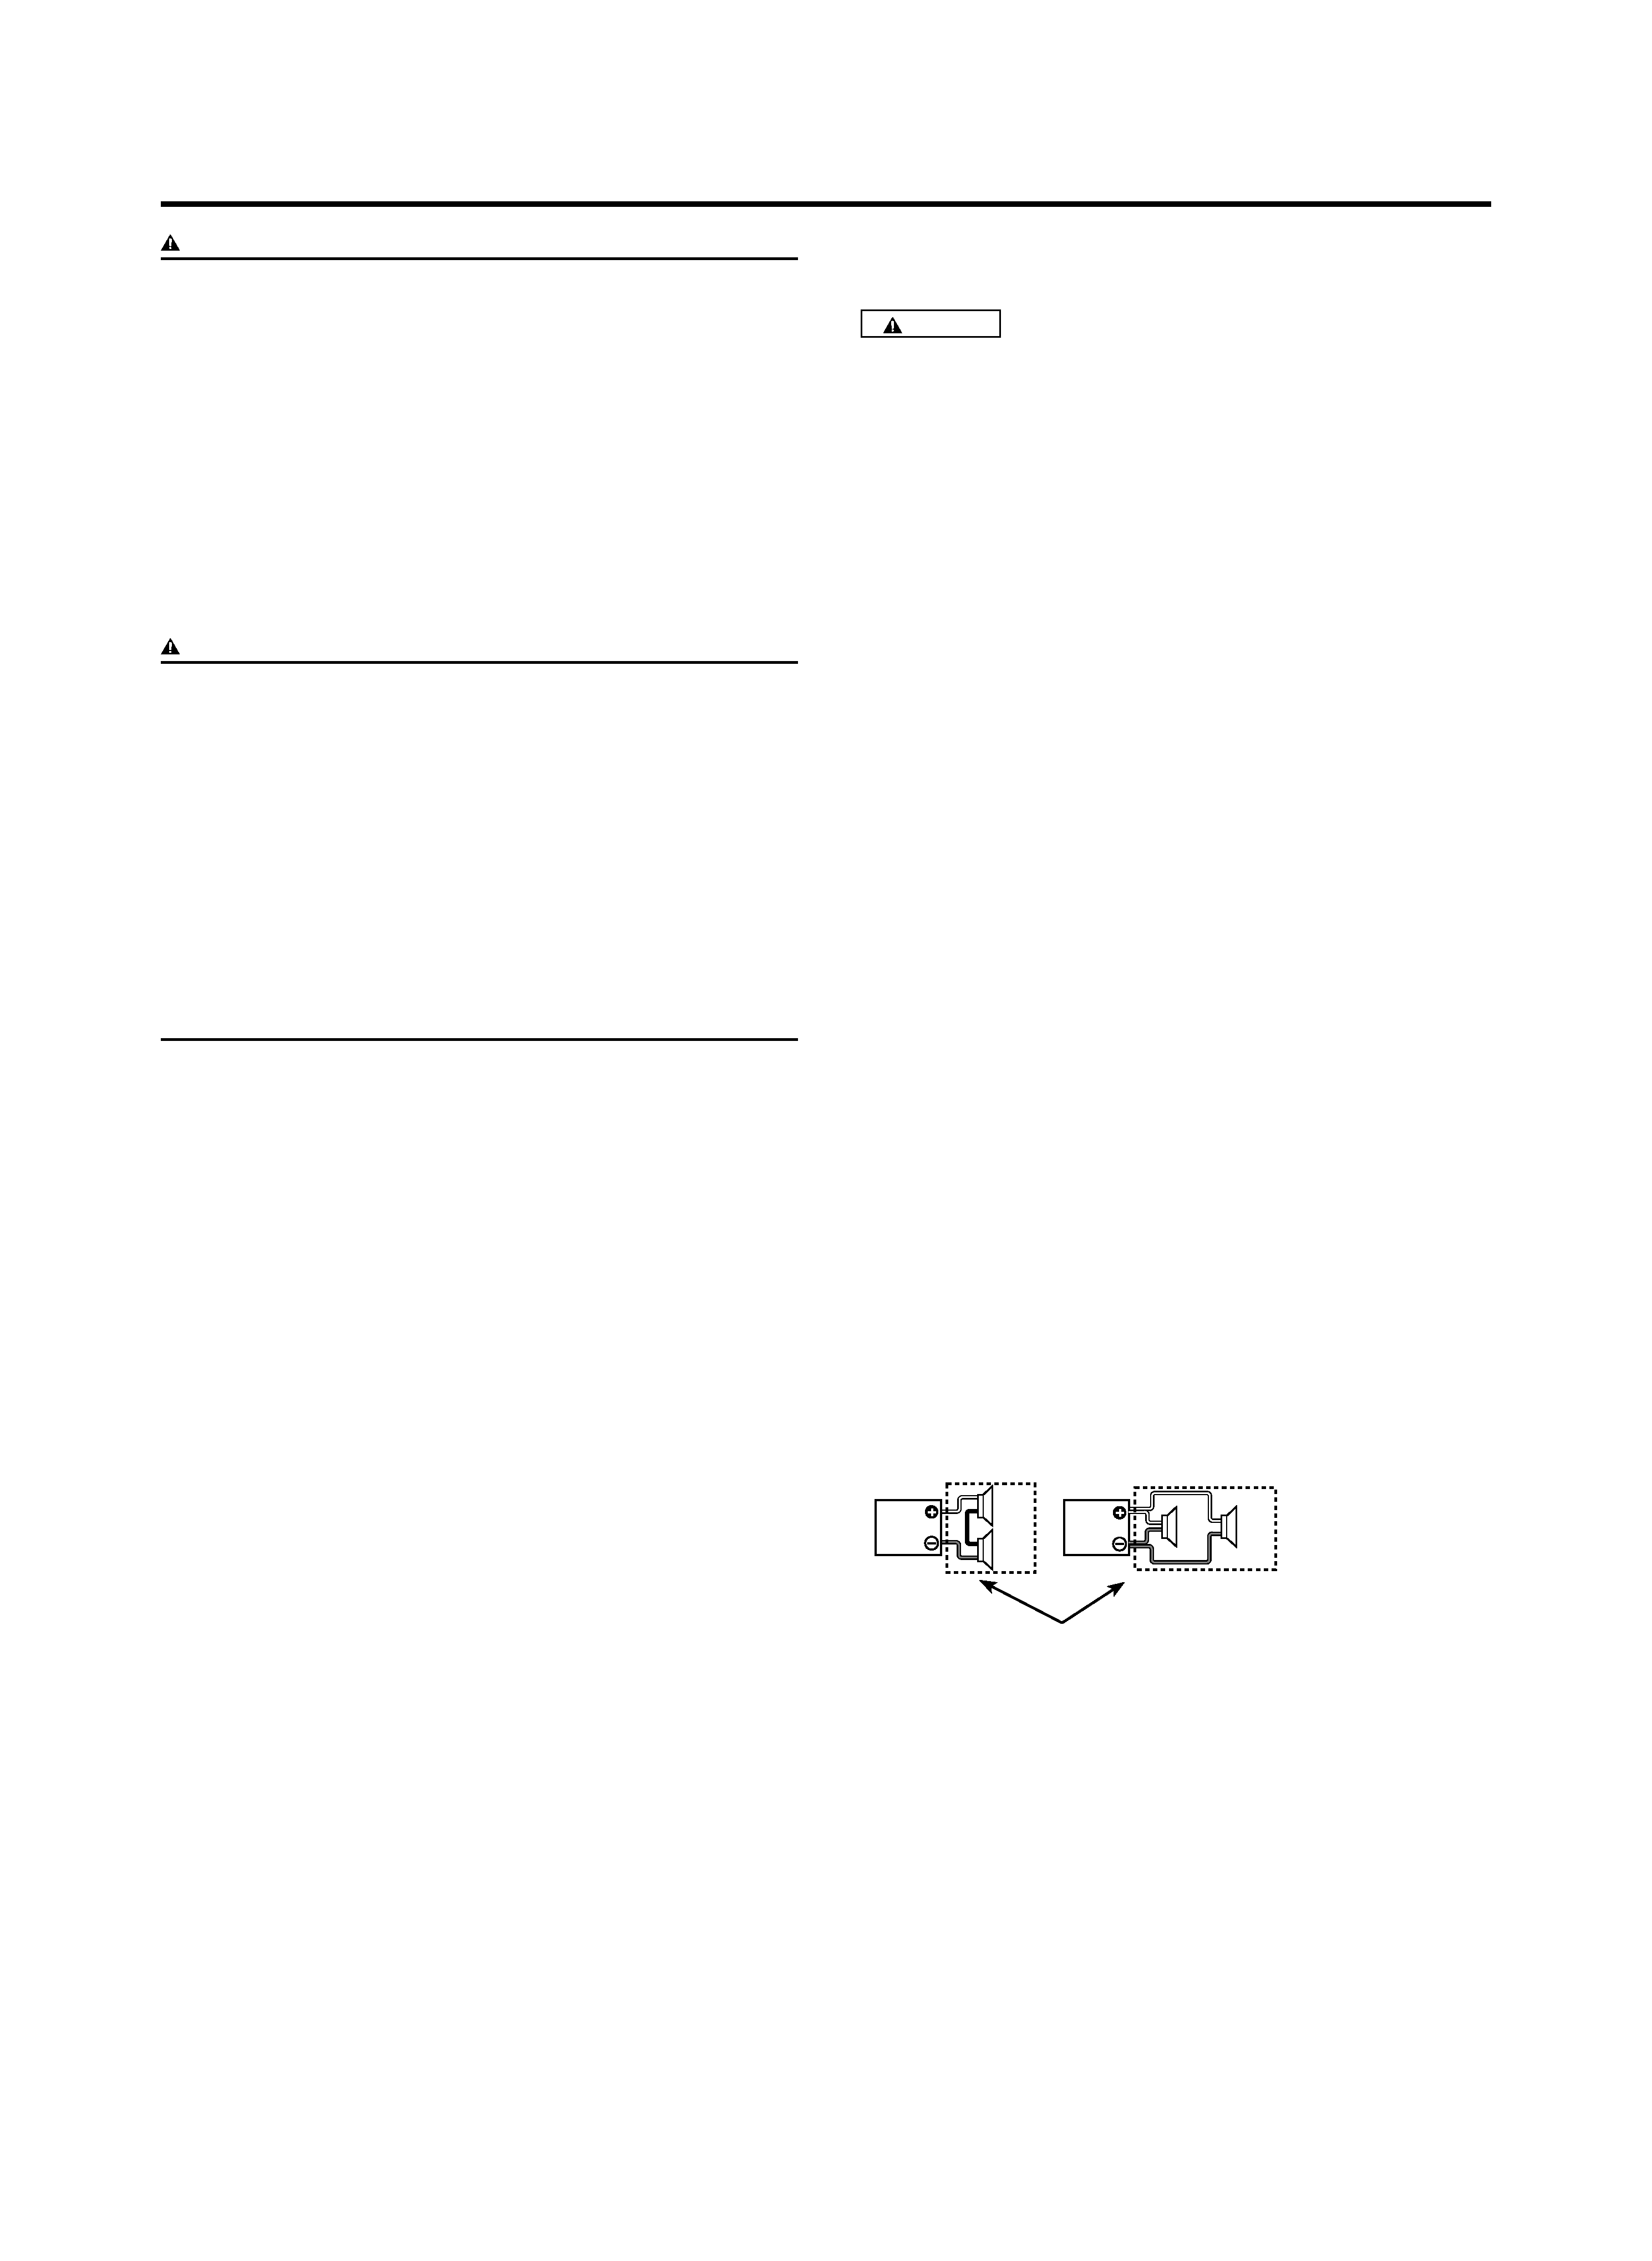
· Usespeakersthathaveanimpedanceof1orgreater.Whenmorethanone
setofspeakersaregoingtobeused,calculatethecombinedimpedanceof
thespeakersandthenconnectsuitablespeakerstotheamplifier.
4
4
8
2
2
4
4
4
4
4
4
4
4
4
8
4
4
4
4
4
4
4
4
4
Combinedimpedance
KAC-X11D_M_1English.indd 2
08.10.21 3:57:09 PM
background image
English
Installation
Accessories
Part name
External View Number of Items
Self-tappingscrews
(ø5×18mm)
4
HexagonWrench(Large)
1
HexagonWrench(Small)
1
Terminalcover(Powerterminal)
1
Remotecable(6.0m)
1
Remotecontroller
1
Mountingbracket
1
Self-tappingscrews
(ø2.6×12mm)
2
Installation procedure
Sincetherearelargevarietyofsettingsandconnectionspossibleaccordingto
applications,readtheinstructionmanualwelltoselectthepropersettingand
connection.
1. Removetheignitionkeyanddisconnectthenegative
·terminalofthe
batterytopreventshortcircuits.
2. Settheunitaccordingtotheintendedusage.
3. RemovetheDressingcover.
4. Connecttheinputandoutputwiresoftheunits.
5. Connectthespeakerwires.
6. Connectthepowerwire,powercontrolwireandgroundingwirefollowing
thisorder.
7. Installtheinstallationfittingsintheunit.
8. Attachtheunit.
9. Installtheremotecontroller.
10.AttachtheDressingcover.
11.Connectthenegative
·terminalofthebattery.
CAUTION
· Donotinstallinthebelowlocations;
(Unstablelocation,Inalocationthatinterfereswithdriving,Inalocation
thatgetswet,Inadustylocation,Inaplacethatgetshot,Inaplacethat
getsdirectsunlight,Inalocationthatgetshitbyhotair)
· Donotinstalltheunitunderthecarpet.Otherwiseheatbuild-upoccurs
andtheunitmaybedamaged.
· Installthisunitinalocationwhichallowsheattoeasilydissipate.
Onceinstalled,donotplaceanyobjectontopoftheunit.
· Thesurfacetemperatureoftheamplifierwillbecomehotduringuse.Install
theamplifierinaplacewherepeople,resins,andothersubstancesthatare
sensitivetoheatwillnotcomeintocontactwithit.
· Whenmakingaholeunderaseat,insidethetrunk,orsomewhereelsein
thevehicle,checkthatthereisnothinghazardousontheoppositeside
suchasagasolinetank,brakepipe,orwiringharness,andbecarefulnotto
causescratchesorotherdamage.
· Donotinstallnearthedashboard,reartray,orairbagsafetyparts.
· Theinstallationtothevehicleshouldsecurelyfastentheunittoaplacein
whichitwillnotobstructdriving.Iftheunitcomesoffduetoashockand
hitsapersonorsafetypart,itmaycauseinjuryoranaccident.
· Afterinstallingtheunit,checktomakesurethatelectricalequipment
suchasthebrakelamps,turnsignallampsandwindshieldwipersoperate
normally.
Remotecontroller
Self-tappingscrew
(ø2.6×12mm)
Mountingbracket
Remote controller
380 mm
320 mm
ø 6
286
mm
272
mm
Installationboard,etc.
(thickness:15mmormore)
Self-tappingscrew
(ø5×18mm)
Hexagonsocket
headcapscrew
(M4×8mm)
HexagonWrench
(Small)
Dressingcover
Coolingfan
KAC-X11D_M_1English.indd 3
08.10.21 3:57:11 PM
background image
English
Connection
HexagonWrench
(Small)
Hexagon
Wrench
(Large)
P.CON
SPEAKER OUTPUT
REMOTE
FUSE [30Ax3]
GND
BATT.
LINE IN
LINE OUT
L
R
SPEAKER OUTPUT
SPEAKER OUTPUT
CAUTION
· Ifsoundisnotoutputnormally,immediately
turnpoweroffandcheckconnections.
· Besuretoturnthepoweroffbeforechanging
thesettingofanyswitch.
· Ifthefuseblows,checkwiresforshorts,then
replacethefusewithoneofthesamerating.
· Checkthatnounconnectedwiresorconnectors
aretouchingthecarbody.Donotremove
capsfromunconnectedwiresorconnectorsto
preventshortcircuits.
· Connectthespeakerwirestoappropriate
speakerconnectorsseparately.Sharingthe
negativewireofthespeakerorgrounding
speakerwirestothemetalbodyofthecarcan
causethisunittofail.
· Afterinstallation,checkthatthebrakelamps,
winkers,andwipersworkproperly.
*Commerciallyavailableparts
WARNING
Topreventfirecausedbyashortinthewiring,
connectafusiblelinkorbreakernearbythe
battery'spositiveterminal.
Groundwire*
Powercontrolwire*
Subwoofer(L+R)
(2)
Batterywire*
ProtectiveFuse*
RCAcable*
Leftinput
Rightinput
Battery
HexagonWrench
(Small)
HexagonWrench
(Small)
Hexagon
Wrench
(Large)
WARNING
Remove the ignition key and
disconnect the negative
· terminal of
the battery to prevent short circuits.
Use the attached
Hexagon Wrench.
Use the
attached
Hexagon
Wrench.
CENTERUNIT
(CDreceiver,etc.)
Whentwosubwoofersare
connected.(4)
(2+2)
(4+4)
Dual voice coil subwoofer
Terminalcover
About the Lead Terminals
1. Wire Thicknesses
Youcanusewireswiththefollowingthicknesses:
Batterywireandgroundwire
AWG4­AWG6
Speakerwire
AWG8­AWG12
2. Strip the wire
Makeacutinthewiresheath(insulatormadefromvinyl,etc.)atthe
position10-13mmawayfromtheendofthewire,andthenremovethe
unnecessaryportionofthesheathbytwistingit.
3. Install the wire
Loosenthescrewusingthesuppliedhexagonwrench.Insertthe
conductorofthewireintheterminalhole,andthentightenthescrew.
10-13mm
(3/8"-1/2")
KAC-X11D_M_1English.indd 4
08.10.21 3:57:13 PM
background image
English
Multi Amplifier with Remote cable connection
Remote cable connection
CAUTION
· Beforeconnectingtheremotecontroller
cables,alwaysturntheBassboostlevelknob
allthewaytotheleft.
YoucancontroltheBassboostlevelofthe
secondandsubsequentSlaveamplifiers
simultaneouslyfromtheMasteramplifier.
Thevolumelevelofeachamplifieris
determinedbythesettingoftheMaster
amplifier(INPUTSENSITIVITY,boostlevelof
theremotecontroller).
Setting the Master amplifier
1. AdjusttheINPUTSENSIVITYtotheoutput
ofthecenterunittobeconnected.
2. SettheLPFfrequencyandISF.
3. TurntheLINEOUTFILTERswitchON.
Setting the Slave amplifier
1. TurntheLINEOUTFILTERswitchOFF.
2. AdjusttheINPUTSENSIVITY.
· ToadjusttheSlaveamplifiertothesame
volumeastheMasteramplifier,adjustthe
INPUTSENSIVITYto0.2V(max.).
CAUTION
· Beforeconnectingtheremotecontroller
cables,alwaysturntheBassboostlevel
knoballthewaytotheleft.
*Commerciallyavailableparts
Remotecable(6.0m:19.7ft)
Remotecontroller
P.CON
SPEAKER OUTPUT
REMOTE
FUSE [30Ax3]
GND
BATT.
LINE IN
LINE OUT
L
R
P.CON
SPEAKER OUTPUT
REMOTE
GND
BATT.
LINE IN
LINE OUT
L
R
P.CON
SPEAKER OUTPUT
REMOTE
GND
BATT.
LINE IN
LINE OUT
L
R
P.CON
SPEAKER OUTPUT
REMOTE
GND
BATT.
LINE IN
LINE OUT
L
R
FUSE [30Ax3]
FUSE [30Ax3]
FUSE [30Ax3]
INPUT
SENSITIVITY[V]
0.2 [MAX]
0.3
0.5
1
2
3
4
[MIN]
5
LINE OUT
FILTER
ON
OFF
INPUT
SENSITIVITY[V]
0.2 [MAX]
0.3
0.5
1
2
3
4
[MIN]
5
LINE OUT
FILTER
ON
OFF
INPUT
SENSITIVITY[V]
0.2 [MAX]
0.3
0.5
1
2
3
4
[MIN]
5
LINE OUT
FILTER
ON
OFF
Remotecable
Remotecontroller
CENTERUNIT
(CDreceiver,etc.)
Masteramplifier
Slaveamplifier
Slaveamplifier
Powercontrolwire*
Extensionwire*
RCAcable*
RCAcable*
Use the
attached
Hexagon
Wrench.
HexagonWrench
(Small)
KAC-X11D_M_1English.indd 5
08.10.21 3:57:15 PM

Reviews

There are no reviews of this manual yet.