KENWOOD HM-582 Owner's Manual

Cover page of KENWOOD HM-582 Owner's Manual

Owner's Manual for KENWOOD HM-582, downloadable as a PDF file.

Manual details

  • Immediate download after payment.
  • Delivered as a PDF file.
  • The manual has 84 pages
  • File size: 2.04 MB
  • Available language versions: English
  • Different language versions may vary sligthly in file size and page count.

We guarantee that...

  • our manuals are complete,
  • our manuals are checked with antivirus,
  • We'll issue refund if the manual is damaged, incomplete or unreadable (our refund policy)

Sample pages

Thumbnail of page 1Thumbnail of page 2Thumbnail of page 3Thumbnail of page 4
Thumbnail of page 5Thumbnail of page 6Thumbnail of page 7Thumbnail of page 8
Thumbnail of page 9
background image
INSTRUCTION MANUAL
KENWOOD CORPORATION
MICRO HI-FI COMPONENT SYSTEM
HM-582MD
DIGITAL AUDIO
COMPACT
TEXT
TEXT
B60-4705-00 00 CH (T) AP 0001
Before installation, be sure to read "System configuration" and "Instal-
lation" in this manual to ensure correct installation.
6
background image
INSTRUCTION MANUAL
KENWOOD CORPORATION
MICRO HI-FI COMPONENT SYSTEM
HM-582MD
DIGITAL AUDIO
COMPACT
TEXT
TEXT
B60-4705-00 00 CH (T) AP 0001
Before installation, be sure to read "System configuration" and "Instal-
lation" in this manual to ensure correct installation.
6
background image
2
Preparation
section
Basic
section
Apprication
section
Knowledge
section
Introduction
Before applying power
Units are designed for operation as follows.
Europe and U.K. ........................................................... AC 230 V only
Inside of this laser product, a component (a laser diode: Wave-
length: 760-800nm) classified as Class 3A laser radiation is con-
tained as alerted by the internal caution label shown above. To
avoid exposure to laser beams, do not open the cover.
CAUTION
INVISIBLE LASER RADIATION
WHEN OPEN. AVOID EXPOSURE
TO BEAM.
The marking of products using lasers
Caution : Read this page carefully to ensure safe operation.
For the United Kingdom
Factory fitted moulded mains plug
1. The mains plug contains a fuse. For replacement, use only
a 13-Amp ASTA-approved (BS1362) fuse.
2. The fuse cover must be refitted when replacing the fuse in
the moulded plug.
3. Do not cut off the mains plug from this equipment. If the
plug fitted is not suitable for the power points in your home
or the cable is too short to reach a power point, then obtain
an appropriate safety approved extension lead or adapter,
or consult your dealer.
If nonetheless the mains plug is cut off, remove the fuse
and dispose of the plug immediately, to avoid a possible
shock hazard by inadvertent connection to the mains sup-
ply.
Safety precautions
WARNING : TO PREVENT FIRE OR ELECTRIC SHOCK, DO NOT EXPOSE
THIS APPLIANCE TO RAIN OR MOISTURE.
CAUTION: TO REDUCE THE RISK OF ELECTRIC SHOCK, DO NOT REMOVE
COVER (OR BACK). NO USER-SERVICEABLE PARTS INSIDE. REFER SER-
VICING TO QUALIFIED SERVICE PERSONNEL.
RISK OF ELECTRIC SHOCK
DO NOT OPEN
THE LIGHTNING FLASH WITH ARROWHEAD SYMBOL, WITHIN AN EQUILATERAL TRIANGLE,
IS INTENDED TO ALERT THE USER TO THE PRESENCE OF UNINSULATED "DANGEROUS
VOLTAGE" WITHIN THE PRODUCT'S ENCLOSURE THAT MAY BE OF SUFFICIENT MAGNI-
TUDE TO CONSTITUTE A RISK OF ELECTRIC SHOCK TO PERSONS.
THE EXCLAMATION POINT WITHIN AN EQUILATERAL TRIANGLE IS INTENDED TO ALERT
THE USER TO THE PRESENCE OF IMPORTANT OPERATING AND MAINTENANCE (SERVIC-
ING) INSTRUCTIONS IN THE LITERATURE ACCOMPANYING THE APPLIANCE.
CAUTION
The marking is located on the rear panel and says that the com-
ponent uses laser beams that have been classified as Class 1. It
means that the unit is utilizing laser beams that are of a weaker
class. There is no danger of hazardous radiation outside the unit.
CLASS 1
LASER PRODUCT
IMPORTANT: The wires in the mains lead are coloured in
accordance with the following code:
Blue
: Neutral
Brown : Live
Do not connect those leads to the earth terminal of a three-
pin plug.
Contents
background image
3
Knowledge
section
Preparation
section
Application
section
Basic
section
Introduction
Special features
Layout free
Introduction
LCD (Liquid Crystal Display) with backlit illumination
CD-TEXT data display
R.D.S. (Radio Data System)
Convenient timer functions
The system components can be installed vertically on the sides (lengthwise) as well as the
conventional, horizontally stacked installation.
Try various layouts of the main unit and speakers and find that match your listening room.
A high-definition graphic display on each component shows the operating modes such as CD
playback and tuner reception conditions at a glance. The display orientation can be changed
according to whether the system components are installed vertically or stacked horizontally.
When discs conforming to CD-TEXT are played with this unit, the text information recorded on the
CD (disc name or titles) is displayed automatically. Some CDs conforming to CD-TEXT may not
display text information.
The RDS data included in FM broadcasts can be used to search for the intended broadcasting
contents and for automatic reception from standby.
1 O.T.T. timer :
When the set time comes, a source starts to play automatically only for an hour.
2 Program timer for playback (AI timer playback) and timer recording:
Two timer programs (PROG.1 and PROG.2) are available for each of the timer playback (AI timer
playback) and timer recording functions. (When playback is started with the AI timer, the
volume increases automatically until the specified level.)
3 Sleep timer :
When the set time comes, the power of the system is set automatically to OFF (standby). This
is convenient for example when you want to fall asleep while listening to music.
CD
=MD high-speed (2x-speed) dubbing
A convenient feature enabling dubbing from CD to MD with simple operation and short period.
(Single CD track dubbing is newly available in addition to the all-track dubbing.)
Frosty door with interior design considerations
The main unit is provided with a storable door, a feature that cannot be found in previous stereo
systems. The door does not only protect the system from damage and dirt but also suits the
interior of many listening rooms.
Sampling rate converter built in
The unit incorporates a sampling rate converter to handle different kinds of digital sources (32kHz,
44.1kHz, 48kHz).
Low standby power consumption
The power consumption during standby is no more than 2 W.
Contents
background image
4
Preparation
section
Basic
section
Apprication
section
Knowledge
section
Introduction
Caution : Read the pages marked
carefully to ensure safe operation.
Contents
Preparation section
Application section
Basic section
Knowledge section
Before applying power................................ 2
Safety precautions ............................................................... 2
Introduction ........................................................ 3
Special features .......................................................................... 3
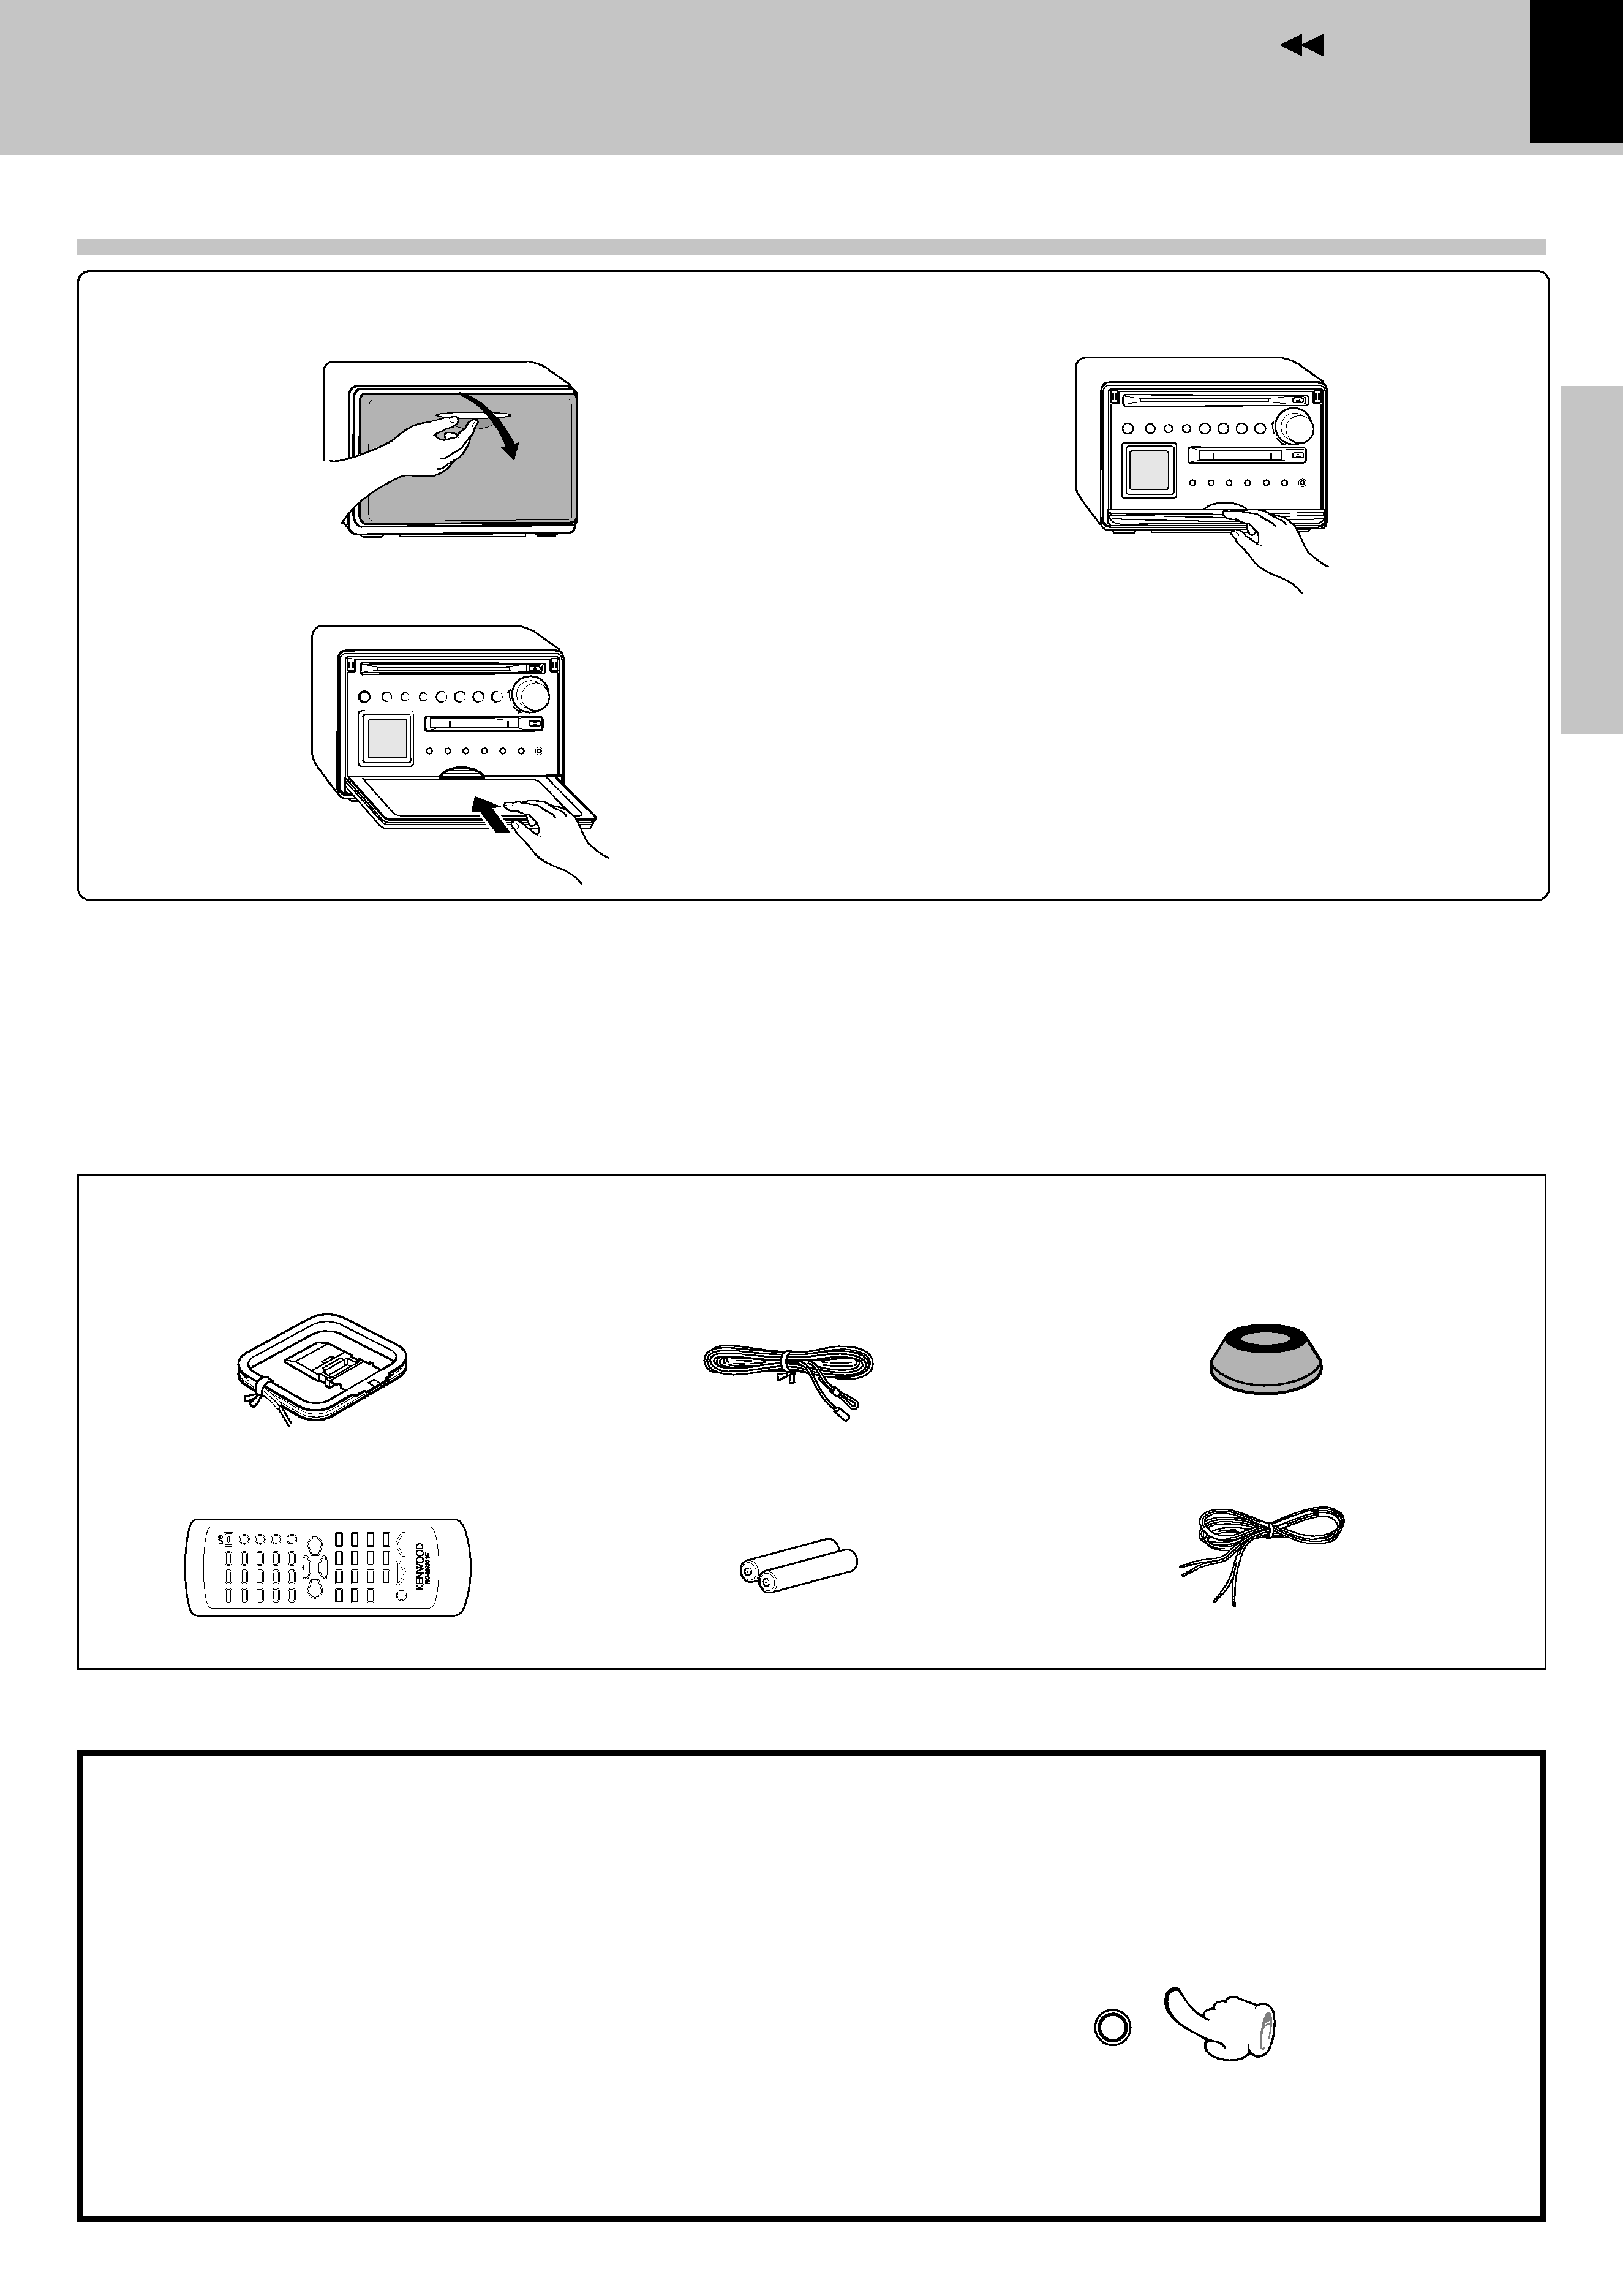
Front door ...................................................................................... 5
Installation.......................................................... 6
System connection........................................... 7
1. Connection of the System Accessories ............................ 7
2. Connection of Other Accessories
(Commercially Available Parts) ......................................... 9
Controls and indicators ................................. 10
Main unit .................................................................................... 10
Remote control unit ................................................................. 12
Operation of remote control unit ........................................... 13
Display ........................................................................................ 14
Clock adjustment............................................ 15
Menu mode ...................................................... 16
Operation in menu mode .......................................................... 16
Important Items ............................................... 76
Maintenance ............................................................................. 76
Reference ................................................................................... 77
Handling of discs ...................................................................... 78
Handling of Mini disc .............................................................. 78
In case of difficulty ........................................ 79
Specifications ................................................. 83
Various CD/MD playback features .............. 38
Listening in the desired sequence (program playback) .. 38
Repeated playback .................................................................. 40
Playing tracks in a random order (random playback) ...... 41
Convenient Recording Methods .................. 42
Selection of the Recording type ............................................. 42
High-speed recording of all tracks in a CD ......................... 43
High-speed recording of a single track in a CD ................. 44
One-touch recording ................................................................ 45
Program recording .................................................................... 46
MD Edit Functions .......................................... 47
Selecting the editing function type ...................................... 47
Reordering several tracks at a time (QUICK MOVE) .......... 48
Moving the order of the track being played in a disc
(MOVE) ......................................................................................... 50
Dividing a track during playback (DIVIDE) ......................... 52
Combining tracks during playback (COMBINE) ................ 54
Erasing several tracks at a time (QUICK ERASE) ................ 56
Erasing a single track during playback (ERASE) ................ 58
Erasing all tracks on a disc (ALL ERASE) ............................. 59
Assigning a title to a disc or track ....................................... 60
Copying titles in title memos for use as titles
of other MDs or tracks(TITLE COPY)(TITLE MEMO) ...... 65
To delete the edited contents (EDIT CANCEL) .................... 68
Listening to an AUX input source ................. 70
Timer operation............................................... 71
Setting the O.T.T. timer ............................................................ 71
Program timer playback (AI timer playback)
and timer recording .............................................................. 72
Sleep timer ................................................................................ 75
Hearing sound ................................................. 18
Playback of CD................................................ 20
Playback of MD ............................................... 23
Searching a desired track by its title (TITLE SEARCH) ..... 25
Receiving broadcast station ......................... 26
Using R.D.S. (Radio Data System) ..................................... 29
Searching for a desired program type (PTY search) ......... 30
Recording on MD............................................. 32
background image
5
Knowledge
section
Preparation
section
Application
section
Basic
section
Introduction
Accessories
AM loop antenna (1)
Remote control unit (1)
Batteries (R6/AA) (2)
Feet for speaker (8)
The demonstration consists of sequential switching
of display for showing the functions available with
the system.
The audio does not change while the demonstration
is active.
Demonstration cannot be started during playback
(or recording) of a source.
÷ Provided that the power is set to ON, demonstration is
switched automatically to "DEMO ON" after there is a
power failure or the power cord is unplugged then plugged
in again.
Demonstration
DEMO ON (Demonstration executed):
While the power is set to ON , press and hold the
menu/demo key on the main unit for more than 2
seconds.
DEMO OFF (Demonstration cancelled):
Speaker cord (2)
FM indoor antenna (1)
menu
/demo
Front door
1 Open the front door.
2 Store the door by sliding in.
3 Lock.
÷ Push in the door until it clicks.
÷ To close the door, unlock it by pushing it slightly and reverse
the above procedure.
÷ Press the menu/demo key in the "DEMO ON" mode.
Unpacking
Unpack the unit carefully and make sure that all accessories are put aside so they will not be lost.
Examine the unit for any possibility of shipping damage. If your unit is damaged or fails to operate, notify your dealer immediately. If your unit was shipped
to you directly, notify the shipping company without delay. Only the consignee (the person or company receiving the unit) can file a claim against the
carrier for shipping damage.
We recommend that you retain the original carton and packing materials for use should you transport or ship the unit in the future.
Keep this manual handy for future reference.
Contents

Reviews

There are no reviews of this manual yet.